
User Guide
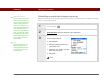
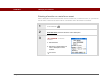
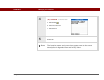
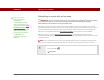
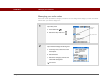

Table Of Contents
- User Guide for the Tungsten™ E2 Handheld
- Table of Contents
- About This Guide
- Setting Up Your Handheld and Your Computer
- Your Handheld
- Moving Around in Applications
- Entering Information on Your Handheld
- How can I enter information on my handheld?
- Entering information with Graffiti® 2 writing
- Writing in the Graffiti 2 input area
- Using full-screen writing
- Writing Graffiti 2 characters
- Keys to success with Graffiti 2 writing
- Graffiti 2 alphabet
- Graffiti 2 numbers
- Graffiti 2 gestures
- Writing Graffiti 2 symbols and other special characters
- Graffiti 2 symbols and special characters
- Writing Graffiti 2 ShortCuts
- Graffiti 2 ShortCuts
- Entering information with the onscreen keyboard
- Entering info from Contacts into another application
- Editing information
- Related topics
- Moving Info Between Your Handheld and Your Computer
- Why synchronize information?
- Synchronizing with your computer
- Synchronizing over a network
- Customizing your synchronization settings
- Using Quick Install and the Send To Handheld droplet
- Entering information with your computer
- Importing information from other applications
- Installing the additional software from the CD
- Removing applications
- Related topics
- Managing Your Contacts
- Managing Your Calendar
- Managing Your Office Files
- Viewing Photos and Videos
- Listening to Music
- Managing Your Tasks
- Writing Memos
- Writing Notes in Note Pad
- Making Bluetooth Wireless Connections
- What can I do with the built-in Bluetooth® wireless technology?
- Entering basic Bluetooth settings
- Setting up a Bluetooth phone connection
- Accessing email and the web with Bluetooth
- Setting up a connection for Bluetooth synchronization
- Setting up a connection to a Bluetooth network
- Creating trusted devices
- Setting advanced Bluetooth features
- Related topics
- Sending and Receiving Email Messages
- Upgrading an existing email account
- About email accounts
- Creating an account
- Managing email accounts
- Getting and reading email
- Switching among email accounts
- Getting email messages
- Auto get mail with notification
- Scheduling auto get mail
- Auto get notifications
- Setting notification options
- Viewing and using the Reminders screen
- Auto get mail retries
- Resource issues with auto get mail
- Inbox icons in the VersaMail application
- Reading email messages
- Selecting whether to receive messages as HTML or plain text
- Customizing the font of messages you are reading
- Sending an email message
- Working with email folders
- Working with email messages
- Working with attachments
- Synchronizing email on your handheld with email on your computer
- Setting up an account on your handheld
- Enabling synchronization on your computer
- Setting synchronization options for your email account
- Setting mail client synchronization options
- Setting Microsoft Outlook as your default email program
- Setting advanced email synchronization options
- Account information screens
- VersaMail conduit shortcuts
- Excluding one or more accounts during synchronization
- Synchronizing an account
- Synchronizing multiple accounts
- Using SSL with the conduit
- Advanced VersaMail application features
- Setting preferences for getting, sending, and deleting email
- Adding or updating a contact directly from a message
- Creating and using filters
- Turning filters on and off
- Editing or deleting a filter
- Managing settings for incoming and outgoing mail
- Adding APOP to an account
- Setting advanced account preferences
- Changing email header details
- Backing up mail databases
- Synchronizing IMAP mail folders wirelessly
- Prerequisites for wireless IMAP folder synchronization
- Turning IMAP folder synchronization on or off
- Synchronizing handheld/mail server IMAP folders from the Options menu
- Working with root folders
- Using Secure Sockets Layer (SSL)
- Related topics
- Sending and Receiving Text Messages
- Browsing the Web
- Accessing a web page
- Quickly jumping to a page
- Changing how you view a page
- Bookmarking your favorite pages
- Disconnecting from and connecting to the Internet
- Downloading files and pages
- Communicating with other users
- Returning to a web page you recently visited
- Changing your home and start pages
- Setting advanced browser options
- Related topics
- Dialing Phone Numbers from Your Handheld
- Sharing Information
- Managing Your Expenses
- Performing Calculations
- Keeping Your Information Private
- Using Categories to Organize Information
- Managing Clock Settings
- Customizing Your Handheld
- Customizing Favorites View
- Customizing Applications View
- Making the screen easier to read
- Assigning a button to your frequently used applications
- Setting the date and time
- Customizing the way you enter information
- Selecting sound settings
- Entering your owner information
- Conserving battery power
- Connecting your handheld to other devices
- Customizing network settings
- Setting up a VPN
- Related topics
- Expanding Your Handheld
- What type of expansion cards can I use?
- How can expansion cards help me?
- Removing an expansion card
- Inserting an expansion card
- Opening an application on an expansion card
- Opening files on an expansion card
- Viewing card information
- Renaming a card
- Copying applications to an expansion card
- Removing all information from a card
- Related topics
- Maintaining Your Handheld
- Common Questions
- Getting Help
- Product Regulatory Information
- Index
Tungsten™ E2 Handheld 143
CHAPTER 7 Managing Your Calendar
Scheduling an event with a time zone
Do not use times zones if you are synchronizing with Palm
®
Desktop software.
Time zones work only if you are synchronizing with Outlook or Exchange ActiveSync.
Palm Desktop software does not recognize time zones.
Selecting a time zone when creating a new event allows you to travel and have your events
automatically adjust to the time zone in your new location. When you schedule an event, set the
time zone and the time the event occurs in the location of the event. The event automatically
adjusts on your schedule based on the primary
location you have set on your handheld.
When you travel, you can change the primary
location on your handheld and the event
automatically adjusts on your schedule to the correct time according to the time zone of the new
primary location.
Only events that have a time zone setting adjust when you change the primary time
zone on your handheld. Events that do not have a time zone setting remain at their set time.
0
1 Press Calendar .
Continued
IMPORTANT
[
! ]
Did You Know?
You can also set a
preference to
automatically include a
time zone whenever you
create a new event. Open
the Options menu and
select Preferences. Select
New events use time
zones. Only new events
created after the
preference is set are
affected.
NOTE