Getting Started
Copyright and Trademark © 2003-2006 palmOne, Inc. All rights reserved. palmOne, the palmOne logo, Zire, the Zire logo, “Z” (Stylized) and stylizations and design marks associated with all the preceding, and trade dress associated with palmOne, Inc.’s products, are among the trademarks or registered trademarks owned by or licensed to palmOne, Inc. or its subsidiaries.
Table of Contents About This Book .....................................................................vi Tips for viewing this guide..........................................................................vi What’s in this guide? ..................................................................................vii Chapter 1: Exploring Your Handheld......................................1 Locating the controls on your handheld .....................................................2 What’s on my handheld? ..
Chapter 4: Managing Your Contacts ....................................28 Adding a contact .........................................................................................29 Locating a contact on your list...................................................................31 Beaming a contact ......................................................................................32 Beyond the basics .......................................................................................
Chapter 10: Viewing Photos .................................................62 Copying photos to your handheld.............................................................63 Viewing photos ...........................................................................................65 Beyond the basics .......................................................................................66 Chapter 11: Customizing Your Handheld ............................67 Setting the date and time .........................
About This Book This guide tells you everything you need to know to start using your handheld— from the things you’ll do every day, to the things that make your handheld not only useful, but fun. Tips for viewing this guide [ ! ] Before You Begin Complete the steps in Read This First in your handheld package to set up your handheld and install the software on your computer.
What’s in this guide? Each chapter contains step-by-step instructions with cues for action, links to detailed information, and sidebars. Step-by-step instructions How-to information. Look for these cues in instructions: Continued Done Cue at the bottom of a page that means the procedure continues on the next page. Cue that signals the end of the procedure. You’re done. [ ! ]IMPORTANT A step that you must follow; otherwise, you could experience an error or even lose information.
Sidebars Tip To access the User Guide, you need to be connected to the Internet. [ ! ] Before You Begin Things you must have completed before you can do the steps described in the chapter. Tip A suggestion on how to use a feature more fully; a shortcut; a pointer to a related feature. Did You Know? An interesting fact about the topic being described; may include a pointer to more information. » Key Term A technical term related to the topic being described.
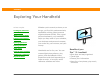
CHAPTER 1 Exploring Your Handheld In this chapter Locating the controls on your handheld What’s on my handheld? Installing extra software from the CD Opening applications Entering information Whether you’re at work, at home, or on the go, you’ll quickly understand why handhelds are also called personal digital assistants (PDAs). Like a good personal assistant, your handheld helps you keep track of your schedule, your business and personal contacts, your to-do list, your memos, and your money.
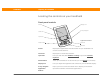
CHAPTER 1 Exploring Your Handheld Locating the controls on your handheld Front panel controls Screen Display icon Clock icon 5-way navigator Input area Application buttons Power button Contacts Calendar Zire™ 31 Handheld Screen Displays the applications and information on your handheld. The screen is touch sensitive. Clock icon Displays the current time and date. Input area Lets you enter info with Graffiti® 2 writing or open the onscreen keyboard.
CHAPTER 1 Exploring Your Handheld Top panel controls » Key Term IR Short for infrared. Beaming uses infrared technology to send information between two IR ports that are within a few feet of each other. Expansion card slot IR port Headphone jack Did You Know? Beaming lets you quickly share appointments, addresses, phone numbers, and more. Zire™ 31 Handheld IR port Beams information between handhelds and other devices that have an IR port.
CHAPTER 1 Exploring Your Handheld Side and back panel controls » Key Term USB The type of connector or cable that’s commonly used to connect accessories to a computer. Stylus Power connector Reset button Mini-USB connector Speaker Zire™ 31 Handheld Stylus Lets you enter information on your handheld. To use the stylus, slide it out of the slot and hold it as you would a pen or pencil.
CHAPTER 1 Exploring Your Handheld What’s on my handheld? Tip Can’t find some of these applications? Tap the category list in the upperright corner of the Home screen and select All. Zire™ 31 Handheld Your handheld comes with many applications preinstalled and ready to use. Open these applications by pressing the application buttons on the front panel or by selecting the icons on the Home screen. 0 Quick Tour Learn about your handheld and how to enter info.
CHAPTER 1 Exploring Your Handheld Tip To install extra software from the CD: Installing extra software from the CD 1. Insert the CD into your CD drive. 2. Windows: On the Discover Your Handheld screen, click Additional Software. Mac: Double-click the Essential Software folder icon. By now you’ve probably installed Palm® Desktop software and some of the extra software from the CD. If you haven’t already installed the extra software, you can install it at any time.
CHAPTER 1 Exploring Your Handheld Opening applications Did You Know? You can reassign the application buttons to open whichever applications you choose. You can open applications with the application buttons on the front of your handheld or with the application icons on the Home screen. Using the application buttons Press an application button to turn on your handheld and to open the application for that button. Tip Handheld on already? Tap the Home icon to go to the Home screen.
CHAPTER 1 Exploring Your Handheld Entering information Tip Write letters on the left side of the input area and numbers on the right. Uppercase letters go in the center. Did You Know? Your handheld package includes a sticker that shows the most common Graffiti 2 characters. Put the sticker on the inside of the flip cover to always have it handy. There are several ways to enter information on your handheld.
CHAPTER 1 Exploring Your Handheld Using the onscreen keyboard » Key Term Record An entry in an application such as a contact in Contacts or an appointment in Calendar. You can use the onscreen keyboard in any application where you need to enter text, numbers, or symbols on your handheld. 0 1 Tip You can enter text whenever you see a blinking cursor on the screen. Open an entry: a. Open an application. b. Select a record or tap New.
CHAPTER 1 Exploring Your Handheld Entering information Tip When a keyboard is open, you can tap abc, 123, or Int’l to open any of the other keyboards. 3 Tap the characters to enter text, numbers, and symbols, and then select Done.
CHAPTER 1 Exploring Your Handheld Using your computer Tip The Palm Desktop online Help has lots of info about how to use Palm Desktop software. Open the Help menu and select Palm Desktop Help. Many of the applications on your handheld are also included in Palm Desktop software.You can use these applications to enter information on your computer. When you synchronize your handheld with your computer, the information is updated in both places.
CHAPTER 1 Exploring Your Handheld MAC ONLY Double-click the Palm Desktop icon in the palmOne folder on your computer, and then click the icons in the launch bar to access the various applications.
CHAPTER 1 Exploring Your Handheld Using menus Tip You can also open the handheld menus by tapping the application title in the upper-left corner of the screen. When the menus are open, you can use the navigator to select menus and menu items. Menus let you access additional commands and settings. They are easy to use, and once you master them in one application, you know how to use them in all your applications. 0 1 Open an application. 2 Tap Menu to open the menus. .
CHAPTER 1 Exploring Your Handheld Using the 5-way navigator Tip To remove the selection highlight without making a selection, scroll to the first icon (in the upper-left corner) and then press Left on the navigator. Tip From most applications you can return to the Home screen by holding down Select on the navigator. The navigator lets you access your information quickly with one hand and without the stylus. The navigator does various things based on which type of screen you’re on.
CHAPTER 1 Exploring Your Handheld Moving around list screens In list screens, select and move between entries such as a note, memo, contact, or photo. Up or Down Scrolls an entire screen of entries, as long as there’s nothing highlighted. Hold down to accelerate the scrolling. Select Inserts the selection highlight. When the selection highlight is present: Up or Down entry. Select Left Scrolls to the previous or next Displays the selected entry. Removes the selection highlight.
CHAPTER 1 Exploring Your Handheld Handheld do’s and don’ts To protect your handheld from damage and ensure reliable performance, follow these guidelines. Handheld do’s • Use the protective cover that came with your handheld. It protects your handheld screen from being scratched. • Use only the stylus to tap the screen—no pens, pencils, paper clips, or other sharp objects. • Use only the supplied power adapter to charge your handheld. • Keep the battery charged.
CHAPTER 1 Exploring Your Handheld Beyond the basics User Guide For everything you need to know about your handheld— all that’s in this guide, and much more—go to www.palmOne.com/zire31userguide. My Handheld Make your handheld uniquely yours. For great tips, software, accessories, and more, visit www.palmOne.com/ myzire31. Support If you’re having problems with your handheld, go to www.palmOne.com/ support/zire31.
CHAPTER 2 Synchronizing Your Handheld with Your Computer In this chapter Why synchronize information? What information is synchronized? Synchronizing information Maybe you only think to use your handheld on its own to look up phone numbers, enter appointments, and so on. But you can do much more with your handheld if you synchronize it with your computer.
CHAPTER 2 Synchronizing Your Handheld with Your Computer Why synchronize information? Quickly enter and update information on your computer and handheld. Synchronizing updates information both on your handheld and in Palm® Desktop software on your computer. For example, you can quickly enter a contact list on your computer and then send it to your handheld instead of re-entering the information.
CHAPTER 2 Synchronizing Your Handheld with Your Computer What information is synchronized? [ ! ] Before You Begin Complete the following: If you use the preset settings, information from all the following applications is transferred each time you synchronize your handheld with your computer: • Initial handheld setup • Install Palm Desktop software from the CD For setup and installation procedures, see Read This First included in your handheld package.
CHAPTER 2 Synchronizing Your Handheld with Your Computer Synchronizing information » Key Term HotSync® Technology that allows you to synchronize the information on your handheld with the information on your computer. Tip If the Select User dialog box appears during synchronization, select the username whose information you want to synchronize, and click OK. Tip If you need help with synchronizing, see What do I do if I can’t synchronize with my computer? 0 1 Prepare your handheld: a.
CHAPTER 2 Synchronizing Your Handheld with Your Computer Beyond the basics User Guide For everything you need to know about your handheld— all that’s in this guide, and much more—go to www.palmOne.com/zire31userguide.
CHAPTER 3 Expanding Your Handheld In this chapter How can expansion cards help me? Inserting an expansion card A Chinese proverb says, “Life just gives you time and space; it's up to you to fill it.” But doesn’t it always seem that no matter how much space you have, you still need more? Removing an expansion card Beyond the basics Zire™ 31 Handheld Expansion cards (sold separately) provide a compact and limitless answer to the storage dilemma. When one card becomes full, simply use another card.
CHAPTER 3 Expanding Your Handheld What type of expansion cards can I use? » Key Term SDIO An acronym for Secure Digital input/ output. Tip Looking for a handy way to carry your expansion cards? You can purchase a variety of carrying cases. Visit www.palmOne.com/ myzire31 and click the Accessories link. Your handheld is compatible with SDIO, SD, and MultiMediaCard expansion cards. SDIO expansion cards let you add accessories to your handheld.
CHAPTER 3 Expanding Your Handheld Inserting an expansion card 0 1 Insert the card into the expansion slot with the label side facing the front of the handheld. Push Label side 2 Push the card in with your thumb until you hear the confirmation tone. NOTE No confirmation tone? Check the Sounds & Alerts Preferences to make sure the System Sound setting is turned on.
CHAPTER 3 Expanding Your Handheld Removing an expansion card 0 1 Push lightly against the card with your thumb. Push 2 Slide the card out of the expansion slot.
CHAPTER 3 Expanding Your Handheld Beyond the basics User Guide For everything you need to know about your handheld— all that’s in this guide, and much more—go to www.palmOne.com/zire31userguide. My Handheld Make your handheld uniquely yours. For great tips, software, accessories, and more, visit www.palmOne.com/ myzire31. Click a link below to go to the User Guide on the web and learn about these related topics: Expansion Cards • Opening applications that are stored on expansion cards.
CHAPTER 4 Managing Your Contacts In this chapter Adding a contact Locating a contact on your list Beaming a contact Beyond the basics Zire™ 31 Handheld Say good-bye to a paper address book that you need to update manually every time someone moves, changes their e-mail address, or gets a new work extension. With Contacts, not only is it easy to enter information such as names, addresses, and phone numbers, but it is just as quick to view, update, and organize contact information.
CHAPTER 4 Managing Your Contacts Adding a contact [ ! ] Before You Begin If you want to add photos to your contacts, install palmOne™ Photos from the installation CD onto your handheld. Windows: Insert the CD and follow the onscreen instructions to install extra software. 0 1 Press the Contacts 2 Add your contact information: application button. a. Select New. Mac: Insert the CD and double-click the Essential Software folder icon.
CHAPTER 4 Managing Your Contacts Adding a contact Tip To learn how to transfer photos to your handheld, see palmOne Photos later in this guide. 3 [ & ] OPTIONAL Add a photo: a. Tap the Picture box. Tap here b. Select the photo you want. Tip If you want a reminder about a birthday, select the Reminder check box, enter the number of days before the birthday that you want to see the reminder, and then select OK.
CHAPTER 4 Managing Your Contacts Locating a contact on your list Tip You can also press Right on the navigator (or tap the Quick Look Up icon at the top of the screen) to open the Quick Look Up line. Press Up and Down to select the letter of the name you want in each box, and press Right to move to the next box. Did You Know? The Phone Lookup feature lets you add contact information directly into certain other applications on your handheld.
CHAPTER 4 Managing Your Contacts Beaming a contact Tip You can create a contact with your own information and select it as your business card by opening the Record Menu and selecting Business Card. Beam your business card to other handhelds by holding down the Contacts application button until the Beam dialog box appears. 0 1 Press the Contacts 2 Beam the contact: application button. a. Locate the contact you want to beam. b. Open the menus . c. Select Record, and then select Beam Contact. d.
CHAPTER 4 Managing Your Contacts Beyond the basics User Guide For everything you need to know about your handheld— all that’s in this guide, and much more—go to www.palmOne.com/zire31userguide. My Handheld Make your handheld uniquely yours. For great tips, software, accessories, and more, visit www.palmOne.com/ myzire31.
CHAPTER 5 Managing Your Calendar In this chapter Scheduling an appointment Checking your schedule Setting an alarm Beyond the basics Staying on top of your schedule is an important part of being productive both at work and at home. Calendar can help you remember appointments and spot schedule conflicts. You can view your calendar by day, week, or month, or as an agenda list that combines your list of tasks with your appointments.
CHAPTER 5 Managing Your Calendar Scheduling an appointment » Key Term Event The name for an entry in the Calendar application, including appointments, birthdays, reminders, recurring meetings, and so on. Tip You can also scroll to a date by pressing Right or Left on the navigator or by tapping the arrows at the top of the Day View screen. 0 1 Open Day View: a. Press the Calendar application button. b.
CHAPTER 5 Managing Your Calendar Scheduling an appointment Tip To enter reminders, holidays, anniversaries, and other events that take place on a particular date but not at a particular time, tap No Time. 4 If the appointment is longer or shorter than an hour, set the duration: a. In Day View, tap the start time. b. In the Set Time dialog box, tap End Time. c. Tap the hour and minute lists to select the time the appointment ends. Tip Color-code your calendar.
CHAPTER 5 Managing Your Calendar Checking your schedule Sometimes you want to look at your schedule for a particular date, while other times you want to see an overview of a week or month. Tip Press the Calendar application button repeatedly to cycle through the Agenda View, Day View, Week View, and Month View. 0 1 Press the Calendar 2 Tap the icons in the lower-left corner to see four different Calendar views: application button.
CHAPTER 5 Managing Your Calendar Setting an alarm Did You Know? If you set your alarm sounds in World Clock instead of in Calendar you have more alarm sound choices. Tip Check out the other options in the Event Details dialog box. For example, Repeat creates an event that recurs daily, weekly, or at whatever interval you set up. Did You Know? When you set an alarm, a little alarm clock appears to the right of the event description.
CHAPTER 5 Managing Your Calendar Beyond the basics User Guide For everything you need to know about your handheld— all that’s in this guide, and much more—go to www.palmOne.com/zire31userguide.
CHAPTER 6 Managing Your Tasks In this chapter Creating a task Organizing your tasks Marking a task complete Beyond the basics Some of the most successful people in the world are also the busiest. When asked how they manage to do it all, busy people usually say, “I make lists.” The Tasks application on your handheld is the perfect place to make a list of the things you need to do.
CHAPTER 6 Managing Your Tasks Creating a task Tip If no task is currently selected, you can create a new task by writing in the Graffiti® 2 input area. Tip Set an alarm for the selected task. Tap Details, tap the Alarm box, tap the Alarm check box, enter the alarm settings, and then select OK. 0 1 Go to the Home 2 Create a task: screen and select Tasks . Due date a. Tap New. b. Enter a description of the task.
CHAPTER 6 Managing Your Tasks Organizing your tasks Sometimes you want to look at all the things you need to do, while other times you want to see only certain types of tasks. Did You Know? Overdue tasks have an exclamation point (!) next to the due date. Tip Your Task Preferences settings control which tasks appear in the Tasks list, such as completed or due tasks. To change these settings, open the Options menu and select Preferences.
CHAPTER 6 Managing Your Tasks Marking a task complete You can check off a task to indicate that you’ve completed it. Tip You can set Task Preferences to record the date that you finish your tasks, and you can show or hide finished tasks. To change these settings, open the Options menu and select Preferences. Zire™ 31 Handheld 0 1 2 Go to the Home screen and select Tasks . Select the check box on the left side of the task.
CHAPTER 6 Managing Your Tasks Beyond the basics User Guide For everything you need to know about your handheld— all that’s in this guide, and much more—go to www.palmOne.com/zire31userguide.
CHAPTER 7 Writing Memos In this chapter Creating a memo Viewing and editing a memo Beyond the basics Zire™ 31 Handheld Your handheld contains applications for storing the most common types of information: contact names and numbers, appointments, and so on. Memos is the tool to use for capturing information that is meaningful to you but does not fall into one of these categories.
CHAPTER 7 Writing Memos Creating a memo Did You Know? You can create as many memos as you want, up to the available memory on your handheld. Each memo can be up to about 32KB in size; that’s about 650 sentences. 0 1 Go to the Home 2 Create a memo: screen and select Memos . a. Select New. Tip In the Memos list, you can also just start writing to create a new memo. The first letter is automatically capitalized. b. Enter your memo.
CHAPTER 7 Writing Memos Viewing and editing a memo Tip The Memos list shows the first line of each memo, so make sure that first line is something you will recognize. Did You Know? You can connect your handheld to a portable keyboard and type your memos on the go without carrying around a heavy laptop. You can purchase a variety of carrying cases. Visit www.palmOne.com/ myzire31 and click the Accessories link. Tip You can change the size of the text in Memos to enhance readability.
CHAPTER 7 Writing Memos Beyond the basics User Guide For everything you need to know about your handheld— all that’s in this guide, and much more—go to www.palmOne.com/zire31userguide. My Handheld Make your handheld uniquely yours. For great tips, software, accessories, and more, visit www.palmOne.com/ myzire31.
CHAPTER 8 Writing Notes In this chapter Creating a note Viewing and editing a note Beyond the basics Need to jot down a phone number or a reminder to yourself? Avoid fumbling for scraps of paper, and write important reminders in Note Pad. You can use Note Pad to do everything you might do with a piece of paper and a pencil. Note Pad gives you a place to draw freehand and take notes in your personal handwriting, which is even faster and more flexible than creating a memo on your handheld.
CHAPTER 8 Writing Notes Creating a note Tip You can change the color of the pen and paper (background). From the Note Pad list screen, open the Options menu, select Preferences, and then tap Colors. 1 Go to the Home 2 Create a note: a. Write your note directly on the handheld screen. Tip Tap the pen selector to change the pen width or to select the eraser. b. Select the time at the top of the screen and enter a title using Graffiti® 2 writing or the onscreen keyboard. .
CHAPTER 8 Writing Notes Viewing and editing a note Tip You can clear the screen completely while editing a note. Open the Edit menu and select Clear Note. 0 1 Go to the Home 2 Select the note: Or, to delete a note completely, open the note and then tap Delete. screen and select Note Pad . a. Select Done to display the Note Pad list. b. Select the note you want to view or edit. 3 Read or edit the note, and then select Done.
CHAPTER 8 Writing Notes Beyond the basics User Guide For everything you need to know about your handheld— all that’s in this guide, and much more—go to www.palmOne.com/zire31userguide.
CHAPTER 9 Listening to Music In this chapter Transferring MP3 files to an expansion card Transferring music from a CD to an expansion card Playing music on your handheld Beyond the basics Are you tired of listening to small talk during that long commute on the bus or train? Do you need something smaller than a CD player when you’re out for a walk or at the gym? RealOne® Mobile Player lets you play music on your handheld.
CHAPTER 9 Listening to Music Transferring MP3 files to an expansion card [ ! ] Before You Begin Windows: Install RealOne Player on your handheld and your computer. Insert the CD and follow the onscreen instructions for installing extra software. Tip You can also use a card reader accessory (sold separately) to transfer MP3 files from your computer to your expansion card. Create an “SD_Audio” folder on the card, and store your MP3 files in this folder.
CHAPTER 9 Listening to Music Transferring MP3 files to an expansion card [ ! ] Before You Begin Mac: Install RealOne Player on your handheld. Insert the CD and doubleclick the Essential Software folder icon. Tip You can also use a card reader accessory (sold separately) to transfer MP3 files from your computer to your expansion card. Create an “SD_Audio” folder on the card, and store your MP3 files in this folder.
CHAPTER 9 Listening to Music Transferring music from a CD to an expansion card If your songs are on a CD and you want to listen to them on your handheld, you need to use RealOne® Player on your computer to convert and transfer the files. WINDOWS ONLY 0 1 Access the CD from RealOne Player on your computer: a. Double-click the RealOne Player icon on your computer desktop. b. Insert the CD into your computer’s CD drive. c. Click CD in RealOne Player on your computer.
CHAPTER 9 Listening to Music Transferring music from a CD to an expansion card Tip If you want to select only a few songs, click Deselect All and then click the check box next to the songs you want to select. 2 Select the songs you want to add to your library: a. Click Save Tracks. b. Follow the onscreen instructions to select and copy tracks. Did You Know? A 64MB expansion card holds about an hour of music (capacity varies with sampling rates).
CHAPTER 9 Listening to Music Transferring music from a CD to an expansion card Tip For tips on using RealOne Player on your computer, go to the Help menu in RealOne Player or visit www.realone.com. 3 Prepare your handheld: a. Insert an expansion card into your handheld. b. Go to the Home screen and select RealOne . c. Connect your handheld to the HotSync cable. [ ! ] IMPORTANT Do not tap the HotSync icon. 4 Select the songs you want to transfer: a. In RealOne Player on your computer, click Devices.
CHAPTER 9 Listening to Music Transferring music from a CD to an expansion card Tip On your handheld, tap Songs to view a list of the songs available for you to play. The songs you just transferred are at the bottom of the list. Cont’d. d. In the Add Clips window, select the songs you want to add, and then click Add Clips. Add Clips e. Click Close. The tracks you selected should now say “Ready To Transfer.” 5 Transfer the selected songs to your expansion card: a.
CHAPTER 9 Listening to Music Playing music on your handheld Tip For tips on using RealOne Mobile Player, open the Options menu and select Help. Did You Know? RealOne Mobile Player continues playing the songs in your list until it reaches the end of your list or until you tap the Stop button, even if your handheld screen is off. 0 1 On your handheld, go to the Home 2 Select a song to play: screen and select RealOne . • To play the current song, tap Play.
CHAPTER 9 Listening to Music Beyond the basics User Guide For everything you need to know about your handheld— all that’s in this guide, and much more—go to www.palmOne.com/zire31userguide. Click the link below to go to the User Guide on the web and learn about these related topics: RealOne Mobile Player • Creating playlists by choosing which songs to play and the order to play them in • Removing songs from an expansion card My Handheld Make your handheld uniquely yours.
CHAPTER 10 Viewing Photos In this chapter Copying photos to your handheld Viewing photos Beyond the basics A picture may be worth a thousand words, but what happens when you have a thousand pictures that you are trying to keep organized? Or maybe just a few that are so meaningful that you want to have instant access to them at any time? Solve both problems with palmOne™ Photos, which features easy viewing and organization of photos.
CHAPTER 10 Viewing Photos Copying photos to your handheld [ ! ] Before You Begin Install palmOne Photos from the installation CD onto your handheld. Windows: Insert the CD and follow the onscreen instructions for installing extra software. You can use palmOne Photos to transfer photos from Palm® Desktop software on your computer to your handheld or to an expansion card. You can also create and edit entire albums and send them to your handheld, where you can view your photos.
CHAPTER 10 Viewing Photos Copying photos to your handheld MAC ONLY 0 Tip In Mac OS X, you can make the Send to Handheld droplet a permanent part of your desktop by dragging the droplet to the Dock. Then simply drag photos, and other files you want to transfer to your handheld, onto the Dock. 1 Select the photos you want to transfer: a. Drag and drop the photos onto the Send to Handheld droplet in the palmOne folder. b. In the Send to Handheld dialog box, select your username and click OK.
CHAPTER 10 Viewing Photos Viewing photos Did You Know? If you or your friends have a digital camera that uses SD memory cards, you can insert the cards into the expansion slot and view the photos on your handheld. 0 1 Go to the Home 2 View photos: screen and select Photos . a. Tap the pick list in the upper-right corner and select the album containing the photos you want to view. Tip Select Slide Show to display all photos in an album, automatically, one after another.
CHAPTER 10 Viewing Photos Beyond the basics User Guide For everything you need to know about your handheld— all that’s in this guide, and much more—go to www.palmOne.com/zire31userguide.
CHAPTER 11 Customizing Your Handheld In this chapter Setting the date and time Preventing your handheld from turning on by accident Changing the screen fonts Although customizing your handheld is optional, it’s like changing the preset radio stations in your car.
CHAPTER 11 Customizing Your Handheld Setting the date and time You can set the current date and time based on your location. These settings are used by all the applications on your handheld that require a date, time, or location. Tip You can rename the location to the city where you live. Tap the Name field, and then modify the location name. Tip When you travel to a new time zone, change the Location setting to quickly reset the date and time.
CHAPTER 11 Customizing Your Handheld Setting the date and time 3 Set the date: a. Tap the Set Date box. Year arrows b. Tap the arrows to select the current year. c. Tap the current month. d. Tap the current date. 4 Set the time: a. Tap the Set Time box. b. Tap the hour and minute boxes, and then tap the arrows to change them. c. Tap AM or PM, and then select OK. 5 Select Done.
CHAPTER 11 Customizing Your Handheld Preventing your handheld from turning on by accident Tip When Keylock is on, your handheld does not respond when you press the application buttons. To use your handheld again, press the power button and then tap Deactivate Keylock. Does your handheld turn itself on accidentally in your briefcase, pocket, or purse? You can lock the buttons on the front of your handheld so that you prevent this from happening and don’t drain the battery.
CHAPTER 11 Customizing Your Handheld Changing the screen fonts In many applications, you can change the font style to make text easier to read. There are four font styles available in applications that let you change the font style.
CHAPTER 11 Customizing Your Handheld Changing the screen fonts 0 1 Open the Select Font dialog box: a. Open an application. b. Open the menus . c. Select Options, and then select Font. 2 Tap the font style you want to use, and then select OK.
CHAPTER 11 Customizing Your Handheld Changing the background of your screen Use your favorite photos as the background for the Home screen and the Agenda View screen in Calendar. Choose the same photo for both screens or make them different. [ ! ] Before You Begin Install palmOne™ Photos from the installation CD onto your handheld. 0 1 Windows: Insert the CD and follow the onscreen instructions for installing extra software. Mac: Insert the CD and double-click the Essential Software folder icon.
CHAPTER 11 Customizing Your Handheld Correcting problems with tapping » Key Term Digitizer Another name for your handheld’s screen and its internal circuitry. Tip If your screen is not responding to taps, use the navigator to open Digitizer Preferences. » Is your screen not responding to taps? Are you getting unexpected results when you tap? For example, when you tap the number keyboard icon, does the Find dialog box open instead? If this happens, it’s time to align the screen.
CHAPTER 11 Customizing Your Handheld Selecting sound settings Tip You can choose different types of sounds for Calendar, Tasks, and World Clock. Go to the application, open the Options menu and then select Preferences. Did You Know? When you connect a headset to your handheld, the external speaker is automatically silenced, the Sounds & Alerts settings are maintained, and all volume levels are automatically adjusted for use with a headset.
CHAPTER 11 Customizing Your Handheld Changing screen colors Choose a new set of text and background colors for all your applications. 0 1 Open Color Theme Preferences: a. Go to the Home b. Select Prefs screen. . c. Select Color Theme. 2 Select a theme, and then select Done.
CHAPTER 11 Customizing Your Handheld Beyond the basics User Guide For everything you need to know about your handheld— all that’s in this guide, and much more—go to www.palmOne.com/zire31userguide. My Handheld Make your handheld uniquely yours. For great tips, software, accessories, and more, visit www.palmOne.com/ myzire31.
CHAPTER 12 Common Questions Although we can’t anticipate all the questions you might have, this chapter provides answers to some of the most commonly asked questions. How do I upgrade from another Palm OS® handheld? 1. Synchronize your old handheld with your old desktop software. 2. Install the new Palm® Desktop software. There’s no need to delete the old desktop software first. 3. Select the username you assigned to your old handheld during the desktop installation.
CHAPTER 12 Common Questions Why can’t I find an icon on the Home screen? • Tap the pick list in the upper-right corner of the Home screen and select All. You may need to scroll down a bit, but you should now see an icon for each of the applications on your handheld. • Some of the applications that come with your handheld are not preinstalled. You need to install these extra applications from the CD.
CHAPTER 12 Common Questions Tip Need more help with synchronizing your handheld? Open Palm Desktop software, go to the Help menu and select HotSync Online Troubleshooting Guide. • Reduce the brightness of the display. • Reduce the Auto-off after setting. • Use Keylock Preferences to prevent your handheld from being turned on accidentally. • Minimize use of the expansion card slot. What do I do if I can’t synchronize with my computer? Make sure the HotSync® cable is connected securely.
CHAPTER 12 Common Questions Tip After a soft reset, the Preferences screen appears with the Date & Time option highlighted so you can reset the date and time if necessary. What do I do if my handheld doesn’t respond to taps correctly? If your handheld is not responding to taps correctly, you need to align the screen. What do I do if my handheld freezes? On rare occasions your handheld may not respond when you press a button or tap the screen. In this case, you need to reset your handheld.
CHAPTER 12 Common Questions Beyond the basics User Guide For everything you need to know about your handheld— all that’s in this guide, and much more—go to www.palmOne.com/zire31userguide.
Product Regulatory Information FCC Statement This device complies with part 15 of the FCC rules. Operation is subject to the following two conditions: (1) This device may not cause harmful interference, and (2) this device must accept any interference received, including interference that may cause undesired operation. This equipment has been tested and found to comply with the limits for a Class B digital device, pursuant to Part 15 of the FCC rules.
Canadian ICES-003 Statement This Class B digital apparatus meets all requirements of the Canadian Interference-Causing Equipment Regulations. Cet appareil numérique de la classe B respecte toutes les exigences du Réglement sur le matériel brouilleur du Canada. CE Compliance Statement This product was tested by palmOne, Inc. and found to comply with all the requirements of the EMC Directive 89/336/EEC as amended. Declaration of Conformity palmOne, Inc.
• EN61000-4-6:1996, Conducted Immunity, 150kHz-80MHz, 3V RMS, 1kHz, 80% AM • IEC 61000-4-11: 1994, 100% Voltage Dip 0.5 period, 30% Dip 25 periods and >100% Dip 250 periods Authorized palmOne Representative:David Woo Manager, palmOne, Inc., World Wide Compliance Date: November 4, 2003 Battery Warning Do not mutilate, puncture, or dispose of batteries in fire. The batteries can burst or explode, releasing hazardous chemicals.
Uwaga Static Electricity, ESD, and Your palmOne™ Handheld Electrostatic discharge (ESD) can cause damage to electronic devices if discharged into the device, so you should take steps to avoid such an occurrence. Description of ESD Static electricity is an electrical charge caused by the buildup of excess electrons on the surface of a material. To most people, static electricity and ESD are nothing more than annoyances.
• For example, if your computer has a metal case and is plugged into a standard three-prong grounded outlet, touching the case should discharge the ESD on your body. • Increase the relative humidity of your environment. • Install ESD-specific prevention items, such as grounding mats. Conditions that enhance ESD occurrences Conditions that can contribute to the buildup of static electricity in the environment include the following: • Low relative humidity.
INDEX SYMBOLS * (asterisk) characters 29 NUMERICS 5-way navigator 2, 14 A accessing applications 79 documentation on the web viii information 14 accessories 17, 22, 24, 27, 33, 39, 44, 48, 52, 61, 66, 77, 82 Add Clips icon 58 adding applications 19, 20, 22 contacts 29–30, 31 storage space 23, 24 Addit software 6 Additional Software option 6 add-on applications 20, 78 addresses See contacts adjusting speaker volume 75 agenda lists 34 See also Calendar Agenda View (Calendar) 37 alarm clock 38 Alarm Sound p
beaming 3, 17, 32, 82 beaming port See IR port birthdays 30 blinking cursor 9 bold fonts 72 brightness control 2 Brightness icon 2 built-in applications 5 Business Card command 32 business cards 32 buttons back panel 4 front panel 2 locking 70 navigator 14 not responding 81 opening applications with 7 reassigning application 7, 77 C calculator 6 Calculator icon 5 calendar color-coding appointments 36, 39 formatting 77 selecting dates on 41 Calendar application additional information for 39 checking schedul
contacts 29, 32 memos 45, 46, 47 MP3 files 56 notes in Note Pad 50 photo albums 66 recurring events 38, 39 reminders 49 song lists 57, 61 tasks 41 current date and time 68 cursor 9 customer support viii, 17, 61 customizing alarms 39 backgrounds 73 Contact application 33 handheld 67, 77 cutting and pasting 48 D data entry 2, 9, 17, 77 data See information Date & Time Preferences screen 68 dates assigning to appointments 35 assigning to tasks 41, 43 defining start and end times for 39 formatting 77 selecting
adding applications to 27 additional information for 27 benefits of 24 deleting applications from 27 deleting songs on 61 displaying contents of 27 inserting 3, 25 naming 27 removing 26 transferring audio files to 54–59 transferring photos to 63 Expense icon 5 F fade setting 73 FAQs 78 FCC Statement 83 features of handheld 1 file linking 22 file types 54 files deleting 27 removing from expansion cards 27 filing appointments 36 finding contacts 31 font styles 71, 72 fonts changing 71–72 formats audio files
losing vii, 79, 81 owner 70 receiving from outside sources 22 saving 79 security options for 77 sharing 3, 17, 27 storing 24 synchronizing 18–21, 80 transferring to CPU 20 updating 18, 19 infrared port See IR port input area 2 inserting expansion cards 3, 25 installing additional software 6 applications 19, 20, 22 third-party applications 78 Int’l button 10 international keyboard 10 IR port 3, 32 See also beaming synchronizing from 22 K key terms viii keyboard connecting to portable 47 entering information
N naming expansion cards 27 navigating through documentation vi navigator 2, 14 new lines 46 No Time button 36 Note Pad additional information for 52 clearing 51 displaying notes 51 opening 50 overview 49 setting preferences for 50 Note Pad icon 5 notes See also memos adding to events 39 adding to tasks 44 notes (Note Pad) attaching alarms to 52 creating 50 deleting 51 editing 51 keeping private 52 organizing 52 selecting 51 setting alarms for 50 number keyboard 9 numbers 8, 10, 77 O online documentation v
Previous View icon (Acrobat Reader) vi printing Getting Started Guide vi prioritizing tasks 41 privacy settings calendar 39 contacts 33 handheld 17 memos 48 notes 52 tasks 44 programs See software; applications protecting your handheld 16, 17, 77 purging old appointments 39 Q questions and answers 78 Quick Install icon 54 Quick Look Up icon 31 Quick Tour 5, 8 R Read This First vi RealOne Mobile Player 6 compatible formats for 54 converting songs on CDs 56 getting help with 58, 60, 61 overview 53 reassigni
shortcuts viii, 17, 77 side panel controls 4 sidebars vii, viii Silent profile 75 slide shows 65, 66 Small bold icon 72 Small font icon 72 soft resets 81 software vi, 6, 24, 82 See also applications Solitaire 6 song files See music files; sound files song formats 53 song lists 57, 59, 61 songs 24, 60, 61 See also music sorting information 33, 48, 52 sound files See also audio files; music files sounds 75 Sounds & Alerts Preferences 75 speaker 4, 75 special characters 8, 10 specifications 84 static electrici
items in lists 15 memos 47 notes 51 photos 65, 66 schedules 37 song lists 59 tasks 42, 43, 44 views in Calendar 34 volume 75 W warnings 85 warranty 81 web sites handheld online documentation viii Week View (Calendar) 37 World Clock 38 World Clock icon 5 writing area 2, 77 writing in your own handwriting 49 writing tool 4, 16 Z Zire handheld See handheld Zire™ 31 Handheld 96