USER MANUAL 3415DVD 34cm TV / DVD Combination TV + DVD Please read this manual carefully before using this TV set and keep it for future reference. PALSONIC CORPORATION PTY LTD 1 JOYNTON AVENUE WATERLOO NSW 2017 AUSTRALIA TEL: (02) 9313 7111 FAX: (02) 9313 7555 www.palsonic.com.
CONTENTS Before Operation Safety and precautions ........................................................................ 2 Installation ............................................................................................. 3 Aerial Connections .............................................................................. 3 Preparation of the remote control ........................................................ 3 Function buttons and external sockets ..............................................
Safety and Precautions To ensure safe and reliable operation of the TV set, please observe the following precautions, operation and maintenance. Attention: 1. Pay attention to the power supply cord before installing the TV set. Do not hang anything on the cord, and avoid treading on the cord. 2. The slots on the housing are designed for ventilation to ensure reliable operation of the TV set and prevent overheating. They must never be blocked.
Installation 1. First read carefully the relevant instructions in "Safety and Precaution". 2. place the TV set in a place where there in no direct sunlight on it. Any light reflecting from the screen will cause fatigue of your eyes. 3. Use gentle indirect lighting for comfortable watching. The best distance of watching is 5~7 times the screen height. 4. Keep a space of 10cm or over between the TV set and wall for good ventilation. 5.
Function Buttons and External Sockets Front panel of the TV set Rear panel of the TV set Video input terminal Antenna/ CATV input socket Video output terminal Audio left channel output terminal Audio left channel input terminal COAXIAL Coaxial terminal Audio right channel output terminal Audio right channel input terminal 4
Using the Remote Control Buttons on the remote control Stand By POWER OPEN/CLOSE SCAN SWAP CALL DVD Open/close Scan MUTE Former Program Mute 1 2 3 4 5 6 7 8 Call Screen Display Program Number TV/AV Exchange TV/AV 9 Digital Selector -/-- 0 H.LOCK H.LOCK TV/DVD TV/AV DVD Volume/Channel Selection MENU MENU Exit Screen Mode Picture Mode EXIT Calendar P.
Switching On/Off the TV Set This section explains the use of the power button and remote handset to turn your unit on and off. Switching on/ off the TV set Switching on/off the TV set 1 Press the Power switch on the The power indicator will light. 2 If the indicator "RED" press the button on the remote control. Alternatively you can turn the TV on with P+ or P- buttons if the "Child lock is not set.
Watching TV You can watch a TV program on a channel which has been tuned to a broadcast. Watching TV programs How to select a TV program Select the desired programs 1 2 3 4 5 6 7 8 9 0 1 Using number buttons Directly enter the channel number with the numeric keypad on the remote control. To select channel numbers between 10 ~ 99 press [-/--] button and enter the two digit channel number. To select channel numbers between 100 ~ 218 press [-/--] button twice and enter the 3 digit channel number.
Watching TV (continued) Press the SWAP button to select the channel you were watching previously. Auto scan function scans through all programs in memory including those with "skip" set to "off" (see "Program skip" on page 12). Program swap and auto scan functions Program swap Press the SWAP button to select the channel you were watching previously. 18 AUTO BG SWAP 8 AUTO BG 18 AUTO BG Auto program scan SCAN 1 Press the SCAN button to scan through all the memorised TV programs.
Searching Channels This TV set has three methods to set the channels, which are respectively full automatic, semi automatic and manual fine tune. In this section, how to use the remote control to set the channel is explained. You can also use the buttons on the TV set to set channel. Full automatic mode Automatic search P+ V- MENU 2 Press the P+/- buttons to select "AUTO SEARCH". TUN 3 Press the V+ button to start AUTO search. All channels will be stored in the order they are received.
Searching Channels (continued) Semi-automatic search Semi-automatic search 1 Press the P+/- buttons or the. PROGRAMME NUMBER (0-9) to choose the desired channel (e.g. Channel 1). P+ V- MENU V+ 2 Press the MENU button. The MAIN MENU will appear with the PlC (picture) icon flashing. Press the MENU button a further 3 times until the TUN (tuning) icon is flashing. Press P-to enter the TUNING menu. P- 3 Press the P+/- buttons to select "SEARCH".
Searching Channels (continued) Manual fine tune Manual fine tune If the picture and/or sound are poor, try using the FINE TUNE feature. Do not use this feature unless reception is poor. 1 Press the P+/- buttons or PROGRAM NUMBER (0-9) button to choose the desired channel (e.g. channel 1). 1 AUTO BG P+ V- MENU V+ P- 2 Press the MENU button. The MAIN MENU will appear with the PlC (picture) icon flashing. Press the MENU button a further 3 times until the TUN (tuning) icon is flashing.
Searching Channels (continued) Programme skip Program skip Channels can be set so that they are skipped during program selection. P+ V- V- MENU V+ 1 Press the P+/- buttons or PROGRAM NUMBER (0-9) button to choose the desired channel (e.g. channel 1). 1 AUTO BG P- 2 Press the MENU button. The MAIN MENU will appear with the PlC (picture) icon flashing. Press the MENU button a further 3 times until the TUN (tuning) icon is flashing. Press P- to enter the TUNING menu.
Convenient Picture & Sound Control Functions Multiple picture modes How to select picture modes You can quickly select the desired picture mode from STANDARD four preset modes and one customised mode. Press the P.STD button to select the desired RICH picture quality. Five kinds of picture modes USER (i.e., "STANDARD", "RICH", "USER", "LISTEN", "SOFT") can be selected in turn.
Convenient Picture & Sound Control Function (continued) Black Stretch Automatically increases the contrast range Noise Reduce Picture Noise & Grain Reduction Circuit. (Use only on poor reception) Black stretch and noise reduce How to select BLACK STRETCH 1 Press the MENU button. The MAIN MENU will appear with the PlC (picture) icon flashing. Press the MENU button a further 2 times until the FUN (function) icon is flashing. Press P- to enter the FUNCTION menu.
Convenient Picture & Sound Control Functions (continued) Mute and Fade Sound mute MUTE 1 Press the MUTE button on the remote control to turn off the sound. MUTE will appear on the top left of the display. MUTE 2 Press MUTE again to turn the sound back on. Fade When FADE is turned on, the TV will protect the tube by fading the picture in when the TV is switched on, and fading the picture out when the TV is switched off. P+ V- MENU V+ P- P+ V- MENU 1 Press the MENU button.
Time Functions Clock setting and timer on/off functions Clock setting The clock will only work if the TV set if left turned on or in standby. When the set is disconnected from the power supply or is turned off by the main power on the front panel, the clock loses power and will need to be reset when the power is reconnected. TIME 1 Press the TIME button, and the TIME menu appears on the screen.
Timer Functions (continued) Sleep timer and program preset Sleep timer TIME The sleep timer switches the set to stand-by after the sleep time has elapsed. Sleep time can be set in 10 minute intervals up to 180 minutes, as shown in the illustration. Setting the sleep time to zero turns off the sleep timer. 1 Press the TIME button, and the TIME menu appears on the screen. P+ V- MENU V+ 2 Press the P+/- buttons to select "SLEEP TIMER". P- 3 press the V-/+ buttons to set the value of the SLEEP TIMER.
Set Up Functions Screen saver and Calendar How to start screen saver function When the background function is ON a bouncing 'NO SIGNAL' will be displayed on a blue back ground. NO SIGNAL P+ V- MENU V+ P- 1 Press the MENU button. The MAIN MENU will appear with the PlC (picture) icon flashing. Press the MENU button a further 2 times until the FUN (function) icon is flashing. Press P- to enter the FUNCTION menu. 2 Press the P+/- buttons to select BACKGROUND.
Set Up Functions (continued) AVL AVL function Automatic Volume Level control reduces the effect of large volume changes. For instance, when advertisements come on. P+ V- MENU V+ P- 1 Press the MENU button. The MAIN MENU will appear with the PlC (picture) icon flashing. Press the MENU button a further 2 times until the FUN (function) icon is flashing. Press P- to enter the FUNCTION menu. BACKGROUND BLACK STRETCH NOISE REDUCE FADE AVL ON P+ V- MENU V+ 2 Press the P+/- button to select "AVL".
Organise Functions Organise ORGANISE This feature enables TV programmes that may be on a wrong program number to be moved to another number. This feature is very useful when Automatic Search Tuning has been used because programmes are stored in the order they are found, which is usually not the desired order. When organising, it is best to start from the lowest programme number first. P+ V- MENU V+ P- P+ V- MENU V+ P- P+ V- MENU V+ 1. Press the MENU button.
Setting the Lock This TV set provides the option of locking various parts of the TV to guard against unauthorised viewing. Changing your Password Changing your password This TV set can set a four digit password, the original one is 0000, if you want to reset it, please follow the instructions below. H.LOCK 1 Press H.LOCK button, the screen will show as the form on the right. 2 Press the 0 button four times and enter the menu of LOCK setting. Press P+/- button and move the indicator to CHANGE PW.
Setting the Lock (continued) Setting the Lock Setting the Lock There are TUNING LOCK, AV LOCK, and CHILD LOCK, etc, you can set it due to your needs. H.LOCK 1 3 2 5 7 6 9 8 P+ MENU P- INPUT PASSWORD ..... 2 Press the PROGRAM NUMBER (0-9) button 0 for four times (or input the password you set), and enter the LOCK menu. LOCK SET CHANGE PW. TUNING LOCK PRESET PROG AV LOCK CHILD LOCK MAX VOLUME UNLOCK 4 0 V- 1 Press the H.LOCK button, the screen will show as the form on the right.
Basic Playback Basic Playback Preparations Press the TV/DVD button on the remote control or the TV to enter the DVD status. Basic playback 1. Press OPEN/CLOSE to open the disc tray, place a disc on the disc tray. There are two different disc sizes. Place the disc in the correct guide on the disc tray. If the disc is out of the guide, it may damage the disc and cause the DVD player to malfunction. Do not place a disc which is unplayable in this DVD player. 2.
Advanced Playback Advanced Playback IMPORTANT NOTE: ALL DESCRIBED FUNCTIONS ARE FOR DVD DISCS. IF YOU PLAY OTHER FORMATS THE OPERATION AND DISPLAY ON SCREEN MAY VARY. SUBTITLE Press " SUBTITLE ", the screen will display "SUBTITLE 01/XX XXXXX", "01" indicates the ordinal number of this language; "XX" indicates total number of language; "XXXXXX" indicates the language of country. (the number of language depends on disc). This function can select up to 32 languages displayed on screen.
Special Function Playback JPEG DISC PLAYBACK Users can record pictures from digital camera or scanner onto a CD-R or CD-RW disc using a personal computer, CD recording drive and suitable software. Be sure to use good quality recordable discs and trustworthy software with good instructions. Take care with recording settings: the disc must be recorded as data disc IS09660 format, short file names (8 characters) are best, no multi-session and must be "finalised".
DVD System Setup DVD System Setup General Setup Process SETUP 1. Press the SETUP button, the General Setup Page, Preference Page will be displayed in turn. 2. Press or to select the item, then press to enter the submenu. ..General Setup Page.. TV Display LB 4: 3:Ps Angle Mark On 4: 3:Lb OSD Lang ENG 16: 9 Spdif Output Caption On ..Preference Page.. PLAY/ENTER 3. Press or to setup, then press PLAY/ENTER to confirm. TV Type Auto Parental Password Default PAL AUTO NTSC 4.
DVD System Setup (continued) DVD System Setup General Setup Page ANGLE MARK: Users can select a particular camera angle when playing a DVD which offers multiple angles. This item allows you to set Angle Mark ON or OFF. ..General Setup Page.. TV Display Angle Mark OSD Lang Spdif Output LB On ENG On Off ..General Setup Page.. TV Display Angle Mark OSD Lang Spdif Output Caption Screen Saver On Screen Display (OSD) Language: Users can select on-screen display language.
DVD System Setup (continued) DVD System Setup Preference Page SETUP PLAY/ENTER SETUP PLAY/ENTER The Preference Page is only available when there is no disc in the player. These settings are applied consistently to all discs which are inserted and played. TV TYPE: This player supports different TV output, including MULTI (Auto), NTSC, and PAL systems. Usually please set to MULTI.
Playable Discs The following discs can be played: You cannot play discs other than those listed above. You cannot play discs of non-standardized discs, even if they may be labelled as above. The performance of CD-R or CD-RW disc is depend on the way the disc is prepared. - see under "Special function playback - JPEG disc playback".
Disc Protection and DVD Characteristics ON HANDLING DISCS ON STORING DISCS Do not touch the playback side of the disc. Do not attach paper or tape to disc. Do not store discs in a place subject to direct sunlight or near heat source. Do not store discs in place subject to moisture and dust such as bathroom or near humidifier. Store discs vertically in a case. Stacking or placing object on discs outside of their case may cause warping.
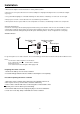
Connecting the TV Set to Other Video & Audio Equipment Connection of AV input/output terminal The figure below shows how to connect external equipment using AV signals. an additional TV DVD, VCD or other units VHF OUT Video output UHF IN VIDEO L COAXIAL AUDIO R To audio output To audio input To video input Laser DVD with output terminal DVD, VCD or other units There is also an AV input on the side of your television.
Troubleshooting Guide To assist in location possible faults use help guide below. BREAKDOWN PHENOMENON PICTURE CHECKING SOUND The aerial direction and connection Picture with snow Double or Triple Image Noise Normal This is called ghosting which can be minimised with an outside aerial, and good quality cable and terminations. Altering the aerial direction can also minimise this effect.
Specifications Specifications 3415VD Model Colour system PAL, NTSC PLAYBACK Sound system BG Picture tube 34cm colour picture tube Sound output power 2X2W (10% THD) Power requirements AC 240V ~ 50Hz Power consumption 70W Dimension Accessories 356 (Width) x 370 (Depth) x 367 (Height) mm Remote control Owner's manual Battery (AAA) X1 X1 X2 NOTE Design and specifications are subject to change without notice. Dimensions quoted in this manual are approximate.
PALSONIC CORPORATION PTY LTD 1 JOYNTON AVENUE WATERLOO NSW 2017 AUSTRALIA TEL: (02) 9313 7111 FAX: (02) 9313 7555 www.palsonic.com.