OWNER'S MANUAL PURE FLAT AV STEREO TELEVISION 51CM CORDLESS REMOTE COLOUR TELEVISION MODEL: 5110PF Type Tested Electrical Safety AS/NZS 3250 Lic 4166 Standards Australia APP No: N15899 PALSONIC CORPORATION PTY LTD 1 JOYNTON AVENUE WATERLOO NSW 2017 AUSTRALIA TEL:(02)9313 7111 FAX:(02)9313 7555 www.palsonic.com.
Congratulations on your purchase of this Palsonic colour television receiver. We recommend that you thoroughly read this manual before use to fully enjoy the many functions and excellent effects of this receiver. Retain this manual in an easily accessible location for future reference. * Screen displays and illustrations in this manual may differ from the actual ones for better visibility. Contents INTRODUCTION Features ...................................................
INTRODUCTION Features . . . . . . . . . . . . 51cm pure flat picture tube Hyperband English/Chinese on-screen menu display 100 preset channels Auto-search, manual search Intellectualized I 2 C-bus control Sleep timer, Auto Power-Off & blue background display Full function remote control Four picture mode setting AUDIO/VIDEO input & output terminals S-VIDEO terminal Advanced picture improvement circuit 1.
NOTES FOR OPERATION * Do not let the TV set be in stand-by condition for a long period of time. When it is not in use, please turn off the power supply and remove the power plug. When it is to be left unattended for a prolonged period of time, it is recommended to disconnect the connection to the outdoor aerial, to avoid thunder strike. * Please follow cautions for safety in the TV set instructions, and all warnings and descriptions denoted on the TV set.
Installation Antenna Connection To ensure a bright-coloured and clear picture, you should use an outdoor aerial or CATV cable. If the signals are strong enough, you may use an indoor aerial. Note: In case of using the Twin-lead aerial feeder (300 ) for UHF/VHF aerial, use a 300-75 ohm adaptor (not supplied) When using the coaxial cable (not supplied) (75 ) for UHF/VHF aerial, connect the plug into the 75 ohm aerial socket directly.
Appearance Front view POWER SWITCH (2) Video 2 input terminals {VIDEO, AUDIO L/MONO, R} TV/AV CHANNEL UP MENU CHANNEL DOWN VOLUME DOWN Note: Functions of MENU, TV/AV, remote controller.
Appearance Remote Controller 5
OPERATION Turning the Power On/Off . The following describes how to turn the TV on/off using the TV's main switch and the remote controller. To turn the power on/off 1. Press the POWER switch, the red power indicator lights up. 2. If no picture appears on the screen, press the button or any one of 0~9 number buttons on the remote controller to turn the set on. Without using the remote controller, you can directly press VOL or CH or TV/AV button on the set to turn on the TV.
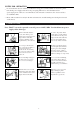
OPERATION Tuning in . There are two ways to preset channels: to preset channels automatically and to preset channels manually. Below we will describe how to preset the channels by making use of the menu. To preset channels (Auto search) Use the AUTO SEARCH function to preset all the active channels in your local area automatically. To enter into menu Press the MENU button repeatedly to call up the POS. MEMORY menu on the screen.
OPERATION Tuning in (continued) . Use the MANUAL SEARCH function if desired channels can not be preset with the AUTOSEARCH or if you would like to preset channels to specific position numbers one by one. . It is convenient to set the channel numbers to the same position numbers using MANUAL SEARCH and SKIP functions.
OPERATION Tuning in (continued) To skip unnecessary position numbers and MFT (Manual Fine Tuning) To skip a position number After presetting the channels, you can skip unnecessary position numbers so that only the channels you want to watch are selected. POS.MEMORY POSITION 01 1. Enter into the POS. MEMORY menu, select and highlight BAND VHFL SKIP OFF POSITION, then select the unwanted program number with the SEARCH DOWN MFT DOWN or button. AUTO MEMORY !!!!!!...... 2.
OPERATION Tuning in (continued) The setting of colour and sound system 1. Press the SYS button, the colour and sound system will be displayed on the screen. COLOR AUTO SOUND BG SELECT 2. If the colour is abnormal, press the or button to select COLOR, then press the or button to select the proper colour system. Every time you press the or button, the colour system will change in the sequence below. COLOR AUTO SOUND BG SELECT AUTO PAL 443NTSC ADJUST 358NTSC 3.
OPERATION Channel selection l You can watch TV programmes being broadcast on the preset channels. To watch a TV programme You can select your desired TV program by one of the following methods. Using the direct select buttons To select a one-digit position number, press the -/-- button to display "-" and 0~9 to select a number (0~9). . 1 . To select a two-digit position number, press -/-- to display "-" and press 0~9 to select number (10~99).
OPERATION Convenient Picture Controls Selectable picture To select the picture mode You can select the picture quality instantly among three preset modes and one user-set mode. Press the P.S button to select the desired picture quality. MEMORY1, MEMORY2, MEMORY3 and MEMORY 4 (user-set) can be selected cyclically. MEMORY 1 MEMORY 2 MEMORY 3 To set the desired picture quality to the MEMORY position 1. Press the MENU button to enter into the PICTURE menu. Or press the P.
OPERATION Convenient Sound Controls Adjusting the volume and muting the sound To adjust the sound volume Adjust the sound volume with the VOL buttons. Press the VOL button to decrease the sound. Press the VOL button to increase the sound. VOLUME 50 !!!!!!!..... To mute the sound The muting function is convenient when you need to pay attention to surrounding sounds, answer a phone call, receive a visitor, etc. 1. Press the MUTE button to mute the sound. MUTE 2.
OPERATION Other functions Sleep timer and to select the language for the OSD SLEEP timer Making use of the Sleep timer function allows you to have the set automatically turned off after a preset time. Press the SLP button every time, the time displaying on the screen will change in the sequence below: OFF 120MIN SLEEP:30MIN. 110MIN.......... 10MIN To select the language for the OSD Making use of this function can switch the language for the OSD to either English or Chinese. OTHER 1.
CONNECTING OTHER EQUIPMENT External Equipment Connections . The following describes how to use and connect the TV with other AV equipment. Refer to the owner’s manual of the equipment to be connected as well. To connect AV input terminal You can connect video equipments such as a VTR and video camera to this TV and enjoy the high quality picture and sound. If your video equipment has a S-VIDEO output terminal, connect it to the S-VIDEO input terminal (special S-VIDEO type) of the unit.
CONNECTING OTHER EQUIPMENT To connect AV input terminal (continued) To select the video input, press TV/AV the button on the TV set or AV button on the remote controller repeatedly until you see the corresponding input indication on the screen. To return to aerial input, press the AV button until it displays program number, or press channel select button or the CH button. TV VIDEO 1 VIDEO 2 (S-VIDEO) If the colour of video input is abnormal, the colour system setting may be incorrect.
OTHERS Troubleshooting Guide . Before calling service personnel, please check the following chart for a possible cause to the trouble you are experiencing. Check the following items Symptoms . . . . No power, red indicator is not lit up Poor colour, poor tint Spots appear on the screen Stripes appear on the screen Be sure the power cord is plugged in. Contrast, colour, tint are not correctly adjusted Possible interferences of automobiles, motorcycle, trolley bus, neon lamps, etc.
PALSONIC CORPORATION PTY LTD 1 JOYNTON AVENUE WATERLOO NSW 2017 AUSTRALIA TEL:(02)9313 7111 FAX:(02)9313 7555 www.palsonic.com.