OWNER'S MANUAL 51CM CORDLESS REMOTE COLOUR TELEVISION MODEL: 5125PF Type Tested Electrical Safety AS/NZS 3250 Lic 4164 Standards Australia APP No: N15959 PALSONIC CORPORATION PTY LTD 1 JOYNTON AVENUE WATERLOO NSW 2017 AUSTRALIA TEL: (02) 9313 7111 FAX: (02) 9313 7555 www.palsonic.com.
Congratulations on your purchase of this Palsonic colour television receiver. We recommend that you thoroughly read this manual before use to fully enjoy the many functions and excellent effects of this receiver. Retain this manual in an easily accessible location for future reference. Screen displays and illustrations in this manual may differ from the actual ones for better visibility.
Contents Features ........................................................................................................................ Important Safety Cautions .......................................................................................... Identification of Controls ............................................................................................ Front view .................................................................................................................
Features Features Intellectualized I2C-bus control Digital AFT Technology Four Picture Modes Two groups of Video/Audio input terminals One group of DVD input terminals On-screen menu display Full function remote control Hyperband Channel exchange On timer/Off timer Game Calendar 1
Important Safety Cautions Safety Cautions When any unusual situation occurs, turn off the power supply at once and remove the plug from the wall outlet. Contact a qualified service department in your local area. Do not expose the TV set to rain or excessive moisture. Avoid using the set in very warm or damp places and never use it in a bathroom. When cleaning dust off the picture tube disconnect the power first. You can wipe lightly with a piece of dry, clean and soft cloth.
This TV set can operate on a power of ~240V, 50Hz. You must not use a power supply of any other type. Do not cover the ventilating hole in the cabinet Keep a space of more than 10cm from the walls to the TV set to ensure adequate ventilation. If the power cord or the plug is damaged contact a qualified service department for service. When the TV set is to be left unattended for a long period of time, turn off the power supply and remove the plug from the wall outlet.
Identification of Controls Front view/Back view Front view VOL+ VOLCH+ 1 2 3 CHMENU 4 5 6 7 8 AV/TV 9 1. 2. 3. 4. 5. 6. 7. 8. 9. Remote sensor. Indicator. Power Switch. VOL+ button: volume up adjust; menu item adjust. VOL- button: volume down adjust; menu item adjust. CH+ button: channel up select; menu item select. CH- button: channel down select; menu item select. MENU button: to enter into menu operation. AV/TV button: video input select.
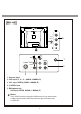
Back view (2) R AUDIO L/MONO 5 VIDEO (1) DVD VIDEO Y L/MONO S-VIDEO CB L/MONO AUDIO AUDIO CR R R 4 3 1. Antenna input 2. DVD input (Y, C B , C R , AUDIO: L/MONO, R) 3. AV1 input (VIDEO, AUDIO: L/MONO, R) 4. S-VIDEO input 5. 1 Earphone jack AV2 input (VIDEO. AUDIO,: L/MONO, R) Notes: The S-VIDEO terminal is prior to the VIDEO terminal, if you want to watch a video program from the VIDEO input terminal, please disconnect the S-VIDEO first.
Identification of Controls (continued) Remote Control Power on/standby Direct Channel selector Sound Mute 1 2 3 4 5 6 Picture mode select 7 8 9 DSP On-screen display call AV 0 Previous channel TV/VIDEO Input selector Channel up Volume down Volume up To access MENU operation Channel down Scanning program Playing game SCAN SLP CAL Sleep timer GAME Calendar 6
Battery Installation Effective range of the Remote Control 1 Open the battery cover. 2 Install two "AA" batteries matching the +/- polarities of the battery to the +/- marks. 3 Replace the battery cover. Notes: Notes: 1. When the remote control will not be used for a long period of time or when the batteries are worn out, remove the batteries. 2. Do not drop or dampen the remote control. 3. Do not disassemble the remote control. 1. There should be no obstacle between the TV and the transmitter. 2.
Installation Antenna installation/Connect to video and audio equipment Antenna installation Optimum reception of colour requires a good signal and will generally mean that an outdoor antenna must be used. The exact type and position of the antenna will depend upon your particular area. Notes: Turn off the power first, when you connect an outdoor antenna to the antenna input terminal.
Connect video and audio equipment This TV set provides 2 groups of AV input terminals and 1 group of DVD terminal for your convenient connection to VCR, DVD or other video equipment to enjoy the high quality picture. Please refer to the owner's manual of the equipment to be connected as well. R Connect to the side AV input terminals R VIDEO EQUIPMENT AUDIO Y W L/MONO To audio outputs To video output R VIDEO W Y Signal To earphone jack Connect the rear AV and DVD input terminals.
In menu operation, press CH+/- to select item, press VOL+/- to adjust selected item. Press MENU button again or wait for several seconds to exit menu. Operations Menu Introduction Press MENU button To adjust the picture's contrast. To adjust the picture's brightness. P I C T U R E CONTRAST BRIGHT COLOR SHARPNESS TINT 50 50 50 50 50 To adjust the picture's colour. To adjust the picture's sharpness. To adjust the picture's skin colour.
Operations Power On/Power Off Power On/Power Off Turning On 1 Press the POWER SWITCH on the TV set. 2 If no picture appears and the red indicator lights up, the TV set is in STANDBY mode. Press button on the remote control, then the TV set is turned on. 1 2 3 4 5 6 P.M 7 8 9 DSP AV 0 3 When the TV set is in STANDBY mode, you can also press the CH+/- buttons on the TV set to turn on the TV.
Operations Selecting Input Signal Selecting Input Signal 1 Press AV button repeatedly. The screen displays input signal source AV1/AV2/YUV/TV. Select the input signal source you need. 1 2 3 4 5 6 P.M 7 8 9 DSP Digit DSP AV 2 In AV mode, you can press the digit buttons to switch back to TV mode. 0 AV 3 Press DSP button. The screen displays current state. Press again to cancel.
1 Press MENU button. 2 Press VOL+/- buttons to select PRESET menu. 3 Press CH- button to access PRESET menu. Operations Tuning In Auto search/Manual search Auto search Access PRESET menu. Press CH+/- buttons to select AUTO. Press VOL+/- buttons and the TV set starts Auto channel preset. All active channels will be preset and stored into the memory automatically. After presetting, the TV will display the first channel. 1 2 3 4 5 6 P.
Operations Tuning In (continued) Channel skipping/Fine tuning After presetting the channels, you can skip unnecessary position numbers so that only the channels you want are selected. Channel skipping 1 2 3 4 5 6 P.M 7 8 9 DSP AV 0 Digit CH+ MENU VOLVOL+ CHSCAN SLP CAL GAME Please select a channel number with Digit buttons or CH+/- buttons. You can also access PRESET menu, select CHANNEL item and select a channel number with VOL+/- buttons.
Channel exchange/Setting colour system/Setting sound system After channel presetting, you can edit the order of the programs by using the channel exchange function. Channel exchange Access PRESET menu and select TARGET item. 1 2 3 4 5 6 P.M 7 8 9 DSP AV 0 Digit CH+ MENU VOLVOL+ CHSCAN SLP CAL Press VOL+/- buttons to select a target channel number that you would like to exchange with the current channel. Then select EXCHANGE item and press VOL+/buttons to confirm.
Operations Selection Channel Use 0-9 buttons and --/--- buttons/Use CH+/- Buttons/Use the PREVIOUS button 1 Use Digit buttons To select one-digit channel Press --/--- button to display "-". 1 2 3 4 5 6 P.M 7 8 9 DSP AV 0 Press 0-9 direct channel selector. 8 Digit To select two-digit channel Press --/--- button repeatedly to display "--". -- -1 18 Press 0-9 buttons. Press 1-9 buttons.
Operations Picture Controls Contrast/Brightness/Colour/Sharpness/Tint To adjust the picture's contrast. P I C T U R E CONTRAST BRIGHT COLOR SHARPNESS TINT 1 2 3 4 5 6 P.M 7 8 9 DSP AV 0 50 50 50 50 50 Press CH+/- buttons to select item upwards or downwards Press VOL+/buttons to adjust selected item. CH+ MENU VOLVOL+ CHSLP CAL GAME To adjust the picture's brightness. 50 50 50 50 50 To adjust the picture's colour. To adjust the picture's sharpness. To adjust the picture's skin colour.
Operations Sound Controls Adjusting the volume and muting the sound 1 Use VOL+/- buttons Press VOL+ button to increase the volume. Press VOL- button to decrease the volume. 1 2 3 4 5 6 P.M 7 8 9 DSP AV 0 2 Use Press button to mute the sound completely and the screen displays MUTE. VOLVOL+ SCAN SLP CAL button. MUTE Press button again to restore and the VOLUME bar appears.
1 Press MENU button. 2 Press VOL+/- buttons to select CLOCK menu. 3 Press CH- button to access CLOCK menu. Operations Clock Setting Sleep Timer/Clock Setting/On Timer Setting Sleep timer Access CLOCK menu and press CH+/buttons to select SLEEP item. Press VOL+/- buttons to select between 0, 30, 60, 90, 120, 150 and 180. When the sleep time elapses, the TV set goes to STANDBY automatically. 1 2 3 4 5 6 P.
Operations Clock Setting (continued) On channel Setting/Off timer Setting On Channel Setting Please set ON TIME before setting CHANNEL. Access CLOCK menu and select CHANNEL item. 1 2 3 4 5 6 P.M 7 8 9 DSP AV 0 Digit CH+ MENU VOLVOL+ CHSCAN SLP CAL GAME C L O C K SLEEP CLOCK ON TIME OFF TIME CHANNEL 30 MIN --:--AM 11:20AM --:--AM 3 C L O C K SLEEP CLOCK ON TIME OFF TIME CHANNEL 30 MIN --:--AM 11:20AM --:--AM 3 Press VOL+/- buttons or Digit buttons to select a channel number.
1 Press MENU button. 2 Press VOL+/- buttons to select Setup menu. 3 Press CH- button to access Setup menu. Operations System Setting Blue background/OSD Language/Calendar Blue background Access SETUP menu. Press CH+/- buttons to select BLUEBACK item. Press VOL+/- buttons to select ON or OFF. If you select ON, when there is no signal or signal is too poor, then a blue background will appear. 1 2 3 4 5 6 P.
Operations System Setting (continued) Playing games/Menu demonstration Playing game Access SETUP menu. Press CH+/buttons to select GAME item and press VOL+/- buttons to access game interface. You can also access game interface by pressing GAME button directly. 1 2 3 4 5 6 P.M 7 8 9 DSP AV 0 S E T U P BLUEBACK LANGUAGE CALENDAR GAME DEMO ON ENG In game interface, press VOL+/- buttons to select game level (0~4). The higher the level, the faster the bars roll.
Menu demonstration Access SETUP menu. Press CH+/buttons to select DEMO item. Press VOL+/- buttons, then TV set demonstrates menu operation. 1 2 3 4 5 6 P.M 7 8 9 DSP AV 0 Press any button to stop it.
Troubleshooting Guide Troubleshooting Guide Before calling service personnel, please check the following chart for a possible cause to the trouble you are experiencing. Symptoms Check the following items Power is not turned on Be sure the power cord is plugged in. Poor colour, poor tint Contrast, colour, tint are not correctly adjusted Spots appear on the screen Possible interferences of automobiles, motorcycle, trolley bus, neon lamps, etc.
Specifications Specifications Power Supply: AC 240V, 50Hz Power Consumption: 70W Dimensions (mm): 590 (W) x 450 (H) x 473 (D) Weight (kg): 25 CRT: 51cm TV system & channel coverage System VHF UHF CATV PAL-B/G X~Z+2,S1~S41 2-12 21-69 Colour System: PAL, NTSC (AV) Sound output: 2.5W x 2 Accessories: Remote control X 1 Design and specifications are subject to change without notice.
PALSONIC CORPORATION PTY LTD 1 JOYNTON AVENUE WATERLOO NSW 2017 AUSTRALIA TEL: (02) 9313 7111 FAX: (02) 9313 7555 www.palsonic.com.