OWNER'S MANUAL 51CM CORDLESS REMOTE COLOUR TELEVISION MODEL: 5169 Type Tested Electrical Safety AS/NZS 3250 Lic 4164 Standards Australia APP No: N15959 PALSONIC CORPORATION PTY LTD 1 JOYNTON AVENUE WATERLOO NSW 2017 AUSTRALIA TEL:(02)9313 7111 FAX:(02)9313 7555 www.palsonic.com.
Congratulations on your purchase of this Palsonic colour television receiver. We recommend that you thoroughly read this manual before use to fully enjoy the many functions and excellent effects of this receiver. Retain is manual in an easily accessible location for future reference. Contents Notes for operation .................................................................................................... Installation and Appearance 1 Antenna connection .............................................
This equipment has been designed and manufactured to meet the highest international standards, but, like any electrical apparatus which is operated at mains voltage, care must be taken if you are to obtain the best results and safety is to be assured. This is particularly important with audio and TV equipment. DO DO read this handbook carefully and keep it handy for ready reference.
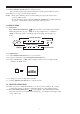
CONTROL PANEL REMOTE SENSOR POWER SWITCH ANTENNA INPUT AV IN OUT POWER INDICATOR 1. ANTENNA CONNECTIONS 1.1 Optimum colour reception requires a good antenna. An out-door antenna will be more effective to obtain a clear-picture. 1.2 Insert the out-door antenna into the antenna socket on the cabinet back. Adjust the direction or position of the outdoor antenna for the best possible picture. 2. POWER SWITCH 2.
3.1 STANDBY ( ) Button 3.1.1 Press STANDBY ( ) button to turn on the set (the indicator shows yellow) when the set is in STANDBY mode (the indicator shows red) , the channel position number is displayed in the screen. Press STANDBY ( ) button to return the set to the STANDBY mode when the set is in OPERATION mode, and the indicator shows red. 3.2 CHANNEL PRESET 3.2.1 AUTO PRESET 3.2.1.1 Press PRESET ON/OFF button to set PRESET mode. The current band and channel position will be displayed on screen.
3.2.2.4 Press PRESET ON/OFF button to exit preset mode. The searched program station has been memorised at the present channel position, 3.2.2.5 Repeat 1~ 4 steps to search another channel. NOTE : * If the same channel position is selected during repeat operation, the former memory will be erased. * If some channel position is tuned by MANUAL TUNING mode, AFC (automatic frequency control) function is defeated in this channel position. 3.3 SKIP BUTTON 3.3.
CHANNEL INCREASE CH 1 2 3 99 CH 0 CH 8 CHANNEL DECREASE 1 (REMOTE) 2 3 99 0 (THE APPLIANCE) 3.5 VOLUME CONTROL 3.5.1. Press the VOL 3.5.2. Press the VOL button to increase volume ; the green bar on the screen moves right. button to decrease volume ; the green bar on the screen moves left. Display of maximum volume Display of minimum volume ......................... 3.6 AV/TV SELECTOR Press AV/TV button to change TV mode to AV mode when the set is in receiving (TV) mode.
4. REMOTE CONTROL OPERATION: REMOTE CONTROL UNIT CH VOL PPS : CHANNEL SELECTOR : VOLUME CONTROL : PERSONAL PREFERENCE SELECT (BRIGHTNESS, COLOUR) : PICTURE/TIME ADJUSTMENT PICTURE : PICTURE CONTROL DSP : DISPLAY : STANDBY 1 ~ 9 : DIGITAL CHANNEL SELECTOR 10/0 : CHANNEL 10 OR CHANNEL 0 SELECTOR SYSTEM : COLOUR SYSTEM CONTROL -/- : DIGIT OR TWO DIGIT CHANNEL SELECT : PREVIOUS 4.1 INSTALLING BATTERIES: 4.1.1 Remove the battery cover of Remote Control Unit. 4.1.2 Insert two "AAA", 1.
4.3 CHANNEL SELECTION 4.3.1 Press CHANNEL SELECTOR ( ) the channel number will be increased or decreased and displayed in the upper right corner of the screen. 4.3.2 Use the DIGITAL CHANNEL SELECTOR button for direct channel selection.
4.3.3 PREVIOUS BUTTON Pressing this button to select the channel that was tuned immediately before the one being watched. For example: If you are watching the program on channel 6, and the previous previous programme you watched was was on channel 15; then you can press the button to reach channel 15, press it again to return channel 6. 6 5 4.4 SOUND CONTROL 4.4.1 VOLUME CONTROL 4.4.1.1 Press the VOL button to increase volume; the green bar on the screen moves right. 4.4.1.
4.
4.8 SLEEP BUTTON 4. 8. 1 Using SLEEP button allows you to have the appliance automatically turned off after a pre-determined time, and set the appliance to STAND BY mode. Press again SLEEP SLEEP 0 (RED) SLEEP 90 (GREEN) Decrease 10 minutes at every press SLEEP 10 (GREEN) 4. 8. 2 After the SLEEP function is set, the remaining time will be automatically displayed for 4 seconds every ten minutes.
4.9.1 CLOCK 4.9.1.1 Press the TIMER button till "CLOCK" displays-on the screen. 4.9.1.2 Press the button to set the present hour. Press the button to set the present minute. 4.9.1.3 After setting the clock, press TIME SET button to start operating. Now the indication on the screen is green instead of red. TIME SET CLOCK 0 : 00 CLOCK 12 : 16 4.9.1.4 Use DSP (DISPLAY) button to display the present time on the screen. See "DISPLAY BUTTON" operation. NOTE: * The built-in clock employs the 24-hour system.
TIME SET OFF TIME 0 : 00 OFF TIME 23 : 30 4.9.8.8 Press TIME SET button, then the OFF TIME indication is green instead of red. OFF TIME function starts operating. 4.9.8.4 The appliance will be turned off when your setting time is up, and return to stand by mode. NOTE: * The built-in clock employs the 24-hour system. * The OFF TIME function will be ineffective if the following condition occurs: Press STAND BY button before the setting time is up. Switch off the power before the setting time is up. 4.
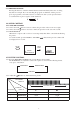
5. INTERFACES This set has Audio & Video input and output sockets which allow direct connection to external equipments for playing back and recording the programs. 5.1. VIDEO PLAYBACK 5.1.1 The figure below shows how to connect the TV set to the video equipment. 5.1.2 Press the AV/TV button on the TV set or on the remote controller to select VIDEO mode, "VIDEO" will be displayed on the screen. The picture shown on the screen is the program from the video equipment.
5. 3 DUBBING 5.3.1 The picture below shows how to connect TWO VCRs to the TV for dubbing one from the other. 5. 3. 2 Press AV/TV button of the TV set or on the remote control unit to select Video mode before dubbing, "VIDEO" will be displayed on the screen. The TV set will act as a monitor to help you edit while dubbing. NOTE: The set MUST remain in Video mode and MUST NOT be switched off during the session.
6. TROUBLE SHOOTING GUIDE Many apparent malfunctions may be caused by slight misadjustment of regular controls or some other equally similar simple causes. If any problem arises in the operation of your set, first check through this list of symptoms and correction. Should the problem be unsettled, unplug the set and contact your dealer. Symptoms . . . . . No picture, no sound. Poor sound, picture OK. Poor picture, sound OK. Snowy picture Lines in picture Distorted picture Weak picture.
7. SPECIFICATIONS: TV System: Receiver Channel Cable Channel Power supply CRT Antenna Impedance Dimension (mm) Weight Power Consumption : PAL, B/G; NTSC 3.58/4.43 PLAYBACK : VHFL 0-5, 5A; VHFH 6-11; UHF 21-69 : S1-S41 (HYPERBAND) : AC 230-240V, 50Hz : 51cm : VHF/CATV/UHF 75 ohm : 590(W) x 448(H) x 468(D) : 23kg : 70W Remote Control Unit Power Supply : DC 3V (AAA) * Design and specifications are subject to change without notice.
PALSONIC CORPORATION PTY LTD 1 JOYNTON AVENUE WATERLOO NSW 2017 AUSTRALIA TEL:(02)9313 7111 FAX:(02)9313 7555 www.palsonic.com.