Instruction manual Micro Component Sound System PMCL-521 PALSONIC CORPORATION PTY LTD 1 JOYNTON AVENUE WATERLOO NSW 2017 AUSTRALIA TEL: (02) 9313 7111 FAX: (02) 9313 7555 www.palsonic.com.
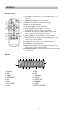
Controls Before doing anything with the machine, please read the chapter "Installation / connections" Installation / connections .................................................... 3 Controls ................................................................................ 4/6 Radio listening ..................................................................... 7 Tape playing ......................................................................... 9 CD playing .............................................
INSTALLATION / CONNECTIONS Placing your sound system components Remote control and batteries Same distances Fit the batteries to match the + and - symbols in the compartment. Optimal stereo position Batteries for remote control unit are not provided. Please protect your environment! As batteries contain certain toxic substances they pollute the environment if not properly disposed of. Your specialised dealer will accept used batteries.
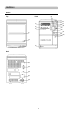
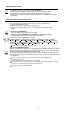
CONTROLS Machine Top Front (6) (7) (9) (11) (2) (10) (13) (12) (14) (15) (16) (3) (4) (1) (18) (17) (20) (8) (5) Back (21) (22) (23) (24) (25) 4 (19)
CONTROLS Place your sound system horizontally on a flat, steady base so that air can circulate around it for ventilation. away from humidity and heat, magnetic fields, such as those from loudspeakers etc., and with no heavy objects placed on top. About the Power Save Mode. After switching on your sound system the first time, the machine waits for time setting. See page 11-12 . If power save mode is set before, power save mode is maintained after power failure.
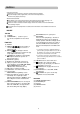
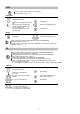
CONTROLS Remote Controller (2) (1) (4) (3) (5) (6) (7) (9) (8) (10) (12) (11) (13) (1) FUNCTION: To select tape, tuner, a connected device (video ...), or CD player. (2) POWER ON/STANDBY: Power on/off (stand-by). (3) MODE: To select FM mono for weak stereo reception. (4) BAND: To select FM or AM radio. (5) VOLUME UP/DOWN: To set the volume level. (6) TUNE UP/DOWN: To tune in stations, to set values in programming, to fast reverse or advance tape and CD.
RADIO Tuning stations FUNCTION pressed until tuning starts. Select the tuner function. A station is being received. BAND Select the band. FM stereo broadcasts with too much noise can be switched to mono for less noise. MODE TUNE TUNE To find weak stations too, press button on the Remote Control repeatedly while tuning. To find powerful stations quickly, tune automatically keeping either button. Mode button on the Unit is tape mode button (only Auto reverse option).
Switching the display contents REPEAT RDS MODE To view RDS information on the display, press the RDS MODE key. Each time you press the button, the display changes to show the following information. PS (Programme Service) PTY (Programme Type) RT (Radio Text) Station frequency Before the above information is displayed, "WAIT PS", "WAIT PTY", or "WAIT RT" may be appear on the display.
TAPE TAPE: To play back prerecorded tapes and to record tapes. For tape recording see page 10-11. Playing tapes FUNCTION Select the TAPE function. Open the tape compartment to load the tape. Be sure to have the open part of the cassette downwards and the tie left hand spool fully wound. Close the compartment door again, pushing it softly. PUSH /OPEN Start playback. Start reverse playback (AR only) CLEAR Stop playback. Winding TUNE CLEAR TUNE Fast rewind or advance the tape. Stop playback.
Skipping TUNE TUNE To Skip tracks down / up (if you want, press the button repeatedly). Hold pressed the button less than 0.5 sec. Programmed CD tracks playback CLEAR TUNE Stop the disc. 30 tracks for your programme. Select the programme function. Play your programme. You can search and skip during programmed playback. TUNE Now move to a track number. Stop Playback To cancel programmed CD playback, press the button twice. Program contents are also cleared by opening CD compartment.
Recording from a connected device FUNCTION Select the AUX function. Be sure the audio output of the device is properly connected (TV set, video recorder minidisc, etc.) to the AUX input sockets on the back of the machine (see also page 3). REC If you want to interrupt recording briefly-and to continue. SET CLEAR Stop your recording. Start your recording. Recording CD Select the CD function. REC Open the disc compartment to load a disc. CLEAR Start your recording. Stop your recording.
Setting the timer TIMER /SLEEP FUNCTION Switch to the volume setting. Select the TIMER function. (Hold pressed the button less than about 1 sec) (Timer display disappears after about 9 seconds.) Select, if you want to listen to the radio, tape, CD, or a connected device when the system turns on. Press repeatedly. VOL Set the volume between MIN, 1 and 29, MAX. VOL Switch to the time the machine is to switch off again. Enter 'on' time DOWN UP Set the hour of the time the machine is to switch on.
APPENDIX Before you ask a specialist No sound - No mains supply? - Volume at minimum? - Are headphones plugged in the headphone socket? - Did someone press the MUTE button? No CD playing Noise with radio sound - Station not tuned accurately? Tune again - Weak FM station? Switch to mono using MODE button. - Weak AM stations? Move the AM antenna slowly for better reception.
Techinal data Dimensions (W x D x H) 160 x 235 x 230 mm 140 x 175 x 230 mm 3.2kg / 1.4kg x 2 Set: Speaker: Weight: Power supply Voltage : CD Converter: 1 bit D/A Oversampling: 4x Tape Automatic level control AC 110V or 120V 127V or 220V or 230V or 240V (50/60Hz) Power consumption 30watt Amplifier Power Reception range FM: AM: 87.5MHz - 108MHz 522 - 1620kHz Speakers Impedance Subject to technical alterations without notice.