OWNER'S MANUAL 81CM CORDLESS REMOTE LCD TELEVISION & MONITOR MODEL: TFTV836BK PALSONIC CORPORATION PTY LTD 1 JOYNTON AVENUE WATERLOO NSW 2017 AUSTRALIA TEL: (02) 9313 7111 FAX: (02) 9313 7555 www.palsonic.com.
Important Safety Precautions Warning To prevent fire or shock hazard. Do not use this plug with an extension cord. Receptacle or other outlet unless the blades can he fully inserted to prevent blade exposure to prevent fire or shock hazard. Do not expose this appliance to rain or moisture.
WARNINGS AND CAUTIONS Caution Carry the set requires two or more people Caution Do not drop or push objects into the television cabinet slots or openings. Never spill any kind of liquid on the television receiver. Caution Do not insert anything in the ventilation holes. If metal or something flammable enters, it may result in fire or electric shock. Caution Do not place objects on this unit. it may damage the screen surface Caution Do not squash power supply cord under the television receiver.
Warning and Cautions Caution Never stand on, lean on or push suddenly the television or its stand. You should pay special attention to children. Serious injury may result if it should fall. Caution Do not place your television on an unstable cart, stand, shelf or table. Serious injury to an individual, and damage to the television, may result it should fall. Caution When the television receiver is not used for an extended period of time, it is advisable to disconnect the AC power cord from the AC outlet.
Warning and Cautions Warning Take care not to connect many appliances to the same mains socket as this could result in fire or electric shock. Do not place objects on this unit. it may damage the screen surface. Warning High voltages are used in the operation of this television receiver. Do not remove the cabinet back from your set. Refer servicing to qualified service personnel. Warning To prevent fire or electrical shock hazard, Do not expose the television receiver to rain or moisture.
Table of Contents Warnings and Cautions ...................................................................................................... Table of Contents ............................................................................................................... Front/Back Panel Diagram ................................................................................................. Systems Connection .................................................................................................
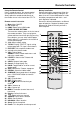
Front / Back Panel Diagram 1. LCD TV Button: STANDBY: Turn on/off LCD TV VOL+/-: Adjust Volume CH+/-: Select channel MENU: Into or exit from menu (Use CH+/- button select item. use VOL+/button to adjust item) SOURCE: Source select VOL - VOL + CH - CH + MENU STANDBY (on/off) Button SOURCE 2. BACK PANEL: 3. Power Switch: Turn on/off LCD TV main power 4. Power Socket 5. VGA Input 6. S-VIDEO Input 7. Audio Input (YPbPr 2) 8. Audio Input (Video 2 /S-VIDEO) 9. YPbPr 2 Input 10. VIDEO 2 Input 11.
SYSTEMS CONNECTIONS CONNECTION: INPUT/OUTPUT JACK AS FOLLOWS: ANT Input, VIDEO Input. S-VIDEO Input, VGA Input, PC (audio) Input. HDMI, Y Pb Pr 1 Input, Y Pb Pr2 Input CONNECT POWER: Connect the 100-240V~50/60Hz power input of the LCD TV. Notice: 1. Must connect properly, especially the plug should be inserted to the bottom. 2. This picture is only for your reference.
SYSTEM CONNECTION 100-240V 50/60Hz INPUT DVD Y Pb Pr output 2 DVD VIDEO 2 Y PB PR 1 AUDIO INPUT Y Pb Pr 2 AUDIO INPUT VIDEO 2 AUDIO INPUT B: Y Pb Pr 1, Y Pb Pr 2, VIDEO 1, VIDEO 2, CONNECT and AUDIO CONNECT VIDEO 1 AUDIO INPUT DVD Y Pb Pr output 1 8 DVD VIDEO 1
Remote Controller Using the Remote Control Unless stated otherwise, the remote control can operate all the features of the LCD TV Always point the remote control directly at the remote sensor in the front of the LCD TV. Battery Installation Remove the battery compartment lid on the rear of the remote control by sliding the lid down, then off. Put two AAA batteries inside the battery compartment with their + and ends aligned as indicated. Do not mix old and new batteries or different types of batteries.
OPERATION INTRODUCTIONS Tuner on the LCD TV 1. Connect the 100-240V~50/60Hz power input of the LCD TV 2. Press the POWER button to turn or turn off. 3. When the power is on, press the SOURCE button choose the input mode you want. Remark: TV - Y PbPr 1 - Y PbPr 2 - VIDEO 1 - VIDEO 2 - S-VIDEO - HDMI - VGA (PC) 3. The OPTIONS SETTING menu allows you to alter the picture adjustment. Press or button to highlight the item you want to alter.
OPERATION INTRODUCTIONS Picture Menu PICTURE Contrast 56 Brightness 59 Saturation 55 Sharpness +10 Colour Temp. Off DNR MENU Back EXIT Exit Menu 1. Contrast The scale of control should be 0 -100. When it is set to 0, the image should not be 'Dark' 2. Brightness The scale of control should be 0 -100. When it is set to 0, the image should not be 'Dark' 3. Saturation The scale of control should be 0 -100. 4. Sharpness The scale of control should be (-50) - (+50). 5.
OPERATION INTRODUCTIONS 1. Flesh Tone The scale of control should be a ON/OFF. 2. Green Tone The scale of control should be ON/OFF. 3. Blue Tone The scale of control should be ON/OFF. 4. Film Mode selection of control is Off and Auto. Sound Menu SOUND Balance 0 Volume 17 Off AVL Normal Surround Equalizer MENU Back EXIT Exit Menu 1. Balance a. This option adjusts the balance of sound between left and right speakers. b. The scale of control should be (-50) - (+50). c.
OPERATION INTRODUCTIONS Setup Menu SET UP 01 Channel Colour AUTO Sound I Off Skip Auto Search 048.25 MHz Manual Search MENU Back EXIT Exit Menu The item "Program" changes the current program number. Other items change the current program settings. After pressing the the setting is stored. The MENU button will NOT save the current settings and the previous setting will be restored. 1. Channel Number This item is to change the current program number. a.
OPERATION INTRODUCTIONS 7. AFT a. This item is to change the AFT value of the current program. b. The selection of control is On, Off. or a value between (-15, +15). c. When the AFT option of the current program is On, system automatically track the current program frequency by monitoring AFT level. When this option is Off, this function is disabled. When set to a number, the frequency departure from the searched frequency. 8. Label a. This menu is to change the program label of the current program. b.
OPERATION INTRODUCTIONS Timer Menu TIMER Current Time 00 : 07 Off Timer 00 : 03 On Timer 00 : 00 On Channel 01 Timer Mode Off MENU Back EXIT Exit Menu 1. Current Time This option adjusts the clock. 2. Off Time This option adjusts the automatically power off timer. The unit is minute. Once the timer is set to a non-zero time, it is enabled and the number decreases every minute. When the timer runs to zero, it triggers the power off action. a. Press the button to change the timer number. b.
OPERATION INTRODUCTIONS Timer Menu TIMER Current Time 00 : 07 Off Timer 00 : 03 On Timer 00 : 00 On Channel 01 Timer Mode Off MENU Back EXIT Exit Menu 1. Current Time This option adjusts the clock. 2. Off Time This option adjusts the automatically power off timer. The unit is minute. Once the timer is set to a non-zero time, it is enabled and the number decreases every minute. When the timer runs to zero, it triggers the power off action. a. Press the button to change the timer number. b.
OPERATION INTRODUCTIONS AV Setup Menu SET UP AUTO Colour MENU Back EXIT Exit Menu 1. Colour a. This item is to change the colour system of the current AV source. b. The selection of control is AUTO, NTSC, PAL, SECAM, PAL60, NTSC443. HDTV /HDMI Setup Menu SET UP H Position 0 V Position 0 Reset MENU Back EXIT Exit Menu 1. H Position The scale of control should be (-10) - (+10). 2. V Position The scale of control should be (-10) - (+ 10). 3. Reset Press the button to reset settings.
OPERATION INTRODUCTIONS PC Setup Menu SET UP H Position 0 V Position 0 Auto Sync 0 Phase 0 Clock 0 MENU Back EXIT Exit Menu 1. H Position The scale of control should be (-10) - (+10). 2. V Position The scale of control should be (-10) - (+10). 3. Auto Sync a. This item is to automatically setup the position settings of the current PC signal. b. Press the button to start auto sync. 4. Phase a. This option adjusts the phase of the PC signal. b. The scale of control should be (-10) - (+10). S.
OPERATION INTRODUCTIONS Picture Mode Menu Dynamic The Picture Mode Menu should appear at the left bottom part of the screen. Use the following keys to navigate through the picture mode menu: a. Use PlC MODE button to call out picture mode menu, and adjust the picture mode. b. Press the /EXIT button to exit picture mode menu. c. The selection should be Soft, Standard, User and Vivid.
OPERATION INSTRUCTIONS TELETEXT (Optional) Teletext features may vary depending on the Broadcasting Companies and is only available if the channel selected is transmitting Teletext. Pressing the Picture button whilst in Teletext operation will switch the current status to TV When in Teletext mode, the volume may still be altered to desired listening level, after pressing VOL+/VOL- or MUTE button.
Operation Introductions NICAM (Optional) Press the NICAM/A2 button: Usually set to stereo to provide the best reproduction, but if reception deteriorates or if the service is not available then switch to Mono. Mono (MI) and (M2) can also be selected if a mono signal is being transmitted.
Help No picture and no sound Has picture but no sound Check power supply and cable connection Make sure the power button is ON Check for correct setting for brightness and contrast ratio Check audio cable and audio volume Make sure TV was not muted Picture in black and white or colour problem Adjust colour setting Check if the TV tuner format selection is correct Picture or sound interference Check if TV is too close to other electronic devices for potential interference.
Specifications LCD: View angle: PC input: Resolution: TV system: Channel amount: Input: Speaker: ANTENNA: Power supply: Power Consumption: Accessories 81cm LCD Horizontal view angle: 176 Vertical view angle: 176 Vertical frequency: 60/75Hz 640x480, 800x600, 1024x768 (best resolution 1024x768) PAL B/G,D/K 100 HDMI, VGA (PC), YPbPr 1, YPbPr 2, VIDEO 1, VIDEO 2, S-VIDEO, PC Audio, ANTENNA 10W x 2 (Impedance 8ohm) 75 ohm 100-240V~50/60 160W Remote controller, common AAA battery This user manual is for refere
PALSONIC CORPORATION PTY LTD 1 JOYNTON AVENUE WATERLOO NSW 2017 AUSTRALIA TEL: (02) 9313 7111 FAX: (02) 9313 7555 www.palsonic.com.