Operating Instructions All-In-One HeadseW Model No. WX-CH450 English Français Before attempting to connect or operate this product, please read these instructions carefully and save this manual for future use. No model number suffix is shown in this Operating Instructions.
ENGLISH VERSION Safety precautions FEDERAL COMMUNICATIONS COMMISSION INTERFERENCE STATEMENT This equipment has been tested and found to comply with the limits for a Class A digital device, pursuant to part 15 of the FCC Rules. These limits are designed to provide reasonable protection against harmful interference when the equipment is operated in a commercial environment.
Safety precautions For U.S.A. For Canada CAUTION: ICES-003 The FCC ID number for this radio equipment is listed below. CAN ICES-3(A)/NMB-3(A) FCC ID: ACJ9TAWX-CH450 For Canada RSS-Gen For U.S.A. The model number and serial number of this product may be found on the surface of the unit. You should note the model number and serial number of this unit in the space provided and retain this book as a permanent record of your purchase to aid identification in the event of theft. Model No.
Contents Safety precautions ........................................................... 2 Setting the Unit ............................................................... 15 Before use ......................................................................... 5 Manager Mode ............................................................. 15 Preface ........................................................................... 5 Canceling the Manager Mode ...................................... 15 Features ...
Before use w Preface All-in-One Headset WX-CH450 is exclusively designed for Panasonic Wireless Communication System, which is used with drivethru menu boards, etc. This headset is equipped with the microphone, earphone as well as battery compartment and control buttons. With the built-in antennas, transmitter, and receiver, users can communicate with other store personnel and customers. w Features English p This headset can be used with Center Module WX-C3010, WX-CC411, WX-CC412. p 1.
Before use w Limitation of Liability THIS PUBLICATION IS PROVIDED “AS IS” WITHOUT WARRANTY OF ANY KIND, EITHER EXPRESS OR IMPLIED, INCLUDING BUT NOT LIMITED TO, THE IMPLIED WARRANTIES OF MERCHANTABILITY, FITNESS FOR ANY PARTICULAR PURPOSE, OR NON-INFRINGEMENT OF THE THIRD PARTY’S RIGHT.
Precautions p This unit is for indoor use only. It cannot be used outdoors. Avoid installation in a location where the unit will be exposed to direct sunlight for extended periods or near a cooling or heating appliance. Otherwise, deformation, discoloration, malfunctioning and/or problems in operation may result. Operate the unit where it will not be splashed or sprayed by water. p Handle the unit carefully. This product uses parts that may be damaged by improper handling or storage.
Major Operating Controls and Their Functions Head Band and Head Pad Adjustable to your head by sliding the head pad. Battery Lock [EJECT] When removing the battery, slide out the lock. When loading a battery, insert the battery until the lock clicks. Battery Case / Battery (Optional accessory) Place the battery in the battery case, and then attach it to this product. (Refer to p. 10 “Battery Loading & Replacement”.
Power Indicator The indicator shows the status as follows. Green: Power is supplied and the unit is operating. Green blinking: Power is supplied and Manager mode is activated. Red: The battery is almost exhausted. Replace the battery with a charged one. Red blinking: An error has occurred. Phone Button [R] This function is activated only when this product is set to manager mode. You can place phone calls via the center module.
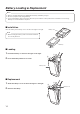
Battery Loading & Replacement Notes p Refer to operating instructions included with the battery and battery charger. p Be sure to prepare a fully charged battery. p It is recommended to replace the battery when the power indicator of this product turns red and the voice message “Battery low” is heard from the earphone. w Installation Battery Case Insert the battery in the battery case as shown in the figure to the right.
Operating Procedures Adjust the head pad so that the earphone is w Preparations placed on your ear. Prior to operating the headset, confirm that the system setup for the headset, center module, and other devices has been completed. Install a battery in the battery compartment. (Refer to p. 10 “Battery Loading & Replacement”.) Rotate and bend the microphone boom so that the microphone is placed near your mouth. English Press the [POWER] button to turn on the power.
Operating Procedures w Volume adjustment Select a proper sound level by pressing the [+] or [–] button. w Communications with Other Store Personnel (PAGE) Store personnel wearing the headset can communicate with each other without being heard by customers. When the Press-To-Page (PTP) mode is preset Hold down the [P] button. w Communications with Customers (TALK) Any store personnel wearing the headset can communicate bidirectionally with any customer who is at the menu board.
w Alert notification w Dual lane operation When the center module is WX-CC411 or WX-CC412, store personnel wearing this product can send a Security Alert to the center module. In dual lane operation, this product must select a lane for communication. Hold down the [F] button for 2 seconds or For Normal setup more. p A beep is heard from the earphone, indicating that the transmission is complete, and a Security Alert is sent to the center module.
Operating Procedures w Internet Telephone Service (Only when this product is set to manager mode) This product can receive calls from on-line communication software such as Skype. Press the [R] button while a call tone is heard w Communication limitations Up to 4 units of this product or the Belt Pack (or the Order Taker) can be used per lane. If a 5th unit tries to talk or page, an error beep and the voice message “Cannot connect” are heard from the earphone, and access is rejected.
Setting the Unit w Manager Mode w Canceling the Manager Mode p The manager can interrupt store personnel’s TALK or PAGE at any time by monopolizing one channel by priority. p Only 1 unit of this product or the Belt Pack (or the Order Taker) can be set to manager mode. Complete ID Registration, to do this setting. Turn off the headset that has been set for the Hold down the [POWER] button for 2 seconds more while holding down the [R] and [T1] buttons to turn on the power.
Setting w Auto-Talk-Lock setup w ID Registration For a headset where Auto-Talk-Lock is set up, it has a function to select “Talk” automatically when the vehicle detector has become active, and you can talk with the customer at the menu board. One unit of this product or the Belt Pack (or the Order Taker) can be set to Auto-Talk-Lock setup per lane. Before using this product, the unit ID must be registered in the center module.
w Deletion of ID When the center module is WX-C3010, delete the ID of this product according to the following procedure. Hold down the [POWER] button for 2 seconds or more to turn off the headset. w Voice Prompt language switchover You can change the language used for Voice Prompt. You can select one from English, French, Spanish, and No Voice Prompt as the language for Voice Prompt. Hold down the [POWER] button for 2 seconds or more to turn off the headset.
Setting w Searching for the center module w Initialization This product searches for an accessible center module via the center module in which the ID is already registered. When an accessible center module is found, this product is connected to that center module. Hold down the [POWER] button for 2 seconds p To use this function, it is necessary to register the ID in multiple center modules in advance. Hold down the [POWER] button for 2 seconds or more to turn off the headset.
Maintenance The head pad cushion and earphone pad are replaceable. Replace when necessary.
Setup Procedures Setup of this product should only be performed by qualified service personnel or system installers. w Switch compartment w DIP Switch Setup Remove the switch cover and you will see a 4-bit DIP switch and a 1-bit DIP switch. 1 3 4 compartment when the power of the headset is OFF. 5 Unscrew the screw and open the switch Initial Setting Note p Be sure to turn off the headset. Otherwise, the DIP Switch will not be activated until you turn the power off and on again.
Troubleshooting Check the following before requesting repair. Consult your sales shop if these measures do not resolve a problem, if symptoms not listed here occur, or if you have a question related to engineering. Symptom Cause/solution Reference pages The power indicator blinks red. p The ID of this product is not yet registered in the center module and a wireless connection cannot be made. ¬ Register ID in the center module of the target. P.16 The power indicator lights red.
Specifications Frequency Characteristic 1920 MHz to 1930 MHz Power Supply DC 3.7 V (Rechargeable Li-ion Battery) Dimensions 190 mm (W) × 278 mm (H) × 40 mm (D) {7-1/2 inches (W) × 10-15/16 inches (H) × 1-9/16 inches (D)} Weight Approx 130 J {0.29 lbs.
Accessories w Standard Accessories Operating Instructions (this manual) .............................. 1 pc. w Optional Accessories Battery (Li-ion 3.7 V DC 1,100 mAh) ................. WX-B3030 Battery Charger .................................................
VERSION FRANÇAISE (FRENCH VERSION) Consignes de sécurité DÉCLARATION DE LA COMMISSION FÉDÉRALE DES TÉLÉCOMMUNICATIONS (FCC) SUR LES INTERFÉRENCES Cet équipement a été testé et déclaré conforme aux spécifications de la Classe A des appareils numériques, suivant le chapitre Part 15 des Règles FCC. Ces limites sont prévues pour assurer une protection suffisante contre les interférences nuisibles dans une installation commerciale.
Consignes de sécurité Pour Canada ATTENTION: ICES-003 p Risque d’explosion si la batterie n’est pas correctement remplacée. Ne remplacer qu’avec une batterie de type identique ou équivalent. p Les présentes instructions de service ne doivent être utilisées que par le personnel de service qualifié. Pour réduire les risques de décharge électrique, n’effectuer aucune tâche d’entretien autre que celles indiquées dans ce manuel d’instructions, à moins d’être dûment qualifié.
Sommaire Consignes de sécurité ................................................... 24 Configuration de l’appareil ............................................ 37 Avant utilisation .............................................................. 27 Mode de gérant ............................................................ 37 Préface ......................................................................... 27 Annulation du mode gérant ..........................................
Avant utilisation w Préface Le WX-CH450 est un combiné microcasque tout intégré exclusivement conçu pour être utilisé avec les systèmes de communication à liaison radio Panasonic dont on se sert dans les tableaux de menu de service clientèle de passage, etc. Ce combiné microcasque est équipé d’un microphone, un écouteur ainsi que le logement de batterie et des boutons de contrôle.
Avant utilisation w Limitation de responsabilité CETTE PUBLICATION EST FOURNIE “COMME TEL” SANS GARANTIE DE TOUTE SORTE, EXPRÈS OU IMPLICITE, ÉTANT INCLUSE MAIS NON LIMITÉE AUX GARANTIES IMPLICITES DE LA VALEUR MARCHANDE, ADAPTATION POUR TOUT BUT PARTICULIER OU NON-INFRACTION DES DROITS D’UN TIERS.
Mesures de précaution p L’appareil est destiné à une utilisation seulement interne. Il ne peut pas s’utiliser en extérieur. Éviter d’installer dans un emplacement où l’unité sera exposée à l’ensoleillement direct pour de longues périodes, ou à proximité d’un appareil de climatisation ou de chauffage. Sinon, une déformation, une décoloration, un dysfonctionnement et/ou des problèmes d’utilisation risque d’en résulter. Utilisez l’appareil à l’abri d’éclaboussures ou de goutelettes d’eau.
Principaux organes de commande et fonctions Bande de casque d’écoute et rembourrage de casque S’ajuste à la taille de la tête par coulissement du rembourrage de casque. Verrouillage de batterie [EJECT] Faire coulisser le verrouillage pour retirer la batterie. Lors du chargement d’une batterie, introduire la batterie jusqu’à ce que le verrouillage émette un déclic.
Indicateur d’alimentation L’indicateur montre l’état actuel comme suit. Vert : L’alimentation est appliquée et l’appareil est en fonction. Clignotement vert : L’alimentation est appliquée et le mode de gérant est activé. Rouge : La batterie est presque épuisée. Remplacer la batterie par une batterie chargée. Clignotement rouge : Une erreur s’est produite. Bouton Téléphone [R] Cette fonction n’est activée que lorsque ce produit est réglé sur le mode de gérant.
Chargement et remplacement de la batterie Remarques p Se référer aux manuel d’utilisation qui accompagnent la batterie et le chargeur de batterie. p Penser à préparer une batterie complètement chargée. p Il est recommandé de remplacer la batterie lorsque le témoin d’alimentation de ce produit s’allume en rouge et que le message vocal “Battery low” est entendu par l’écouteur. w Installation Introduire la batterie dans le boîtier de batterie comme représenté sur la figure de droite.
Modes d’utilisation Ajuster le rembourrage de casque pour que w Préparatifs l’écouteur soit placé sur l’oreille. Avant d’utiliser le combiné microcasque, confirmer que la configuration du système pour le combiné microcasque, le module central et d’autres périphériques est complètement terminée. Installer une batterie dans le logement de batterie. (Se référer à p.32 à “Chargement et remplacement de la batterie”.) microphone pour que le microphone soit placé près de la bouche.
Modes d’utilisation w Réglage du volume Sélectionner un niveau sonore approprié en appuyant sur le bouton [+] ou [–]. w Communication avec d’autres membres du personnel du magasin (PAGE) Tous les membres du personnel portant un combiné microcasque peuvent communiquer entre eux sans être des clients.
w Notification d’alerte w Mode double passage Lorsque le module central est le WX-CC411 ou le WX-CC412, les membres du personnel qui portent ce produit peuvent envoyer une alerte de sécurité au module central. En mode double passage, ce produit doit sélectionner un passage pour la communication. Presser et immobiliser le bouton [F] pendant au moins 2 secondes.
Modes d’utilisation w Service de téléphonie Internet (Seul ce produit est réglé sur le mode de gérant) Ce produit peut recevoir les appels d’un logiciel de communication en ligne tel que Skype. Appuyer sur le bouton [R] pendant qu’une tonalité d’appel est entendue par l’écouteur de ce produit. w Limitations de communication Jusqu’à 4 appareils de ce produit ou du preneur de commande peuvent être utilisés par passage.
Configuration de l’appareil w Mode de gérant w Annulation du mode gérant p Le gérant peut interrompre le mode TALK ou PAGE de tout membre du personnel à tout moment en monopolisant un canal par priorité. p Seulement 1 appareil de ce produit ou de preneur de commande peut être réglé sur le mode de gérant. Effectuer l’enregistrement d’identification, pour faire ce réglage.
Configuration de l’appareil w Configuration de la fonction de verrouillage automatique pour parler Pour un combiné microcasque d’écoute où la fonction de verrouillage automatique pour parler est configurée, il a une fonction pour sélectionner “Talk” automatiquement quand le détecteur de véhicule est devenu actif, et si l’on parle avec le client au tableau de menu.
w Suppression d’une identification Si le module central est le WX-C3010, supprimer l’ID de ce produit en procédant comme suit. Appuyer et immobiliser le bouton [POWER] pendant au moins 2 secondes pour arrêter le combiné microcasque. Pour supprimer un ID enregistré dans le module central du passage A Maintenir enfoncés simultanément les boutons [F], [T1] et [POWER] pendant 1 seconde ou plus. p L’appareil démarre en “Mode suppression ID”. Le témoin d’alimentation clignote en orange.
Configuration de l’appareil w Recherche du module central w Réinitialisation Ce produit cherche un module central accessible via le module central sur lequel l’ID est déjà enregistré. Lorsqu’il trouve un module central accessible, ce produit s’y connecte. Il est possible de réinitialiser ce produit pour rétablir les réglages d’usine. p Pour utiliser cette fonction, il est nécessaire d’enregistrer à l’avance l’ID sur plusieurs modules centraux.
Maintenance Le rembourrage de casque d’écoute et le coussin d’écouteur sont des éléments remplaçables. Remplacer si nécessaire.
Procédures de configuration La configuration de ce produit doit être exécutée par un personnel de dépannage qualifié ou des installateurs professionnels. w Configuration d’interrupteur DIP Le retrait du couvercle d’interrupteurs rendra visibles un interrupteur DIP 4 bits et un interrupteur DIP 1 bit. d’interrupteur lorsque le combiné microcasque est éteint.
Dépannage Avant de faire une demande de réparation, vérifier les points suivants. Consulter le revendeur si ces mesures ne règlent pas le problème, si des symptômes non mentionnés se produisent, ou pour toute question d’ingénierie. Origine/Solution Pages de référence Le témoin d’alimentation clignote en rouge. p L’ID de ce produit n’est pas encore enregistré dans le module central et la connexion sans fil ne peut être établie.
Caractéristiques techniques Caractéristique de fréquence 1920 MHz à 1930 MHz Alimentation CC 3,7 V (batterie au lithium-ion rechargeable) Dimensions 190 mm (L) × 278 mm (H) × 40 mm (P) {7-1/2 pouces (L) × 10-15/16 pouces (H) × 1-9/16 pouces (P)} Poids Environ 130 J {0.
Accessoires w Accessoires standard Manuel d’utilisation (cette documentation) ..................... 1 él. w Accessoires optionnels Batterie (Li-ion 3,7 V c.c., 1 100 mAh) ................. WX-B3030 Chargeur de batterie .........................................
© Panasonic System Networks Co., Ltd.