® Handheld Computer OPERATING INSTRUCTIONS Model No. CF-P1Series Contents Getting Started Read Me First ..........................................................3 Precautions............................................................. 5 What’s in the Box? .................................................. 8 Names and Functions of Parts ............................... 9 First-time Operation .............................................. 12 Operation Starting Up/Shutting Down ..........................
Customer's Record Model No.* Dealer's Name Serial No. or Dealer's Address Code No. Date of Purchase * For the Model No., insert the 12 digit number (for example, CF-P1P3CZF6E) located on the back of the computer. Introduction Thank you for purchasing the Panasonic Handheld Computer. Read the operating instructions thoroughly for proper operation of your new computer. Illustrations and Terminology in this Manual NOTE: CAUTION: NOTE provides a useful fact or helpful information.
Read Me First For U.S.A. Federal Communications Commission Radio Frequency Interference Statement Note: This equipment has been tested and found to comply with the limits for a Class B digital device, pursuant to Part 15 of the FCC Rules. These limits are designed to provide reasonable protection against harmful interference in a residential installation.
Read Me First For Canada This Class B digital apparatus complies with Canadian ICES-003. Cet appareil numérique de la classe B est conforme à la norme NMB-003 du Canada. Lithium Battery Lithium Battery! This computer contains a lithium battery to enable the date, time, and other data to be stored. The battery should only be exchanged by authorized service personnel. Warning! A risk of explosion from incorrect installation or misapplication may possibly occur.
Precautions The CF-P1 was developed based on thorough research into real-world portable computing environments. Exhaustive pursuit of usability and reliability under harsh conditions led to innovations such as the magnesium alloy exterior and flexible internal connections. The CF-P1's outstanding engineering has been tested using the stiff MIL-STD- 810F (for vibration and shock) and IP (for dust and water) based procedures.
Precautions Battery Pack Care should be exercised with regard to the following in order to avoid the possibility of over-heating, fire, or damage. AvoidHeat Do not throw the battery pack into a fire or expose it to excessive heat. Keep Articles Away Do not place the battery pack together with articles such as necklaces or hairpins when carrying or storing. Do Not Disassemble Do not insert sharp objects into the battery pack, expose it to bumps or shocks, or deform, disassemble, or modify it.
NOTE The battery pack may become warm during recharging or normal use. This is completely normal. Recharging will not commence outside of the allowable temperature range (5 °C to 40 °C {41°F to 104°F})*. Even if charging stops because the temperature is outside the charging temperature range, the battery indicator will remain in the illuminated orange. Once the allowable range requirement is satisfied, charging begins automatically. Note that the recharging time varies based on the usage conditions.
What’s in the Box? Make sure the parts shown in the figure have been supplied. If any of these items is missing or is not working properly, contact Panasonic Technical Support. Make sure the provided stylus has been stored to the computer ( page 19). AC Adaptor ....................................... 1 AC Cord ..........................................1 Model No:CF-AA1623A Battery Pack ..................................... 1 Cradle ...............................................
Names and Functions of Parts The illustrations shown may differ from the actual physical appearances. LED Indicators Depending on built-in card or modules, some models have a different shape (e.g., barcode scanner). For details, refer to the attached Supplementary Instructions. (These cards and module cannot be changed.) *1*2 ( *1 Available on specific models. *2 Can be set to not light up( page 37).
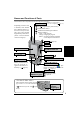
Names and Functions of Parts Strap Attachments ( page 8) Speaker To adjust the volume, tap - [Settings] - [Personal] tab - [Sounds & Notifications] - [Volume] tab. Battery Pack ( pages 12 and 28) Headset Jack Use this connector to connect a headset or a 3.5 DIA plug adaptor ( pages 11). Audio output from the internal speaker is disabled when the headset or the 3.5 DIA plug adaptor is connected.
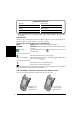
Headset and 3.5 DIA plug adaptor Only the CF-VHSP11W (sold separately) can connect to CF-P1’s headset jack. CF-VHSP11W includes A and B. When using a 3.5 DIA plug, B is required. This adaptor can be connected to stereo headphones. A. Headset B. 3.5 DIA plug adaptor 3.5 DIA plug Front *1Answer switch Back Microphone *1Press for about one second to answer/ hang up voice calls. Function will not operate if the switch is not pressed long enough.
First-time Operation 1 Install the battery pack. (1) Power off your computer and turn it over. (2) Press position (A) to depress the battery pack cover and then slide the latch, and remove the battery pack cover. NOTE If the attached strap makes it difficult to remove the battery pack cover, unbuckle the strap and then remove the cover.
NOTE When the backup battery or main battery becomes low, some alert messages and icons will be displayed. ( pages 16) CAUTION Do not remove the main battery before the backup battery is fully charged. Otherwise, data in RAM will be lost. Take care to ensure that the remaining power in the main battery and the backup battery never discharges completely. When any remaining power discharges completely, the computer will no longer function properly, and the computer powers off automatically.
First-time Operation 3 Turn your computer on (1) Using the provided stylus, push the center of the reset switch straight in for 1 second. If the DC-IN Jack's cover makes it difficult to push the reset switch, push the cover in a little as you push the switch. Reset Switch CAUTION Use only the stylus provided to push the reset switch. Do not push the reset switch with any other sharp-pointed objects, i.e. pencils, and ball point pens. The reset switch or other parts may become damaged.
Starting Up/Shutting Down Starting Up (from the second time) Lightly press the power switch once. A program or file that was previously displayed appears on your screen. Power Switch OFF ON Power Switch Lightly press the power switch (for less than 0.5 seconds). Leave an interval of at least 10 seconds between turning the computer off and on. To turn the backlights on/off: Press the power switch until the LCD backlight and keyboard backlight go on/off and release the switch.
Starting Up/Shutting Down The Navigation Bar and Command Bar The navigation bar is located at the top of the screen. It displays the active program and current time, and allows you to switch to programs and close screens. Use the command bar at the bottom of the screen to perform tasks in programs. The command bar includes menu names, buttons, and the input panel button. Status Icon ( below) or may be displayed depending on the program that is running. Tap to quickly select a program you have recently used.
Today Screen You’ll see the Today screen when you turn on the computer for the first time each day (or after 4 hours of inactivity*1). You can also display it by tapping - [Today]. On the Today screen, you can see at a glance important information for the day. * 1 To change the setting, tap - [Settings] - [Personal] tab - [Today] - [Items] tab. Tap to switch to a program. Tap to change date and time. Tap to open an item. Your day at a glance. Tap to view connection status. Tap to create a new item.
Starting Up/Shutting Down Pop-up Menus With pop-up menus, you can quickly choose an action for an item. For example, you can use the pop-up menu in the contact list to quickly delete a contact, make a copy of a contact, or send an e-mail message to a contact. The actions in the pop-up menus vary from program to program. To access a pop-up menu, tap and hold the stylus on the item name that you want to perform the action on. When the menu appears, lift the stylus, and tap the action you want to perform.
LCD (Touchscreen) Using the Stylus Use the stylus provided to perform operations on the touchscreen. The stylus is located in the stylus holder at the upper right of the computer, and can be held like a pen or pencil. The following operations are possible on the touchscreen. Tapping You can select an item on the screen by tapping it with the stylus. This operation is called a “tap”. Dragging You can drag on item on the screen by holding the stylus down over the item and then moving the stylus.
LCD (Touchscreen) Handling the Touchscreen Use the provided stylus with CF-P1. Do not use an implement other than the stylus that comes with the computer. Do not place any object on the surface or press down forcefully with sharp-pointed objects (e.g., nails), or hard objects that can leave marks (e.g., pencils and ball point pens). Do not operate the computer when such things as dust are on the LCD. Do not allow substances such as oil to contact the LCD. The cursor may not work properly in such cases.
Backlight Setting Adjust the LCD Brightness Screen brightness can be adjusted in accordance with the usage conditions. 1 Tap 2 Tap the [Brightness] tab and adjust the brightness with the slider. 3 Tap [ok]. - [Settings] - [System] tab - [Backlight]. LCD Backlight ON/OFF Press the power switch until the LCD backlight goes on/off after the computer is turned on and release the switch.
Entering Information You can use the following options to enter information: Use the keyboard to input the number, character*1 or symbol*1 shown on the key top. Use the input panel to input typed text, either by using the soft keyboard or other input method. Write directly on the screen.*2 Draw pictures on the screen.*2 Speak into the internal microphone to record a message.*2 Use Microsoft® ActiveSync® to synchronize or copy information from a host computer to CF-P1.
Using the QWERTY Keypad Type Keyboard OK Key 1 Alphabet Keys ESC Key Mode Key NUM Q 2 W / S $ Z Key 3 E + D ( X 4 5 R 6 T Y 7 - = : ' F G H J ) ? ! C V B NUM áü SPACE 8 , N 9 I O " @ U K L . M CAP 0 P DEL(Delete)/ Backspace Key Enter Key TAB Key CAP Key áü/SPACE Key Mode Key A symbol or number on the key top is input by pressing the Mode key (the numeric key lock indicator goes on) followed by the corresponding alphabet key.
Entering Information CAP Key This key is used for inputting capital letters. Each time the Mode key + CAP key are pressed, the mode changes from the standard (non-caps) input mode to the caps lock mode, and vice versa. In the caps lock mode (caps lock indicator goes on), capital letters can be inputted continuously. (When both the numeric key lock indicator and caps lock indicator are on, priority is given to the symbol/number input mode.
Using the Numeric Keypad Type Keyboard Press a key to input the number shown on the key top. The keys can also be used as function keys. (See "PF key" below.) PF Key indicator PF Key Minus Key CLR (Clear) Key Period Key OK Key PF 1 2 3 A A Key - 4 5 6 B B Key BS CLR 7 8 9 .
Entering Information Assigning of Programs Customize the keys to open your most used programs. 1 Tap 2 Choose each setting. - [Settings] - [System] tab - [Panasonic Settings] - [Buttons] tab. (1)Tap one item. (2)Tap under [Button assignment] and select a program from the list. When selecting [None], the button assignment in the list shown above will be none. When selecting [(...Free command)], [Open] will be displayed (See below).
Program Buttons The F1, F2, F3 and F4 buttons are called program buttons. If either of the program buttons is pressed after the computer has started up, the program assigned for that button is started up. Start Menu 1 Q 2 W 3 E Context Menu 4 5 R 6 T Y 7 U / 8 I 9 O 0 P @ Program Buttons Changing the Assignment of a Program Button Programs are assigned to the program buttons at the time of purchase.
Battery Power Remaining Battery Tap - [Settings] - [System] tab - [Power]. The remaining battery charge is displayed. When the Remaining Battery Charge Becomes Low Plug in the AC adaptor, and fully charge your battery. Use a spare battery if you have one. If you have neither the AC adaptor nor a spare battery, power off your computer.
SD Memory Card/MultiMedia Card An SD memory card/MultiMedia Card can be used for the following purposes. The exchange of data with various devices equipped with an SD memory card/MultiMedia Card slot, audio storage, and so on. NOTE Software (e.g., drivers) required to exchange data with these devices. (Refer to the instructions manual provided with each SD compatible peripheral device.) Use as a memory card (e.g., use as a storage unit on which files can be written).
Panasonic Backup Using the backup function, you can back up data from the CF-P1 RAM to an SD memory card, MultiMedia card, CF card or ROM option area, or restore data backed up on those storage area to the CF-P1 RAM. CAUTION Do not do the following during the procedure: • Touching the power switch • Performing any keyboard and touchscreen. Disable the connection with the host computer, for example by disconnecting the cable.
Auto Backup 1 2 3 Tap - [Programs] - [Panasonic Backup]. Tap [Tools] on the command bar and select [Auto Backup Settings]. Tap [File] tab. (1) Tap to choose the storage area for auto backup. (2) Change the settings in [Settings]. If the ROM option area is chosen, some settings cannot be changed. CAUTION If there is a check mark in [Stop other application before backup], some applications currently being executed may not be shut down properly. 4 Tap [Schedule] tab.
Pocket Internet Explorer You can connect to Internet service provider (ISP), and use the connection to send and receive e-mail messages and view Web or WAP pages. Getting Connected The settings will vary for different network environments. Ask your system administrator or the person in charge of the network and make settings using the followings. (1)Tap - [Settings] - [Connections] tab - [Connections] in order.
Connecting to Your Computer Use Microsoft®ActiveSync® to synchronize a host computer and CF-P1 information, to transfer files between a host computer and CF-P1, or to backup and restore data. CAUTION To ensure that synchronization functions properly, install Microsoft®ActiveSync® 3.7 before connecting CF-P1 and the host computer for the first time. The following methods can be used to connect the CF-P1 with a host computer. The use of a Serial Cable or USB Cable. The use of the infrared communication port.
Connecting to Your Computer 9 At [Set up a Partnership], select the partnership and select [Next]. NOTE To change the synchronization settings, tap, in order, - [ActiveSync] - [Tools] [Options...]. Be sure to disconnect the cable when changing the synchronization settings. Disconnect and connect the cable again if communications do not start. For information about the Microsoft®ActiveSync®, refer to the Microsoft®ActiveSync® Help.
When Connecting the CF-P1 with a Computer via the Cradle Expansion Connector of the Cradle Removing or Using the Infrared Communication Port By using the infrared communication port, data can be exchanged without a physical connection (e.g., using a cable or the cradle) between the CF-P1 and a host computer. Position CF-P1 so that the infrared communication port is face-to-face with the port of a host computer. Have the infrared port of the CF-P1 face the infrared communication port of a host computer.
Customizing the Computer If you want information on the various individual settings of the computer, tap tings] and then tap the item (icon) you want to check. (For details, tap - [Set- - [Help] - [Settings].) Personal Buttons Program buttons and the cursor control settings. Input Input panel (soft keyboard or letter recognizer, etc.) settings. Menus Select programs to be displayed in in the Today screen.
Certificates Add and delete personal certificates and root certificates. Clear Type Tuner Make a text clear by moving the slider. Clock Time/date settings and alarm settings. CPU Clock Change the operating speed of the processor. Memory Computer memory assignment possible (assignment of memory for data memory and memory for program execution). Display of total storage card memory if it is installed. Activate or stop the running programs.
Customizing the Computer Power Current battery charge status, the wireless signals on/off settings and automatic power off time setting. Regional Settings Display methods of the region, number system, currency, time, and date. Remove Programs Remove programs in storage memory. Screen Touchscreen alignment ( page 20), ClearType setting. Connections Bluetooth (Only for the Bluetooth model) The Bluetooth radio turning on or off settings. The device discoverable setting.
Dealing with Problems Resetting Your Computer When the computer fails to respond to an operation, reset your computer. There are two methods for resetting the computer. CAUTION Use only the provided stylus to push in the reset switch. Do not push the reset switch with any other sharp-pointed objects, i.e. pencils, and ball point pens. The reset switch or other parts may become damaged. Performing a Reset Reset Switch This selection saves all stored records and entries and then restarts the computer.
Dealing with Problems Troubleshooting Starting Up CF-P1 does not turn on. Or, there is no display when CF-P1 is turned on. Check to see if a fully charged battery pack is properly installed. The power does not go on unless the AC adaptor is connected: The battery level is too low. Charge the battery with the AC adaptor. (Make sure that the battery never discharges completely and that it is charged periodically.) Push the reset switch to restart CF-P1.
Application Software The computer locks up during the execution of an application, or the execution speed becomes noticeably slower. Connect the AC adaptor and push the reset switch. Check the remaining battery level and make sure that multiple applications are not running simultaneously. Close all applications that are not being used. Display It is hard to view the LCD. The LCD backlight may have automatically turned off due to the power-saving function.
Dealing with Problems Sounds Quality of recorded sound is poor. Tap - [Settings] - [Personal] tab - [Input] - [Options] tab - [Voice recording format], and select a higher frequency. Play sound is recorded even though the Mix playsound checkmark is off. Playsound (sound from the speaker) is being picked up and recorded by the microphone. If you want to avoid playsound recording completely, connect the headset or the headphone.
For Effective Use Maintenance LCD Avoid using water when cleaning the panel. Ingredients included in water may leave residue and reduce readability of the screen. Avoid rubbing off dust/dirt with cloth since it may leave scratch on the screen. Sweep dust/dirt with fine brush, then wipe it with “dry” soft cloth used for cleaning glasses. Apply camera lens cleaner on a soft gauze and clean it with gentle force.
Specifications CF-P1P3 series Model No. CF-P1P1 series ® CPU Memory (RAM/ROM) Video Memory LCD Type Displayed Colors Keyboard Pointing Device Slots CF Card Slot Intel PXA263 400MHz Instruction Cache Memory: 32 KB Data Cache Memory: 32 KB 64 MB (Max 128 MB)/ 64 MB (Flash) 256 KB 3.5 type (Reflective color TFT with front light*1) 65536 colors (240 x 320 dots) 38-key keyboard 23-key numeric keypad (QWERTY type) (“10-key” type) Touchscreen, Cursor Control One Type I or Type II, Allowable current 3.
Microsoft® ActiveSync® 3.7 System Requirements Microsoft ® Windows® XP, Microsoft® Windows ® 2000, Microsoft ® Windows ® Millennium Edition, Microsoft ® Windows NT ® Workstation 4.0 with SP6 or later, or Microsoft ® Windows® 98 Microsoft® Outlook® 98 or later required for synchronization to the desktop or portable computer of email, calendar, contacts, tasks, and notes. (Microsoft® Outlook ® 2002 recommended) Microsoft ® Internet Explorer 4.
LIMITED USE LICENSE AGREEMENT THE SOFTWARE PROGRAM(S) (“PROGRAMS”) FURNISHED WITH THIS PANASONIC® PRODUCT (“PRODUCT”) ARE LICENSED ONLY TO THE END-USER (“YOU”), AND MAY BE USED BY YOU ONLY IN ACCORDANCE WITH THE LICENSE TERMS DESCRIBED BELOW. YOUR USE OF THE PROGRAMS SHALL BE CONCLUSIVELY DEEMED TO CONSTITUTE YOUR ACCEPTANCE OF THE TERMS OF THIS LICENSE. Matsushita Electric Industrial Co., Ltd. (“MEI”) has developed or otherwise obtained the Programs and hereby licenses their use to you.
Copyright This manual is copyrighted by Matsushita Electric Industrial Co., Ltd. with all rights reserved. No part of this manual may be reproduced in any form without the prior written permission of Matsushita Electric Industrial Co., Ltd. No patent liability is assumed with respect to the use of the information contained herein. ©2003 Matsushita Electric Industrial Co., Ltd. All Rights Reserved. Disclaimer Computer specifications and manuals are subject to change without notice.
© 2003 Matsushita Electric Industrial Co., Ltd. All Rights Reserved.