Operating Instructions Model No. KX-TS3282W Preparation Integrated Telephone System Pulse-or-tone dialing capability Basic Operation Advanced Operation 2 LINE Caller ID Compatible PLEASE READ BEFORE USE AND SAVE. Panasonic World Wide Web address: http://www.panasonic.
Before Initial Use Thank you for purchasing your new Panasonic integrated telephone. Please read IMPORTANT SAFETY INSTRUCTIONS on page 67 before use. Read and understand all instructions. Caller ID and Call Waiting Service, where available, are telephone company services. After subscribing to Caller ID, this phone will display a caller’s name and phone number.
Accessories (included) For extra orders, call 1-800-332-5368. AC Adaptor (p. 10) Order No. KX-TCA1-G AA (R6, UM-3) Batteries (p. 9) one three Handset (p. 10) Order No. PQJXC0402Z Handset Cord (p. 10) Order No. PQJA212M one one 4-Wire Telephone Line Cord with Green Plugs (p. 11-13) Order No. PQJA10088Z 2-Wire Telephone Line Cord with Transparent Plugs (p. 13, 14) Order No.
Contents Preparation Location of Controls . . . . . . . . . . . . . . . . . . . . . . . . . . . . . . . . . . . . . . . . 6 Display . . . . . . . . . . . . . . . . . . . . . . . . . . . . . . . . . . . . . . . . . . . . . . . . . . . 8 Installation . . . . . . . . . . . . . . . . . . . . . . . . . . . . . . . . . . . . . . . . . . . . . . . . 9 Installing the Batteries . . . . . . . . . . . . . . . . . . . . . . . . . . . . . . . . . . . . . . . 9 Connecting the Handset and AC Adaptor . . . . . . . . . . .
Editing. . . . . . . . . . . . . . . . . . . . . . . . . . . . . . . . . . . . . . . . . . . . . . . . . . . 42 Erasing . . . . . . . . . . . . . . . . . . . . . . . . . . . . . . . . . . . . . . . . . . . . . . . . . . 43 Preparation One-Touch Dialer . . . . . . . . . . . . . . . . . . . . . . . . . . . . . . . . . . . . . . . . . . 44 Storing Names and Numbers . . . . . . . . . . . . . . . . . . . . . . . . . . . . . . . . . 44 Dialing a Stored Number . . . . . . . . . . . . . . . . . . . . . . . . . .
Location of Controls [CLEAR] Button (p. 37, 43) [EXIT] Button (p. 19, 30, 40) [ENTER] Button (p. 15, 17) One-Touch Auto Dial Buttons [M1], [M2], [M3] (p. 44) ▼ Navigator Key ([▼], [▲], [ ], [ ]) (p. 15, 19, 30, 40) Display (p. 8) Headset Jack (p. 61) ▼ [FUNCTION/EDIT] Button (p. 19, 33) VOLUME [ ], [ ] Buttons (p. 26) [HOLD] Button (p. 27, 48) [CONF] (Conference) Button (p. 51) [INTERCOM] Button and Indicator (p. 46, 47) [LINE 2/DATA] Button and Indicator (p.
[PAUSE] Button (p. 52) Preparation [DIAL LOCK] Button (p. 57) [REDIAL] Button (p. 26) [PAGE] Button (p. 48) [R] (TONE) Button (p. 53) Extension Buttons and Indicators (p. 18, 46) [MUTE] Button (p. 52) [FLASH] Button (p. 53) MIC (Microphone) (p. 25, 28) [SP-PHONE (Speakerphone)/HEADSET] Button and Indicator (p.
Display 1234567890123456 ABCDEFGHIJKLMNOP abcdefghijklmnop (This display shows all of the possible configurations.) 12:34AM 5/21[1] 10 new calls When the handset is on the cradle, the AC adaptor is connected and the SP-PHONE/ HEADSET indicator light is off, the display shows the current time and date, the extension number, and the number of new calls if you subscribed to a Caller ID service (p. 29). 12:00 1.1 [1] If “ ” flashes on the display, the clock needs adjusting (p. 15, 16).
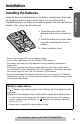
Installation Installing the Batteries Preparation Install the three included batteries in the battery compartment. They work as emergency power during a power failure. The unit will work as a standard telephone, so that you can make or answer external calls with the handset. (You cannot use the intercom.) 1. Press down the cover in the direction of the arrow and remove it. 2 1 2. Install the batteries in proper order as shown, matching the correct polarity. 3. Close the battery cover.
Installation Connecting the Handset and AC Adaptor Handset Handset Handset Cord Power Outlet (AC 120 V, 60 Hz) Power Outlet (AC 120V, 60Hz) Handset Cord Remove the wall mounting adaptor (see page 62, step 2), then fasten the AC adaptor cord to prevent it from being disconnected. Attach the wall mounting adaptor again. AC Adaptor After completing all the connections (p. 10-14), plug the AC ACadaptor Adaptorinto the power outlet.
Connecting Telephone Line Cords Preparation A maximum of eight KX-TS3282Ws can be connected in parallel. You can also connect KX-T3281W. To use the intercom, you must connect the telephone line cord to the LINE1/2 telephone jack of the unit.
Installation • If you re-connect the telephone line cord(s), confirm that all of the extension indicators light with the AC adaptor connected, then connect the telephone line cord(s). If all of the extension indicators do not flash, the extension number has been assigned to this unit and the number might be used for another unit on the same line. Erase the previously assigned number (p. 17), then connect the telephone line cord(s). Re-assign the number to the unit (p. 17).
To connect the units to two single-line telephone jacks 4-Wire Telephone Line Cord with GREEN Plugs Preparation If you provide only two single-line telephone jacks for the units, continue to wire them using optional Panasonic T-adaptors KX-J66. To order, call the accessories telephone number on page 3.
Installation Connecting a Communication Device After connecting the telephone line cord to a two-line telephone jack, you can connect a communication device (computer, modem, fax, answering machine, etc.) through this unit using the LINE2/DATA jack.
Programmable Settings Time and Date Preparation You can select 12-hour clock (AM/PM) or 24-hour clock by programming. Make sure that the handset is on the cradle, the AC adaptor is connected and the SP-PHONE/HEADSET indicator light is off. • If the display exits the set clock menu, press [FUNCTION/EDIT], then scroll to “Set clock” by pressing [ ] or [ ]. ] or [ENTER] (Yes key). ▼ 1 Press [ Set clock ENTER=Yes ▼ After the AC adaptor is connected, the display will show “Set clock” for 60 seconds.
Programmable Settings Press [ENTER] (Save key). Extension# 12345678 Erase ENTER=Save ▼ • A beep sounds. • The clock starts working. • If 3 beeps are heard, the setting is not correct. Start again from step 2. • The display will go to the extension number assigning menu as shown on the right if you had started programming within 60 seconds after plugging in the AC adaptor. The menu will remain for 60 seconds. To assign a number, see page 17, from step 4.
Assigning the Extension Number Preparation Assign the extension number to the unit to use the intercom feature. Make sure that the unit has been connected to other units (KX-TS3282W and/or KX-T3281W) in parallel (p. 11-13) before programming. Make sure that the handset is on the cradle, the AC adaptor is connected and the SP-PHONE/HEADSET indicator light is off. Press [ ]. 4 5 Press [ ] or [ ] to move the cursor to select the extension number (1 to 8).
Programmable Settings What the extension indicators mean Off The extension is not in use. On The extension is in use. Memory card Remove the memory card and use it as a name index for extensions.
Programming Summary Preparation You can program the following functions from the menu. After pressing [FUNCTION/EDIT], the main menu will be displayed first. If the main menu item has the sub-menu, it will be displayed. See the corresponding pages for function details. Make sure that the handset is on the cradle, the AC adaptor is connected and the SP-PHONE/HEADSET indicator light is off. Press [FUNCTION/EDIT]. ▼ ––––––––––––––– Save M1,M2,M3 . . . . . p. 44 Save directory . . . . p. 38 LCD contrast . .
Programmable Settings Dialing Mode If you have touch tone service, set to Tone. If rotary or pulse service is used, set to Pulse. Your phone comes from the factory set to Tone. Make sure that the handset is on the cradle, the AC adaptor is connected and the SP-PHONE/HEADSET indicator light is off. Scroll to “Dial setting” by pressing [ ] or [ ]. 3 Press [ ]. 4 Press [ ] at “Set dial mode”. 5 Select “Pulse” or “Tone” by pressing [ ] or [ ]. 6 Press [ENTER] (Save key).
LCD Contrast ▼ ––––––––––––––– Save M1,M2,M3 Save directory Scroll to “LCD contrast” by pressing [ ] or [ ]. 3 Press [ ]. Ex. Level 3 4 Select the desired LCD contrast by pressing [ ] or [ ]. ▼ 2 ▼ 1 Press [FUNCTION/EDIT]. • The current setting is displayed. • “■ ■” shows one level. Preparation You can select the LCD contrast level from 1 to 4 by programming. To make the display clearer, set to high level. Your phone comes from the factory set to 3.
Programmable Settings Ringer Volume You can select the ringer volume for each external line and the intercom line individually. Set to HIGH, LOW, or OFF. If set to OFF for Line 1 and/or Line 2, the unit will not ring for the line(s). If the ringer for the intercom line is OFF, the unit will not ring for intercom calls. Your phone comes from the factory set to HIGH. Make sure that the handset is on the cradle, the AC adaptor is connected and the SP-PHONE/HEADSET indicator light is off.
< < > Preparation • You can exit the programming mode any time by pressing [EXIT]. • If set to OFF, “Ringer off ” with the line(s) (“ 1 ”, “ 2 ” and/or “INT”) is(are) displayed while the unit is not in use (standby mode). • You can also change each ringer volume while the unit is just ringing for the external/intercom line, by pressing VOLUME [ ] or [ ]. To turn the ringer OFF, press and hold VOLUME [ ]. • You can change the ringer tone for Line 1, Line 2 and Intercom individually (see below).
Programmable Settings Make sure that the handset is on the cradle, the AC adaptor is connected and the SP-PHONE/HEADSET indicator light is off. 1 Press [FUNCTION/EDIT]. ▼ ––––––––––––––– Save M1,M2,M3 Save directory 2 Scroll to “Ringer setting” by pressing [ ] or [ ]. 3 Press [ ]. 4 Scroll to “Ringer pattern” by pressing [ ] or [ ]. 5 Press [ ]. 6 Select the desired ringer tone (1 to 8) by pressing [ ] or [ ] for each line.
Making Calls The unit will automatically select a free line when you lift the handset to make a call. (To change the line selection, see page 55.) To hang up, place the handset on the cradle. [LINE 1] and Indicator [LINE 2/DATA] and Indicator VOLUME [ ], [V] Basic Operation [HOLD] MIC [SP-PHONE/HEADSET] and Indicator Using the speakerphone [SP-PHONE/HEADSET]. 1 Press • The SP-PHONE/HEADSET indicator lights. • A free line is automatically selected and the line indicator lights.
Making Calls During speakerphone operation < For best performance, please note the following: • Talk alternately with the other party in a quiet room. • If the other party has difficulty hearing you, press VOLUME [ ] to decrease the speaker volume. • You can switch to the handset by lifting it up. To switch back to the speakerphone, press [SP-PHONE/HEADSET]. You can place the handset on the cradle. To adjust the handset volume (4 levels) or the speaker volume (8 levels) while talking Ex.
To put a call on hold Press [HOLD] during a conversation. • The line indicator light flashes. • If using the handset, you can place it on the cradle. • To transfer the call to another extension, see page 48. Hold Press EXT1~EXT8 to transfer To release the hold Press the line button. Basic Operation • The other extension users can release the hold by pressing the line button.
Answering Calls When a call is being received, the unit rings and the called line indicator flashes quickly. “Incoming call” and the line are displayed. You can answer a call by simply lifting the handset. (To change the line selection, see page 55.) If you subscribe to a Caller ID service, the calling party’s information will be displayed after the first ring (p. 29). In order to view the Caller ID information, please wait until the second ring to answer a call. Using the speakerphone [SP-PHONE/HEADSET].
Caller ID Service Basic Operation This unit is compatible with a Caller ID service offered by your telephone company. If you subscribe to a Caller ID service, the calling party’s information will be displayed after the first ring. The unit can record information of up to 50 different callers for both lines combined, including the time and date received, the called line, and the number of times called, in the Caller List. The Caller List information is sorted from the most recent to the oldest call.
Using the Caller List If you have received new calls, the number of new calls will be displayed as shown on the right, while the unit is not in use (standby mode). Ex. Received 10 new calls 12:34AM 5/21[1] 10 new calls Viewing the Caller List Make sure that the handset is on the cradle, the AC adaptor is connected and the SP-PHONE/HEADSET indicator light is off. To check who has called, follow the steps below. ▼ show. • You can go to the directory list by pressing [ ] (p. 40).
Ex. When you search from the most recent call: Press [ ] or [ ] to enter the Caller List. ▼ Caller list 2 new calls =Directory Press [ ]. • If there is no name information for a caller, the display will only show the phone number. Press [ ]. To return to the previous caller, press [ ]. 2 BROWN,NANCY 222-3333 10:50AM 11/23 X4 Basic Operation 1 SMITH,JACK 1-222-333-4444 11:50AM 11/24 To exit the Caller List, press [EXIT]. Press [ ]. 1 TURNER,CINDY 1-234-456-7890 10:00AM 11/22 √ Press [ ].
Using the Caller List Calling Back from the Caller List ] or [ ] to enter the Caller List. Caller list 3 new calls =Directory ▼ 1 Press [ 2 Scroll to the desired caller by pressing [ ] or [ ]. • To exit the Caller List, press [EXIT]. 3 TURNER,CYNDY 1 1-234-456-7890 10:50AM 11/23 X4 Lift the handset or press 12:34PM 11/25 [1] [SP-PHONE/HEADSET] or a line button. • The displayed phone number is dialed automatically. • After a few seconds, the display will show the length of the call.
Editing the Caller’s Phone Number You can edit a phone number into one of 3 patterns [see below (a), (b) and (c) on this page] to call back or store it into the directory or the One-Touch Dialer memory (p. 36). The Caller ID Number Auto Edit Feature (p. 34, 35) This feature will allow the unit to edit a Caller ID number into one of 3 patterns you desired for you automatically in the Caller List. For details and activation please see pages 34 and 35.
Using the Caller List The Caller ID Number Auto Edit Feature There are 3 patterns of phone number [(a), (b), and (c), p. 33]. This feature allows your phone to automatically edit an in-coming Caller ID number into one pattern you preferred, and display the Caller ID number with that pattern automatically.
Make sure that the handset is on the cradle, the AC adaptor is connected and the SP-PHONE/HEADSET indicator light is off. 3 Press [ ]. 4 Select “On” or “Off” by pressing [ ] or [ ]. 5 Press [ENTER] (Save key). ▼ Scroll to “Caller ID edit” by pressing [ ] or [ ]. • The current setting is displayed. ▼ Line setting Caller ID edit Set clock Auto edit :On ENTER=Save Basic Operation 2 ––––––––––––––– Save M1,M2,M3 Save directory ▼ 1 Press [FUNCTION/EDIT]. • A beep sounds.
Using the Caller List Storing Caller List Information in the Directory or in the One-Touch Dialer Memory You can store names and numbers that are in the Caller List to the directory or the one-touch auto dial buttons ([M1], [M2] and [M3]). Make sure that the handset is on the cradle, the AC adaptor is connected and the SP-PHONE/HEADSET indicator light is off. 1 Press [ ] or [ ] to enter the Caller List. to the caller you want to store by 2 Scroll pressing [ ] or [ ].
Erasing Caller List Information After checking the Caller List, you can erase some or all of the entries. Make sure that the handset is on the cradle, the AC adaptor is connected and the SP-PHONE/HEADSET indicator light is off. To erase a specific caller from the Caller List ] or [ ] to enter the Caller List. Caller list 10 new calls =Directory ▼ 1 Press [ Scroll to the caller you want to erase from the Caller List by pressing [ ] or [ ]. 3 Press [CLEAR].
Directory You can store up to 50 names and phone numbers in the directory. All directory items are sorted by the first word in alphabetical order. Using the directory, you can make a call by selecting a name on the display. Make sure that the handset is on the cradle, the AC adaptor is connected and the SP-PHONE/HEADSET indicator light is off. Storing Names and Numbers pressing [ ] or [ ]. Press [ ]. ▼ 2 • The display shows the number of stored items then “Enter name ”.
Selecting characters to enter names The dialing buttons ([0] to [9]) can be used to enter letters and symbols. Pressing each button selects a character as shown below. Number of times key is pressed Keys 1 2 3 4 5 6 7 8 9 10 11 [1] # & ’ ( ) , – .
Directory Finding Stored Items Make sure that the handset is on the cradle, the AC adaptor is connected and the SP-PHONE/HEADSET indicator light is off. ] or [ ] to enter the directory ▼ Directory list =Caller list ▼ ▼ [ 1 Press list. ▼ • You can go to the Caller List by pressing [ ] (p. 30). 2 Scroll to the desired item by pressing [ ] or [ ]. Press [ ]. • All directory items are stored in the order shown on the right. Press [ ].
Dialing 2 ] or [ ] to enter the directory Directory list =Caller list ▼ ▼ ▼ [ 1 Press list. Scroll to the desired item that you want to dial by pressing [ ] or [ ]. Frank 456-7890 • To search for the item by initial, see page 40. • To exit the directory list, press [EXIT]. 3 Lift the handset or press [SP-PHONE/HEADSET] or a line button. • The number is dialed automatically. 4 To hang up, place the handset on the cradle or press [SP-PHONE/HEADSET].
Directory Editing Make sure that the handset is on the cradle, the AC adaptor is connected and the SP-PHONE/HEADSET indicator light is off. ▼ ▼ 1 Press [ ] or [ ] to enter the directory list. to the directory item you want to Jane 2 Scroll 456-7890 change by pressing [ ] or [ ]. • To search for the item by initial, see page 40. Press [FUNCTION/EDIT]. Enter name Jane ▼ ▼ 3 4 Edit the name using the dialing buttons ([0] to [9]), up to 15 characters (p. 39). Press [ ] (Next key).
Erasing Make sure that the handset is on the cradle, the AC adaptor is connected and the SP-PHONE/HEADSET indicator light is off. ▼ 1 Press [ ] or [ ] to enter the directory list. to the directory item that you 2 Scroll want to erase by pressing [ ] or [ ]. • To search for the item by initial, see page 40. Press [CLEAR]. 4 Press [ENTER] (Yes key) or [CLEAR]. ▼ • To stop erasing, press [ ] (No key). • A beep sounds and the item is erased. • To erase other items, repeat from step 2.
One-Touch Dialer Storing Names and Numbers You can store up to 3 names and phone numbers in the one-touch auto dial buttons. Do not press any one-touch auto dial buttons before storing to prevent misoperation. Make sure that the handset is on the cradle, the AC adaptor is connected and the SP-PHONE/HEADSET indicator light is off. 1 Press [FUNCTION/EDIT]. ▼ Press [ ] at “Save M1,M2,M3”.
• When using the Dial Lock (p. 57) or Call Restriction feature (p. 58), you cannot store an item in a one-touch auto dial button ([M1] to [M3]). 3 beeps will be heard in step 2. • You can exit the programming mode any time by pressing [EXIT]. • If a pause is required for dialing, press [PAUSE] where needed. If required, you can also insert [FLASH] in a phone number. Pressing [PAUSE] or [FLASH] counts as one digit (p. 52, 53).
Intercom A 2-way intercom can be set up between two extensions. Make sure that each extension has been assigned the number ([1] to [8]) (p. 17) and is connected to the LINE1/2 telephone jack of the unit (p. 11-13). Paging a Designated Extension [INTERCOM]. 1 Press • The INTERCOM indicator lights. • The SP-PHONE/HEADSET indicator lights and the speakerphone turns on. • To switch from the speakerphone to the handset, lift it off the cradle. 2 Press an extension button ([EXT1] to [EXT8]).
To answer a page The INTERCOM indicator light flashes quickly (for the Ringer tone or Voice mode) and the paging extension is displayed. Depending on the ringer pattern setting (p. 23), your unit will function as follows: Ringer tone (1 to 8): The selected tone rings. Voice mode: The paging party’s voice is heard through the speaker after 2 short beeps. Auto Answer mode: After 2 short beeps, the speakerphone turns on automatically. You can then talk with the caller. Ex. EXT.
Intercom Paging All Extensions [INTERCOM]. 1 •Press The INTERCOM indicator lights. • The SP-PHONE/HEADSET indicator lights and the speakerphone turns on. 2 Press [PAGE], and after 2 short beeps announce the page using the MIC or the handset. Intercom Press EXT1~EXT8 or PAGE Intercom Paging [ALL] • The other extensions will hear your paging voice through the speaker after 2 short beeps. 3 After one of the paged extension answers, talk into the MIC or the handset.
Room Monitor Feature This feature allows you to monitor a room through an extension using the intercom feature. For example you can monitor a baby from different areas of the house. You can call the destination extension, to monitor the room. Turn the Room Monitor mode ON with the destination extension (p. 23, 24). Make sure that the destination unit must not be used and the handset is on the cradle and the AC adaptor is connected. [INTERCOM]. 1 Press • The INTERCOM indicator lights.
Making/Answering Another Call During a Conversation You can handle two external calls, or an external call and an intercom call simultaneously. Making/answering another external call during a conversation If you hear two tones during a conversation and another line indicator light flashes quickly, an incoming call is being received. You can answer the second call while holding the first call.
Conference Conference with two external calls While having a conversation on one line, you can make or answer a second call on the other line and then combine the calls to make a conference call. During a call, press [HOLD] to put the 1 first call on hold. the other line button to make or 2 Press answer a second call. the second call is connected, 3 When press [CONF] to make a conference call. • To hang up both lines, place the handset on the cradle or press [SP-PHONE/HEADSET].
Special Features How to Use the PAUSE Button (For PBX Line/Long Distance Calls) We recommend you press [PAUSE] if a pause is required for dialing with a PBX or to make a long distance call. Ex. Line access number [9] (PBX) Phone number [9] [PAUSE] • Pressing [PAUSE] once creates a 3.5 second pause. This prevents misdialing when you redial or dial a stored number. • Pressing [PAUSE] more than once increases the length of the pause between numbers. Muting Your Conversation Press [MUTE] while talking.
Temporary Tone Dialing (For Rotary or Pulse Service Users) R] (TONE) before entering access numbers which require tone Press [R dialing. • The dialing mode changes to tone. You can enter numbers to access an answering service, electronic banking service, etc. When you hang up, the mode will return to pulse. FLASH Button Pressing [FLASH] allows you to use special features of your host PBX such as transferring an extension call or accessing special telephone services (optional) such as call waiting.
Special Features Incoming Call Tone During a conversation, you can be informed if another call arrives on another line (Line 1 or 2 or Intercom line). If you set to ON, this incoming call tone will be heard for as long as the external or internal line rings. To delete the incoming call tone, set to OFF. To set the incoming call tone to sound twice, set to “2”. Your phone comes from the factory set to “2”.
Line Selection The unit will automatically select a free external line when you make a call by lifting the handset or pressing [SP-PHONE/HEADSET]. The unit will also select the in-coming called line when you answer the in-coming call. You can change the line selection. There are four options as following: Line 1: Line 1 will be selected. Line 2: Line 2 will be selected. Intercom: Intercom line will be selected.
Special Features Setting the Password You can change the password for the dial lock (p. 57) and call restriction (p. 58). The factory preset password is “1111”. To set the password Make sure that the handset is on the cradle, the AC adaptor is connected and the SP-PHONE/HEADSET indicator light is off. ––––––––––––––– Save M1,M2,M3 Save directory ▼ 1 Press [FUNCTION/EDIT]. Scroll to “Change password” by pressing [ ] or [ ]. 3 Press [ ]. Current password :–––– =Next 4 Enter the current password.
Dial Lock Except for the numbers stored in the one-touch auto dial buttons (p. 44), you can prevent others from making a call to any number. Only incoming calls are accepted until the dial lock is canceled. Before using this feature, we recommend storing emergency numbers in the memory of one-touch auto dial buttons (p. 44). Even if the dialing buttons are locked, the numbers stored in these buttons can be dialed. To set the dial lock [DIAL LOCK]. 1 Press •“ ” flashes on the display.
Special Features Call Restriction You can prevent the unit from dialing phone numbers beginning with specified digit(s) (1 digit or 2 digits). Except for the numbers stored in the memory of one-touch auto dial buttons (p. 44), phone numbers with the restricted leading digits cannot be dialed out. Before using this feature, we recommend storing emergency numbers in the memory of one-touch auto dial buttons (p. 44). Even if the phone numbers are restricted, the numbers stored in these buttons can be dialed.
6 Enter the first number(s) (1 digit or 2 digits) you want to restrict ([0] to [9]). • If you enter a wrong number, press [CLEAR] and enter the correct one. 7 Ex. “9” is entered. Restrict no. :-9 ENTER=Save Press [ENTER] (Save key). • A beep sounds. • To exit the programming mode, press [EXIT]. • You can exit the programming mode any time by pressing [EXIT].
Special Features Call Privacy Feature The Call Privacy feature allows you to prevent other extensions from joining your conversation with an outside party. If you allow other extensions to join your conversation (Call Barge In feature), select “Accept”. Your phone comes from the factory set to “Reject”. Make sure that the handset is on the cradle, the AC adaptor is connected and the SP-PHONE/HEADSET indicator light is off. Scroll to “Line setting” by pressing [ ] or [ ]. 3 Press [ ].
Optional Headset Plugging an optional headset into the unit allows a hands-free phone conversation. Please use only a Panasonic KX-TCA60, KX-TCA86, KX-TCA88, KX-TCA91 or KX-TCA92 headset. To order, call the accessories telephone number on page 3. Connecting the Optional Headset to the Unit Connect the optional headset to the headset jack as shown below. Fasten the headset cord to prevent it from being disconnected. Hook Headset Jack • The illustration of the headset is KX-TCA88.
Wall Mounting This unit can be mounted on a wall phone plate. down the handset hook until it 1 Pull locks, so the tab holds the handset. 2 3 Press the tabs in the direction of the arrows (#), then remove the wall mounting adaptor ($). Connect the AC adaptor. Tuck the telephone line cord inside the wall mounting adaptor, then push it in the direction of the arrows (# and $). • The word “UP” should face upward.
4 Connect the telephone line cord. Mount the unit, then slide down. To temporarily set the handset down during a conversation, place it as shown here.
Troubleshooting Problem 64 Cause and Remedy The unit does not work. • Check the settings (p. 9–14). • Unplug the AC adaptor and remove the batteries to reset. Plug in and re-install the batteries, and try again. • Other communication devices connected on the same line may be interfering with your unit. • Telephone line noise may be interfering with your unit. Consult your telephone company. The unit does not ring. • The ringer volume is set to OFF for the line. Set to HIGH or LOW (p. 22).
Problem Cause and Remedy • Programming is not possible when the handset is off the cradle or the SP-PHONE/ HEADSET indicator lights. • Do not pause for over 60 seconds while storing. • Do not enter a phone number more than 22 digits long. • When using the Dial Lock (p. 57) or Call Restriction feature (p. 58), you cannot store a phone number in the one-touch auto dial buttons ([M1] to [M3]). • If “Directory full” is displayed, erase other stored items from the directory (p. 43).
Troubleshooting 66 Problem Cause and Remedy When you press [INTERCOM], a busy tone sounds and you cannot page another extension. • The intercom line is being used. Wait until the INTERCOM indicator light goes out. You cannot call a designated extension. • The called extension may have been set to the room monitor mode. To talk to the extension, select another ringer pattern on that extension (p. 23, 24). The intercom does not work.
Important Safety Instructions SAVE THESE INSTRUCTIONS For assistance, please call: 1-800-211-PANA(7262) 67 Useful Information When using this unit, basic safety precautions should always be followed to reduce the risk of fire, electric shock, or personal injury. 11. Read and understand all instructions. 12. Follow all warnings and instructions marked on this unit. 13. Unplug this unit from AC outlets before cleaning. Do not use liquid or aerosol cleaners. Use a damp cloth for cleaning. 14.
Important Safety Instructions WARNING: TO PREVENT FIRE OR SHOCK HAZARD, DO NOT EXPOSE THIS PRODUCT TO RAIN OR ANY TYPE OF MOISTURE. • The AC adaptor is used as the main disconnect device, ensure that the AC outlet is located/installed near the unit and is easily accessible. CAUTION: To reduce the risk of fire or injury to persons, read and follow these instructions. 11. Use only the battery(ies) specified. 12. Do not dispose of the battery(ies) in a fire. It (they) may explode.
FCC and Other Information This equipment complies with Part 68 of the FCC rules and the requirements adopted by the ACTA. On the bottom of this equipment is a label that contains, among other information, a product identifier in the format US:ACJ-----. If requested, this number must be provided to the telephone company. Registration No. ..................................................... (found on the bottom of the unit) Ringer Equivalence No. (REN) ........................................................
FCC and Other Information WHEN PROGRAMMING EMERGENCY NUMBERS AND(OR) MAKING TEST CALLS TO EMERGENCY NUMBERS: 1) Remain on the line and briefly explain to the dispatcher the reason for the call. 2) Perform such activities in the off-peak hours, such as early morning or late evenings. This device complies with Part 15 of the FCC Rules.
Index E Extension buttons..................... 46 Extension indicators ................. 18 F FCC and Other Information...... 69 FLASH Button .......................... 53 Flash time................................. 53 Function Menu ......................... 19 H Headset, optional ..................... 61 I Incoming Call Tone................... 54 Installation, AC adaptor ............ 10 Installation, Telephone Line Cord .........................................11-14 Intercom call........................
Index R Redial .......................................26 Redial list..................................26 Ringer Off.................................22 Ringer pattern ..........................23 Ringer tone...............................23 Ringer Volume ..........................22 Room Monitor.....................23, 49 Rotary service, Tone dialing .....53 S Safety Instructions....................67 Shipping product for service ................................ Back cover Specifications ....................
PANASONIC CONSUMER ELECTRONICS COMPANY, DIVISION OF MATSUSHITA ELECTRIC CORPORATION OF AMERICA One Panasonic Way Secaucus, New Jersey 07094 PANASONIC SALES COMPANY, DIVISION OF MATSUSHITA ELECTRIC OF PUERTO RICO, INC., Ave. 65 de Infanteria, Km. 9.
THERE ARE NO EXPRESS WARRANTIES EXCEPT AS LISTED UNDER “LIMITED WARRANTY COVERAGE”. THE WARRANTOR IS NOT LIABLE FOR INCIDENTAL OR CONSEQUENTIAL DAMAGES RESULTING FROM THE USE OF THIS PRODUCT, OR ARISING OUT OF ANY BREACH OF THIS WARRANTY. (As examples, this excludes damages for lost time, lost calls or messages, cost of having someone remove or re-install an installed unit if applicable, travel to and from the servicer. The items listed are not exclusive, but are for illustration only.
Specifications Power Supply: AC adaptor (120 V AC, 60 Hz) Three “AA” size Manganese (R6, UM-3) batteries (for a power failure, p. 9) Power Consumption: Standby: Approx. 1 W Maximum: Approx. 1.5 W Dimensions (H x W x D): Approx. 96 mm x 186 mm x 231 mm (325/32" x 75/16" x 91/16") Mass (Weight): Approx. 890 g (1.94 lb.) Dialing Mode: Tone (DTMF)/Pulse Operating Environment: 5 ˚C–40 ˚C (41 ˚F–104 ˚F) Specifications are subject to change without notice.
For product service • Call 1-800-211-PANA(7262) for the location of an authorized servicenter. • Panasonic’s e-mail address for customer inquiries: consumerproducts@panasonic.com for customers in the USA or Puerto Rico ONLY When you ship the product • Carefully pack your unit, preferably in the original carton. • Attach a letter, detailing the symptom, to the outside of the carton. Symptom • Send the unit to an authorized servicenter, prepaid and adequately insured.