
user manual


32
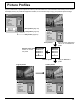
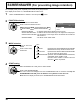
Follow these steps to save picture adjustment values as profi les.
Note:
When the settings are locked in “EXTENDED LIFE SETTINGS”, profi les cannot be saved.
Picture Profi les
Saving profi les
1
Specify the picture quality in the PICTURE menu and
ADVANCED SETTINGS. (see page 29, 30)
2
In the PICTURE menu, select “MEMORY SAVE”.
MEMORY SAVE
MEMORY LOAD
MEMORY EDIT
1
select
2
access
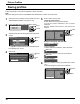
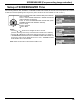
3
Select a profi le name for saving the picture adjustment
values.
MEMORY SAVE
1.
[
]
2.
[
]
3.
[
]
4.
[
]
MEMORY2
MEMORY3
MEMORY4
MEMORY1
1
select
2
set
“
∗
” appears for a profi le in which the picture adjustments
have already been saved.
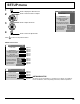
4
Select “OK”.
MEMORY SAVE
CANCEL
SAVE THE ADJUSTED VALUE IN ”MEMORY1”
OK
1
select
2
set
5
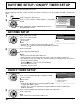
Enter a name for the profi le.
[Entering profi le names]
Profi le names can be up to 40 characters.
To enter text, select characters in the on-screen
keyboard.
Edit the default profile name in the text box as
desired.
MEMORY NAME INPUT
OK
A
MEMORY1
█
BCDEFGH I J K LMALL DELETE
N O P Q R S T U V W X Y Z DELETE
SPACE
abcde f gh i j k lm
nopqr s tuvwxyz
0123456789
!”#$%&’ +–/=?
_` |~<>() [ ] { } ,
@\ ˆ
.;:
CANCEL
1
select
2
set
Example: Specifying “MY PICTURE”
1
Select “ALL DELETE”.
MEMORY1
█
All text is deleted.
To delete individual characters, select “DELETE”.
2
Select “M”.
M
█
Repeat this process to enter the next character.
3
Select “Y”.
MY
█
4
Select “SPACE”.
MY
█
6
When you fi nished entering the profi le name, select
“OK”.
To cancel saving the profi le, select “CANCEL”.
MEMORY NAME INPUT
OK
A
MY PICTURE
█
B C D E F G H I J K L M ALL DELETE
N O P Q R S T U V W X Y Z DELETE
SPACE
abcde f gh i j k lm
nopqr s tuvwxyz
0123456789
!”#$%&’ +–/=?
_` |~<>() [ ] { } ,
@\ ˆ
.;:
CANCEL
1
select
2
set