26323742HL57_EN.book Page 1 Wednesday, March 14, 2007 4:28 PM LCD Color Television 26HL57 32HL57 37HL57 42HL57 For an overview of steps for setting up your new TV, see page 7. A high definition tuner and programming are required to view High Definition TV broadcasts. Please contact your cable or satellite provider. © 2007 TOSHIBA CORPORATION All Rights Reserved Owner’s Record The model number and serial number are on the back of your TV. Record these numbers in the spaces below.
6323742HL57_EN.book Page 2 Wednesday, March 14, 2007 4:28 PM Dear Customer, Thank you for purchasing this Toshiba LCD TV. This manual will help you use the many exciting features of your new LCD TV. Before operating your LCD TV, please read this manual completely, and keep it nearby for future reference. Safety Precautions WARNING: TO REDUCE THE RISK OF FIRE OR ELECTRIC SHOCK, DO NOT EXPOSE THIS APPLIANCE TO RAIN OR MOISTURE. WARNING RISK OF ELECTRIC SHOCK DO NOT OPEN.
26323742HL57_EN.book Page 3 Wednesday, March 14, 2007 4:28 PM Important Safety Instructions 15) CAUTION: • To reduce the risk of electric shock, do not use the polarized plug with an extension cord, receptacle, or other outlet unless the blades can be inserted completely to prevent blade exposure. • To prevent electric shock, match wide blade of plug to wide slot; fully insert. 1) Read these instructions. 2) 3) 4) Keep these instructions. Heed all warnings. Follow all instructions.
26323742HL57_EN.book Page 4 Wednesday, March 14, 2007 4:28 PM 23) Always place the back of the television at least four (4) inches away from any vertical surface (such as a wall) to allow proper ventilation. 24) Never allow anything to rest on or roll over the power cord, and never place the TV where the power cord is subject to wear or abuse. 25) Never overload wall outlets and extension cords. 26) Always operate this equipment from a 120 VAC, 60 Hz power source only.
26323742HL57_EN.book Page 5 Wednesday, March 14, 2007 4:28 PM Choosing a location for your LCD TV To Display your LCD TV on the included Pedestal Stand: Important notes about your LCD TV Observe the following safety precautions: 1) Read and Follow the pedestal assembly instructions included with the pedestal. CAUTION: Before beginning pedestal assembly, carefully lay the front of the LCD Panel face down on a flat, cushioned surface such as a quilt or blanket.
26323742HL57_EN.book Page 6 Wednesday, March 14, 2007 4:28 PM Contents Chapter 1: Introduction . . . . . . . . . . . . . . . . . . . . . . . . . . . . 7 Welcome to Toshiba . . . . . . . . . . . . . . . . . . . . . . . . . . . . . . . . 7 Features of your new TV . . . . . . . . . . . . . . . . . . . . . . . . . . . . 7 Overview of steps for installing, setting up, and using your new TV. . . . . . . . . . . . . . . . . . . . . . . . . . . . . . 7 TV front and side panel controls and connections . . . . . . .
26323742HL57_EN.book Page 7 Wednesday, March 14, 2007 4:28 PM Chapter 1: Introduction Welcome to Toshiba Thank you for purchasing this Toshiba TV, one of the most innovative LCD TVs on the market. This manual applies to models 26HL57, 32HL57, 37HL57, and 42HL57. The model and serial numbers are on the back of your TV. Write these numbers in the space provided on the front cover of this manual for your records. Instructions in this manual are based on using the remote control.
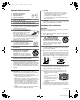
26323742HL57_EN.book Page 8 Wednesday, March 14, 2007 4:28 PM Chapter 1: Introduction TV front and side panel controls and connections TV top Right side panel TV front 4 6 5 7 8 9 Control panel 3 POWER 2 1 1 Green LED — Green light indicates power is on. 2 Remote sensor — Point the remote control toward the remote sensor. See “Remote control effective range” (- page 17).
26323742HL57_EN.book Page 9 Wednesday, March 14, 2007 4:28 PM Chapter 1: Introduction TV back panel connections For an explanation of cable types and connections, see Chapter 2 (- page 10). 1 TV back 2 Power cord Cable Clamper 3 4 5 1 ColorStream® HD-1 and ColorStream® HD-2 — Two sets of ColorStream® high-definition component video inputs (with standard analog audio inputs) for connecting devices with component video output, such as a Toshiba DVD player with ColorStream®.
26323742HL57_EN.book Page 10 Wednesday, March 14, 2007 4:28 PM Chapter 2: Connecting your TV Overview of cable types Cables can be purchased from most stores that sell audio/video devices. Before purchasing any cables, be sure of connector types required by your devices and the length of each cable. Coaxial (F-type) cable Coaxial (F-type) cable is used for connecting your antenna, cable TV service, and/or cable converter box to the ANT input on your TV.
26323742HL57_EN.
26323742HL57_EN.book Page 12 Wednesday, March 14, 2007 4:28 PM Chapter 2: Connecting your TV Connecting a VCR with S-video and a cable box An S-video connection will provide better picture performance than a standard (composite) video cable.
26323742HL57_EN.book Page 13 Wednesday, March 14, 2007 4:28 PM Chapter 2: Connecting your TV Connecting a DVD player with ColorStream® (component video), a VCR, and a satellite receiver Your TV has two sets of ColorStream® (component video) inputs.
26323742HL57_EN.book Page 14 Wednesday, March 14, 2007 4:28 PM Chapter 2: Connecting your TV Connecting a camcorder Connecting an audio system You will need: This connection allows you to use external speakers with an external analog audio amplifier to adjust the sound level. • standard A/V cables – For better picture performance, if your camcorder has S-video, connect an S-video cable (plus the audio cables) to VIDEO-2 on the TV right side panel.
05C02.fm Page 15 Thursday, March 22, 2007 3:23 PM Chapter 2: Connecting your TV Connecting an HDMI™ or DVI device to the HDMI input The HDMI input on your TV receives digital audio and uncompressed digital video from an HDMI source device, or uncompressed digital video from a DVI (Digital Visual Interface) source device.
05C02.fm Page 16 Thursday, March 22, 2007 3:23 PM Chapter 2: Connecting your TV Connecting a personal computer (PC) With either the PC IN or HDMI connection, you can watch your computer’s display on the TV and hear the sound from the TV’s speakers. To connect a PC to the PC IN terminal on the TV: When connecting a PC to the PC IN terminal on the TV, use an analog RGB (15-pin) computer cable and a PC audio cable.
26323742HL57_EN.book Page 17 Wednesday, March 14, 2007 4:28 PM Chapter 3: Using the remote control Preparing the remote control for use • Always remove batteries from the remote control if they are dead or if the remote control is not to be used for an extended period of time. This will prevent battery acid from leaking into the battery compartment.
26323742HL57_EN.book Page 18 Wednesday, March 14, 2007 4:28 PM Chapter 3: Using the remote control Learning about the remote control 1 POWER turns the TV on and off. Press p to turn on the TV. The green LED indicator on the TV front will be illuminated. Press p again to turn off the TV. The buttons used for operating the TV only are described here. For a complete list of the remote control’s functions, see the remote control functional key chart (- page 20). 2 FREEZE freezes the picture.
26323742HL57_EN.book Page 19 Wednesday, March 14, 2007 4:28 PM Chapter 3: Using the remote control Using the remote control to operate your other devices If you have a non-Toshiba device or a Toshiba device that the remote control is not preprogrammed to operate, you must first program the remote control to recognize the device (if you have not already done so) (- pages 21–23).
26323742HL57_EN.book Page 20 Wednesday, March 14, 2007 4:28 PM Chapter 3: Using the remote control Remote Control functional key chart Note: • “---” = key does not send a signal in that remote control mode. • sTV = key will affect the TV, even when the remote control is not in the “TV” device mode.
26323742HL57_EN.book Page 21 Wednesday, March 14, 2007 4:28 PM Chapter 3: Using the remote control Programming the remote control to operate your other devices Your Toshiba TV remote control is preprogrammed to operate most Toshiba devices. To program your TV remote control to operate a non-Toshiba device (or a Toshiba device that it is not preprogrammed to operate), follow the steps below. For details on using the remote control to operate the device, see page 19.
26323742HL57_EN.book Page 22 Wednesday, March 14, 2007 4:28 PM Chapter 3: Using the remote control Remote control codes In some cases you may not be able to operate your device with the TV remote control. Your other device may use a code that is not recognized by the TV remote control. If this happens, use the device’s remote control.
26323742HL57_EN.
26323742HL57_EN.book Page 24 Wednesday, March 14, 2007 4:28 PM Chapter 4: Menu layout and navigation Menu Layout The illustrations below provide a quick overview of your TV’s menu system. To open the main menus (illustrated below), press Y on the remote control or TV control panel.
26323742HL57_EN.book Page 25 Wednesday, March 14, 2007 4:28 PM Chapter 4: Menu layout and navigation Navigating the menu system You can use the buttons on the remote control or TV control panel to access and navigate your TV’s on-screen menu system. • Press Y to open the menu system. • When a menu is open, use the up/down/left/right arrow buttons (BbC c) on the remote control or TV control panel to move in the corresponding direction in the menu.
323742HL57_EN.book Page 26 Wednesday, March 14, 2007 4:28 PM Chapter 5: Setting up your TV Selecting the menu language You can choose from three different languages (English, French and Spanish) for the on-screen display of menus and messages. To select the menu language: 1 2 Press Y and open the Set Up menu. When you press < or , on the remote control or TV control panel, your TV will stop only on the channels you program into the TV’s channel memory.
26323742HL57_EN.book Page 27 Wednesday, March 14, 2007 4:28 PM Chapter 5: Setting up your TV 4 Press b to select CH Program. Set Up Language TV/CABLE CH Program Add/Erase Channel Labeling Video Label MENU Back 5 6 7 1/2 English CABLE ENTER Add ENTER Programming your favorite channels You can preset up to 12 of your favorite channels using the Favorite Channel Programming feature.
26323742HL57_EN.book Page 28 Wednesday, March 14, 2007 4:28 PM Chapter 5: Setting up your TV To clear a favorite channel: 1 2 3 Labeling channels Press Y and open the Function menu. Highlight Favorite Channel and press T. Press BbC c to highlight the channel you want to clear, then press T.
26323742HL57_EN.book Page 29 Wednesday, March 14, 2007 4:28 PM Chapter 5: Setting up your TV Setting the HDMI™ audio mode To set the HDMI audio mode: 1 2 3 Press Y and open the Set Up menu. Highlight AV Connection and press T. Press B or b to select HDMI1 Audio, and then press C or c to select the HDMI audio mode (Auto, Digital, or Analog). (Auto is the recommended mode). See “Connecting an HDMI or DVI device to the HDMI input” (- page 15).
26323742HL57_EN.book Page 30 Wednesday, March 14, 2007 4:28 PM Chapter 6: Using the TV’s features Selecting the video input source to view Press + on the remote control or INPUT on the TV control panel to view a signal from another device connected to your TV, such as a VCR or DVD player. You can select Video1/ ColorStream HD1, Video2, ColorStream HD2, HDMI1, HDMI2, PC or ANT, depending on which input jacks you used to connect your devices (- Chapter 2).
26323742HL57_EN.book Page 31 Wednesday, March 14, 2007 4:28 PM Chapter 6: Using the TV’s features Tuning channels Selecting the picture size Tuning your favorite channels You can view 480i, 480p, 720p, 1080i, and 1080p format programs in a variety of picture sizes—Natural, TheaterWide 1, TheaterWide 2, TheaterWide 3, Full, 4:3 HD, and Native. To tune to the channels you programmed as Favorite Channels, see page 27.
26323742HL57_EN.book Page 32 Wednesday, March 14, 2007 4:28 PM Chapter 6: Using the TV’s features Natural picture size • The image is displayed close to its originally formatted proportion. Some program formats will display with sidebars and/or bars at the top and bottom. Full picture size (for 4:3 [480i, 480p] source programs only) • If receiving a 4:3 format program, the picture is stretched wider to fill the width of the screen, but not stretched taller. • None of the picture is hidden.
09C06.fm Page 33 Thursday, March 22, 2007 3:20 PM Chapter 6: Using the TV’s features Adjusting the Picture Position Using the auto aspect ratio feature 1 2 When the auto aspect ratio feature is set to On, the picture size is automatically selected when one of the following input sources is received: • A 480i signal from the VIDEO-1, VIDEO-2, ColorStream HD-1, or ColorStream HD-2 input. • A 480i, 480p, 720p, 1080i or 1080p signal from the HDMI1 or HDMI2 input. Press Y and open the Set Up menu.
26323742HL57_EN.book Page 34 Wednesday, March 14, 2007 4:28 PM Chapter 6: Using the TV’s features Using the blue screen function 3 When a TV is on but not receiving a signal, the screen typically displays a “snowy” image and the speakers transmit a “static” sound. With the blue screen function set to On, the TV will automatically mute the sound and replace the snowy image with a solid blue screen until the TV receives a signal. Once a signal is received, the normal image and sound are restored.
26323742HL57_EN.book Page 35 Wednesday, March 14, 2007 4:28 PM Chapter 6: Using the TV’s features Adjusting the picture quality Adjusting the picture Selecting the picture mode You can select your desired picture settings from four different modes, as described below. You can adjust the picture quality (back light, contrast, brightness, color, tint, and sharpness) to your personal preferences.
26323742HL57_EN.book Page 36 Wednesday, March 14, 2007 4:28 PM Chapter 6: Using the TV’s features Using the black stretch feature You can use the black stretch feature to correct the contrast balance in the black areas of the picture. The effect depends on the quality of the video signal. To turn on the black stretch feature: 1 2 3 Press Y and open the Picture menu.
26323742HL57_EN.book Page 37 Wednesday, March 14, 2007 4:28 PM Chapter 6: Using the TV’s features Selecting the color temperature You can change the quality of the picture by selecting from three preset color temperatures (Cool, Medium, and Warm), as described below.
26323742HL57_EN.book Page 38 Wednesday, March 14, 2007 4:28 PM Chapter 6: Using the TV’s features Note: A closed caption signal may not display in the following situations: • When a videotape has been dubbed • When the signal reception is weak • When the signal reception is non-standard Closed Caption Reception Adjustment If reception is weak, the picture may appear blurred, and captions or text may not appear clearly on the screen. In this case, use this function to make them appear clearer.
26323742HL57_EN.book Page 39 Wednesday, March 14, 2007 4:28 PM Chapter 6: Using the TV’s features Adjusting the audio quality You can adjust the audio quality by adjusting the bass, treble, and balance. To adjust the audio quality: 1 2 Press Y and open the Audio menu. Press b or B to highlight the item you want to adjust (Bass, Treble, or Balance).
26323742HL57_EN.book Page 40 Wednesday, March 14, 2007 4:28 PM Chapter 6: Using the TV’s features Using the StableSound® feature The StableSound® feature limits the highest volume level to prevent extreme changes in volume when the signal source changes (for example, to prevent the sudden increase in volume that often happens when a TV program switches to a commercial). Using the Locks menu The Locks menu includes the Channel Lock, Video Lock, and New PIN Code features.
26323742HL57_EN.book Page 41 Wednesday, March 14, 2007 4:28 PM Chapter 6: Using the TV’s features Changing your PIN code 1 2 3 To unlock individual channels: Press Y and open the Function menu. In step 4 below left, press BbC c to highlight the channel you want to unlock, and then press T. Highlight Locks and press T. Channel Lock Press B or b to highlight New PIN Code.
26323742HL57_EN.book Page 42 Wednesday, March 14, 2007 4:28 PM Chapter 6: Using the TV’s features Using the PC settings feature You can view an image from a PC on the TV screen. The PC must be connected to the TV’s PC IN terminals. (- page 16). You can use a PC Settings feature to adjust the picture’s horizontal position/width, vertical position/height, clock phase, and sampling clock. Note: If a PC is not connected, this feature will be grayed out in the Set Up menu.
26323742HL57_EN.book Page 43 Wednesday, March 14, 2007 4:28 PM Chapter 6: Using the TV’s features Setting the sleep timer Setting the On timer You can set the sleep timer to turn off the TV after a set length of time (maximum of 12h50m). To set the On timer to turn on the TV automatically: To set the sleep timer: Press [ on the remote control to set the length of time until the TV turns off.
26323742HL57_EN.book Page 44 Wednesday, March 14, 2007 4:28 PM Chapter 6: Using the TV’s features Displaying TV setting information on-screen using RECALL Understanding the auto power off feature To display TV setting information on-screen: The TV will automatically turn itself off after approximately 15 minutes if it is tuned to a vacant channel or a station that completes its broadcast for the day. This feature does not work in VIDEO mode. Press E on the remote control.
10C07.fm Page 45 Tuesday, March 20, 2007 3:15 PM Chapter 7: Troubleshooting General troubleshooting Before calling a service technician, please check this section for a possible cause of the problem and some solutions you can try. Black box on screen • The Closed Caption feature is set to one of the Text modes (T1, T2, T3, or T4). Set the Closed Caption feature to Off (- page 37). TV will not turn on • Make sure the power cord is plugged in, and then press p. • The remote control batteries may be dead.
26323742HL57_EN.book Page 46 Wednesday, March 14, 2007 4:28 PM Chapter 7: Troubleshooting Remote control problems • Make sure the remote control is set to the correct device mode (- page 19). • Remove all obstructions between the remote control and the TV. • The remote control batteries may be dead. Replace the batteries (- page 17). • The TV remote control may not operate certain features on your external device. Refer to the owner’s manual for your other device to determine its available features.
11C08.fm Page 47 Tuesday, March 20, 2007 3:18 PM Chapter 8: Appendix Specifications Notes: • This model complies with the specifications listed below. • Designs and specifications are subject to change without notice. • This model may not be compatible with features and/or specifications that may be added in the future.
26323742HL57_EN.book Page 48 Wednesday, March 14, 2007 4:28 PM Chapter 8: Appendix Limited Canadian Warranty for Toshiba Brand Flat Panel Televisions Toshiba of Canada Limited (“TCL”) makes the following limited warranties to original consumers in Canada.
26323742HL57_EN.book Page 49 Wednesday, March 14, 2007 4:28 PM Chapter 8: Appendix Disclaimer and Limitation of Remedy TO THE EXTENT NOT PRECLUDED BY LAW, ALL OTHER EXPRESS AND IMPLIED WARRANTIES, CONDITIONS AND REPRESENTATIONS FOR THIS TELEVISION, INCLUDING THE IMPLIED WARRANTIES, CONDITIONS AND REPRESENTATIONS OF MERCHANTABILITY AND FITNESS FOR A PARTICULAR PURPOSE, ARE HEREBY DISCLAIMED AND EXCLUDED.
26323742HL57_EN.book Page 50 Wednesday, March 14, 2007 4:28 PM Index A L W Antenna cable ................................ 10 Audio quality adjustments ............... 39 Auto aspect .................................... 33 Auto power off ................................ 44 Labeling video input ........................ 30 Language selection ......................... 26 Last mode memory feature ............. 44 Lip Sync Latency ............................ 29 Locks menu New PIN code.......................
26323742HL57_EN.
26323742HL57_EN.book Page 52 Wednesday, March 14, 2007 4:28 PM HEAD OFFICE: 191 McNABB STREET, MARKHAM, ONTARIO, L3R 8H2, CANADA – TEL: (905) 470-5400 SERVICE CENTERS: TORONTO: 191 McNABB STREET, MARKHAM, ONTARIO L3R 8H2, CANADA – TEL: (905) 470- 5400 MONTREAL: 18050 TRANS CANADA, KIRKLAND, QUEBEC, H9J 4A1, CANADA – TEL: (514) 390-7766 VANCOUVER: 13551 COMMERCE PARKWAY, SUITE 110, RICHMOND, B.C.