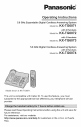
Operating 5.8 GHz Expandable Digital Cordless instructions Answering System Model NoKX-TG6071 with 2 Handsets Model NoKX-TG6072 with 3 Handsets Model NoKX-TG6073 5.8 GHz Digital Cordless Answering System with 4 Handsets Model NoKX-TG6074 Model shown is KX-TG6071. This unit is compatible subscribe with Caller to the appropriate ID. To use this feature, service offered you must by your telephone service provider. Please read these Operating future reference.
Table of Contents Introduction Multi-unit Operation Product information .............. 3 Intercom ..................... Accessory information ............ Important safety instructions ....... For best performance ............ 4 6 8 Transferring calls, conference calls ......................... 38 Registering a handset ........... 39 Useful Information Preparation Setting up the base unit ........... Setting up the handset ........... Controls ...................... 9 9 !2 Display .........
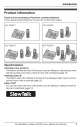
Introduction Product information Thank you for purchasing a Panasonic cordless telephone. These operating instructions can be used for the following models: KX-TG6071 KX-TG6072 KX-TG6073 KX-TG6074 Special features • Handset voice enhancer This feature clarifies the voice of the person you are talking to, reproducing natural-sounding voice that is easier to hear and understand (page 18).
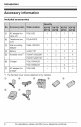
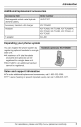
Introduction Accessory information Included accessories ® Telephone line cord PQJA10075 1 1 1 1 ® Wall mounting adaptor PQKL10078Z2 1 1 1 1 ® Battery HHR-P107 1 2 3 4 ® Handset cover *_ PQYNTG3032BR 1 2 - 4 PQYNTG6051SR - - 3 PQLV30054ZB - ! - PQLV30054ZS - - 2 PQLV208 - 1 2 _) 0 Charger AC adaptor for charger "! The handset cover comes attached to the handset. ® ® ® ® 4 ® ® ® For assistance, please visit http://www.panasonic.
Introduction Additionallreplacement accessories Rechargeable nickel metal hydride (Ni-MH) battery HHR-P107 Accessory handset with charger KX-TGA600 Headset KX-TCA60, KX-TCA86, KX-TCA92, KX-TCA93, KX-TCA95 T-adaptor KX-J66 Expanding KX-TCA88HA, KX-TCA94, or your phone system You can expand the phone system by registering optional handsets to a single base unit. • A maximum of 4 total handsets (included and optional) can be registered to a single base unit.
Introduction Important safety instructions When using the product, basic safety precautions should always be followed to reduce the risk of fire, electric shock, or personal injury. 1. Read all instructions carefully. 2. Follow all warnings and instructions marked on the product. 3. Unplug the product from power outlets before cleaning. Do not use liquid or aerosol cleaners. Use a moist cloth for cleaning. 4. Do not use the product near water, for example near a bathtub, wash bowl, kitchen sink, etc. 5.
Introduction WARNING: • To prevent the risk of fire or electrical shock, do not expose the product to rain or any type of moisture. • Unplug the product from power outlets if it emits smoke, an abnormal smell, or makes an unusual noise. These conditions can cause fire or electric shock. Confirm that smoke has stopped emitting and contact the Panasonic Call Center at 1-800-211PANA (! -800-2 ! 1-7262 ). CAUTION: Installation • Never install telephone wiring during a lightning storm.
Introduction For best performance Base unit location/avoiding noise The base unit and other compatible Panasonic units use radio waves to communicate with each other. • For maximum coverage and noisefree communications, place your base unit: - at a convenient, high, and central location with no obstructions between the handset and base unit in an indoor environment. - away from electronic appliances such as TVs, radios, personal computers, wireless devices or other phones.
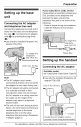
Preparation Setting up the base unit If you subscribe to a DSL service Please attach a noise filter (contact your DSL provider) to the telephone line between the base unit and the Connecting the AC adaptor and telephone line cord telephone line jack in the event of the following: - Noise is heard during conversations. - Caller ID features do not function Connect the telephone line cord until it clicks into the base unit and telephone line jack (O).
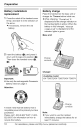
Preparation Battery installation/ replacement Battery charge Place the handset on the base unit or 1 Press the notch of the handset cover firmly, and slide it in the direction of the arrow. • If necessary, remove the old battery. charger for 7 hours before initial use. • While charging, "Charging" is displayed and the charge indicator on the handset lights in amber. When the battery is fully charged, "Charge completed" iS displayed and the indicator lights in green.
Preparation • To ensure that the battery charges properly, clean the charge contacts of the handset, base unit, and charger with a soft, dry cloth once a month. Clean more often if the unit is subject to the exposure of grease, dust, or high humidity. • When the battery is empty, "Charge for 7h" is displayed and the charge indicator does not light for about 5 minutes to concentrate on charging.
Preparation Handset Controls @ Base unit O Speaker Q Q _) [MUTE] O [FLASH] Q [CONF] [CALL WAIT] _l [1_] Q [GREETING REC] (Recording) O [GREETING CHECK] O [ANSWER ON] ANSWER ON indicator _-r- (Conference) (REPEAT) O _) Soft keys O Headset jack Q ["%] (TALK) _) Navigator key ([A] Iv] [4] [.
Preparation Using the navigator key The handset navigator key can be used to navigate through menus and to select items shown on the display by pressing [*], [,], [-,], or [,_]. Adjusting audio volume Press [A] or [v] repeatedly while Setting the unit before use Important: • To program features by scrolling through the display menus, see page 25. talking. Display language [-,lO[,-I You can select either "English" or "Sspa_.ol" as the display language. The default setting is "English".
Preparation Dialing mode If you cannot make calls, change this setting according to your telephone line service. The default setting is "Tone". "Tone": For tone dial service. "Pulse": For rotary/pulse 1 [MENU] _ dial service. [0][5][1] 2 [,]/[A]: Select the 3 [Save] _ [OFF] desired setting. Date and time Set the correct date and time. - To use the available alarm function (page 29).
Making/Answering Calls Erasing a number in the redial list Making calls 1 [REDIAL] 2 [v]/[A]: Select Using the handset 1 Dial the phone number. eTo correct a digit, press [Clear]. 2 Press [_%] or [Call]. 3 When you finish talking, press [OFF] or place the handset on the base unit or charger. Note: • "Line in use" is displayed when someone is talking on the unit or another phone. Using the speakerphone 1 Dial the phone number, and press [<-]. • Speak alternately with the other party.
Making/Answering Calls Using the base unit Using the handset 1 [SP-PHONE] 2 Dial the phone number. 1 Press [='_] or [<-]. • You can also answer the call by pressing any dial key from [0] to [9], I-X--I, [_], or [INTERCOM]. (Any key talk feature) 3 When the other party answers, speak into the MIC. • Speak alternately with the other party. 4 When you finish talking, press [SP-PHONE]. Note: • Use the speakerphone environment.
Making/Answering Useful features a call during Calls Mute button While mute is turned on, you can hear the other party, but the other party cannot hear you. HOLD button This feature allows you to put an outside call on hold. To mute your voice, press [Mute]. • To return to the conversation, [Mute] or [_%]. Press [HOLD] outside call. 2 times during an eTo release the hold, press [_%]. eThe base unit user can take the call by pressing [SP-PHONE].
Making/Answering Calls Note: For Call Waiting service users To use Call Waiting, you must subscribe to Call Waiting service of your telephone service provider. This feature allows you to receive calls while you are already talking on the phone. If you receive a call while on the phone, you will hear a Call Waiting tone. Please contact your telephone service provider for details and availability of this service in your area. Press [CALL WAIT] to answer the 2nd call.
Making/Answering Calls - youareonaconference call. - youarelistening tomessages inthe answering system. - another unitisusing theanswering system. - another handset ishaving an intercom callwiththebase unit. Toturnthisfeature onoroff,press [Slow]during anoutside call. Note: eWhen thisfeature isturned on, [Slow]flashes. • Thisfeature turns offifanother handset starts tohave anintercom callwiththebase unit,oranother unit starts tousetheanswering system.
Phonebook • To enter another character that is Handset located on the same dial key, first press [_] to move the cursor to the next space. phonebook You can add up to 50 items to the handset phonebook and search for phonebook items by name. Editing/correcting a mistake Press [4] or [_] to move the cursor to the character or number you want to erase, then press [Clear]. Enter the Adding items to the phonebook appropriate character or number. • Press and hold [Clear] to erase all characters or numbers.
Phonebook [MENU] in step 1 to change the dialing mode temporarily to tone. Editing items in the phonebook 1 Find the desired item (page 20). [Option] 2 [,]/[A]: "_,dlt" --_ [Select] Copying handset phonebook items 3 Edit the name if necessary (see the character table, page 20). [Next] You can copy one or all of the phonebook items from one handset to another. 4 Edit the phone number if necessary. [Next] _ [Save] _ [OFF] Important: • Ringer ID and Iight-up ID for phonebook items are not copied.
Caller ID Service Using Caller ID service This unit is Caller ID compatible. To use Caller ID features, you must subscribe to Caller ID service of your telephone service provider. Call Waiting Caller ID display If you subscribe to both Caller ID and Call Waiting with Caller ID services, the 2nd caller's information is displayed after you hear a Call Waiting tone (page 18). Please contact your telephone service provider for details and availability of this service in your area.
Caller ID Service and there is a new message, the unit does not announce the caller's name. eWhen you receive a call while on the phone, the 2nd caller's name is not announced even if you subscribe to both Caller ID and Call Waiting with Caller ID services. eThe announcement is heard at the ringer volume (page !6, 28). eThis feature can be turned on or off (page 28).
Caller ID Service (_) 1 - Area code - Local phone number reprogram the area codes you want to edit once again. Example: {1-555-321-5555 ] 4 ["-, ] Caller ID number auto edit feature Once you call back an edited number, the unit will remember the Area Code and Format of the Edited Number.
Programming Programmable settings You can customize the unit by programming the following features using the handset. To access the features, there are 2 methods: - scrolling through the display menus (page 25) - using the direct commands (page 27) • Mainly the direct command Programming method is used in these operating instructions. by scrolling through the display menus 1 [MENU] 2 Press [v] or [A] to select the desired menu.
Programming 35 34 36 36 Message contrast Key tone Auto Set !6 talk Caller Set 35,37 alert LCD tel base ID 24 edit line unit Set dial Set flash Set line Ringer Talking Registration HS language mode .I tone .I CallerID registration .I 22 39 39 13 Display Voice 17 time .I Deregistration Change 14 mode .I prompt .I 13 "1 If you program these settings using one of the handsets, you do not need to program the same item using another handset.
Programming Programming using the direct commands 1 [MENU] 2 Enter the desired feature code. 3 Enter the desired setting code. --_ [Save] • This step may vary depending on the feature being programmed. 4 [OFF] Note: • In the following table, < > indicates the default setting. • If you make a mistake or enter the wrong code, press [OFF], then start again from step 1.
Programming Ring color (Ringer indicator color) [1][4] [1]: =Amber [2]: Color2=Green [3]: Color3=Red - - [4]: Multicolor count Ring [0][6][I] [2]--[Y]: 2--7rings <4> [0]: Toll Ringer (Base tone • 34 • -- - - - - • 14 [2]: 600ms • 17 • - • 36 saver [0][%][1][I]-[3]: Tone <1>--3 unit) Ringer tone .
Programming "! *2 *3 *4 *5 *6 If "System setting" column is checked, you do not need to program the same item using another handset. If you subscribe to Caller ID service and want to view the caller's information after lifting up the handset to answer a call, turn off this feature. Turn this feature off if you prefer not to hear key tones while you are dialing or pressing any keys, including confirmation tones and error tones.
Answering System Answering system This unit contains an answering system which can answer and record calls for Turning the answering system on/off you when you are unavailable to answer the phone. Press IANSWER ON ] to turn on/off the answering system. Important: • Only 1 person can access the answering system at a time. • When callers leave messages, the unit records the day and time of each message. Make sure the date and time have been correctly set (page 14).
Answering System Greeting message When the unit answers a call, callers are greeted by a greeting message. You can record your own greeting message or use a prerecorded greeting message. Recording your greeting message You can record your own greeting message (max. 2 minutes). If you do not record a greeting message, a prerecorded greeting message is used. 1 2 [GREETING REC] Within 10 seconds, press [GREETING REC] again.
Answering System Listening to messages using the handset When new messages have been recorded: message" is displayed. - The message indicator on the handset flashes slowly if the message alert feature is turned on (page 35). Operating system the answering You can also operate the answering system by pressing dial keys on the handset during playback. -- "New [A] or Iv] Adjust the receiver/ speaker volume [1] or [4] Repeat message (during playback) .
Answering System Voice memo Recording a voice memo • The unit plays back new messages. • The voice guidance informs you of the available commands. The announcements are different depending on the voice guidance language settings (page 13). You can use the base unit to leave a voice memo (voice message) for yourself or someone else (max. 3 minutes). Voice memos can be played back later with the same operation used to play back answering system messages.
Answering System your remote code and begin remote operation (page 33). Remote commands You can press diaI keys to access certain answering system functions without waiting for the voice guidance to prompt you. [1] Repeat message (during playback) .1 [2] Skip message (during playback) [41 Play new messages [51 Play all messages [91 Stop playback .2 Start voice guidance .
Answering System 3rd time. You can then hang up without being charged for the call. Caller's recording time You can change the maximum message recording time allotted to each caller. 1 [MENU] _ [0][6][1] 2 [,]/[A]: Select the 3 [Save] _ [OFF] The default setting is "3min". desired setting.
Voice Mail Service Example: Using Voice Mail service Voice Mail is an automatic answering service offered by your telephone service provider. After you subscribe to this service, the telephone service provider's Voice Mail system will answer calls for you when you are unavailable to answer the phone or when your line is busy. Messages are recorded by the telephone service provider, not your telephone.
Voice Mail Service Listening to Voice Mail messages Message The unit lets you know that you have new Voice Mail messages in the following ways: -- "New Voice Mail" is displayed on the handset. message indicator on the handset flashes slowly when there are new recorded messages in the Voice Mail system. The default setting is "off". - The message indicator on the handset flashes slowly if message alert feature is turned on (page 37). Important: 1 Press [_'_], then press [VM] within 15 seconds.
Multi-unit Operation Answering an intercom call Intercom Intercom calls can be made: - between handsets - between the handset and base unit Note: • If you receive an outside call while talking on the intercom, you hear 2 tones. To answer the call with the handset, press [OFF], then press [_%]. To answer the call with the base unit, press [SP-PHONE] 2 times. 1 Press [_%] or [<-] to answer the page. 2 When you finish talking, press [OFF]. 1 Press [SP-PHONE] or [LOCATOR/ INTERCOM] to answer the page.
Multi-unit Operation To establish a conference 1 call: Note for handset and base unit: Press [Conf]. • To leave the conference, press [OFF]. The other parties can continue the conversation. • After the paging party disconnects, you can talk to the outside caller. • To put the outside call on hold, press [HOLD]. To resume the conference, press [Conf]. Registering During an outside call, press [LOCATOR/INTERCOM] to put the call on hold.
Useful Information 3 Wall mounting Insert the hooks on the wall mounting adaptor into the holes Q and Q on the base unit. Base unit 1 Lead the AC adaptor cord and telephone line cord through the hole in the wall mounting adaptor in the direction of the arrow. 2 Tuck the telephone line cord inside the wall mounting adaptor (O). Connect the AC adaptor cord and telephone line cord (I_). 4 Adjust the adaptor to hold the base unit, then push it in the direction of the arrow until it clicks into place.
Useful Information 5 Connect the tele )hone line cord. Mount the unit by inserting the mounting pins into the round openings on the adaptor (for pin I_, use round cut out at the bottom of the To remove the wall mounting adaptor While pushing down the release levers (O), remove the adaptor (_)). adaptor if you are using the 4 inches phone plate), then sliding the unit down to secure it. Connect the AC adaptor to power outlet (page 9). • There are two common types of wail phone plates.
Useful Information Headset (optional) Connecting a headset to the handset allows hands-free phone conversations. We recommend using the Panasonic headset noted on page 5. • Headset shown is KX-TCA86. Switching a call between the headset and handset speakerphone To switch to the handset speakerphone, press [_-]. To return to the headset, press [_'_]. Lanyard/strap eyelet If you have a lanyard/strap (not included), you can hang your handset from your neck or wrist.
Useful Information Error messages If the unit detects a problem, one of the following messages is shown on the display. All handsets registered, are • 4 handsets have already been registered to the base unit. A previously deregistered handset number may still be retained in the base unit. To register an additional handset, erase the unnecessary handset number (page 39). Busy • The called unit is in use. • The handset you tried to copy phonebook items to is in use. Try again later.
Useful Information System is busy. Please later. try again Troubleshooting General use The unit does not work. • Make sure the battery is installed correctly and fully charged (page 10). • Check the connections (page 9). • Unplug the base unit% AC adaptor to reset the unit. Reconnect the adaptor and try again. • The handset has not been registered to the base unit. Register the handset (page 39). I cannot hear a dial tone. • Confirm the telephone line cord is properly connected (page 9).
Useful Information I cannot set the alarm. • In order to set the alarm, you must first set the date and time (page 14). • The handset has lost communication with the base While programming, the handset starts to ring. • A call is being received. Answer the call and start again after hanging up. unit. Move closer to the base unit, and try again. Battery recharge I fully charged the battery, but continues to flash, or r--R, is displayed. • Clean the charge contacts and charge again (page 11).
Useful Information I cannot make long distance calls. • Make sure that you have long distance service. I cannot page the handset or base unit. • The called handset is too far from the base unit. The Slow Talk feature does not work. • If you are on a conference Slow Talk feature. • The called unit is in use. Try again later. call, you cannot use the Caller ID The handset does not • You have not subscribed display the calleCs name and/or phone number, your telephone service provider to subscribe.
Useful Information The caller list/incoming phone numbers are not edited automatically. • The Caller ID number auto edit feature is turned off. I cannot dial the phone number edited in the caller list. • The phone number you dialed might have an incorrectly edited pattern (for example, the long distance "1" or the area code is missing). Edit the phone number with another pattern (page 23).
Useful Information FCC and other information This equipment complies with Part 68 of the FCC rules and the requirements adopted by the ACTA. ©n the bottom of this equipment is a label that contains, among other information, a product identifier in the format US:ACJ ........... If requested, this number must be provided to the telephone company. • Registration No ............ (found on the bottom of the unit) • Ringer Equivalence No. (REN) ....... 0.
Useful Information about what will disable alarm CAUTION: equipment, consult your telephone company or a qualified installer. Any changes or modifications not expressly approved by the party responsible for compliance could void the user's authority to operate this device. This equipment is hearing aid compatible as defined by the FCC in 47 CFR Section 68.316. NOTE: When you hold the phone to your ear, noise might be heard in your Hearing Aid.
Useful Information interference is experienced, move the cordless telephone further away from the TV or VCR. This will often reduce, or eliminate, interference. FCC RF Exposure Warning: • This product complies with FCC radiation exposure limits set forth for an uncontrolled environment. • To comply with FCC RF exposure requirements, the base unit must be installed and operated 20 cm (8 inches) or more between the product and all person's body (excluding extremities of hands, wrist and feet).
Useful Information Specifications General Operating environment 5 °C- 40 °C (4! °F- Frequency 5.76 GHz - 5.84 GHz !04 °F) Base unit Dimensions Approx. height 99 mm x width 178 mm x depth 133 mm (3 29/32inches x 7 inches x 5 1/4 inches) Mass (Weight) Approx. 380 g (0.84 Ib.) Power consumption Standby: Approx. 1.4 W Maximum: Approx. 4.6 W Power output 200 mW (max.) Power supply AC adaptor (120 V AC, 60 Hz) Handset Dimensions Approx.
Useful Information Customer services Obtain Product Information and Operating Assistance; locate your nearest Dealer or Service Center; purchase Parts and Accessories; or make Customer Service and Literature requests by visiting our Web Site at: http://www.panasonic.com/help or, contact us via the web at: http://www.panasonic.com/contactinfo You may also contact us directly at: 1-800-211 -PANA (1-800-21%7262), Monday - Friday 9 am to 9 pro; Saturday - Sunday 10 am to 7 pro, EST.
Useful Information Warranty PANASONIC CONSUMER ELECTRONICS COMPANY, DIVISION OF PANASONIC CORPORATION OF NORTH AMERICA PANASONIC PUERTO RICO, INC. San Gabriel Industrial Park, Ave. 65 de Infanteria, Kin. 9.
Useful Information iF REPAIR iS NEEDED DURING THE LiMiTED WARRANTY PERIOD THE PURCHASER WiLL BE REQUIRED TO FURNISH A SALES RECEIPT/PROOF OF PURCHASE iNDiCATiNG DATE OF PURCHASE, AMOUNT PAiD AND PLACE OF PURCHASE. CUSTOMER WiLL BE CHARGED FOR THE REPAIR OF ANY UNiT RECEIVED WITHOUT SUCH PROOF OF PURCHASE.
Index Memory capacity (message recording): 30 Message alert: 35, 37 Missed calls: 22 Mute: 17 Index A Alarm: 29 Answering calls: 16 Answering system Erasing messages: 31, 32, 34 Listening to messages: 31, 32, 33 Turning on/off: 30, 32, 34 Auto talk: 16 B Battery: 10, 11 Booster (Clarity booster): C Call screening: 30 Call share: 19 18 N P Phonebook: R D S Language: T G H Greeting message: 31 Handset Iocator: 38 43 V Headset, optional: 42 Hold: 17 I Intercom: 38 K Key tone: 27 L Light-
If you need assistance 1 with setup or operation Visit our website: http://www.panasonic.com/help 2 Contact us via the web at: http://wwwpanasonic.com/contactinfo 3 Call us at: !-800-21 !-PANA (1-800-2! 1-7262) TTY users (hearing or speech impaired users) can call 1-877-833-8855. When you ship the product • Carefully pack your unit, preferably in the original carton. • Attach a letter, detailing the symptom, to the outside of the carton.