Operating Instructions Corded/Cordless Telephone with Digital Answering Machine Model No. KX-TGF850 KX-TGF852 KX-TGF853 KX-TG173SK Model shown is KX-TGF850. Before initial use, see “Getting Started” on page 9. Thank you for purchasing a Panasonic product. Please read these operating instructions before using the unit and save them for future reference. Consulte “Guía Rápida Española”, página 65. For assistance, visit our Web site: http://shop.panasonic.com/support for customers in the U.S.A.
Table of Contents Introduction Answering System Model composition ..............................................3 Accessory information ........................................3 Graphical symbols for use on equipment and their descriptions .........................................................5 Answering system .............................................48 Turning the answering system on/off ................48 Greeting message ............................................48 Listening to messages ....
Introduction Model composition Series Model No. Base unit Handset Part No. Part No. KX-TGF850 series KX-TGF850 KX-TGF850 KX-TGFA85 Quantity 1 KX-TGF852 KX-TGF850 KX-TGFA85 2 KX-TGF853 KX-TGF850 KX-TGFA85 3 KX-TG173SK KX-TGF850 KX-TGFA85 3 Accessory information Supplied accessories Quantity No.
Introduction Additional/replacement accessories Please contact your nearest Panasonic dealer for sales information (page 69). Accessory item Model number/Specifications Rechargeable batteries HHR-4DPA*1 R To order, please visit http://shop.panasonic.
Introduction Graphical symbols for use on equipment and their descriptions Symbol Explanation Symbol Explanation Alternating current (A.C.) Class P equipment (equipment in which protection against electric shock rely on Double Insulation or Reinforced Insulation.) Direct current (D.C.
Important Information For your safety To prevent severe injury and loss of life/property, read this section carefully before using the product to ensure proper and safe operation of your product. WARNING the frequency range of 1.92 GHz to 1.93 GHz, and the RF transmission power is 115 mW (max.).) R Do not use the product in health care facilities if any regulations posted in the area instruct you not to do so.
Important Information Note when using alkaline batteries for power backup R The batteries should be used correctly, otherwise the unit may be damaged due to battery leakage. R Do not charge, short-circuit, disassemble, or heat the batteries. R Do not dispose of batteries in a fire. R Remove all the batteries when replacing. R Do not mix old, new or different types of batteries. R It is recommended that batteries are replaced annually. R It is recommended that batteries are replaced after a power outage.
Important Information Specifications R Standard: DECT 6.0 (Digital Enhanced Cordless Telecommunications 6.0) R Frequency range: 1.92 GHz to 1.93 GHz R RF transmission power: 115 mW (max.) R Power source: 120 V AC, 60 Hz R Power consumption: Base unit: Standby: 0.7 W Maximum: 3.0 W Charger: Standby: 0.1 W Maximum: 1.8 W R Operating conditions: 0 °C – 40 °C (32 °F – 104 °F), 20 % – 80 % relative air humidity (dry) 8 For assistance, please visit http://shop.panasonic.
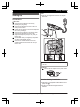
Getting Started Setting up Note: R Use only the supplied Panasonic AC adaptor PNLV226. Connections n Base unit Connect the AC adaptor to the unit by pressing the plug firmly. Connect the telephone line cord to the unit until you hear a click. Fasten the AC adaptor cord and the telephone line cord by hooking it. Connect the AC adaptor to the power outlet. Connect the telephone line cord to the single-line telephone jack (RJ11C) until you hear a click.
Getting Started R Confirm correct polarities ( , ). Removing the battery 1 1 4 2 2 3 1 R Follow the directions on the display to set up the unit. 10 For assistance, please visit http://shop.panasonic.
Getting Started Handset battery charging Charge for about 7 hours. R Confirm “Charging” is displayed (1). R When the batteries are fully charged, “Fully charged” is displayed. 1 Handset battery level Icon Battery level High Medium Low / Needs charging. Empty Note: R At the end of each call, the unit displays a large icon for a few moments to indicate the battery level. R You can set the unit to play a voice announcement when the battery is low or needs charging (page 16).
Getting Started Note: R If your phone service provider requires additional devices in order to make and receive calls, such as a modem, you may still not be able to make and receive calls even if the base unit’s power backup feature is functioning. Base unit battery status when a power failure occurs Icon Battery status Power backup mode is on. Battery power is low.*1 *1 If begins flashing on the base unit, replace the batteries with new ones as soon as possible.
Getting Started R When this feature is activated, is displayed. However, when answer by voice command is turned on (page 21), is not displayed even though this feature is activated. Controls Handset G Charge contacts n Control type Soft keys By pressing a soft key, you can select the feature shown directly above it on the display. Navigator key – MDN, MCN, MFN, or MEN: Scroll through various lists and items. – VOL. (Volume: MDN or MCN): Adjust the receiver or speaker volume while talking.
Getting Started Dial keypad *: Temporary tone dialing MEXITN MREDIALN MPAUSEN MERASENMMUTEN MZN (SP-PHONE: Speakerphone) SP-PHONE indicator MCALL BLOCKN MANSWER ON/OFFN ANSWER ON/OFF indicator MERASEN M N (PLAY/STOP) Message indicator Desk stand/Wall mounting adaptor R The adaptor is a removable attachment for desk stand or wall mounting use (page 55). n Control type Soft keys By pressing a soft key, you can select the feature shown directly above it on the display.
Getting Started Language settings Display language 5 Proceed with the operation for your unit. Handset: *: Select “AM” or “PM”. Base unit: MAM/PMN: Select “AM” or “PM”. 6 7 MSAVEN Handset / Base unit 1 2 3 MMENUN#110 MbN: Select the desired setting. a MSAVEN Proceed with the operation for your unit. Handset: MOFFN Base unit: MEXITN Note: R The language selected will also be used for the low battery alert announcement (page 16).
Getting Started 3 Proceed with the operation for your unit. Handset: MOFFN Base unit: MEXITN Low battery alert This feature plays a voice announcement when the battery is low or needs charging. When this feature is turned on, the unit notifies you as follows. n When you end a call: – The unit plays a voice announcement when the battery is low or needs charging.
Making/Answering Calls B Base unit: Place the corded handset on the cradle. When the speakerphone is used, press MZN. Making calls Using the handset Using the speakerphone 1 Lift the handset and then dial the phone number. R To correct a digit, press MCLEARN. 1 2 Press M N to make the call. R To make the call using the speakerphone, press MZN. During a conversation with the corded handset, press MZN to turn on the speakerphone. R You can place the corded handset on the cradle.
Making/Answering Calls Handset 1 2 Base unit Press MDN or MCN repeatedly to select the desired volume while ringing. R To turn the ringer off, press and hold MCN until the unit beeps. 9 a MDN (Pause) Dial the phone number. a M N Base unit 1 2 3 Note: R To change the ringer volume and ringer tone for an outside call, see page 38. 9 a MPAUSEN Dial the phone number. Lift the corded handset. Note for handset and base unit: R A 3.
Making/Answering Calls 2 To return to the call, press MMUTEN. Base unit 1 2 Press MMUTEN during a call. R The SP-PHONE indicator flashes. To return to the call, press MMUTEN. Note for handset: R MMUTEN is a soft key visible on the display during a call. Flash Handset / Base unit MFLASHN allows you to use the special features of your host PBX such as transferring an extension call, or accessing optional telephone services. Note: R To change the flash time, see page 40.
Making/Answering Calls 2 MbN: “2 way recording” a MSELECTN R The total recordable time is displayed. R The unit announces to both parties that the recording will start. R The unit starts recording. 3 To stop recording, press MMENUN a MbN: “Stop recording” a MSELECTN R You can continue the conversation with the outside caller. Note: R When recording completes: – The total number of recordings will be added to answering system number of messages. – M N on the base unit flashes.
Answer by Voice Command Answer by voice command This feature allows you to answer incoming calls automatically with your voice. When your voice is detected, answered calls will automatically be directed to the speakerphone mode. The default setting is “Off”. The answer by voice command feature functions as follows: 3 MYESN a The unit will display and announce the voice command guidance. R We recommend answering calls as demonstrated. R There must be a 1 second pause between the two phrases.
Answer by Voice Command Note for base unit: R In step 1, you need to answer a call while the base unit is not ringing or not announcing caller information. 22 For assistance, please visit http://shop.panasonic.
Intercom Intercom 2 When you finish talking, press MZN or place the corded handset on the cradle. Intercom calls can be made: – between handsets – between a handset and the base unit Answering an intercom call Note: R When paging unit(s), the paged unit(s) beeps for 1 minute. R If you receive an outside call while talking on the intercom, the interrupt tone sounds. – Handset: To finish intercom, press MOFFN. To answer the call, press M N.
Call Block Using the MCALL BLOCKN button You can press the MCALL BLOCKN button in the following situations to disconnect the current call and add a phone number to the call block list: – when an incoming call is being received – when an incoming call is being recorded by the answering system – when talking on an outside call Once a phone number has been added to the call block list, the unit will block calls from that phone number in the future.
Call Block Base unit: MEXITN Adding call blocked numbers manually Handset 1 2 3 4 MCALL BLOCKN MbN: “Block a single number” a MSELECTN MMENUN a MbN: “Add” a MSELECTN Enter the phone number (24 digits max.) a MSAVEN a MOFFN Base unit 1 2 3 MCALL BLOCKN MbN: “Block a single number” a MSELECTN a MADDN Enter the phone number (24 digits max.) a MSAVEN a MEXITN Storing a range of number Turning the first ring on/off You can choose whether the first ring sounds when a call is received.
Call Block To erase a number: MUNBLOCKN a MbN: “Yes” a MSELECTN a MEXITN Note: R When editing, press the desired dial key to add digits and press MCLEARN to erase digits. Erasing all call block numbers Handset / Base unit 1 2 MCALL BLOCKN MbN: “Block a single number” or “Block range of numbers” a MSELECTN 3 Proceed with the operation for your unit.
Enhanced Call Block Automated call block With automated call block, the unit screens incoming calls before ringing for allowed calls, or ends the calls without ringing for calls identified as robocalls, telemarketing calls, or other undesirable calls (Caller ID subscribers only). The unit will play the greeting message for automated call block and prompt the caller to enter an access code in order for the unit to identify whether the call is automated. You can set the unit to block or unblock mode.
Enhanced Call Block 3 MbN: “Yes” a MSELECTN a MOFFN Note: R We recommend you perform a test run of the automated call block procedure to ensure that the automated call block feature is set correctly. Changing the access code If the unit answers undesirable calls such robocalls even though the automated call block function is on, change the access code (3 digits max.). The default setting is “1”. Handset 1 2 3 MMENUN#789 MCLEARN Enter the new access code.
Enhanced Call Block Viewing/erasing an entry Handset 1 2 3 MMENUN#794 MbN: Select the desired entry. R After viewing, press MOFFN to exit. MERASEN a MbN: “Yes” a MSELECTN a MOFFN Erasing all entries Handset 1 2 3 MMENUN#794 MERASEN a MbN: “Yes” a MSELECTN MbN: “Yes” a MSELECTN a MOFFN Greeting message for automated call block Handset When the unit answers a call, a greeting message is played to the caller.
Enhanced Call Block Telemarketing call block In addition to Automated call block (page 27), you can use Telemarketing call block to further screen the calls to avoid telemarketer calls from getting through. Using this feature, user can request the caller to announce their name, and after checking the name, user can decide whether to answer the call or not. Note: R This feature is only available for landline calls. R While screening the call, call waiting feature is unavailable (page 19).
Phonebook Phonebook You can add 100 names (16 characters max.) and phone numbers (24 digits max.) to the phonebook, and assign each phonebook entry to the desired group (page 32). Important: R All entries can be shared by the base unit and any registered handset. Adding phonebook entries Handset / Base unit 1 Proceed with the operation for your unit. Handset: MFN a MMENUN Base unit: M N a MMENUN 2 3 4 5 MbN: “Add new entry” a MSELECTN Enter the party’s name. a MOKN Enter the party’s phone number.
Phonebook 3 4 MbN: “Save phonebook” a MSELECTN Continue from step 3, “Editing entries”, page 32. Handset / Base unit Base unit 1 2 MCIDN MbN: Select the desired entry. R To edit the number, press MEDITN repeatedly until the phone number is shown in the desired format. 3 4 5 Finding and calling from a phonebook entry 1 Proceed with the operation for your unit. Handset: MFN W Base unit: MWN 2 To scroll through all entries MbN: Select the desired entry.
Phonebook Erasing entries Erasing an entry Handset 1 2 3 Find the desired entry (page 32). MMENUN a MbN: “Erase” a MSELECTN MbN: “Yes” a MSELECTN a MOFFN Speed dial Base unit 1 2 Find the desired entry (page 32). MERASEN a MbN: “Yes” a MSELECTN a MEXITN Erasing all entries Handset / Base unit 1 2 3 4 5 R If you have rotary/pulse service, you need to press * before pressing MFN on the handset or M N on the base unit in step 1 to change the dialing mode temporarily to tone.
Phonebook Note for handset and base unit: R If you edit a phonebook entry which is assigned to a speed dial key, the edited entry does not transfer to the speed dial key. Note for base unit: R You can dial phone numbers in the speed dial while you are on a call. Editing an entry One touch buttons Handset/Base unit 1 Press and hold the desired speed dial key (1 to 9). 2 Proceed with the operation for your unit.
Phonebook Adding extension numbers for handsets Base unit 1 Press and hold the desired one touch button (1 or 2). a MEDITN 2 3 Press MINTN. MbN: Select the desired unit. a MSELECTN 2 times a MEXITN Viewing/editing/erasing an entry Base unit 1 Press and hold the desired one touch button (1 or 2). R After viewing, press MEXITN to exit. 2 To edit an entry MEDITN a Edit the name if necessary. a MOKN a Edit the phone number if necessary.
Programming Menu list To access the features, there are 2 methods. Handset / Base unit n Scrolling through the display menus 1 MMENUN 2 3 4 Press MCN or MDN to select the desired main menu. a MSELECTN Press MCN or MDN to select the desired item from the next sub-menus. a MSELECTN Press MCN or MDN to select the desired setting. a MSAVEN n Using the direct command code 1 MMENUN a Enter the desired code. Example: Press MMENUN#101. 2 Select the desired setting.
Programming Sub-menu 1 Sub-menu 2 Greeting Record greeting*1 – #302 / 48 Check greeting – #303 / 49 Pre-recorded*1 (Reset to pre-recorded greeting) – #304 / 48 #338 / 50 New message alert*1 Outgoing call – On/Off Settings On Outgoing call – Notification to Settings Code Unit – Outgoing call – Remote code Activate Base unit beep On #339 / 50 Ring count*1 2-7 rings <4 rings> Toll saver #211 / 53 Recording time*1 1 min <3 min> Greeting only*2
Programming Main menu: “Speed dial” Operation Code Viewing the speed dial entry.
Programming Sub-menu 1 Sub-menu 2 Settings Code Key detector setting*6 – 1:Add new device (for Detector1)*7 – 2:Add new device (for Detector2) – 3:Add new device (for Detector3) – 4:Add new device (for Detector4) Change name*1 Detector1 #6561 Detector2*8 #6562*8 Detector3*8 #6563*8 Detector4*8 #6564*8 Automated call block*1 Block/Unblock Registration – Unit – #6571 – #6572*8 #6573*8 #6574*8 Deregistration – #6581 – #6582*8 #6583*8 #6584*8 Block #787 27 – #794 28 <1>
Programming Sub-menu 1 Sub-menu 2 Voicemail Save VM access#*1, *9 (VM: Voicemail) Save Voicemail access#*1, *10 VM tone detect*1 LCD contrast (Display contrast) – Handset name – Display name – Answer by voice command On/Off Settings Code – Unit #331 / 54 Off #332 / 54 Handset: Level 1-4 <2> Base unit: Level 1-6 <3> #145 / – – #104 45 On #105 45 On #106 21 #107 21 Sensitivity level Low High Auto intercom – On #273 Key tone – Off
Programming Sub-menu 1 Sub-menu 2 Registration Register handset – #130 45 Deregistration*2 – #131 45 – #131 45 On #150 12 Display Español #110 / 15 Announcement*1 Español #112 / 15 Deregistration*2 – Battery saving mode – Change language Main menu: Settings Code “Customer support” Operation Code Displaying customer support Web address.
Programming *11 If you subscribe to a Caller ID service and want to view the caller’s information after lifting up the handset to answer a call, turn off this feature. *12 The flash time depends on your telephone exchange or host PBX. Contact your PBX supplier if necessary. The setting should stay at “700 ms” unless pressing MFLASHN fails to pick up the waiting call. *13 Generally, the line mode setting should not be changed.
Programming Turning silent mode on/off Handset 1 2 MMENUN#238 MbN: Select the desired setting. a MSAVEN R If you select “Off”, press MOFFN to exit. 3 Enter the desired hour and minute you wish to start this feature. 4 5 *: Select “AM” or “PM”. a MOKN 6 7 *: Select “AM” or “PM”. Enter the desired hour and minute you wish to end this feature. MSAVEN a MOFFN Base unit 1 2 MMENUN#238 MbN: Select the desired setting. a MSAVEN R If you select “Off”, press MEXITN to exit.
Programming R The registered unit’s name/number is displayed. Note: R When this feature is on, another handset or the base unit can hear the monitored handset by making an intercom call. To monitor from outside If you enable this feature, the unit will call a pre-programmed phone number when the handset detects sound. After you answer the call, you can listen in on the room where the handset is located.
Programming R The monitoring unit will answer calls automatically when the auto intercom feature is set to “On” (page 23). Note: R If you receive an outside call when communicating with the monitored handset, the interrupt tone sounds. – To answer the call with the handset, press MOFFN, then press M N. – To answer the call with the base unit, press MZN 3 times.*1 *1 If MMUTEN is pressed, press MZN 2 times. n When monitoring from outside: Answer the call.
Caller ID Service Using Caller ID service Important: R This unit is Caller ID compatible. To use Caller ID features, you must subscribe to a Caller ID service. Contact your phone service provider for details. Caller ID features Handset / Base unit When an outside call is being received, the caller information is displayed. Caller information for the last 50 callers is logged in the caller list from the most recent call to the oldest.
Caller ID Service Editing a caller’s phone number You can edit a phone number in the caller list by removing its area code and/or the long distance code “1”. Note: R Phone numbers from the 4 most recently edited area codes are automatically edited. Erasing selected caller information Handset 1 2 3 4 5 Handset / Base unit MCN CID MbN: Select the desired entry. a MMENUN 1 MbN: “Edit” a MSELECTN Press MEDITN repeatedly until the phone number is shown in the desired format.
Answering System Answering system The answering system can answer and record calls for you when you are unavailable to answer the phone. You can also set the unit to play a greeting message but not to record caller messages by selecting “Greeting only” as the recording time setting (page 53). Important: R Make sure the unit’s date and time setting is correct (page 15). Memory capacity (including your greeting message) The total recording capacity is about 17 minutes.
Answering System 2 3 MYESN Calling back (Caller ID subscribers only) Proceed with the operation for your unit. Handset: MOFFN Base unit: MEXITN Lift the corded handset during playback. R To edit the number before calling back, press MEDITN repeatedly until the phone number is shown in the desired format (page 47). Playing back the greeting message Handset / Base unit 1 2 MMENUN#303 Proceed with the operation for your unit. Handset: To exit, press MOFFN. Base unit: To exit, press MEXITN.
Answering System Key Operation *6 Reset to a pre-recorded greeting message *1 If pressed within the first 5 seconds of a message, the previous message is played. *2 To resume playback: MbN: “Playback” a MSELECTN *3 You can also erase as follows: MPAUSEN a MbN: “Erase” a MSELECTN a MbN: “Yes” a MSELECTN Calling back (Caller ID subscribers only) 1 2 Press MPAUSEN during playback. MbN: “Call back” a MSELECTN Editing the number before calling back 1 2 3 Press MPAUSEN during playback.
Answering System 3 MbN: Select the desired phonebook entry. a MSAVEN a MEXITN n By entering a phone number: 1 MMENUN#338 2 MbN: “Notification to” a MSELECTN a MEDITN 3 Enter the desired name (16 characters max.). a MOKN 4 Enter the desired number (24 digits max.). a MOKN a MSELECTN a MEXITN Turning on/off the new message alert setting Handset / Base unit 1 2 3 4 MMENUN#338 MbN: “On/Off” a MSELECTN MbN: Select the desired setting. a MSAVEN Proceed with the operation for your unit.
Answering System to turn off the new message alert by a call feature. R Even if the unit makes a new message alert call, the handset redial list does not show the record. However, on the base unit redial list it is shown as “Message alert”. Remote operation Using a touch-tone phone, you can call your phone number from outside and access the unit to listen to messages or change answering system settings. The unit’s voice guidance prompts you to press certain dial keys to perform different operations.
Answering System Turning on the answering system remotely 1 Dial your phone number from a touch-tone phone. 2 Let the phone ring 15 times. R A long beep is heard. 3 Enter your remote access code within 10 seconds after the long beep. R The greeting message is played back. R You can either hang up, or enter your remote access code again and begin remote operation (page 52).
Useful Information Example: Voicemail service In addition to your unit’s answering system you may also have voicemail service from your phone service provider. Voicemail is an answering service that may be offered by your phone service provider. This service can also record calls when you are unavailable to answer the phone or when your line is busy. Messages are recorded on the phone company system and not on the unit’s answering system.
Useful Information Listening to voicemail messages When new messages have been recorded, “Voicemail msg. via phone co.” is displayed if message indication service is available. Handset / Base unit 1 MMENUN#330 R The speakerphone turns on. R Lift the corded handset if needed. 2 3 Follow the pre-recorded instructions. When finished, hang up. Note: R You can also use the MACCESSN soft key, if displayed, to play new voicemail messages.
Useful Information 3 Insert the lower tabs of the adaptor into the unit’s bottom slots (A), then insert by pushing down the levers of the adaptor into the upper slots (B). R The words “UP WALL” should be facing up. B B A A 4 Mount the unit on a wall then slide down to secure in place. R This product is compliant with the following wall phone plate sizes (2 types).
Useful Information Error messages Display message Cause/solution Ask phone company for VM access # R You have not stored the voicemail access number. Store the number (page 54). Main unit no power or No link. Reconnect base AC adaptor. R Confirm the base unit’s AC adaptor is connected to the unit and the power outlet correctly. R The handset has lost communication with the base unit. Move closer to the base unit and try again. R Unplug the base unit’s AC adaptor to reset the unit.
Useful Information Problem Cause/solution The unit does not work. R Make sure the batteries are installed correctly (page 9). R Fully charge the batteries (page 11). R Check the connections (page 9). R Unplug the base unit’s AC adaptor to reset the unit. Reconnect the adaptor and try again. R The handset has not been registered to the base unit. Register the handset (page 45). I cannot hear a dial tone. R The base unit’s AC adaptor or telephone line cord is not connected. Check the connections.
Useful Information Making/answering calls, intercom Problem Cause/solution is displayed. R The handset is too far from the base unit. Move closer. R The base unit’s AC adaptor is not properly connected. Reconnect AC adaptor to the base unit. R The handset is not registered to the base unit. Register it (page 45). Noise is heard, sound cuts in and out. R You are using the handset or base unit in an area with high electrical interference.
Useful Information Problem Cause/solution The caller list/incoming phone numbers are not edited automatically. R The Caller ID number auto edit feature is turned off. Turn it on and try again (page 40). R You need to call back the edited number to activate Caller ID number auto edit. I cannot dial the phone number edited in the caller list. R The phone number you dialed might have been edited incorrectly (for example, the long distance “1” or the area code is missing).
Useful Information Voicemail Problem Cause/solution “Voicemail msg. via phone R This notification is displayed when your phone service provider’s voicemail service (not the unit’s answering system) co.” is shown on the display. has recorded a message for you. Typically you can remove this How do I remove this message notification from the display by listening to the message.
Useful Information FCC and other information This equipment complies with Part 68 of the FCC rules and the requirements adopted by the ACTA. On the bottom of this equipment is a label that contains, among other information, a product identifier in the format US:ACJ----------. If requested, this number must be provided to the telephone company. R Registration No.............(found on the bottom of the unit) R Ringer Equivalence No. (REN).......0.
Useful Information CAUTION: Any changes or modifications not expressly approved by the party responsible for compliance could void the user’s authority to operate this device. R The handset may be carried and operated with only the specific provided belt-clip. Other non-tested belt-clips or similar body-worn accessories may not comply and must be avoided. NOTE: This equipment has been tested and found to comply with the limits for a Class B digital device, pursuant to Part 15 of the FCC Rules.
Useful Information canceled when the corded handset comes off during or after setting up. n To deactivate the charge only mode: – Lift the corded handset from the base unit and replace it. – Press any key. – 24 hours passed after activating the charge only mode. 64 For assistance, please visit http://shop.panasonic.
Guía Rápida Española Guía Rápida Española Conexiones Unidad base 1 Conecte el adaptador de corriente alterna a la unidad presionándolo firmemente. 2 Conecte el cable de la línea telefónica a la unidad hasta que escuche un clic. 3 Enganche el cable del adaptador de corriente alterna y el cable de la línea telefónica para fijarlos. 4 Conecte el adaptador de corriente alterna a la toma de corriente.
Guía Rápida Española Sugerencias de operación Teclas de función Al oprimir una tecla de función, puede seleccionar la función que aparece directamente encima de ella en la pantalla. Preste atención a la pantalla para ver qué funciones están asignadas a las teclas de función durante la operación. Tecla navegadora Auricular: − {^}, {V}, {<}, o {>}: Navegue por diversas listas y elementos. − VOL. (Volumen: {^} o {V}): Ajuste el volumen del receptor o el altavoz mientras habla.
Guía Rápida Española Grabación de su mensaje de saludo en el contestador automático (Auricular/ Unidad base) Puede grabar su propio mensaje de saludo en lugar de usar uno pregrabado. 1 {MENU}(3)2 s {r}: “Sí” s {SELEC.} 2 Después de que suene un pitido, hable con claridad en el micrófono a una distancia aproximada de 20 cm (8 pulgadas) (máx. de 2 minutos). 3 Oprima {PARAR} para dejar de grabar. 4 Continúe operando su unidad.
Guía Rápida Española Operaciones básicas Contestador de llamadas (Unidad base) Contestador encendido/apagado Oprima {s} para encender y apagar el contestador de llamadas. Para escuchar mensajes {P} (PLAY) Sistema contestador de llamadas (auricular) Para escuchar mensajes Para escuchar mensajes nuevos: {REPRO.} o {MENU}(323 Para escuchar todos los mensajes: {MENU}(324 Preguntas frecuentes Pregunta Causa y solución ¿Por qué aparece _? L El auricular está demasiado lejos de la unidad base. Acérquelo.
Appendix Customer services Shop Accessories! for all your Panasonic gear Go to hp://shop.panasonic.com/support Get everything you need to get the most out of your Panasonic products Accessories & Parts for your Camera, Phone, A/V products, TV, Computers & Networking, Personal Care, Home Appliances, Headphones, Baeries, Backup Chargers & more… Customer Services Directory For Product Informa!on, Opera!ng Assistance, Parts, Owner’s Manuals, Dealer and Service info go to hp://shop.panasonic.
Appendix Limited Warranty (ONLY FOR U.S.A.
Appendix Limited Warranty Limits and Exclusions This warranty ONLY COVERS failures due to defects in materials or workmanship, and DOES NOT COVER normal wear and tear or cosmetic damage.
Index H Index # A 3-way conference: 20 Additional handset: 45 Alarm: 42 Answer by voice command: 21 Answering calls: 18 Answering system Call screening: 53 Erasing messages: 49, 50, 52 Greeting message: 48 Greeting only: 53 Listening to messages: 49, 52 New message alerting: 50 Number of rings: 53 Recording time: 53 Remote access code: 52 Remote operation: 52 Ring count: 53 Toll saver: 53 Turning on/off: 48 Auto intercom: 23 Auto talk: 18, 40 Automated call block: 27 B Baby monitor: 43 Battery: 9, 12 Batt
Notes 73
Notes 74
Notes 75
IMPORTANT! If your product is not working properly. . . 1 Reconnect AC adaptor to the base unit. 2 Check if telephone line cord is connected. 3 Use rechargeable Ni-MH batteries. (Alkaline/Manganese/Ni-Cd batteries CANNOT be used.) 4 Read troubleshooting page in the Operating Instructions. Visit our Web site: http://shop.panasonic.com/support L FAQ and troubleshooting hints are available.