
Operation Manual


34
Chapter 3 Recording and Playback
Shooting
White/Black Balance Adjustment to
Recording Completion
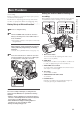
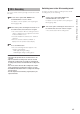
For shooting, follow the steps below.
3
1
4
2
6, 7
5
1
Use the ND FILTER buttons to select a
filter according to ambient light conditions.
2
When the white balance is saved:
• Position the WHITE BAL switch to A or B.
When the white or black balance is not saved
and you have no time to adjust the white
balance:
• Position the WHITE BAL switch to PRST.
• The color temperature can be set to 3200 K or
5600 K.
For details, refer to [Adjusting the White Balance
and Black Balance] (page 46).
If the white balance is adjusted on the spot:
• Select a filter according to ambient light
conditions. Then, position the WHITE BAL
switch to A or B and shoot a white test subject
so that it appears at the center of the screen.
Then, follow the steps below to adjust the white
balance.
1.
Turn the AUTO W/B BAL switch toward AWB
to adjust the white balance.
2.
Turn the AUTO W/B BAL switch toward ABB
to adjust the black balance.
3.
Turn the AUTO W/B BAL switch toward AWB
to adjust the white balance again.
For directions on making adjustments, see
[Adjusting the White Balance] (page 46) and
[Adjusting the Black Balance] (page 47).
3
Point the camera at your subject and adjust the
convergence point, using the CONV. dial.
For details, refer to [Adjusting the Convergence
Point] (page 54).
4
Point the camera at your subject to adjust the
focus, and zoom.
5
To use the electronic shutter, set the shutter
speed and shutter mode.
For more information, see [Setting the Electronic
Shutter] (page 48).
6
Press the REC button to start recording.
7
To stop recording, press the REC button.
NO
TE
Shooting the sun and other very bright subjects may produce
a color cast in surrounding areas.
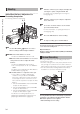
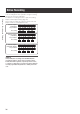
Operation Buttons
During recording, all operation buttons (REW, FF, PLAY/PAUSE,
STOP) are disabled.
Normal Recording
Pressing the REC button starts recording of video and
sound on the P2 cards.
•
The 3D recording mode is set by factory default. The left-
lens (L) image is recorded on the P2 card in card slot L ,
and the right-lens (R) image on the P2 card in card slot R.
• The video and audio (including additional information)
recorded in one session is referred to as a clip.
REC button
REC button
NOTE
Pressing the REC button will not immediately stop data write
operations to a P2 card in the following situations. And the
REC button operation is not recognized.
• When terminating a short recording