V1.
Table of contents 1.Image sensor & record formats ...................................................................................4 1-1. Image size comparison between 4K/UHD and HD formats .................................5 1-2. Key features ........................................................................................................6 1-3. Record modes .....................................................................................................7 1-4.
5. Understanding scene file operations ........................................................................44 5-1. SCENE FILE presets ........................................................................................45 5-2. Factory default settings .....................................................................................45 5-3. Expressing the texture of objects (detail enhancement)....................................46 5-4. Basic settings for Detail.....................................
1.
1. Image sensor & record formats 1-1. Image size comparison between 4K/UHD and HD formats The UHD (3840x2160) image is four times sharper than an FHD 1080p image (nine times that of 720p). And the 4096x2160 resolution (referred to as “4K” on AG-UX180), which is often used for cinema shooting, has a slightly wider image aspect ratio of 17:9. In comparison to a UHD image, this is an extra 256 pixels in the horizontal direction.
1. Image sensor & record formats 1-2. Key features AG-UX180 AG-UX90 (for 59.94Hz region) Optical zoom (i.Zoom) 20x (30x) 15x (25x) 4K(4096x2160) record 24p - UHD(3840x2160) record 59.94p, 50p, 29.97p, 25p, 23.98p 23.98p, 29.97p FHD(1920x1080) record 59.94p, 50p, 29.97p, 25p, 23.98p, 59.94i, 50i 59.94p, 29.97p, 23.98p, 59.94i 50.00Hz: 2-50fps + 100fps 59.94Hz: 2-60fps + 120fps 2-60fps Simul record (P.37) Relay record (P.37) *2 Dual codec record (P.
1. Image sensor & record formats 1-3. Record modes A 4K, Ultra High Definition (UHD), and FHD images in MP4/MOV formats can be selected. And also possible to select lower bitrate HD/SD images in AVCHD format. For AG-UX180 4K/UHD Resolution 4096x2160 3840x2160 Frame rate Bit rate 24.00p 100Mbps 59.94p, 50p 150Mbps 29.97p, 25p, 23.98p 100Mbps 59.94p, 50p 200Mbps FHD 29.97p, 25p, 23.98p 1920x1080 59.94p, 50p 50Mbps 59.94i, 50i 59.94p, 50p AVCHD 59.
1. Image sensor & record formats 1-4. Recording in different codecs with 2 memory cards UX180 UX90 Simultaneous recording with two different codecs is possible. It allows users to record high quality UHD image for main recording while capturing light-weight FHD images for scenario checks etc. Slot1 MAIN REC (UHD or FHD) Slot2 SUB REC (FHD 8M or 50Mbps) サブ記録 (FHD) MAIN REC setting FHD SUB REC setting MAIN + SUB record combinations SUB REC (50M bps) MAIN REC Format Bitrate (bps) UHD@29.
2.
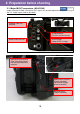
2. Preparation before shooting 2-1. Major IN/OUT connectors (AG-UX180) UX180 UX90 Image resolution of HDMI, SDI and AV OUT signals vary and will depend on the system settings. See 7-2. Output signal (P.66) for the details. Analogue video and audio out Analog audio out (Ø3.5mm stereo mini jack) Wired remote terminals 3G-SDI output (1080p LEVEL-A ready) USB3.0 DEVICE terminal (Type micro-B connector) For connection between a computer USB3.
2. Preparation before shooting 2-1. Major IN/OUT connectors (AG-UX90) UX180 UX90 Image resolution of HDMI and VIDEO OUT signals vary and will depend on the system settings. See 7-2. Output signal (P.66) for the details. Analogue video and audio out Analog audio out (Ø3.5mm stereo mini jack) Wired remote terminals USB3.0 DEVICE terminal (Type micro-B connector) For connection between a computers USB3.0 HOST terminal (Type-A connector) For external storage device connection* HDMI1.
2. Preparation before shooting 2-2. Record mode settings Set the record file format type, frequency, etc. with MENU > “SYSTEM MODE” where the following menu items are available. MENU > SYSTEM MODE - SYSTEM FREQ : 59.94Hz or 50.00Hz (AG-UX180 only) - REC MODE : MOV, MP4 or AVCHD - REC FORMAT : Choose a combination of the number of pixels and bitrate (see P.66) 2-3. Audio input settings The AG-UX series can handle up to 2 channels of audio and record them. 1.
2. Preparation before shooting 2-4. Record modes and required speed class of SD memory cards SD memory cards require a higher writing speed when recording at high bitrates. table shows the minimum speed class necessary for each bitrate. Record mode Record bit rate Minimum required speed class 100Mbps or higher (Incl.
3.
3. MENU settings 3-1. MENU items overview MENU SCENE FILE (Image related settings) [P.16] SYSTEM MODE (Fundamental settings such as CODEC etc.) [P.18] USER SW (Assign functions to USER buttons) [P.19] SW SETUP (Gain, WB and other operation related settings) [P.21] AUTO SW (Function assignment for full auto mode) [P.26] RECORD SETUP (Recording related such as Pre-REC, TC set) [P.27] AUDIO SETUP (Input gain and other audio related settings) [P.
3. MENU settings SCENE FILE Menu item FILE SELECT LOAD/SAVE MASTER DETAIL DETAIL CORING SKIN TONE DETAIL V DETAIL LEVEL RB GAIN CONTROL SETTING Value Description (Factory default setting underlined) F1: / F2:FLUO / F3:SPARK / F4:STILL / F5:CINE V / F6:CINE D Recall scene files. Load / Save custom scene files to/from SD memory cards. Adjust image contour correction level for entire image. Adjust threshold level of image contour correction.
3. MENU settings SCENE FILE Menu item GAMMA MODE BLACK GAMMA KNEE MODE KNEE MASTER POINT KNEE MASTER SLOPE DRS Description Choose image contrast and gradation according to the scene. Adjusts gamma characteristics in darker signal areas. Set operation mode of knee function (compress bright areas to avoid an overexposed image). Sets the signal level where video image compression begins. Adjusts slope angle when in MANUAL KNEE mode. Turn ON/OFF Dynamic Range Stretcher (DRS) function.
3. MENU settings SYSTEM MODE Menu item Description Value (Factory default setting underlined) SYSTEM FREQ (AG-UX180 only) Set system frequency 59.94Hz / 50.00Hz REC MODE Set record file format. MOV / MP4 / AVCHD REC FORMAT Set image quality of video to be recorded. (resolution, frame rate, and bit-rate) Available formats vary depending on the system frequency and REC mode settings. See P.66 for the details.
3. MENU settings USER SW feature Features can quickly be recalled from 13 user assignable buttons. (9 of them are physical buttons and 4 are available as a part of the touch screen.) USER 8 (REC CHECK) USER10 USER11 USER12 LCD Touch screen USER 6 (O.I.S) USER 7 USER13 (LCD/EVF) USER1 USER2 USER3 USER 9 (AWB) USER 5 (ZEBRA) USER 4 (WFM) How to assign? MENU > USER SW > Assign any function to any button. * See next page for assignable functions including their details.
3. MENU settings USER SW The following table shows all functions that can be assigned to the USER buttons. Menu item Description INHIBIT The USER button is disabled (nothing is assigned). FOCUS ASSIST1,2 Turn ON/OFF the FOCUS ASSIST function. See 4-2. Understanding Focus assist features (P.36) for further details of this function. Switch auto iris mode to backlight mode. The backlight mode can prevent underexposure when the lighting is illuminating from behind the subject.
3. MENU settings USER SW The following table shows all functions that can be assigned to the USER buttons. Menu item Description Make focusing easier by enhancing the subject’s edge on the viewfinder and built-in LCD monitor. EVF/LCD DETAIL The level of this enhancement and the frequency can be set using the “EVF/LCD PEAK LEVEL” and “EVF/LCD PEAK FREQ.” items of the DISP menu. IR REC Turn ON/OFF the Infrared shooting mode. (AG-UX180 only) LOW LIGHT Set camera sensitivity mode.
3. MENU settings USER SW The following table shows all functions that can be assigned to the USER buttons. Menu item Description SUPER SLOW Turn ON/OFF super slow record mode (AG-UX180 only) SLOT SEL Select card slot to be recorded or playback. LCD/EVF OUTPUT Select the display device.
3. MENU settings SW SETUP Menu item Value Description (Factory default setting underlined) IRIS RING Set the IRIS control direction of the IRIS ring. DOWN OPEN / UP OPEN LOW GAIN Set GAIN value when the gain selector is set to “L”. AG-UX180 AG-UX90 AUTO - 0dB – 24dB AUTO - 0dB – 30dB MID GAIN Set GAIN value when the gain selector is set to “M”. AG-UX180 AG-UX90 AUTO - 6dB – 24dB AUTO - 6dB – 30dB HIGH GAIN Set GAIN value when the gain selector is set to “H”.
3. MENU settings SW SETUP Menu item PEAKING COLOR PEAKING LEVEL Description Set highlighting color for the peaking focus assist. Set highlighting level of the peaking focus assist. Value (Factory default setting underlined) Red / Blue / Yellow / White -7 – 0 – +7 SPEED(*) / COARSE / FINE FOCUS RING DRIVE Set the type of focus control by the focus ring. FOCUS MACRO Turn ON/OFF macro mode. AREA MODE Choose the feature that works when tapping the subject on the built-in LCD.
3. MENU settings SW SETUP Menu item ZEBRA MODE Description Set the display period of ZEBRA. Value (Factory default setting underlined) CONTINUE / MOMENT (5sec) TYPE 1 TYPE 2 BARS TYPE Set the type of color bars. TYPE 3 SUB REC BUTTON Use one of the REC buttons on the carrying handle. FAST ZOOM Increase servo zoom speed. SUB ZOOM Use one of the zoom levers on the carrying handle. DIGITAL ZOOM i. ZOOM ZOOM/FOCUS Set magnification ratio of the digital zoom.
3. MENU settings AUTO SW Whether to use the following features or not can be individually selected while in the automatic mode. A symbol is indicated on the viewfinder / built-in LCD screen while this mode is set to AUTO. Menu item Value Description (Factory default setting underlined) A.IRIS Auto iris ON / OFF AGC Auto gain control ON / OFF AGC LIMIT Set the upper limit of the amplifier while in AUTO mode.
3. MENU settings RECORD SETUP Menu item Description MEDIA SELECT Select media slot for recording. 2SLOT FUNC. Set the record mode, which uses dual memory card slots. DUAL CODEC REC (AG-UX180 only) INTERVAL REC VFR MODE FRAME RATE SUPER SLOW (AG-UX180 only) PRE-REC INFRARED REC (AG-UX180 only) IR REC COLOR (AG-UX180 only) FOCUS TRANSITION (AG-UX180 only) FOCUS TRANSITION TIME (AG-UX180 only) Select the codec for sub recording. Available in DUAL CODEC mode only.
3. MENU settings AUDIO SETUP Menu item AUDIO LOW CUT CH1 AUDIO LOW CUT CH2 Description Reduce the level of low frequency sound on audio channel 1. Reduce the level of low frequency sound on audio channel 2. Value (Factory default setting underlined) ON / OFF ON / OFF AUDIO LEVEL CH1 Set audio level adjustment mode for audio channel1. AUTO / MANUAL AUDIO LEVEL CH2 Set audio level adjustment mode for audio channel2.
3. MENU settings OUTPUT SETUP Menu item OUTPUT SEL (AG-UX180 only) Value (Factory default setting Description underlined) Select video and audio output. HDMI / SDI / AV RESOLUTION Set resolution of output video signal. SYSTEM /1080p /1080i /DOWN CONV. The type of signal available on the output varies and will depend on REC format setting. See P.66 for the details. REMOTE REC Inserts the REC/PAUSE trigger signal on SDI (AG-UX180) or HDMI OUT.
3. MENU settings DISP SETUP Menu item ZEBRA DETECT1 ZEBRA DETECT2 MARKER GUIDE LINES Value (Factory default setting Description underlined) Set the zebra pattern (right downward). Set the zebra pattern (right upward). Display the spot meter marker. 50% - 80% - 105% 50% - 100% - 105% ON / OFF Select and show the guide line pattern. / / / OFF 16:9 90% / 4:3 / 14:9 / 1.85:1 / 2:1 / 2.35:1 / 2.
3. MENU settings DISP SETUP Menu item Value Description (Factory default setting underlined) Show the information other than the following. OTHER DISPLAY POWER LCD LCD BACKLIGHT (AG-UX180 only) LCD SET EVF SETTING EYE SENSOR (AG-UX180 only) SELF SHOOT EVF COLOR EVF/LCD DETAIL EVF/LCD PEAK LEVEL EVF/LCD PEAK FREQ.
3. MENU settings OTHER FUNCTIONS Menu item FORMAT MEDIA Description SD cards and external drives can be formatted. MEDIA STATUS Show remaining record time of SD cards. PICTURE MEDIASELECT (AG-UX180 only) Select card slot to store still pictures. REC LAMP CLOCK SET TIME ZONE ALERT SOUND ECONOMY (BATTERY) Set the tally lamp to be used during the recording. Set the clock. Set the time difference between the current location and Greenwich Mean Time (GMT).
3. MENU settings NETWORK SETUP Menu item USER ACCOUNT Description Set a user account information for the AG ROP iPad app. (See P.42) Value (Factory default setting underlined) SET / OFF DIRECT / SSID(SELECT) / SSID(MANUAL) Sub settings when “DIRECT” is chosen. (Choose it when connect an iPad to AG-UX camera directly) Set a connection method. - SSID: Network ID of the camera. - BAND: Frequency band to be used (2.4GHz / 5GHz) - CHANNEL (2.4GHz): Channel when a Wi-Fi adaptor (2.4GHz) is used.
4.
4. Understanding advanced features 4-1. Monitoring 4K & UHD image UX180 UX90 The AG-UX180 is equipped with an HDMI 2.0 output port (HDMI1.4a for AG-UX90). It allows the camera to output stunning UHD/59.94p or 50.00p images (UHD/29.97p for AG-UX90) in playback mode and camera through mode. Note: Output image is down-converted to 1080p from UHD/59.94p or 50p once recording starts. 4K monitor TV supports HDMI 2.0 Acceptable video formats* 4K/24.00p * UHD/59.94p ** UHD/50.00p ** UHD/29.97p UHD/25.
4. Understanding advanced features 4-2. Understanding Focus assist features UX180 UX90 The AG-UX series is equipped with following two focus assist features to make focusing easier when recording 4K/UHD higher resolution formats. Two different assist modes (EXPAND and PEAKING) can be individually recalled with USER assignable buttons. How to use 1. Set the FOCUS mode to MANUAL. 2.
4. Understanding advanced features 4-3. Understanding Dual memory card slots Various recording modes are available with dual SD memory card slots. BACKGROUND UX180 UX90 Perform continuous recording to one SD card, even though the other SD card can start and stop recording as required. Slot #1 Take1 Take2 Slot #2 Take3 Record SIMUL UX180 UX90 Record the same content onto two SD cards simultaneously. Even if recording stops on one card, recording on the other card continues.
4. Understanding advanced features 4-4. Synchronizing timecode for multi-cam operation UX180 UX90 The AG-UX180 is equipped with a timecode IN/OUT terminal (common use for IN and OUT). The following describes workflow know-how when using time code synchronization feature with two AG-UX180 units. Synchronize TCG 01:20:00:50 TCG 01:20:00:50 Preparation 1. Connect TC PRESET IN/OUT terminals on both master and slave units with a BNC cable. 2.
4. Understanding advanced features 4-5. Understanding user customizable image stabilizer UX180 UX90 Much higher performance is required of image stabilizers for 4K/UHD cameras because even a small amount of shake can easily be seen when working in these resolutions. The AG-UX series is equipped with nine times higher stabilization performance achieved through an expanded stabilization range. The stabilization characteristics can also be customized to meet professional requirements.
4. Understanding advanced features 4-6. Understanding user customizable auto focus UX180 UX90 The AG-UX series is equipped with customizable auto focus to meet professional requirements. Customizing image stabilization characteristic 1. MENU > SW SETUP > CUSTOM AF : ON 2. MENU > SW SETUP > Set “AF SPEED” and “AF SENSITIVITY” as explained below. AF SPEED (focusing speed) adjustment - Factory default setting = 0 (adjustable range: -5 - - - 0 - - - +5) - Focusing speed increase as the value increases.
4. Understanding advanced features 4-7. Understanding Focus transition feature UX180 UX90 A new focus transition feature allows users to easily adopt impressive camera work with racking focus (changing focus of the lens during a shot). This is even available in 4K/UHD mode, where this would normally be a challenging focus operation if performed manually. EXIT 1 2 3 How to operate focus transition 1. Set focus mode to MANUAL. 2.
4. Understanding advanced features 4-8. Understanding Remote operation via AG ROP iPad app UX180 UX90 Remote control via Wi-Fi network is available by using an application for iPad. Necessary equipment iPad (iOS 7.1 or higher) AG-UX180/90 Wi-Fi Wireless module *1 Panasonic AJ-WM50, WM30 AG ROP app *1 Contact your dealer for availability of the wireless modules. Setting up equipment (overview) 1. 2. 3. 4. 5. Install the Panasonic AG ROP app from App Store to the iPad.
4. Understanding advanced features Setup example: Settings on the Camera side 1. Set following USB related menu items to enable the USB3.0 port for AG ROP connection. MENU > OTHER FUNCTIONS > USB MODE SELECT > HOST MENU > OTHER FUNCTIONS > USB MODE > ON 2. Set network related menu items (MENU > NETWORK SETUP > ) below. Menu Value WIRELESS SETUP Wireless LAN Setup Choose “DIRECT” and set followings SSID: Enter SSID name (Default: UX180, UX90) BAND: Choose “2.4GHz” or “5GHz” depends on Wi-Fi adaptor type.
5.
5. Understanding scene file operations The following six different scene presets come standard with the camera, and can be user customized if required. 5-1. SCENE FILE presets F1: Basic setting F2: FLUO Suitable for recording where the characteristics of fluorescent lamps are taken into consideration (example: shooting indoors). Most of the parameters are equal to “F1:” but the MATRIX is adjusted for fluorescent lighting.
5. Understanding scene file operations 5-3. Expressing the texture of objects (detail enhancement) When expressing the outline or surface texture of an object, faint reflection of light may be intensified or, to the contrary, the picture may look blurred. This is a phenomenon caused by the strength / weakness of Detail signal to intensify the video signal for the object’s outline. Adjustment of Detail signal can make the object’s luster or texture look more natural.
5. Understanding scene file operations 5-4. Basic settings for Detail MENU > SCENE FILE > [MASTER DETAIL] (Factory default settings underlined) -31 - - - 0 - - - +31 Adjusts the level of overall Detail effect. [DETAIL CORING] 0 - - - +1 - - - +60 Sets the level of signal (including noise) that suppresses the Detail effect. [SKIN TONE DTL] ON / OFF Sets the level of detail effect for a certain color (skin) tone.
5.
5. Understanding scene file operations Detail coring control Outline compensation can be performed by adjusting the Detail, and enhanced outlines enable clear representation of images. But at the same time it may make the picture look coarse. This occurs because added Detail will also work on low-level signals which include noise. Detail coring function can adjust the range of added Detail signal but also helps to reduce the noise introduced by the Detail circuits. Noise is a low-level signal.
5. Understanding scene file operations 5-5. Expressing the gradation of a picture (Knee, Gamma) Due to bright sunny weather or lighting, “blown-out highlights” can sometimes occur, where bright areas look completely white. This is a phenomenon caused by the luminance signals that are out of the camera’s Dynamic Range (processing range). In order to put such high-brightness input signals within the Dynamic Range, Knee function can be used to compress the gradation.
5. Understanding scene file operations KNEE MASTER POINT: 107% Highlight areas tend to be overexposed (no gradations visible) when value is increased. KNEE MASTER POINT: 93.0% KNEE MASTER POINT: 80.0% Gradations in the highlight areas become visible when value is decreased.
5. Understanding scene file operations Gamma settings There are cases where the color and contrast, which look natural to the eye, are not fully reproduced in the captured image. An effective way to improve the gradation of the output signal is to select a suitable Gamma curve according to the scene conditions. The AG-UX series offers eight types of different Gamma curves. HD: This is a video Gamma characteristic for HD (High Definition).
5.
5.
5.
5.
5.
5. Understanding scene file operations Black gamma control Dark parts of the image can be lifted or suppressed with this control. MENU > SCENE FILE > (Factory default settings underlined) [BLACK GAMMA] -8 - - - 0 - - - +8 Sets gamma characteristic for dark part of the image.
6.
6. After recording 6-1. Connecting to PC/Mac Recorded clips can be transferred rapidly between PC/Mac over USB3.0 interface. USB DEVICE USB3.0 cable (Optional) How to connect 1. Turn ON the power of the AG-UX camera. 2. Set MENU > OTHER FUNCTIONS > USB MODE : ON 3. Set MENU > OTHER FUNCTIONS > USB MODE SELECT: DEVICE 4. Connect a USB3.0 cable between the camera (USB DEVICE terminal) and PC/Mac. 5. Tap “PC” on the touch screen to connect.
6. After recording 6-3. Folder name structure for MOV/MP4 folders Following information determines the folder names that stores clips in MOV/MP4 formats. Example: When a folder is named as “100RARH0” The folder contains following video clips. - Pixel count: “3840x2160” - Frame rate: “59.94fps” - Record format: MP4 LPCM progressive (A) Pixel count Y: 1920 x 1080 R: 3840 x 2160 Q: 4096 x 2160 (B) Framerate (fps) A: 59.94 B: 50 C: 29.97 D: 25 E: 24.00 F: 23.
7.
7. Appendix 7-1. Recording time in each video setting How to read record format MP4, MOV format (AG-UX180) System frequency 59.94Hz/50.00Hz Record format Memory card capacity 16GB 64GB 20min 1h 20m 4K 2160/24.00p 100Mbps UHD 2160/59.94p 150Mbps ---- UHD 2160/29.97p 100Mbps 20min 1h 20m 1h 20m 55min UHD 2160/23.98p 100Mbps 20min FHD 1080/59.94p All-I 200Mbps 10min 40min FHD 1080/59.94p 100Mbps 20min 1h 20m FHD 1080/59.94p 50Mbps 40min 2h 40m FHD 1080/29.
7. Appendix 7-1. Recording time in each video setting (continued) AVCHD (AG-UX180) Record format PS System frequency 1080/59.94p PH 1080/59.94i PH 1080/23.98p HA 1080/59.94i 59.94Hz Memory card capacity 16GB 64GB 1h 20m 5h 20m 1h 30m 6h 00m 1h 30m 6h 00m 2h 00m 8h 30m HE 1080/59.94i 6h 40m 27h 30m PM 720/59.94p 4h 15m 17h 10m SA 480/59.94i 4h 00m 16h 30m PS 1080/50.00p 1h 20m 5h 20m PH 1080/50.00i 1h 30m 6h 00m HA 1080/50.00i HE 1080/50.00i PM 720/50.00p 50.00Hz SA 576/50.
7. Appendix 7-1. Recording time in each video setting (continued) MP4, MOV format (AG-UX90: 59.94Hz model) Record format Memory card capacity 16GB 64GB UHD 2160/59.94p 150Mbps ---- UHD 2160/29.97p 100Mbps 20min 1h 20m 55min 1h 20m UHD 2160/23.98p 100Mbps 20min FHD 1080/59.94p All-I 200Mbps 10min 40min FHD 1080/59.94p 100Mbps 20min 1h 20m FHD 1080/59.94p 50Mbps 40min 2h 40m FHD 1080/29.97p All-I 200Mbps 10min 40min FHD 1080/23.
7. Appendix 7-2. Output signal formats 1. AG-UX180 System frequency: 59.94Hz REC format 4K 24.00p 2160/24.00p SDI OUT -- AV OUT SYSTEM Resolution setting 1080p 1080/24.00p 1080/24.00PsF -- 1080/59.94p -- 1080/59.94p -- SYSTEM UHD 59.94p UHD 29.97p UHD 23.98p FHD 59.94p PS 59.94p FHD 59.94i PH 59.94i HA 59.94i HE 59.94i FHD 29.97p FHD 23.98p PH 23.98p PM 720p SA 480i HDMI OUT *1 -- 1080p 2160/59.94p 1080/59.94p 1080i 1080/59.94i 1080/59.94i -- DOWN CONVERT 480/59.94p 480/59.
7. Appendix 7-2. Output signal formats (continued) 2. AG-UX180 System frequency: 50.00Hz REC format 4K 24.00p UHD 50.00p UHD 25.00p FHD 50.00p PS 50.00p FHD 50.00i PH 50.00i HA 50.00i HE 50.00i FHD 25.00p PM 25.00p SA 576i 2160/24.00p SDI OUT -- AV OUT SYSTEM Resolution setting HDMI OUT 1080p 1080/24.00p 1080/24.00PsF -- SYSTEM 2160/50.00p 1080/50.00p -- 1080p 1080/50.00p 1080/50.00p -- 1080i 1080/50.00i 1080/50.00i -- DOWN CONVERT 576/50.00p 576/50.00i 576/50.
7. Appendix 7-2. Output signal formats (continued) 3. AG-UX90 System frequency: 59.94Hz REC format UHD 29.97p UHD 23.98p FHD 59.94p PS 59.94p FHD 59.94i PH 59.94i HA 59.94i HE 59.94i FHD 29.97p FHD 23.98p PH 23.98p PM 720p SA 480i HDMI OUT VIDEO OUT SYSTEM Resolution setting 2160/29.97p -- 1080p 1080/59.94p -- 1080i 1080/59.94i -- DOWN CONVERT 480/59.94p 480/59.94i SYSTEM 2160/23.98p -- 1080p 1080/59.94p -- 1080i 1080/59.94i -- DOWN CONVERT 480/59.94p 480/59.
7. Appendix 7-3. Genuine accessories This page introduces accessories come standard with AG-UX180 and AG-UX90 MIC HOLDER FIXING SCREW (12mm) Part No. VYC1144 (1pc.) MIC HOLDER Part No. VYC1146 EYE CUP (for AG-UX180) Part No. SYA0048 EYE CUP (for AG-UX90) Part No. SYA0019 LENS HOOD UNIT (for AG-UX180) Part No. SYK1585 LENS HOOD UNIT (for AG-UX90) Part No. SYK1595 Battery pack (5,900mAh) AC adaptor XLR connector cover Part No. AG-VBR59 Part No. SAE0011AE Part No. VJF1468 (1pc.
7. Appendix Optional accessory Battery pack (AG-VBR batteries support quick charging with AG-BRD50 quick charger) AG-VBR118G (11,800mAh) AG-VBR89G (8,850mAh) Battery charger AG-BRD50 (Support quick charging with AG-VBR batteries) AG-B23 (AC cord comes standard) AG-VBR59 (5,900mAh) VW-VBD58 (5,800mAh) Microphone LED light AJ-MC200G (+48V, XLR) VW-LED1 (Work with 4x AA batteries) Wi-Fi module SD memory card UHS-I Read max.95MB/s Write max.90MB/s AJ-WM50 * (5G/2.4GHz bands) AJ-WM30 * (2.
Revision history Issued Dec.2016 Revision history First edition issued Document ver. v1.
Panasonic Corporation Download firmware, check frequently asked questions at https://panasonic.