
Operating instructions


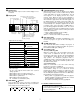

6
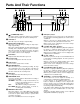
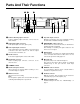
Parts And Their Functions
(STANDBY/ON) switch
The unit is turned on when this switch is pressed. When
the switch is pressed again, the unit is in standby mode.
STOP button
When this is pressed, the tape stops travelling.
PAUSE/STILL (PAGE) button
When this is pressed during recording, the tape tempo-
rarily stops travelling.
When pressed during playback, the tape temporarily stops
travelling, and a still picture appears on the TV monitor.
When pressed again, the tape travel resumes. The pages
on the menu screen are advanced when the button is
pressed while a menu screen is displayed.
PLAY button
Playback starts when this button is pressed.
Cassette holder
This is the loading slot for the video cassette.
EJECT button
This is used to eject the video cassette.
REC REVIEW button
When the button is pressed during recording, the tape
runs temporarily in the reverse direction, and after the
recorded section has been played back a few seconds,
the unit is returned to the recording mode.
REC button
Recording starts when this button is pressed.
TIMER MODE switch
This is the operation switch for internal timer recording or
external timer recording.
INT TIMER:
OFF:
EXT TIMER:
MENU/REC LOCK switch
When this switch is set to REC LOCK, the time mode
and operation buttons except for REC and REC REVIEW
as well as the power switch cannot be operated while
recording is in progress.
When it is set to MENU, the menu screen appears.
REW (SET –) button
When this button is pressed, the tape is rewound. When
it is kept depressed during playback, the review mode is
established.
When it is pressed once during playback in the alarm
search mode, the unit is placed in the review mode.
When a menu screen is displayed, it is used to change
an item (decrement a value).
Field REV ADV (SHIFT ) button
When this is kept depressed during still-picture playback,
the picture is advanced field by field in the reverse
direction. When it is released, the still picture reappears.
When it is pressed while a menu screen is displayed, the
setting items move downward.
FF (SET +) button
When this is pressed, the tape is fast forwarded. When it
is kept depressed during playback, the unit is placed in
the cue mode.
When it is pressed once during playback in the alarm
search mode, the unit is placed in the cue mode.
When a menu screen is displayed, it is used to change
an item (increment a value).
Field FWD ADV (SHIFT ) button
When this is kept depressed during still-picture playback,
the picture is advanced field by field in the forward
direction. When it is released, the still picture reappears.
When it is pressed while a menu screen is displayed, the
setting items move toward the right.
TRACKING (–, +) buttons/V-LOCK buttons
These buttons are used to adjust the tracking or to
compensate the vertical dancing during still picture.
If noise appears on the playback picture, press the
buttons to adjust the tracking is such a way that the
picture is made as clear as possible. When both buttons
are pressed together during 3- or 6-hour mode playback,
the tracking is adjusted automatically.
If the image shakes slightly in the vertical direction during
still picture, press the V-LOCK buttons to reduce the
dancing.
Further, the time/date display position can be adjusted
during STOP and EJECT (see page 14).
1
2
3
4
5
6
7
8
9
0
q
w
e
r
t
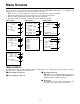
At the times set by the internal timer, the
power is automatically turned on or off and
recording starts or stops.
When timer recording is not performed.
When the external power is turned on,
recording starts automatically.
TRACKING /
V-LOCK RESET
COUNTER /
REC
ALARM
TIME MODE
SEARCH
PAGE
PAUSE/STILL
REV ADV
MENU
OFF
REC LOCK
INT TIMER
OFF
EXT TIMER
REW FF
FWD ADV
STOP PLAY
SHIFT
SET
EJECT
REC REVIEW
REC
REV
FWD
1234 5 678
apoiuyt90qw e r
s