
Multi Purpose Camera Operating Instructions
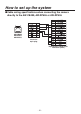


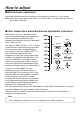
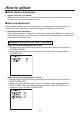

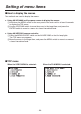
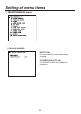
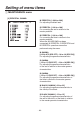
Table Of Contents
- TABLE OF CONTENTS
- Accessories
- Introduction
- Characteristics
- Precautions for use
- Major operating controls and their functions
- How to install
- How to set up the system
- Configuration example 1: Connection of camera controller
- Configuration example 2: High-speed P/T system (1)
- Configuration example 3: High-speed P/T system (2)
- Configuration example 4: Controlling the camera from the AW-RP655 or AW-RP555 controller
- Control exercised from the AW-CB400.
- When the camera is to be controlled from the AW-RP655 controller
- When the camera is to be controlled from the AW-RP555 controller
- Cable wiring specifications when connecting the camera directly to the AW-CB400, AW-RP655 or AW‑RP555
- Operation procedure
- How to adjust
- Intelligent functions
- Setting of menu items
- Appearance
- Specifications

- 28 -
Setting of menu items
How to display the menus
Two methods are used to display the menus.
Using AK-HC1800N multi purpose camera to display the menus:
Hold down the MENU switch on the rear panel of the main unit for at least 3 seconds
to display the TOP menu.
Use the UP/DOWN switch to move the cursor to the target item, and press the
ENTER switch to move to a menu at a lower hierarchical level.
Using AK-HRP150G camera controller
Press the MENU ON/OFF switch on the AK-HRP150G so that its lamp lights.
The TOP menu now appears.
Move the cursor to the target item, and press the MENU switch to move to a menu at
a lower hierarchical level.
TOP menu
When the VIDEO MENU is selected: When the FILM MENU is selected: