Before Operation Digital Copier Operating Instructions (For Copier) Making Copies Model No. DP-150FX DA-DS150 (Option) Before operating this copier, please read these instructions completely and keep these operating instructions for future reference.
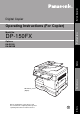
Operation Chart Common Features ■ Full Size Copying 100% Automatic Document Feeder Control Panel 2SIDED 2 SIDED REDIAL/ PAUSE SORT ENERGY SAVER RESET COPY 1 2 in 1 FAX FLASH/ SUB-ADDR PHOTO DATA AUTO DARKER SELECT PAPER TRAY ON LINE ZOOM (50~200%) abc.. DIRECTORY SEARCH - + 2 ABC 3 DEF CLEAR/STOP 4 GHI 5 JKL 6 MNO 7 PQRS 8 TUV 9 WXYZ FUNCTION SET START MONITOR TONE 0 -/() LIGHTER 1 2 (3) Place the Press the Original Copy Key C Face-Up C Up to 30 originals (20 lbs.
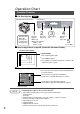
Operation Chart Overview Overview Useful for office, more than 4 functions 1 Copier 2 Facsimile 3 Printer 4 Scanner 5 Application Software C Document Manager C Document Viewer C Document Scanner C Utilities (Status Monitor, Phone Book Editor, Device Configuration Editor) C Can copy up to Legal size. C Available to copy text/photos/ halftones originals. C Plain paper Super G3 compatible Fax. C Can be used as a regular telephone with optional handset.
Energy Star The DP-150FX copier complies with Tier 2 of the Environmental Protection Agency’s Energy Star Program. This voluntary program specifies certain energy consumption and usage standards for copiers. These copiers will automatically “power down” after a specified period of non-use. The use of these Energy Star compliant copiers will reduce energy consumption and ultimately benefit the environment. The default functions can be adjusted depending on your office requirements.
Energy Star Table of Contents Table of Contents Before Operation Overview ........................................................................................................................................ 3 Precautions .................................................................................................................................... 6 ■ External/Internal ................................................................................... 9 Components ■ Control Panel ..................
Precautions For your safety ■ Laser Safety Caution This product utilizes a laser. Use of controls or adjustments or performance of procedures other than those specified herein may result in hazardous radiation exposure. ■ Caution Labels DANGER-Invisible laser radiation when open and interlock defeated. AVOID DIRECT EXPOSURE TO BEAM. FFPTE2479 Product complies with DHHS Rules 21 CFR Subchapter J in effect at date of manufacture. Utsunomiya, Tochigi, Japan Label when manufactured in Japan.
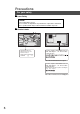
Precautions Precautions Handling ■ Do not look directly at exposure lamp when copying. ■ Do not turn the power switch off or open the front panel during copying. (See page 9) C Do not drop paper clips or other metal objects into the copier. Toner and Paper ■ Store toner cartridge and paper in cool areas with low humidity. C High quality paper of 16 lbs. - 24 lbs. (15 – 34 lbs. via sheet bypass) may be used.
Precautions Installation ■ The copier should not be installed in areas with the following conditions: C Extremely high or low temperature and humidity. Proper ambient conditions Temperature: 50°F – 90°F Relative humidity: 30% – 80% C Where temperature and humidity can change rapidly, causing condensation. C Direct exposure to sunlight. C Directly in air conditioning flow. C In areas of high dust concentration. C In areas of poor ventilation. C In areas with chemical fume concentration.
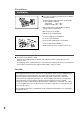
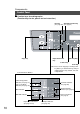
Precautions Components Components Using the Sheet Bypass External/Internal ■ External Exit Tray Pull out the tray when copying. Control Panel ADF (Automatic Document Feeder) Right Cover Sheet Bypass Button Power Switch 2nd Paper Feed Module (Option) On Off Push here when closing Right Cover.
Components Control Panel ■ Function keys for making copies. (Function keys for fax, please see fax instruction.
Components Message Display Energy Saver Key REDIAL/ PAUSE FLASH/ SUB-ADDR abc.. DIRECTORY SEARCH + ENERGY SAVER 1 2 ABC 3 DEF 4 GHI 5 JKL 6 MNO 7 PQRS 8 TUV 9 WXYZ Reset Key C Press to reset all features to initial power-on state. RESET CLEAR/STOP FUNCTION SET START MONITOR TONE Set Key 0 -/() Keypad Start Key Clear/Stop Key Press to stop copy run or clear copy count in display. C By pressing Exposure Control key, the Exposure Indicator will be indicated as follows.
Mode Functions ■ Energy Saver Mode/Sleep Mode Energy Saver Mode # To enter this mode Press Energy Saver key. The indicator will flash. Automatically enters after 15 minutes from the last copy. $ To cancel this mode Press Energy Saver key again. Sleep Mode # Automatically enters after 30 minutes from the last copy. Power consumption will drop and the Energy Saver key indicator will light. $ To cancel this mode. Press Energy Saver key.
Mode Functions Features Features ■ Features List Reduction or Enlargement Copying (See page 14) Copying with preset ratios. Zoom Copying (See page 15) Copying with variable zoom ratios. Digital Skyshot copy (See page 16) Copying from small originals without dark areas around the image. 2 Sided Copy (See page 17) Copying 2-sided from 1-sided originals. 2 in 1 copy (See page 18) Copying from two 1-sided originals, side by side, to 1-sided copies.
Common Features Reduction or Enlargement Copying ■ There are 3 preset reduction and 1 preset enlargement modes. 2SIDED 2 SIDED REDIAL/ PAUSE SORT ENERGY SAVER RESET COPY Message Display 2 in 1 FAX FLASH/ SUB-ADDR PHOTO DATA AUTO DARKER ZOOM SELECT (50~200%) PAPER TRAY ON LINE abc..
Common Features Zoom Copying ■ A zoom ratio can be selected from 50% to 200% in 1% increments. 2SIDED 2 SIDED REDIAL/ PAUSE SORT ENERGY SAVER RESET COPY Message Display 2 in 1 FAX FLASH/ SUB-ADDR PHOTO DATA AUTO DARKER SELECT PAPER TRAY ON LINE ZOOM (50~200%) abc.. DIRECTORY SEARCH - + 1 2 ABC 3 DEF 4 GHI 5 JKL 6 MNO 7 PQRS 8 TUV 9 WXYZ CLEAR/STOP FUNCTION SET START MONITOR TONE 0 -/() 1 Paper Tray Key* 2 Place the Original Press Copy Key 3 Select zoom ratio.
Creative Features Digital Skyshot Copy ■ To copy from the platen with ADF open. Making copies from small originals without dark areas around the image. The Digital Skyshot mode is normally set on. If the mode is not set, please use the following procedure. 2SIDED 2 SIDED REDIAL/ PAUSE SORT ENERGY SAVER RESET COPY Message Display 2 in 1 FAX FLASH/ SUB-ADDR PHOTO DATA AUTO SELECT DARKER PAPER TRAY ON LINE ZOOM (50~200%) abc..
Creative Features 2 Sided Copy ■ For 2-sided copying. 2SIDED 2 SIDED REDIAL/ PAUSE SORT ENERGY SAVER RESET COPY Message Display 2 in 1 FAX FLASH/ SUB-ADDR PHOTO DATA AUTO ZOOM SELECT DARKER abc..
Creative Features 2 in 1 Copy ■ For 2 in 1 copying. 2SIDED 2 SIDED REDIAL/ PAUSE SORT ENERGY SAVER RESET COPY Message Display 2 in 1 FAX FLASH/ SUB-ADDR PHOTO DATA SELECT AUTO DARKER PAPER TRAY ON LINE ZOOM (50~200%) - abc..
Creative Features ■ For 2 in 1 copying. (2 Sided mode) 2SIDED 2 SIDED REDIAL/ PAUSE SORT ENERGY SAVER RESET COPY Message Display 2 in 1 FAX DATA ZOOM SELECT AUTO DARKER (50~200%) PAPER TRAY ON LINE - abc..
Creative Features Sorting ■ Multiple copies to be sorted automatically. 2SIDED 2 SIDED REDIAL/ PAUSE SORT ENERGY SAVER RESET COPY Message Display 2 in 1 FAX FLASH/ SUB-ADDR PHOTO DATA ZOOM SELECT AUTO DARKER (50~200%) PAPER TRAY ON LINE - abc..
Creative Features Using the Sheet Bypass ■ To copy on printed paper, letterhead, mailing labels, transparencies and oddsize paper, etc., or to use the bypass as an additional paper source. 1 2 Position original. Select copy ratio/size. (See page 14) 3 Creative Features Open the sheet bypass. Open the tray. Tray # Place paper into the tray. (Up to 50 sheets) Insert the paper until it stops. 4 Do not fill above. Copy side down for copying on letterhead paper and mailing labels.
Option Option ■ 2nd Paper Feed Module (DA-DS150) Available to add 250-sheet paper tray. C C For installation, see the Installation Instructions provided. For setting and changing paper size, see page 24. The illustration is the main unit with optional 2nd Paper Feed Module.
Handling Adding Paper ■ Use the following steps to add paper. 1 Lift paper tray and pull out of the copier until it stops. 2 Push the bottom plate down until it locks. 3 Place paper into paper tray. How to place paper: Place the paper copy side up. 4 Option Do not fill above. Make sure paper is not loaded above overfill indicator located in the paper tray. Overfill Indicator 1-sided copy 5 NOTE Handling Push paper tray back into copier.
Handling Changing Paper Size ■ Following is the procedure to change paper size of paper tray from the control panel. This procedure is also same for optional 2nd Paper Feed Module. 2SIDED 2 SIDED REDIAL/ PAUSE SORT ENERGY SAVER RESET COPY Message Display 2 in 1 FAX FLASH/ SUB-ADDR PHOTO DATA AUTO DARKER ZOOM SELECT (50~200%) PAPER TRAY ON LINE - DIRECTORY abc..
Handling Changing Toner Cartridge ■ Message will appear in the message display when needs to add toner. 1 Right Cover Button # Open the sheet bypass. $ Push the button. % Open the right cover. Sheet Bypass 2 3 4 # Open the front panel. Hook Do not open the front panel first. It can not be opened unless you open the covers shown in procedure 1. $ Pull the green hook of toner cartridge. Remove the toner cartridge. # Shake the new toner cartridge several times.
Handling Changing Drum Unit ■ Message will appear in the message display when needs to change drum unit. 1 # Open the sheet bypass. $ Push the button and open the right cover. % Open the front panel. & Remove the toner cartridge. For detail procedure, see page 25. (Procedure 1 to 3) 2 Remove the drum unit by pulling the handle with green label. 3 4 Take out the new drum unit from the plastic bag. 5 # Replace the toner cartridge. (See page 25) $ Close the front panel. % Close the right cover.
Handling Removing a Paper Misfeed (Main Unit) ■ Paper transport and paper entry areas 2SIDED 2 SIDED SORT 2 in 1 PHOTO DATA I AUTO DARKER ZOOM SELECT (50~20 PAPER TRAY - LIGHTER 1 2 Button Right Cover # Open the sheet bypass. $ Push the button. % Open the right cover. Sheet Bypass Remove the misfed paper. Caution heated surface 3 4 ATTENTION When a paper misfeed has occurred # Paper Misfeed Indicator will light. $ Paper misfeed message will appear in the message display.
Handling Removing a Paper Misfeed (Main Unit) ■ Paper exit area 2SIDED 2 SIDED SORT 2 in 1 PHOTO DATA I AUTO DARKER ZOOM SELECT (50~20 PAPER TRAY When a paper misfeed has occurred # Paper Misfeed Indicator will light. $ Paper misfeed message will appear in the message display. - LIGHTER 1 Right Cover # Open the sheet bypass. $ Push the button. % Open the right cover. Button Sheet Bypass 2 Open the front panel. 3 # Turn the knob. $ Remove the misfed paper.
Handling Removing an Original Misfeed (ADF) ■ ADF (Automatic Document Feeder) area 2SIDED 2 SIDED SORT 2 in 1 PHOTO AUTO DATA I DARKER SELECT PAPER TRAY ZOOM (50~20 - When an original misfeed has occurred # Paper Misfeed Indicator will light. $ Paper misfeed message will appear in the message display. LIGHTER 1 Paper Feed area: Open paper feed cover of ADF. Paper Feed Cover Remove misfed paper and close paper feed cover. 2 Paper Exit Area: Open paper feed cover of ADF.
Handling Removing a Paper Misfeed (Automatic Duplex Unit) ■ Automatic Duplex Unit area 2SIDED 2 SIDED SORT 2 in 1 PHOTO DATA I AUTO DARKER ZOOM SELECT (50~20 PAPER TRAY - When a paper misfeed has occurred # Paper Misfeed Indicator will light. $ Paper misfeed message will appear in the message display. LIGHTER 1 Right Cover # Open the sheet bypass. $ Push the button. % Open the right cover. Button Sheet Bypass 2 Caution heated surface Caution: this fuser area will be hot.
Handling Removing a Paper Misfeed (2nd Paper Feed Module) ■ 2nd Paper Feed Module area 2SIDED 2 SIDED SORT 2 in 1 PHOTO AUTO DATA I DARKER SELECT PAPER TRAY ZOOM (50~20 - When a paper misfeed has occurred # Paper Misfeed Indicator will light. $ Paper misfeed message will appear in the message display. LIGHTER 1 Open paper feed cover. 2 Remove the misfed paper. 3 Close paper feed cover. Button Sheet Bypass ATTENTION C C To clear the paper misfeed indicator. # Open the sheet bypass.
Checking Troubleshooting Check Action Unit does not operate Does the display light up? Check if the Power Switch is turned on and if the power plug is inserted into the outlet. Is Energy Saver key flashing? Press Energy Saver key on control panel. Does the Add Paper Indicator appear on display? (J) Does the Paper Misfeed Indicator appear on display? (I) Add paper. (See page 23) or check if the paper tray is closed completely.
Checking Copies are light Does the exposure indicator say “light”? Press Auto/Photo Select Key to choose the auto mode. (See page 2) Does the add toner message appear on the message display? Change toner cartridge. (See page 25) Light image on the front side of copier Copy Image Sample Image towards the front side of copier is light. Push the green handle of the toner cartridge to right. Direction of paper exit ■ If the measures outlined above do not solve the problem, call your Service provider.
Checking ■ When copies become unclear, clean the corona by following procedure. Line images in the copy. ABCDEF (Sample) 1 Right Cover Button Sheet Bypass # Open the sheet bypass. $ Push the button. % Open the right cover. & Open the front panel. ( Pull the green hook of toner cartridge. 2 # Remove the toner cartridge. $ Remove the drum unit by pulling the handle with green label. 3 # Slide corona cleaner (green) back and forth one or two times. $ Put the corona cleaner to original position.
Specifications Copier Functions ■ Main unit Type: Desk Top Copy/Print Process: Laser/Electrostatic photographic method Process: Mono-component Ultra Magnefine™ Toner Resolution: Max. 600 dpi Multi-Copy Speed: 15 letter size copies per minute Maximum Original Size: 8.5″ × 14″ (Legal size) Void area: max. 5.
Consumables List ■ Consumables List When ordering consumables, please use the correct part number as listed below. Consumable Name Part Number Yield Toner Cartridge DQ-UG15A Approx. 5,000 sheets* Drum Unit DQ-UH32A Approx. 30,000 sheets ∗ Based on copying onto letter-size 6% image original. Note: To see total count of copies, press and hold % Select key, then press CLEAR/STOP key. To print total count of copies, press and hold % Select key, then press START key.
NOTE 37
NOTE 38
U.S.A. only WARRANTY “PANASONIC DOCUMENT IMAGING COMPANY MAKES NO WARRANTIES, GUARANTEES OR REPRESENTATIONS, EXPRESSED OR IMPLIED, TO CUSTOMER WITH RESPECT TO THIS PANASONIC COPIER, INCLUDING BUT NOT LIMITED TO, ANY IMPLIED WARRANTY OF MERCHANTABILITY OR FITNESS FOR A PARTICULAR PURPOSE.