Owner’s Manual Grill/Microwave Oven Household Use Only Model No. NN-GN68KS Scan this code for special instructions and features. PLEASE READ THESE INSTRUCTIONS CAREFULLY BEFORE USING THIS PRODUCT, AND SAVE THIS MANUAL FOR FUTURE USE. To register your product and for all other assistance, please contact us via the web at: http://shop.panasonic.com/support (U.S.A Only) For microwave oven safety reference, please visit the FDA’s web page at: http://www.fda.
CONTENTS Safety Information IMPORTANT SAFETY INSTRUCTIONS ............................................................................................................................................... 3-5 Installation and Grounding Instructions ............................................................................................................................................ 6 Food Preparation ..........................................................................................................
IMPORTANT SAFETY INSTRUCTIONS Your safety and the safety of others are very important. We have provided important safety messages in this manual and on your appliance. Always read and obey all safety messages. This is the safety alert symbol. It is used to alert you to potential hazards that can kill or hurt you and others. All safety messages will follow the safety alert symbol and either the word “DANGER”, “WARNING” or “CAUTION”.
IMPORTANT SAFETY INSTRUCTIONS (continued) 9. When cleaning surfaces of the door and oven that come together on closing the door, use only mild, non-abrasive soaps or detergents applied with a sponge or soft cloth. 10. DO NOT allow children to use this appliance, unless closely supervised by an adult. DO NOT assume that because a child has mastered one cooking skill he/she can cook everything. 11.
IMPORTANT SAFETY INSTRUCTIONS (continued) WARNING Safety Precautions TO AVOID THE RISK OF SHOCK: Glass Tray DO NOT remove top or outer panel from oven. Repairs must be done only by a qualified service person. 1. DO NOT operate the oven without the Roller Ring and the Glass Tray in place. 2. DO NOT operate the oven without the Glass Tray fully engaged on the drive hub. Improper cooking or damage to the oven could result.
Installation and Grounding Instructions Examine Your Oven Power Supply Unpack oven, remove all packing material and examine the oven 1. A short power-supply cord is provided to reduce the risks for any damage such as dents, broken door latches or cracks in the resulting from becoming entangled in or tripping over a longer door. Notify dealer immediately if oven is damaged. DO NOT install cord. if oven is damaged. 2. Longer cord sets or extension cords may be used if care is exercised in their use.
Food Preparation 4) FOODS WITH NONPOROUS SKINS • DO NOT COOK / REHEAT WHOLE EGGS, WITH OR WITHOUT THE SHELL. Steam buildup in whole eggs may cause them to explode, and possibly damage the oven or cause injury. Reheating SLICED hard-boiled eggs and cooking SCRAMBLED eggs is safe. • Potatoes, apples, whole squash and sausages are examples of foods with nonporous skins. These types of foods must be pierced before microwave cooking to prevent them from exploding.
Food Preparation (continued) 8) THERMOMETERS • DO NOT use a conventional meat thermometer in your oven. Arcing may occur. Microwave safe thermometers are available for both meat and candy. 10) REHEATING PASTRY PRODUCTS • When reheating pastry products, check temperatures of any fillings before eating. Some foods have fillings, which heat faster and can be extremely hot, while the surface remains warm to the touch (for example, jelly donuts).
Cookware Guide This section answers the question, “Can I use in the Microwave?” Aluminum Foil Glass Jars It is not recommended to use. Arcing can occur if foil is too close to oven wall or door and cause damage to your oven. No. Most glass jars are not heat resistant. Browning Dish Yes. Only use browning dishes that are designed for microwave cooking. Check browning dish information for instructions/heating chart. Do not preheat for more than six minutes.
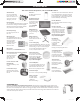
Location of Controls Oven Window Menu Label (do not remove) Exhaust Air Vent Warning Label Waveguide Cover (do not remove) Wire Rack CAUTION: Do not use the wire rack in “Microwave” cooking. It can cause arcing and damage to the oven.
Control Panel Display Window Grill Button (See page 14) Power Level Button (See page 13) Time Buttons Combination Button (See page 14) Turbo Defrost Button (See page 17) Timer/Clock Button (See page 12, 14-15) Coffee/Milk Button (See page 18) Sensor Reheat Button (See page 19) Popcorn Button (See page 18) Sensor Cook Button (See page 19) Auto Grill Button (See page 21) Frozen Foods Button (See page 22)
Operation Using the Microwave for the First Time 1 4 Setting the Clock Setting the Child Safety Lock 1 1 Display Window Plug into a properly grounded electrical outlet. 2 With the oven NOT cooking, press Timer/Clock twice; the colon will blink. Enter time of day using the Time buttons. Press Stop/Reset to confirm; a colon (:) will appear in the display window. 2 NOTES: These choices can be selected only when you plug-in the oven.
Operation (continued) Cooking 1 If cooking at high power (10), skip to step 2. Press Power Level until the desired power level appears in the display. P10 is the highest and P1 is the lowest. P0 is the keep warm feature. Press Power Level once P10 (HIGH) twice P9 3 times P8 4 times P7 (MED-HIGH) 5 times P6 (MEDIUM) 6 times P5 7 times P4 8 times P3 (MED-LOW)/ DEFROST 9 times P2 10 times P1 (LOW) 11 times P0 (KEEP WARM) 2 Quick 30 1 1 Press Power Level 11 times to select the P0 (KEEP WARM).
Operation (continued) Grill Combination 1 Press Grill until the desired power level appears in the display window. Press once twice 3 times Power Level 1 (HIGH) 2 (MEDIUM) 3 (LOW) 2 Directions for Grilling: When grilling, heat is radiated from the two elements at the top of the oven. The Grilling elements do not require preheating. Grilling is particularly useful for reheating crispy foods such as fried chicken or chicken nuggets. It is also suitable for hot sandwiches and au gratin dishes.
Operation (continued) Setting a Standing Time Setting a Delayed Start 1 1 4 5 The start time can be delayed to start cooking at a later time. To do this, first press Timer/ Clock. 2 Some recipes call for a standing time after cooking. Press Power Level until the desired power level appears in the display. P10 is the highest and P1 is the lowest. Set desired standing time using Time buttons (up to 99 minutes, 50 seconds).
Operation (continued) Add Time 3-Stage Setting (Example: To add cooking time after Grill 1.) 1 After cooking, press Add Time once to select the Add Time feature. 2 (Example: Continually set [P10] 2 minutes, [P6] 3 minutes and [P2] 2 minutes.) NOTES: 1. This feature is not available for Automatic function (such as Turbo Defrost, Coffee/Milk, Sensor Reheat, Popcorn, Sensor Cook, Auto Grill and Frozen Foods). 2.
Operation (continued) Turbo Defrost Conversion Defrosting Tips & Techniques 1 Follow the chart to convert ounces or hundredths of a pound into tenths of a pound. To use Turbo Defrost, enter the weight of the food in pounds (1.0) and tenths of a pound (0.1). If a piece of meat weighs 1.95 lbs or 1 lb 14 oz., enter 1.9 lbs. Preparation For Freezing: 1. Freeze meats, poultry, and fish in packages with only one or two layers of food. Place wax paper between layers. 2.
Operation (continued) Coffee/Milk Popcorn 1 1 (Example: To pop 3.2 oz. (91 g) of popcorn) NOTES: 1. If the user desires, More/ Less adjustment can be done. Press (More) once to add 10 seconds or twice to add 20 seconds. Press (Less) once to subtract 10 seconds or twice to subtract 20 seconds. Press (More) or (Less). Press Popcorn until the desired before pressing Start. size appears in the display. 2. Pop one bag at a time. Press Menu 3. Place bag in oven according once 3.2 oz.
Operation (continued) Sensor Reheat 1 Sensor Cook 2. If the user desires, More/Less adjustment can be done. Press (More) to add 20% more time than suggested. Press (Less) to subtract 20% cooking time. Press (More) or (Less) before pressing Start. Press Sensor Reheat once. 2 3. After having used the Sensor Reheat feature a few times, you may decide you would prefer your food cooked to a different doneness – that is why you would utilize the (More) or (Less) buttons. 4.
Operation (continued) Sensor Cook Chart See the chart below for Sensor Cook categories. Menu Serving/Weight Hints ½ - 1½ cups Place oatmeal in a microwave safe serving bowl with no cover. Follow manufacturers’ 1. Oatmeal (110 – 335 g) directions for preparation. Follow manufacturers’ directions for preparation of pre-cooked breakfast sausage. Place in a 2. Breakfast Sausage 2 - 8 links radial pattern. 3. Omelet 4. Soup 5. Potatoes 2 – 4 eggs 1 – 2 cups (250 – 500 ml) 1 – 4 potatoes (6 – 8 oz.
Operation (continued) Auto Grill 1 2 3 Press Auto Grill until the number corresponding to the desired food appears in the display (see chart below). Select Serving/weight of the food using the More/Less/ Weight buttons. Press Start; the cooking will start and the time will count down in the display. At the end of cooking, five beeps will sound. NOTES: 1. Place Wire Rack on Glass Tray. Place food on Wire Rack directly. 2. These menu items use energy from both the microwave and the griller.
Operation (continued) Frozen Foods 1 2 Press Frozen Foods until the number corresponding to the desired food appears in the display (see chart below). Press Start. Cooking is complete when five beeps sound. NOTES: 1. If the user desires, More/Less adjustment can be done. Press (More) to add 20% more time than suggested. Press (Less) to subtract 20% cooking time. Press (More) or (Less) before pressing Start. 2. If the temperature of the cavity is too high, Frozen Foods feature cannot be used.
Microwave shortcuts FOOD To separate refrigerated Bacon, 1 pound (450 g) To soften refrigerated Butter, 1 stick, ¼ pound (110 g) To melt refrigerated Butter, 1 stick, ¼ pound (110 g) To melt Chocolate, 1 square, 1 oz. (28 g) To melt Chocolate, ½ cup (125 ml) chips To toast Coconut, ½ cup (125 ml) To soften Cream Cheese, 8 oz. (225 g) To brown Ground Beef, 1 pound (450 g) POWER P10 (HIGH) P3 TIME (in mins.) 30 sec.
Microwave shortcuts (continued) FOOD To roast Nuts, 1½ cups (375 ml) To toast Sesame Seeds, ¼ cup (60 ml) To skin Tomatoes, (one at a time) POWER P10 (HIGH) P10 (HIGH) P10 (HIGH) TIME (in mins.) 3-4 To remove Cooking Odours P10 (HIGH) 5 2 - 2½ 30 sec. DIRECTIONS Spread nuts into a 9-inch (23 cm) microwave safe pie plate. Stir occasionally. Place in a small microwave safe bowl. Stir twice. Place tomato into a microwave safe bowl containing boiling water. Rinse and peel. Repeat for each tomato.
Food Characteristics Food Characteristics Cooking Techniques Both bone and fat affect cooking. Bones may cause irregular cooking. Meat next to the tips of bones may overcook while meat positioned under a large bone, such as a ham bone, may be undercooked. Large amounts of fat absorb microwave energy and the meat next to these areas may overcook. Foods with skins or membranes must be pierced, scored or have a strip of skin peeled before cooking to allow steam to escape.
Food Characteristics (continued) Stirring Test for Doneness Stirring is usually necessary during microwave cooking. Always bring the cooked outside edges toward the center and the less cooked center portions toward the outside of the dish. The same tests for doneness used in conventional cooking may be used for microwave cooking. Meat is done when fork-tender or splits at fibers. Chicken is done when juices are clear yellow and drumstick moves freely. Fish is done when it flakes and is opaque.
Care and Cleaning of Your Microwave Oven Please see below and the following page for particular cleaning instructions for each section of the oven. BEFORE CLEANING: Unplug oven at wall outlet. If outlet is inaccessible, leave oven door open while cleaning. AFTER CLEANING: Be sure to place the Roller Ring and the Glass Tray in the proper position and press Stop/ Reset Button to clear the Display. 1. Outside oven surfaces: Clean with a damp cloth.
Before Requesting Service See below before calling for service, as most problems can easily be remedied by following these simple solutions: Problem Solution The oven causes TV interference. Some radio, TV, Wi-Fi, cordless telephone, baby monitor, blue tooth or other wireless equipment interference might occur when you cook with the microwave oven. This interference is similar to the interference caused by small appliances such as mixers, vacuums, blow dryers, etc.
Limited Warranty (Only for U.S.A.
Specifications Power Source ............................................................................................................................................................................................................................120 V, 60 Hz Power Consumption Microwave .................................................................................................................................................................................................... 11.1 Amps, 1,310 W Grill .
Panasonic Consumer Electronics Company, Division of Panasonic Corporation of North America Two Riverfront Plaza Newark, New Jersey 07102 Panasonic Appliances Microwave Oven (Shanghai) Co., Ltd. Website : http://shop.panasonic.com/support F0003CB00AP_04.