
Datasheet


5
LC4H Electronic Counter
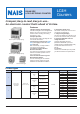
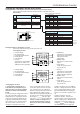
Setting the operation mode and counter
Setting procedure 1) Setting the operation mode (input mode and output mode)
Set the input and output modes with the DIP switches on the side of the unit.
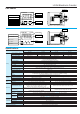
DIP switches
Setting procedure 2) Setting the set value
Set the set value with the keys on the front of the unit.
Front display section
DIP switch
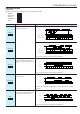
Item
DIP switch No.
1 2 3
ON ON ON SHOT-A
OFF OFF OFF SHOT-B
ON OFF OFF SHOT-C
OFF ON OFF SHOT-D
ON ON OFF HOLD-A
OFF OFF ON HOLD-B
ON OFF ON HOLD-C
OFF ON ON —
Output mode
Operation mode Refer to table 1
1
2
3
Minimum reset input signal width 20 ms 1 ms
4
Maximum counter setting 30 Hz 5 kHz
5
Input mode Refer to table 2
6
7
8
ONOFF
DIP switch No.
6 7 8
ON ON ON Addition input
OFF OFF OFF Subtraction input
ON OFF OFF Directive input
OFF ON OFF Independent input
ON ON OFF Phase input
OFF OFF ON —
ON OFF ON —
OFF ON ON —
See note 1
See note 1
See note 1
See note 1
Input mode
Note 1: The counter and set value displays will display DIP Err.
Note 2: Set the DIP switches before installing the unit.
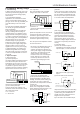
ON
12345678
DIP switches
(Same for 16-digit, screw-down terminal type)
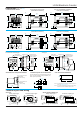
Q Counter display
W Set value display
E Controlled output indicator
R Reset indicator
T Lock indicator
Y UP keys
[Changes the corresponding
digit of the set value in the
addition direction (upwards)]
U DOWN keys
Changes the corresponding
digit of the set value in the
subtraction direction
(downwards)
I RESET switch
Resets the set value and the
output
O LOCK switch
Locks the operation of all
keys on the unit
1
3
4
5
8
9
2
6
7
UP
DOWN
RESET
LOCK
COUNTER LC4H
OP.
RST
LOCK
Q Counter display
W Set value display
E Controlled output indicator
R Reset indicator
T Lock indicator
Y UP keys
Changes the corresponding
digit of the set value in the
addition direction (upwards)
U RESET switch
Resets the set value and the
output
I LOCK switch
Locks the operation of all
keys on the unit
RESET
LOCK
COUNTER LC4H
OP.
RST
LOCK
1
3
4
5
7
8
2
6
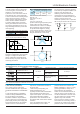
• Changing the set value
1. It is possible to change the set
value with the up and down keys (4-
digit type only) even during counting.
However, be aware of the following
points.
1) If the set value is changed to less than
the count value with counting set to the
addition direction, counting will continue
until it reaches full scale (9999 with the
4-digit type and 999999 with the 6-digit
type), returns to zero, and then reaches
the new set value. If the set value is
changed to a value above the count
value, counting will continue until the
count value reaches the new set value.
2) If counting is set to the subtraction
direction, counting will continue until full
scale (-999 with the 4-digit type and -
99999 with the 6-digit type) regardless of
the new set value, and then the display
will change to with the 4-digit
type and with the 6-digit type.
2. If the set value is changed to “0,”
the unit will not complete count-up.
However, be aware of the following
points.
1) When counting is set to the addition
direction, counting will continue until full
scale is reached (9999 with the 4-digit
type and 999999 with the 6-digit type),
return to zero, and then complete count-
up.
2) When counting is set to the
subtraction direction, counting will
continue until full scale is reached (-999
with the 4-digit type and -99999 with the
6-digit type), and then the display will
change to with the 4-digit type
and with the 6-digit type.
Table 1: Setting the output mode
Table 2: Setting the input mode