
User Manual


Table Of Contents
- Contents
- Before use
- 1. Basic operations
- 1-1. Background transition
- 1-2. Wipe
- 1-3. Key
- 1-4. PinP (picture in picture)
- 1-5. DSK (downstream key)
- 1-6. Key Link
- 1-7. FTB (Fade to Black)
- 1-8. Internal color signals
- 1-9. Switching the AUX output
- 1-10. Memory
- 1-10-1. Memory registration and recall items
- 1-10-2. Storing the settings in the memory (Store)
- 1-10-3. Recalling the operations stored in the memory (Recall)
- 1-10-4. Memory preview
- 1-10-5. Deleting the operations stored in the memory (Delete)
- 1-10-6. Selecting the buses whose settings are to be registered and or played back
- 1-10-7. Registering the material selection items
- 1-10-8. Setting effect dissolve (shot memory)
- 1-10-9. Editing event memory timelines
- 1-10-10. Registering memories (Register)
- 1-11. Video memories
- 1-12. Memory card
- 1-13. Waveform monitor settings
- 1-14. Setting the status display
- 2. Input/output signal settings
- 2-1. Input signal settings
- 2-1-1. Setting the frame synchronizer
- 2-1-2. Setting the input mode
- 2-1-3. Setting the delay amount
- 2-1-4. Freezing the input signals
- 2-1-5. Setting the material names
- 2-1-6. Setting the up-converter
- 2-1-7. Setting the video process function
- 2-1-8. Setting the analog input gain (option)
- 2-1-9. Setting the analog composite input signals (option)
- 2-1-10. Setting the DVI input signals
- 2-1-11. Displaying the DVI input signal information
- 2-1-12. Adjusting the DVI input signals
- 2-1-13. Automatic adjustment of the black level and white level (analog input signals)
- 2-2. Output signal settings
- 2-3. Setting the sync signals
- 2-4. Adjusting the output signal phase
- 2-5. Setting the multi view display
- 2-6. Setting the ancillary data and embedded audio data
- 2-1. Input signal settings
- 3. System settings
- 4. External interfaces
- 5. Setting menu table
- Appendix (glossary)
- Index
10
1. Basic operations
1-2. Wipe
1-2-1. Selecting the wipe pattern
The wipe patterns are selected using the number keys.
1Press the [BKGD PATT] button (or [KEY PATT] button).
The [BKGD PATT] button (or [KEY PATT] button)
indicator lights in amber, and the pattern table screen
appears on the built-in display.
2Use [F1] to select the page.
3Use one of the number keys to select the pattern.
The corresponding button lights in amber, and the
pattern is switched.
4Use [F5] to close the table screen.
The table screen can also be closed by pressing the
[BKGD PATT] button or [KEY PATT] button and turning
off the button’s indicator.
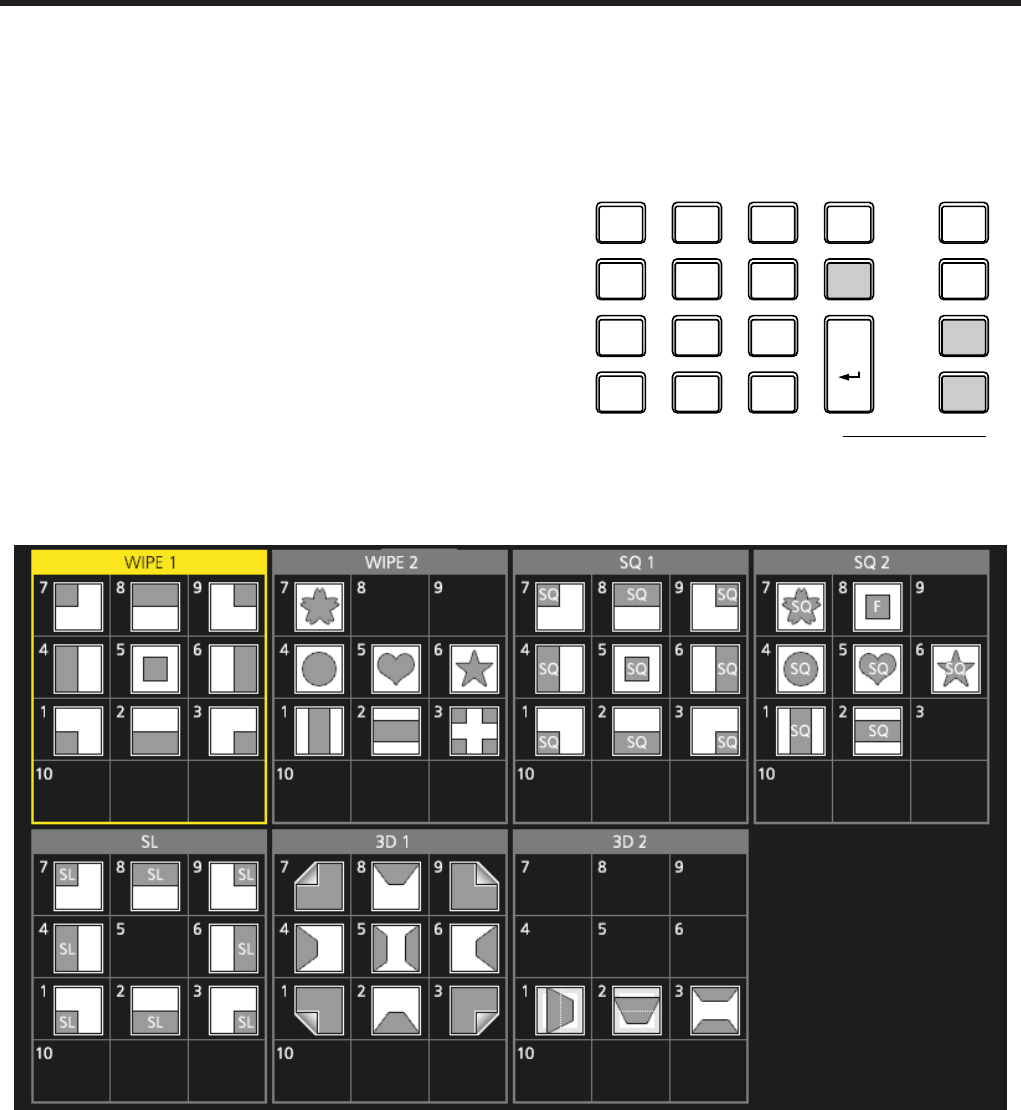
pw Table of wipe patterns
p The “SQ2: 8” pattern takes effect when the [KEY PATT] button has been pressed.
4
INS
MENU
INPUT
VMEM
BKGD
PATT
KEY
PATT
TAKE
ENTER
� /
+
PAGE
PLAY
REC
STOP
XPT
DSBL
<
CLIP 1
STILL 1
MEMORY / WIPE PATTERN / 10 KEY
<<
TRIM OFF
>>
CLIP 2
STILL 2
REV
TRIM OUT
TRIM IN
9
PASTE
6
MOD
3
REV
C
UNDO
8
COPY
5
DEL
2
>
.
>>
7
NEW
1
<
0/10
<<
>