
User's Manual


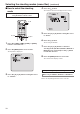
Table Of Contents
- Before use
- Basic shooting operations
- How to turn the power on and off
- Priority mode (Priority Mode)
- Selecting the units
- Selecting the shooting modes (scene files)
- Shooting
- What to do when encountering problems in the basic shooting operations
- More advanced operations
- Manual shooting
- Preset memories
- White balance adjustment
- Black level (master pedestal) adjustment
- Basic operations
- Camera menu items
- Setting the camera menu items
- Top Menu screen
- Camera screen (when Full Auto is selected)
- Camera screen (when Manual1 to 3 is selected)
- Contrast 1/2 screen
- Contrast 2/2 screen
- Picture 1/3 screen
- Picture 2/3 screen
- Picture 3/3 screen
- 16-axis color matrix
- System screen
- Output screen
- Others 1/4 screen
- Others 2/4 screen
- Others 3/4 screen
- Others 4/4 screen
- Maintenance screen
- Firmware Version screen
- IP Network screen
- Camera menu item table
- Displaying the web screen
- Web screen operations
- Web screen configurations
- Recording to and playing back from a memory card
- Web camera functions
- Displaying the web screen using a mobile terminal
- Limiters
- Activation
- Troubleshooting
- Index

10
Selecting the shooting modes (scene files)
(continued)
■How to select the shooting
mode
When performing the operations
using the wireless remote control
2, 8
4, 6, 7
3, 5, 7
1
1 Press the [CAM1], [CAM2], [CAM3] or [CAM4]
button to select the unit.
2 Press the [MENU] button for 2 seconds.
The Top Menu is displayed.
* Top Menu *
Camera Scene: Full Auto
System
Maintenance
3 Press the [▲] or [▼] button to bring the cursor
to “Camera”.
4 Press the [
○
] button.
The “Camera” sub-menu is displayed on the monitor.
** Camera **
Scene Full Auto
Contrast Level 0
Day/Night Day
Night-Day Level ----
Return
5 Press the [▲] or [▼] button to bring the cursor
to “Scene”.
6 Press the [
○
] button.
The shooting mode blinks.
7 Press the [▲] or [▼] button to select the
shooting mode (Full Auto, Manual1, Manual2 or
Manual3) to be used, and press the [
○
] button
to enter the selection.
8 Press the [MENU] button for 2 seconds.
The camera menu display is exited.
When performing the operations using the controller
When using an AW-RP50, AW-RP120 or AK-HRP200:
Refer to the Operating Instructions of the controller.