
User's Manual
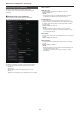
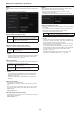
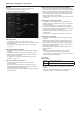
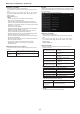
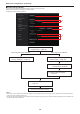
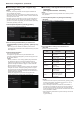
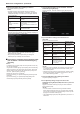
Table Of Contents
- Read this first! (For AW‑UE100WP, AW‑UE100KP)
- Read this first! (For AW‑UE100WPC, AW‑UE100KPC)
- Read this first! (For AW‑UE100WE, AW‑UE100KE, AW‑UE100WED, AW‑UE100KED)
- Read this first! (For AW‑UE100WE, AW‑UE100KE)
- Read this first!
- Before use
- Features
- Accessories
- Optional accessories
- Operating precautions
- Wireless remote control (optional accessory)
- Parts and their functions
- Setting the remote control IDs
- Network settings
- Basic shooting operations
- How to turn the power on and off
- Selecting the units
- Selecting the shooting modes (scene files)
- Shooting
- What to do when encountering problems in the basic shooting operations
- More advanced operations
- Manual shooting
- Preset memories
- White balance adjustment
- Black balance adjustment
- Black level (master pedestal) adjustment
- Genlock adjustment
- Basic setup operations
- Camera menu items
- Setting the camera menu items
- Top Menu screen
- Camera screen
- Brightness 1/2 screen
- Brightness 2/2 screen
- Picture 1/6 screen
- Color TEMP. Setting screen
- Picture 2/6 screen
- Picture 3/6 screen
- Picture 4/6 screen
- Picture 5/6 screen
- Picture 6/6 screen
- Matrix 1/5 screen
- Matrix 2/5 screen
- Matrix 3/5 screen
- Matrix 4/5 screen
- Matrix 5/5 screen
- Lens screen
- System 1/2 screen
- System 2/2 screen
- Output 1/5 screen
- Output 2/5 screen
- Output 3/5 screen
- Output 4/5 screen
- Output 5/5 screen
- UHD Crop 1/2 screen
- UHD Crop 2/2 screen
- Pan/Tilt 1/2 screen
- Pan/Tilt 2/2 screen
- P/T Acceleration screen
- Preset 1/2 screen
- Preset 2/2 screen
- Preset Acceleration screen
- Maintenance screen
- Firmware Version 1/2 screen
- Firmware Version 2/2 screen
- IP Network screen
- Initialize screen
- Hour Meter screen
- HDMI Status screen
- Error Status screen
- Camera menu item table
- Displaying the web screen
- Web screen operations
- Web screen configurations
- Displaying the web screen using a personal computer equipped with a touch panel
- Displaying the web screen using a mobile terminal
- Limiters
- Setting/releasing the limiters
- Safe mode
- Troubleshooting
- Specifications
- Index

z HTTPS
Using the HTTPS function enables access to the camera to be
encrypted and communication safety to be improved.
The setting is confirmed with the [Set] button.
See page 148 for details on the HTTPS setup method.
CRT key generate
A CRT key (SSL encryption key) is generated by HTTPS.
To generate a CRT key, click the [Execute] button to display the [CRT
key generate] dialog.
For details, refer to “Generating a CRT key (SSL encryption key)”
(→ page 149).
Self‑signed Certificate ‑ Generate
A self-signed security certificate is generated by HTTPS. (Self-signed
Certificate)
To generate a self-signed certificate (security certificate), click the
[Execute] button to display the [Self-signed Certificate - Generate]
dialog and perform the operation.
For details, refer to “Generating a self-signed certificate (security
certificate)” (→ page 149).
Self‑signed Certificate ‑ Information
This displays information relating to the self-signed certificate
(security certificate).
When the [Confirm] button is clicked, the registered content of the
generated self-signed certificate (security certificate) is displayed in
the [Self-signed Certificate - Confirm] dialog.
Click the [Delete] button to delete the generated self-signed certificate
(security certificate).
CA Certificate ‑ Generate Certificate Signing Request
When using a security certificate issued by the Certificate Authority
(CA) as a security certificate for HTTPS, a Certificate Signing Request
(CSR) is generated for application to the Certificate Authority (CA).
To generate a Certificate Signing Request (CSR), click the [Execute]
button to display the [CA Certificate - Generate Certificate Signing
Request] dialog and perform the operation.
For details, refer to “Generating a Certificate Signing Request (CSR)”
(→ page 150).
CA Certificate ‑ CA Certificate install
This displays information relating to server certificates (security
certificates) issued by the Certificate Authority (CA), which are to be
or are already installed.
In the [File Open] dialog, which is displayed by clicking the [Select]
button, select the file of the server certificate (security certificate)
issued by the Certificate Authority (CA) and click the [Execute] button
to install the server certificate (security certificate).
If the server certificate (security certificate) is installed, its file name
will be displayed.
For details, refer to “Installing a Server Certificate” (→ page 151).
CA Certificate ‑ Information
This displays information relating to the server certificate (security
certificate).
When the [Confirm] button is clicked, the registered content of the
installed server certificate (security certificate) is displayed in the
[Server Certificate - Confirm] dialog, If the server certificate (security
certificate) is not installed, the content of the generated Certificate
Signing Request (CSR) is displayed.
Click the [Delete] button to delete the installed server certificate
(security certificate).
<NOTE>
• To delete an enabled server certificate (security certificate),
confirm that there is a backup to the said certificate in your
personal computer or recording media. A server certificate (security
certificate) will be needed to reinstall it.
Connection
[HTTP, HTTPS]
This sets the method to connect to the unit.
HTTP Only HTTP connection is possible.
HTTPS Only HTTPS connection is possible.
Factory settings: HTTP
For details, refer to “Setting the Connection Method” (→ page 151).
<NOTE>
• When using an HTTPS connection, network connection with the
AW-RP120, AW-RP50, and AK-HRP200 will be disabled.
146
Web screen configurations (continued)