
User's Manual
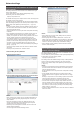
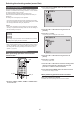
Table Of Contents
- Read this first! (For AW‑UE100WP, AW‑UE100KP)
- Read this first! (For AW‑UE100WPC, AW‑UE100KPC)
- Read this first! (For AW‑UE100WE, AW‑UE100KE, AW‑UE100WED, AW‑UE100KED)
- Read this first! (For AW‑UE100WE, AW‑UE100KE)
- Read this first!
- Before use
- Features
- Accessories
- Optional accessories
- Operating precautions
- Wireless remote control (optional accessory)
- Parts and their functions
- Setting the remote control IDs
- Network settings
- Basic shooting operations
- How to turn the power on and off
- Selecting the units
- Selecting the shooting modes (scene files)
- Shooting
- What to do when encountering problems in the basic shooting operations
- More advanced operations
- Manual shooting
- Preset memories
- White balance adjustment
- Black balance adjustment
- Black level (master pedestal) adjustment
- Genlock adjustment
- Basic setup operations
- Camera menu items
- Setting the camera menu items
- Top Menu screen
- Camera screen
- Brightness 1/2 screen
- Brightness 2/2 screen
- Picture 1/6 screen
- Color TEMP. Setting screen
- Picture 2/6 screen
- Picture 3/6 screen
- Picture 4/6 screen
- Picture 5/6 screen
- Picture 6/6 screen
- Matrix 1/5 screen
- Matrix 2/5 screen
- Matrix 3/5 screen
- Matrix 4/5 screen
- Matrix 5/5 screen
- Lens screen
- System 1/2 screen
- System 2/2 screen
- Output 1/5 screen
- Output 2/5 screen
- Output 3/5 screen
- Output 4/5 screen
- Output 5/5 screen
- UHD Crop 1/2 screen
- UHD Crop 2/2 screen
- Pan/Tilt 1/2 screen
- Pan/Tilt 2/2 screen
- P/T Acceleration screen
- Preset 1/2 screen
- Preset 2/2 screen
- Preset Acceleration screen
- Maintenance screen
- Firmware Version 1/2 screen
- Firmware Version 2/2 screen
- IP Network screen
- Initialize screen
- Hour Meter screen
- HDMI Status screen
- Error Status screen
- Camera menu item table
- Displaying the web screen
- Web screen operations
- Web screen configurations
- Displaying the web screen using a personal computer equipped with a touch panel
- Displaying the web screen using a mobile terminal
- Limiters
- Setting/releasing the limiters
- Safe mode
- Troubleshooting
- Specifications
- Index

Select the unit (or units) to be operated from the wireless remote control
or controller.
Even when using only one unit, it must still be selected.
When performing operations from a wireless
remote control
Up to four units can be operated using one wireless remote control.
To select the unit using the wireless remote control, the IR ID switches
on the unit’s back panel must be set.
For details of the IR ID switch settings, refer to page 19 and page 30.
1. Press the <CAM1>, <CAM2>, <CAM3>, or <CAM4>
button.
The unit’s status display lamp blinks green when a signal matched by
the remote control ID has been received, and it blinks orange when a
signal that is not matched by the remote control ID has been received.
When performing operations from a controller
A maximum of five units can be operated by one controller when using
serial control.
When using an AW-RP150 or AW-RP60
For details, refer to the operating instructions for the controller.
• Network connection with AW-RP150 or AW-RP60 requires setup of an
initial account. (→ page 33)
When an initial account is not set up, AW-RP150 or AW-RP60 can
detect but cannot control this unit.
• When operating the camera on a network with a controller, such as the
AW-RP150 or AW-RP60, and [Serial] or [IP] of [Tracking Data Output]
is set to [On], the tracking data output may be delayed or the value
may not be updated. (→ page 64)
Selecting the units
36