
User's Manual
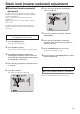
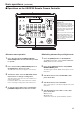

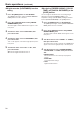
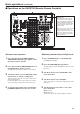
Table Of Contents
- Before use
- Basic shooting operations
- How to turn the power on and off
- Priority mode (Priority Mode)
- Selecting the units
- Selecting the shooting modes (scene files)
- Shooting
- What to do when encountering problems in the basic shooting operations
- More advanced operations
- Manual shooting
- Preset memories
- White balance adjustment
- Black level (master pedestal) adjustment
- Basic operations
- Camera menu items
- Setting the camera menu items
- Top Menu screen
- Camera screen (when Full Auto is selected)
- Camera screen (when Manual1 to 3 is selected)
- Contrast 1/2 screen
- Contrast 2/2 screen
- Picture 1/3 screen
- Picture 2/3 screen
- Picture 3/3 screen
- 16-axis color matrix
- System screen
- Genlock screen
- Output screen
- Others 1/4 screen
- Others 2/4 screen
- Others 3/4 screen
- Others 4/4 screen
- Maintenance screen
- Firmware Version screen
- IP Network screen
- Camera menu item table
- Displaying the web screen
- Web screen operations
- Web screen configurations
- Recording to and playing back from a memory card
- Web camera functions
- Displaying the web screen using a mobile terminal
- Limiters
- Activation
- Troubleshooting
- Index

21
Black level (master pedestal) adjustment
■Black level (master pedestal)
adjustment
The black level can be adjusted when using a multiple
number of cameras including the unit. Ask your dealer to
perform this adjustment.
(Use an oscilloscope or waveform monitor for the
adjustment.)
Adjust the black level in accordance with the units and
devices used.
The black level can be adjusted only when Manual1,
Manual2 or Manual3 is selected as the shooting mode
(scene file).
When performing the operations
using the wireless remote control
1 Press the [M/IRIS] button.
Set the iris to the manual mode.
2 Press the [IRIS –] button.
The lens iris closes until the image is completely black.
3 Select Manual1, Manual2 or Manual3 by
following the procedure in “How to select the
shooting mode” (page 10) under “Selecting the
shooting modes (scene files)”.
4 Press the [▲] or [▼] button to bring the cursor
to “Picture”.
5 Press the [
○
] button.
The “Picture 1/3” sub-menu is displayed.
*** Picture 1/3 ***
Chroma Level 0
White Balance Mode VAR
Color Temperature 3200K
R Gain 0
B Gain 0
Pedestal 0
Return
6 Press the [▲] or [▼] button, and bring the
cursor to “Pedestal”.
*** Picture 1/3 ***
Chroma Level 0
White Balance Mode VAR
Color Temperature 3200K
R Gain 0
B Gain 0
Pedestal 0
Return
7 Press the [
○
] button to start the “Pedestal”
value blinking.
8 Press the [▲] or [▼] button, change the
“Pedestal” value, and press the [
○
] button to
enter the selection.
9 Press the [MENU] button for 2 seconds.
The camera menu display is exited.
10
If necessary, press the [A/IRIS] button to adjust
the iris automatically.
When performing the operations using the controller
When using an AW‑RP50, AW‑RP120 or AK‑HRP200:
Refer to the Operating Instructions of the controller.