Installation/Troubleshooting Network Camera Management System Model No. BB-HGW700A 1 Before Using ........................................................... 3 1.1 Important Safety Instructions ...............................................3 1.1.1 FCC and Other Information ............................................................. 4 1.1.2 Security Cautions ............................................................................ 6 1.1.3 Open Source Software .........................................
Installation/Troubleshooting Introduction How to Use This Documentation This product includes the following two manual types. • Installation/Troubleshooting (this manual) Installation/Troubleshooting provides an explanation of included accessories, a guide to initial setup and troubleshooting tips. • Operating Instructions (included on the CD-ROM) Operating Instructions provides a detailed explanation of the operations, settings and functions of this product.
Installation/Troubleshooting 1 Before Using 1.1 Important Safety Instructions When using this product, basic safety precautions should always be followed to reduce the risk of fire, electric shock, or personal injury. 1. 2. 3. 4. 5. Read and understand all instructions. 6. Protect the AC adaptor cord and AC cord from being walked on or pinched particularly at plugs, convenience receptacles, and the point where they exit from this product. 7.
Installation/Troubleshooting 1.1.1 FCC and Other Information This equipment has been tested and found to comply with the limits for a Class B digital device, pursuant to Part 15 of the FCC Rules. These limits are designed to provide reasonable protection against harmful interference in a residential installation. This equipment generates, uses, and can radiate radio frequency energy and, if not installed and used in accordance with the instructions, may cause harmful interference to radio communications.
Installation/Troubleshooting This device complies with Part 15 of the FCC Rules. Operation is subject to the following two conditions: (1) This device may not cause harmful interference, and (2) this device must accept any interference received, including interference that may cause undesired operation.
Installation/Troubleshooting 1.1.2 Security Cautions When using this product, take appropriate measures to avoid the following security breaches.
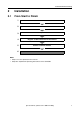
Installation/Troubleshooting 2 Installation 2.1 From Start to Finish 1 Check the Accessories 2 Connect This Product 3 Set Up the PC 4 Register an ISP and Connect to the Internet 5 Connect a Network Camera 6 Use This Product Notes • Steps 1 to 5 are explained in this manual. • Steps 6 is explained in Operating Instructions on the CD-ROM.
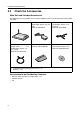
Installation/Troubleshooting 2.2 Check the Accessories Main Unit and Included Accessories The following items are provided with this product. Additional pieces can be ordered by calling 1-800332-5368. Main unit ........................1 pc. AC adaptor..................... 1 pc. (Cord length: approx. 3 m (9.8 feet)) Order No. PQLV202Y AC cord ......................... 1 pc. (Cord length: approx. 1.8 m (5.9 feet)) Order No. PSJA1069Z Ethernet® cable (category 5 straight cable).................1 pc.
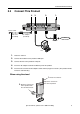
Installation/Troubleshooting 2.3 Connect This Product 4. 3. 2. 1. To the outlet AC cord (included) AC adaptor (included) Internet 5. Modem PC 1. Raise the antenna. 2. Connect the modem to this product's WAN jack. 3. Connect the PC to this product's LAN jack. 4. Insert the AC adaptor cord into the DC IN jack of this product. 5. Insert the AC cord into the AC adaptor socket and the plug into an outlet. (This product will be turned on automatically.) When using the stand 1.
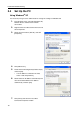
Installation/Troubleshooting 2.4 Set Up the PC Using Windows® XP It is necessary to log in as the administrator to change the settings on Windows XP. 10 1. From the Start menu, select My Computer, My Network Places and then View network connections. 2. Right-click the Local Area Connection icon and select Properties. 3. Select Internet Protocol (TCP/IP), and click [Properties]. 4. Click [Advanced...]. 5. Check that the Default gateways field is empty, and click [OK].
Installation/Troubleshooting Using Windows 2000 It is necessary to log in as the administrator to change the settings on Windows 2000. 1. Right-click the My Network Places icon and select Properties. 2. Right-click the Local Area Connection icon and select Properties. 3. Select Internet Protocol (TCP/IP) and click [Properties]. 4. Click [Advanced...]. 5. Check that the Default gateways field is empty and click [OK]. • If an IP address is entered in the field, select it and click [Remove]. 6.
Installation/Troubleshooting Using Windows Me/98SE 12 1. From the Start menu, select Settings and click Control Panel. 2. Double-click the Network icon. • If you cannot find the Network icon when using Windows Me/98SE, click Display All Control Panel Applications. 3. Select a TCP/IP compatible with the LAN card, and click [Properties] in the Network dialog box. 4. Click the IP Address tab and select Obtain an IP address automatically. 5.
Installation/Troubleshooting 6. Click the DNS Configuration tab, select Disable DNS, and click [OK]. 7. Click [Yes] and restart the PC.
Installation/Troubleshooting 2.5 Register an ISP and Connect to the Internet 1. Start up the web browser. 2. Enter "http://bbhgw.webpage:8080" into the web browser's address bar (the default port number is 8080). • The user name and password window is displayed. 3. Enter New User Name, New Password, and Retype New Password and click [Save]. • The top page is displayed. Notes • It is important to always use your user name and password for authentication when using this product.
Installation/Troubleshooting 4. Click Setup. Setup Camera Portal Notes • In the default settings, it is possible to display the top page by entering "http://192.168.0.254:8080" into the web browser's address bar. • When accessing Setup from the top page, an authentication window is displayed (after starting the web browser, first time only). Log in by entering your user name and password and clicking [OK].
Installation/Troubleshooting 5. Register an ISP The ISP registration page allows you to register new ISPs for this product, edit them, and delete them. Internet connection methods vary according to the ISP. Select a connection method referring to the ISP's setup information. Consult with your contracted ISP about which connection type to use, or about your service or contract.
Installation/Troubleshooting PPPoE Connection Follow the steps below to set up PPPoE connection. Private address 192.168.0.2 ISP Modem Internet The ISP assigns an IP address by PPPoE connection. Private address 192.168.0.1 1. Select [ISP Registration]. 2. Click [Register/Edit] on the ISP registration list. 3. Select PPPoE.
Installation/Troubleshooting 4. Enter ISP Name. • Enter no more than 20 characters. In the example right, "abcde" has been entered. 5. Enter User Name and Password, and if specified by the ISP, enter Service Name, Access Concentrator Name, DNS Server 1, 2, and/or Domain Name. • See the ISP's setup information. To return to the original settings, click [Cancel]. 6. When setup is complete, click [Save and Go to Connection Mode]. • The connection mode page is displayed. 7.
Installation/Troubleshooting DHCP Connection (Internet Connection using a DHCP Server) Follow the steps below to set up DHCP connection, where an IP address is automatically allocated by the ISP. ISP Modem Private address 192.168.0.2 Internet The ISP's DHCP Server assigns an IP address. Private address 192.168.0.1 1. Select [ISP Registration]. 2. Click [Register/Edit] on the ISP registration list. 3. Select DHCP. 4. Enter ISP Name. • Enter no more than 20 characters.
Installation/Troubleshooting 6. When setup is complete, click [Save and Go to Connection Mode]. • The connection mode page is displayed. 7. Select the ISP entered in step 4. 8. When setup is complete, click [Save]. • The entered information is saved. Note When saving, do not cut the power supply. If cut, saving might not be completed successfully. 9. When [Restart] is displayed on the setup page, click it. 10. Restart the PC. • Check that the PC is connected to the Internet.
Installation/Troubleshooting Static Connection (Internet Connection using a Static IP Address) It may be necessary, if you are instructed by the ISP, to enter the value of the IP address or gateway address into setup information. Private address 192.168.0.2 ISP Modem Internet Static IP Address An IP address is set based on information from the ISP. Private address 192.168.0.1 1. Select [ISP Registration]. 2. Click [Register/Edit] on the ISP registration list. 3. Select Static.
Installation/Troubleshooting 4. Enter ISP Name. • Enter no more than 20 characters. In the example right, "abcde" has been entered. 5. Enter the IP Address, Subnet Mask, Gateway and DNS server 1, 2, and if specified by the ISP, enter the Domain Name. • See the ISP's setup information. To return to the original settings, click [Cancel]. 6. When setup is complete, click [Save and Go to Connection Mode]. • The connection mode page is displayed. 7. Select the ISP entered in step 4. 8.
Installation/Troubleshooting 2.6 Connect a Network Camera To the modem 2. To the PC To the outlet 1. 3. 1. Connect the Ethernet cable between the camera and the LAN jack of the router. 2. Insert the AC adaptor cord into the DC IN jack of the camera. 3. Insert the AC cord into the AC adaptor socket and the plug into an outlet (The camera will be turned on automatically.
Installation/Troubleshooting 4. Check the connection. 1) To display the top page of this product start up the web browser, enter "http:// bbhgw.webpage:8080" into the address bar, and press [Enter]. • 1) Enter "http://bbhgw.webpage:8080". In standard settings, if you enter "http:/ /192.168.0.254:8080" into the web browser's address bar, the top page will be displayed. 2) Check that the camera indicator is shining green and click [Camera Portal].
Installation/Troubleshooting • • 5. A blue unmarked window is displayed when the camera is outside operation time. If a blue unmarked window is displayed even when the camera is operating, click [Refresh Camera]. (A blue unmarked window may be displayed when authentication is being confirmed.) If the camera and this product are disconnected while sending or receiving data, a key mark (when camera authentication is set up) or a blue unmarked window is displayed.
Installation/Troubleshooting 3 Troubleshooting Up-to-date support information can be found on the Panasonic Support Website (http:// panasonic.co.jp/pcc/products/en/netwkcam/). Please refer to it, along with this guide, when troubleshooting. Checking Connection Problem Cause and Remedy The modem is connected but the WAN indicator is off. • • Check that the modem and this product are connected. Check that the power of the modem and this product are turned on.
Installation/Troubleshooting Setup Pages Display Problem The Top Page or Setup Page is not displayed. Cause and Remedy • • • • • • • Dialog boxes may not be displayed immediately due to the state of the LAN. Check that one of LAN1 - LAN4 or WIRELESS indicators are shining green. Also, check if the LAN card or wireless LAN card is on. If not, check that the LAN is connected. Check that the power supply was turned on in the following order: modem, this product, PC connected to the LAN side.
Installation/Troubleshooting Problem The Camera Portal or Setup Page is not displayed. Cause and Remedy • • • • • • The Update Firmware page is displayed. • The firmware is damaged. Re-install the firmware. (see page 95 of Operating Instructions on the CD-ROM) The wireless device cannot be connected. • Change the PC wireless LAN card's communication mode to Infrastructure. The device-specific SSID and 128-bit encryption key are set in factory default.
Installation/Troubleshooting Camera Setup Problem The camera is not automatically registered on the Camera Portal page. Cause and Remedy • • • • Check that this product, the camera and the PC are all connected. If the camera's FACTORY DEFAULT RESET button is pressed while this product is starting up (the first 30 seconds after turning on the power), the camera may not be registered automatically. In this case, press the camera's FACTORY DEFAULT RESET button again after this product has started up.
Installation/Troubleshooting Problem The Camera Portal or Setup Page cannot be accessed from the WAN side. Cause and Remedy • • • • • • • The network may be congested. Wait a while and try to connect again. To access the setup page, it may be necessary to set the web browser. (see page 122 of Operating Instructions on the CDROM) JavaScript is used on the setup page. If JavaScript is disabled in the web browser settings, enable it and then access the setup page.
Installation/Troubleshooting Problem Cause and Remedy The POWER indicator is blinking green. • The firmware is damaged. Take the following steps to update the firmware. (Connect this product and the PC using a wire connection. Firmware cannot be updated on a wireless connection.) When blinking quickly: 0.4 second intervals 1 Cut the power to this product. 2 Turn on the power while holding the FACTORY DEFAULT RESET button on the rear of this product.
For product service Panasonic Servicenters are listed in the servicenter directory. Call 1-800-272-7033 for the location of an authorized servicenter. This product is designed for use in the United States of America. Sale or use of this product in other countries/areas may violate local laws. When you ship the product Carefully pack your unit, preferably in the original carton. Attach a letter, detailing the problem, to the outside of the carton.