Removable Front Panel CD Player/Receiver CD-ÔÎÂÂ/ÂÒË‚Â ÒÓ Ò˙ÂÏÌÓÈ Ô‰ÌÂÈ Ô‡ÌÂθ˛ CQ-C1110W/C1100W UME / PUSH SE L CQ-C1110W BA ND VO L D•M APM TUNE TRACK CLOCK POWER 8 2 9 3 10 11 12 4 5 6 SCAN SQ ND 7 1 RA C SR MUTE OM REP P DIS Operating Instructions àçëíêìäñàü èé ùäëèãìÄíÄñàà (CQ-C1110W) Matsushita Electric Industrial Co., Ltd. Web site: http://www.panasonic.co.
Safety information àÌÙÓχˆËfl ‰Îfl ·ÂÁÓÔ‡ÒÌÓÒÚË çÄ êìëëäéå üáõäÖ TO REDUCE THE RISK OF FIRE OR ELECTRIC SHOCK, AND ANNOYING INTERFERENCE, USE ONLY THE INCLUDED COMPONENTS. óÚÓ·˚ ËÁ·Â„‡Ú¸ ËÒ͇ ÔÓʇ‡ ËÎË ˝ÎÂÍÚÓ¯Ó͇, ËÒÔÓθÁÛÈÚ ÚÓθÍÓ ÍÓÏÔÓÌÂÌÚ˚, ‚ıÓ‰fl˘Ë ‚ ÍÓÏÔÎÂÍÚ. WARNING: èêÖÑìèêÖÜÑÖçàÖ: TO REDUCE THE RISK OF FIRE OR ELECTRIC SHOCK OR PRODUCT DAMAGE, DO NOT EXPOSE THIS APPLIANCE TO RAIN, SPLASHING, DRIPPING OR MOISTURE.
E N G L I S H Accessories Panasonic welcomes you to our ever growing family of electronic product owners. We know that this product will bring you many hours of enjoyment. Our reputation is built on precise electronic and mechanical engineering, manufactured with carefully selected components and assembled by people who take pride in their work. Once you discover the quality, reliability, and value we have built into this product, you too will be proud to be a member of our family.
General Power Display change Turn the key in the ignition until the accessory indicator lights. Power on: Press [SRC] (POWER). Power off: Press [SRC] (POWER) again and hold. Press [DISP] (display) to switch to the clock display. When the power is off: No display Clock display Note: Please refer to next page when “AdJ” is displayed. Bass Regular mode Treble Fader Balance 4 q Press [DISP] (CLOCK). Push [SEL] to select the audio mode.
E N G L I S H Caution: To ensure safety, never attempt to preset stations while you are driving. Preset station setting Display change E N G L I S H Up to 6 stations each can be saved in the FM1, FM2, FM3 and AM preset station memories. Press [DISP] (display) to switch to the clock display. 6 Radio mode Radio Press [SRC] (source) to change to the radio mode. 5 CD player Radio FM Stereo indicator Note: Existing saved stations are overwritten with new stations after following this procedure.
E N G L I S H E N G L I S H CD player Disc insert and playback [u] (eject) 7 Playback will start automatically after the player recognized the loaded disc as an ordinary music CD. (When a CD-R or CD-RW which has CD-DA formatted data as the same as an ordinary music CD is loaded, this player recognizes it as an ordinary music CD.) “LOAd” will be displayed until the disc is loaded. Label side Caution: • Only 12 cm CD, CD-DA data recorded CD-R and CD-RW discs are available for this unit.
E N G L I S H 9 Installation Anti-Theft system This unit is equipped with a removable face plate. Removing this face plate makes the radio totally inoperable. q Remove the removable face plate Installation hardware Preparation • Before installation, check the radio operation with antenna and speakers. • Disconnect the cable from the negative (–) battery terminal (see caution below). • Unit should be installed in a horizontal position with the front end up at a convenient angle, but not more than 30°.
E N G L I S H E N G L I S H Installation (Continued) Cautions: • We strongly recommend that you wear gloves for installation work to protect yourself from injuries. • When bending the mounting tab of the mounting collar with a screwdriver, be careful not to injure your hands and fingers. 11 First complete the electrical connections, and then check them for correctness. (➡ page 16) The included Mounting Collar q is designed specially for this unit. Do not use it to attach any other model.
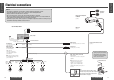
E N G L I S H E N G L I S H Electrical connections Caution: • This product is designed to operate with a 12 V DC, negative ground battery system. • To prevent damage to the unit, be sure to follow the connection diagram below. • Strip about 5mm of the lead ends for connection. • Do not insert the power connector into the unit until the wiring is completed. • Be sure to insulate any exposed wires from a possible short-circuit from the car chassis.
Only for CQ-C1110W Speaker connections Remote control unit Battery installation Caution: Please follow the instructions given below. Failure to do so will cause damage to the unit and speakers. 15 L + - R+ - (White) + - (White w/black stripe) (Gray) + - (Gray w/black stripe) • Use ungrounded speaker only. • The maximum speaker input should be 45 W or more. (If used with the optional power amplifier, the speaker input should be higher than the maximum amplifier output.
E N G L I S H 17 E N G L I S H Troubleshooting If you suspect something wrong Immediately switch the power off. Disconnect the power connector and check that there is neither smoke nor heat from the unit before asking for repairs. Never try to repair the unit by yourself because it is dangerous to do so. Troubleshooting tips Caution: • Do not use the unit if it malfunctions or if there is something wrong.
E N G L I S H E N G L I S H Troubleshooting (Continued) ❐ CD (Continued) 19 Problem Possible cause ➡ Possible solution Time is counted but no sound comes out. The first track of a mix mode disc was reproduced. (Mix mode is a format in which data except music is recorded on the first track and music data is recorded on other than the first track in a session.) ➡Play back music data recorded on other than the first track.
E N G L I S H 21 Maintenance E N G L I S H Specifications ❐ General Care of the Unit ❐ Cleaning this unit ❐ Caution on cleaning Use a dry, soft cloth to wipe. Never use solvents such as benzine, thinner as they may mar the surface of the unit.