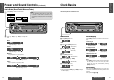
CD Player/Receiver CQ-DP151/DP101W SCAN/APM RANDOM VOL CD RECEIVER CQ-DP151W BAND 45WX4 < REP PWR TUNE TRACK SEL REMOTE DISP MUTE 7 1 8 2 9 3 10 4 11 5 12 6 Operating Instructions SOURCE LOUD M/L MONO /LOC (CQ-DP151W) ≥ Please read these instructions carefully before using this product and save this manual for future use.
E N G L I S H Panasonic welcomes you to our ever growing family of electronic product owners. We know that this product will bring you many hours of enjoyment. Our reputation is built on precise electronic and mechanical engineering, manufactured with carefully selected components and assembled by people who take pride in their work. Once you discover the quality, reliability, and value we have built into this product, you too will be proud to be a member of our family.
Only for CQ-DP151W E N G L I S H Remote Control Unit Preparation Power and Sound Controls Battery Installation Power 1 1 Remove the battery holder. Pull the holder by the position B while pushing position A in the direction indicated by the arrow. 2 Install the battery on the battery holder. Set a new battery properly with its (i) side facing up as shown in the figure. 3 Insert the battery holder. Push in the battery holder back into its original position.
E N G L I S H Power and Sound Controls (Continued) 3 1 Clock Basics E N G L I S H The 24-hour system is used for the clock. 4 Audio Mode (Bass/Treble/Balance/Fader) Press [SEL] to select the audio mode. Note: ≥ If no operation takes place for more than 5 seconds in audio mode (2 seconds in volume mode), the display returns to the regular mode.
E N G L I S H 5 Radio Basics Selection 1 Mode Press [SOURCE] to change to Preset Station Setting Source Radio the radio mode. Caution: ≥ To ensure safety, never attempt to preset stations while you are driving. Up to 6 stations each can be saved in the FM1, FM2, FM3 and AM preset station memories. CD player (When a CD is inserted.
E N G L I S H 7 CD Player Basics Caution: ≥ Only 12 cm CD is available for this unit. < (EJECT) Disc Insert and Playback Disc insert E N G L I S H Track Selection Track Search [5TRACK]: Advance to the next track. [6TRACK]: Back to the beginning of the current track. Back to the previous track. (Press twice.) Press and hold ... [5TRACK]: Fast forward [6TRACK]: Fast backward Release to resume the regular CD play. 8 < Direct Track Selection Playback will start automatically.
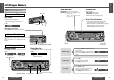
E N G L I S H Installation Guide ❐ Identify All Leads WARNING 9 This installation information is designed for experienced installers and is not intended for non-technical individuals. It does not contain warnings or cautions of potential dangers involved in attempting to install this product. Any attempt to install this product in a motor car by anyone other than qualified installer could cause damage to the electrical system and could result in serious personal injury or death.
E N G L I S H 11 Installation Guide (Continued) Speakers Connect the speaker wires. See the wiring diagram (➡ page 32) for the proper hookups. Follow the diagram carefully to avoid damaging the speakers and the stereo unit. The speakers used must be able to handle more than 45 W of audio power. If using an optional audio amplifier, the speakers should be able to handle the maximum amplifier output power. Speakers with low input ratings can be damaged.
E N G L I S H Installation Guide (Continued) Remove the Unit Install Removable Face Plate 13 Switch off the power of the unit. 1 Slide the left side of the removable face plate in place. 2 Press the right end of the removable face plate until “click” is heard. the removable face plate. 1 Remove 1 Press ['] (release button). The removable face plate will be released.
E N G L I S H 15 Electrical Connections Troubleshooting Cautions: ≥ This product is designed to operate of a 12 V DC, negative ground battery system. ≥ To prevent damage to the unit, be sure to follow the wiring diagram below. ≥ Remove approx. 5 mm of protective covering from the ends of the leads before connecting. ≥ Do not insert the power connector into the unit until the wiring is completed. ≥ Be sure to insulate any exposed wires from a possible short-circuit from the car chassis.
E N G L I S H 17 Troubleshooting (Continued) ❐ CD ❐ Remote Control Trouble Cause/Step CD is inside but no sound. CD sound skips, tone quality is low. Sound skips due to vibration. CD is dirty. ➡Clean CD, referring to the section on “Notes on CD”. CD is dirty. ➡Clean CD, referring to the section on “Notes on CD”. ≥ CD is defective. ≥ Mechanical trouble. ➡Press [<] (EJECT).
E N G L I S H Maintenance Specifications Care of the Unit ❐ General 19 ❐ Cleaning this Unit ❐ Caution on Cleaning Use a dry, soft cloth to wipe. Never use solvents such as benzine, thinner as they may mar the surface of the unit. Notes on CD ONLY USE DISCS CARRYING THE LABEL. How to hold the CD ≥ Do not touch the underside of the disc. ≥ Do not make scratches on the disc. ≥ Do not bend disc. ≥ When not in use, keep CD in the case.