C8405N_OI_001_cover.qxd 06.11.13 2:07 PM ページ2 AAC WMA MP3 CD Player/Receiver Model: CQ-C8405N Operating Instructions Bedienungsanleitung Manuel d’instructions d instructions Gebruiksaanwijzing Bruksanvisning Manuale di istruzioni Manual de Instrucciones Brugsvejledning àÌÒÚÛ͈Ëfl ÔÓ ˝ÍÒÔÎÛ‡Ú‡ˆËË TEXT ¡Please read these instructions carefully before using this product and keep this manual for future reference.
C8405N_OI_01_eng.qxd 06.11.13 2:08 PM ページ2 Safety Information ■ Read the operating instructions for the unit and all other components of your car audio system carefully before using the system. They contain instructions about how to use the system in a safe and effective manner. Panasonic assumes no responsibility for any problems resulting from failure to observe the instructions given in this manual.
Observe the following cautions when using this unit. ❑ Keep the sound volume at an appropriate level. Keep the volume level low enough to be aware of road and traffic conditions while driving. ❑ Do not insert or allow your hand or fingers to be caught in the unit. To prevent injury, do not get your hand or fingers caught in moving parts or in the disc slot. Especially watch out for infants. ❑ This unit is designed for use exclusively in automobiles.
C8405N_OI_01_eng.qxd 06.11.13 2:08 PM ページ4 Safety Information (continued) CLASS 1 LASER PRODUCT Label Indications and Their Locations CAUTION LASER RADIATION WHEN OPEN. DO NOT STARE INTO BEAM. Laser Product Caution THIS PRODUCT IS A CLASS 1 LASER PRODUCT. USE OF CONTROLS OR ADJUSTMENTS OR PERFORMANCE OF PROCEDURES OTHER THAN THOSE SPECIFIED HEREIN MAY RESULT IN HAZARDOUS RADIATION EXPOSURE. DO NOT OPEN COVERS AND DO NOT REPAIR BY YOURSELF. REFER SERVICING TO QUALIFIED PERSONNEL.
C8405N_OI_01_eng.qxd 06.11.
C8405N_OI_01_eng.qxd 06.11.13 2:08 PM ページ6 Features CQ-C8405N AAC WMA MP3 CD Player/Receiver Compatible with the AAC format This unit has newly become compatible with AAC-formatted files in addition to the existing MP3 and WMA files. Note: Some of AAC files (such as SD-Jukebox type) are not playable.
C8405N_OI_01_eng.qxd 06.11.13 2:08 PM ページ7 Contents English 2 42 82 122 162 202 242 282 322 Common ¡Safety Information ¡Before Reading These Instructions ¡Features ¡Controls Layout ¡Preparation (ACC Setting etc.) ¡General ¡Sound Control 2 4 6 8 10 12 16 Each Source ¡Radio ¡Radio Data System (RDS) in FM Broadcasting ¡CD Player ¡MP3/WMA/AAC Player 18 20 24 26 As Needed Deutsch Français Nederlands Svenska Italiano Español Dansk êÛÒÒÍËÈ ¡Audio Setting ¡Function Setting (Security Function Setting etc.
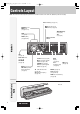
C8405N_OI_01_eng.qxd 06.11.13 2:08 PM ページ8 Controls Layout Note: This instruction manual explains operations for use with the buttons on the main unit.
Number Buttons # Remote Control Unit NUMBER – 9 VOL Volume }:Up {:Down SEL Select MENU Number RANDOM 4 0 to 9 POWER SRC (SOURCE) RANDOM POWER SOURCE MENU SEL SRC SCAN 5 REPEAT 6 7 SCAN REPEAT 9 VOL SET BAND Pause/Play SET APM Auto Preset Memory BAND MUTE 1 2 3 RANDOM SCAN REPEAT 4 5 6 7 8 9 0 DISP TUNE TUNE TRACK (FILE) 8 MUTE SBC-SW Super Bass Control-Subwoofer TUNE # NUMBER DISP Display CAR AUDIO 0 Controls Layout 0 English C8405N_OI_01_eng.qxd 06.11.
C8405N_OI_01_eng.qxd 06.11.13 2:08 PM ページ10 Cancellation of demonstration screen Preparation For the first use, the following screen may appear repeatedly. 5 Turn [VOL] to select “DEMONSTRATION”. 1 Set your car's ignition switch to the ACC For using the remote control, use [}] or [{]. or On position. 2 Press [SOURCE] (PWR: POWER). The demonstration screen appears. 6 Press [PUSH SEL] to select “OFF”. For using the remote control, use [BAND] (SET). 7 Press [MENU] to close the menu screen.
ACC Setting Caution Be sure to select OFF when your car has no ACC position in the ignition switch. Failure to do this could cause the battery to go dead. For a ACC-equipped car, select ON. (a page 31) The following functions are available. (default: OFF) ¡ The power is turned on automatically when inserting a disc. ¡ The clock can be displayed even if the power is off. (a page 15) English C8405N_OI_01_eng.qxd 06.11.
C8405N_OI_01_eng.qxd 06.11.13 2:08 PM ページ12 General This chapter explains how to turn on or off the power, how to adjust the volume, etc. Power on (PWR: POWER) Power On/off Press [SOURCE] (PWR: POWER). Power off Hold down [SOURCE] (PWR: POWER) until you hear a beep, then release it. Removing Mounting 1 Turn off the power (a page 12) 2 Press [ ] 1 Slide the left side of the face plate in (The face plate disengages with a click when it is removed.
C8405N_OI_01_eng.qxd 06.11.13 2:09 PM ページ13 English Open/Eject When a disc is already loaded, the disc will automatically be ejected. Tilt Cautions ¡ To avoid damaging the face plate, do not push it down or place objects on it while it is open. ¡ Do not pinch your finger or hand in the face plate. ¡ Do not insert foreign objects into the disc slots. ¡ For the following cases, the face plate automatically closes. Use caution not to catch your finger.
C8405N_OI_01_eng.qxd 06.11.13 2:09 PM ページ14 General (continued) The source changes as follows every time [SOURCE] is pressed.
C8405N_OI_01_eng.qxd 06.11.13 2:09 PM ページ15 English The display changes as follows every time [DISP: DISPLAY] is pressed. Note: The graphic pattern and still image are selectable. (a page 32) At power-on: Mode (DISP: DISPLAY) Display Change Folder hierarchy (Compressed Audio Player mode only.) Ordinary display + clock Ordinary display + graphic pattern Only graphic pattern General Display OFF All displays disappear in 5 seconds.
C8405N_OI_01_eng.qxd 06.11.13 2:09 PM ページ16 Sound Control SRS and SQ that provide users with simple adjustment of sound quality are described on this page. Audio Setting (a page 30) allows users to adjust each speaker and the optional subwoofer in more detail (regarding BASS, TREBLE, BALANCE, FADER, SUB.W, LPF, HPF, REAR). SRS WOW SRS WOW™ is 3-D sound technology based on the HRTF (Head Related Transfer Function) theory.
English The equalizer curve is selectable from among preset 6 types (FLAT, ROCK, POP, VOCAL, JAZZ, and CLUB) depending on your listening category. Note: SQ is not changeable when SRS WOW is enabled. (a page 16) SQ changeover The SQ category is changed every time [SQ] (SOUND QUALITY) is pressed. Note: Setting of SQ, bass/treble and volume are influenced one another. If the influence mentioned above causes distortion to the audio signal, readjust bass/treble or volume.
C8405N_OI_01_eng.qxd 06.11.13 2:09 PM ページ18 Radio This chapter explains how to listen to the radio. 1 Press [SOURCE] to select the radio mode. 2 Press [BAND] to select a band. 3 Select a station. Operation Flow Frequency adjustment []] (TUNE): Lower [[] (TUNE): Higher Notes: ¡ For tuning in on only stations whose receiving conditions are good in the station search, set LOCAL to ON. (a page 19) ¡ For reducing noise when a receiving FM stereo wave is weak, set MONO to ON.
Auto Preset Memory (APM) Stations with good receiving conditions automatically preset. 1 Select a band. down 2 Hold [BAND] (APM) for 2 sec. or more. The preset stations under best receiving conditions are received for 5 sec. each after presetting the stations (SCAN). To stop scanning, press [}] or [{]. Only LOCAL is available while receiving an AM station. 1 Press [MENU] to display the menu display. Radio Menu Display For using the remote control, hold down [SEL] (MENU) for 2 sec. or more.
C8405N_OI_01_eng.qxd 06.11.13 2:09 PM ページ20 Radio Data System (RDS) in FM Broadcasting Useful functions such as AF, TA, PTY, etc. are available in the RDS (Radio Data System)-ready areas. Some FM stations are broadcasting added data compatible with RDS. This radio set offers convenient functions using such data. RDS service availability varies with areas. Please understand if RDS service is not available in your area, the following service is not available, either.
C8405N_OI_01_eng.qxd 06.11.13 2:09 PM ページ21 Program Service Name PTY on display English Lights when TA is activated. Receiving station PTY RDS mode display Lights when PTY is activated. Lights while receiving a TP station (that broadcasts TA). Lights when AF is activated. TA receiving display Lights while receiving the TA signal. Holding down [TA/AF] for 2 sec. or more toggles AF on and off. Set AF to off for presetting a non-RDS station or other cases.
C8405N_OI_01_eng.qxd 06.11.13 2:09 PM ページ22 Radio Data System (RDS) in FM Broadcasting (continued) TA ON/OFF Pressing [TA/AF] toggles TA on and off. TA (TA: TRAFFIC ANNOUNCEMENT) Notes: ¡ This operation is not adjustable by the remote control. ¡ Traffic information is available in monaural. ¡ Adjust the TA volume only while receiving a TA. Lights when TA is activated. 1 Press [MENU] to display the menu dis- (AF: ALTERNATIVE FREQUENCY/REGION) AF/Region Setting (FM Menu Display) play.
C8405N_OI_01_eng.qxd 06.11.13 2:09 PM ページ23 Holding down [DISP] (PTY) for 2 sec. or more toggles PTY mode on and off. 2 Press [BAND] (SET). English PTY ON/OFF Search starts. Notes: ¡ To stop searching, press [BAND] (SET). ¡ When there is no corresponding program type station, Program Search by PTY “NONE” is displayed. Press [}] or [{] to select PTY in the PTY mode.
C8405N_OI_01_eng.qxd 06.11.13 2:09 PM ページ24 CD Player Cautions ¡ This unit does not support 8 cm discs. ¡ Do not use irregularly shaped discs. (a page 40) ¡ Do not use discs that have a seal or label attached. ¡ To avoid damaging the face plate, do not push it down or place objects on it while it is open. ¡ Do not pinch your finger or hand in the face plate when the face plate is in motion. ¡ Do not insert foreign matter into the disc slots.
Random and Repeat play can be set. 1 Press [MENU] to display the menu disFor using the remote control, hold down [SEL] (MENU) for 2 sec. or more. : Off (default) : Random playback REPEAT : Off (default) : Playing the current track repeatedly (RANDOM, REPEAT) Random, Repeat Play (CD Menu Display) play. RANDOM English C8405N_OI_01_eng.qxd 06.11.13 2:09 PM ページ25 TEXT (CD-TEXT) 2 Turn [VOL] to select a function to be adjusted.
C8405N_OI_01_eng.qxd 06.11.13 2:09 PM ページ26 MP3/WMA/AAC Player This unit can play MP3, WMA, and AAC files. When a disc is already loaded, press [SOURCE] to select the compressed audio mode. 1 Press [u OPEN] to open the face plate. When a disc is already loaded ( will automatically be ejected. lights), the disc 2 Load a disc with the printed side facing Operation Flow up. The face plate closes automatically, and the unit recognizes the disc and starts playing automatically, too.
Notes: ¡ Refer to the pages 28 and 29 for cautions. ¡ This unit does not support a MIX mode CD (a CD containing both CD-DA and compressed audio files). In case of using such a CD, problems may occur such as anacoustic playback. 1 FOLDER RANDOM Press [MENU] to display the menu display. For using the remote control, hold down [SEL] (MENU) for 2 sec. or more. : Off (default) : Random playback (folder) REPEAT : Off (default) : Playing the current file repeatedly FOLDER REPEAT adjusted.
C8405N_OI_01_eng.qxd 06.11.13 2:09 PM ページ28 MP3/WMA/AAC Player (continued) Each of MP3 (MPEG Audio Layer-3), WMA (Windows Media™ Audio), and AAC (Advanced Audio Coding) is a format for compressed audio file. These formats allow users to save all the files contained in approximately 10 pieces of existing CDs on one piece of CD-R/RW. Note: Each of encoding software is not included with this unit.
¡ Do not save an audio file (CD-DA file) and a compressed audio file on the same disc. Failure to observe this may result in difficulty in playing. ¡ If compressed audio files formatted with two or more types are saved on the same disc, each format shall have a different folder. ¡ Do not write files other than compressed audio files. ¡ Playability may depend on the combination of writing software and disc writer to be used. ¡ This unit does not support the play list function.
C8405N_OI_01_eng.qxd 06.11.13 2:09 PM ページ30 Audio Setting Adjustment to each speaker and an optional subwoofer 1 Press [PUSH SEL: SELECT ] to display the AUDIO menu display. For using the remote control, use [SEL] (MENU). 2 Press [PUSH SEL: SELECT ] to select a mode to be adjusted. For using the remote control, use [SEL] (MENU). 3 Turn [VOL] clock- wise or counterclockwise to adjust. For using the remote control, use [VOL }] or [VOL {]. AUDIO Menu Display Note: Only the VOLUME, SUB.
C8405N_OI_01_eng.qxd 06.11.13 2:09 PM ページ31 Function Setting 1 Press [MENU] to display the menu display. For using the remote control, hold down [SEL] (MENU) for 2 sec. or more. 2 MUTE KEY Setting [MUTE] buttons’ functions : Volume off (default) : Volume down by 10 steps English Adjustment to display on the FUNCTION menu : Volume down by 5 steps EXT.MUTE (External Mute) Press []] or [[] to display the FUNCTION menu.
C8405N_OI_01_eng.qxd 06.11.13 2:09 PM ページ32 Display Setting Adjustment to display on the DISPLAY menu 1 Press [MENU] to display the menu GRAPHIC PATTERN display. (Default: All) For using the remote control, hold down [SEL] (MENU) for 2 sec. or more. Turn [VOL] to make a selection. All: Sequential display from pattern A to D. Pattern A-D 2 Press []] or [[] to display the DISPLAY menu. STILL IMAGE (Default: All) Turn [VOL] to make a selection.
C8405N_OI_01_eng.qxd 06.11.13 2:09 PM ページ33 You can edit the moving images and still images that are initially stored in the unit. You also can use the data that is downloaded from the Panasonic Web site and the data that is stored with a digital camera or other devices and processed with exclusive software, IMAGE STUDIO. See “Notes on Customize Function” (a page 34) as well. Note: Visit Panasonic Web site (http://panasonic.co.jp/pas/en/software/customize/index.html) for details.
C8405N_OI_01_eng.qxd 06.11.13 2:09 PM ページ34 Customize the Display (Customize Function) (continued) Note on Download Service At Customizing The download service may be suspended or stopped without advance notice. The download service is not available in some areas. Please visit the site below for further information. Panasonic Web site: (http://panasonic.net) Notes on IMAGE STUDIO ¡ This download service is not available in some areas. For details, please access the Panasonic website.
C8405N_OI_01_eng.qxd 06.11.13 2:09 PM ページ35 Check and take steps as described below. If the described suggestions do not solve the problem, it is recommended to take the unit to your nearest authorized Panasonic Service Centre. The product should be serviced only by qualified personnel. Please refer the checking and the repair to professionals. Panasonic shall not be liable for any accidents arising out of neglect of checking the unit or your own repair after your checking.
C8405N_OI_01_eng.qxd 06.11.13 2:09 PM ページ36 Troubleshooting (continued) Problem Some operations are not executable. Common (continued) No sound from speaker(s) The speaker channels are reversed between right and left. The sound field is not clear in the stereo mode. Central sound does not settled. The power fails unintentionally. Poor reception or noise Possible cause a Possible solution Some operations are not executable in particular modes such as menu mode.
The number of auto preset stations is less than 6. Preset stations cannot be stored. Possible cause a Possible solution The number of receivable stations is less than 6. a Move to an area where receivable stations number is maximum, and try presetting. The contact of the battery lead is poor, or the battery lead is not always powered. a Make sure that the battery lead is connected securely, and preset stations again. PS does not appear even if an RDS station is tuned in to. (“NO PS” appears.
C8405N_OI_01_eng.qxd 06.11.13 2:09 PM ページ38 Troubleshooting (continued) Problem No playback or disc ejected CD Sound skipping or noise Sound skipping due to vibration Disc unejectable Possible cause a Possible solution The disc is inserted upside down. a Insert a disc correctly. There is a flaw or foreign material on the disc. a Remove the foreign material, or use a flawless disc. There is a flaw or foreign material on the disc. a Remove the foreign material, or use a flawless disc.
Possible cause a Possible solution The battery is inserted in the wrong direction. A wrong battery is inserted. aInsert a correct battery in the correct direction. The battery is weak. aReplace the battery with new one. No response to pressing buttons The aiming direction of the remote control unit is wrong. aAim the remote control unit at the sensor of the unit and press buttons. The sensor is exposed to direct sunlight.
C8405N_OI_01_eng.qxd 06.11.13 2:09 PM ページ40 Notes on CD-Rs/RWs Notes on CD/CD Media (CD-ROM, CD-R, CD-RW) Notes on Discs If you use commercial CDs, they must have either of these labels shown at right. Some copy-protected music CDs are not playable. TEXT How to hold the disc ¡ Do not touch the underside of the disc. ¡ Do not scratch on the disc. ¡ Do not bend the disc. ¡ When not in use, keep the disc in a case.
C8405N_OI_01_eng.qxd 06.11.13 2:09 PM ページ41 Sampling Frequency DA Converter Pick-Up Type Light Source Wavelength Frequency Response Signal to Noise Ratio Total Harmonic Distortion Wow and Flutter Channel Separation 8 times oversampling 4 DAC System Astigma 3-beam Semiconductor laser 790 nm 20 Hz – 20 kHz (±1 dB) 96 dB 0.01 % (1 kHz) Below measurable limits 85 dB Radio FM Stereo Radio Frequency range Usable sensitivity Stereo separation 87.
C8405N_OI_003_memo.qxd 06.11.
C8405N_OI_003_memo.qxd 06.11.
C8405N_OI_001_cover.qxd 06.11.13 2:07 PM ページ1 Matsushita Electric Industrial Co., Ltd. Web Site : http://panasonic.
Before Wiring/Vor der Verdrahtung/ Avant le câblage/Voor het aansluiten van de bedrading ●Probieren Sie den Radiobetrieb vor dem Einbau mit Antenne und Lautsprechern aus. Exclusively operated with 12 V battery with negative (–) ground. Connect the power lead (red) last. (for non-ISO connector) Connect the battery lead (yellow) to the positive (+) terminal of the battery or fuse block terminal (BAT). (for non-ISO connector) Strip about 5 mm of the lead ends for connection.
CQ-C8405N Installation Instructions (1-2) YFM294C087CA Wiring/Verdrahtung/Câblage/Bedrading Caution To prevent damage to the unit, do not connect the power connector until the whole wiring is completed. Vorsicht Um Beschädigungen des Gerätes zu vermeiden, schließen Sie den Versorgungsstecker erst an, nachdem die gesamte Verdrahtung vollständig beendet wurde.
C8405N_SU_001_cover.qxd 06.11.13 2:28 PM ページ2 System Upgrade Guidebook System-Upgrade-Handbuch Guide pratique de mise à niveau de système Systeemuitbreidingsgids Guidebok om systemuppgradering Guida per il potenziamento del sistema Guía de mejora del sistema Systemopgraderingsvejledning àÌÒÚÛ͈Ëfl ÔÓ ‡Ò¯ËÂÌ˲ ÒËÒÚÂÏ˚ Model: CQ-C8405N ¡For upgrading your system, read this manual carefully before use. This manual should be retained for future reference after read.
C8405N_SU_01_eng.qxd 06.11.13 2:28 PM ページ2 Safety Information ■ Read the operating instructions for the unit and all other components of your car audio system carefully before using the system. They contain instructions about how to use the system in a safe and effective manner. Panasonic assumes no responsibility for any problems resulting from failure to observe the instructions given in this manual.
Observe the following cautions when using this unit. ❑ Keep the sound volume at an appropriate level. Keep the volume level low enough to be aware of road and traffic conditions while driving. ❑ Do not insert or allow your hand or fingers to be caught in the unit. To prevent injury, do not get your hand or fingers caught in moving parts or in the disc slot. Especially watch out for infants. ❑ This unit is designed for use exclusively in automobiles.
C8405N_SU_01_eng.qxd 06.11.13 2:28 PM ページ4 About this Book Before Reading These Instructions This book is an instruction manual that explains how to operate your purchased head unit and its remote control as an accessory when the head unit is connected to optional devices.
C8405N_SU_01_eng.qxd 06.11.
C8405N_SU_01_eng.qxd 06.11.13 2:28 PM ページ6 General DVD Changer The optional adapter (Conversion Cable for DVD/CD Changer: CA-CC30N) allows you to connect the optional Panasonic DVD changer unit (CX-DH801N). For details, refer to the operating instructions for the DVD changer unit. (a page 8, 10) CD Changer The optional adapter (Conversion Cable for DVD/CD Changer: CA-CC30N) allows you to connect the optional Panasonic CD changer unit (CX-DP880N).
C8405N_SU_01_eng.qxd 06.11.13 2:28 PM ページ7 Radio FM1, FM2, FM3, AM (LW/MW) (a Operating Instructions) English The source changes as follows every time [SOURCE] is pressed. System-up Connector Device connected to the System-up Connector of this unit When optional devices are connected: Shift to connected devices When an expansion module is connected: The devices connected to the ports 1 to 4 are activated in sequence after shifting to AUX2 (devices connected to the AUX terminal of the expansion module).
C8405N_SU_01_eng.qxd 06.11.13 2:29 PM ページ8 Disc Changer (When CDs or MP3 discs are loaded) Connected an optional CD changer or an optional DVD changer can be controlled by this unit. 1 Load a magazine (discs). When a magazine is already loaded, press [SOURCE] to select the changer mode. The unit recognizes the magazine and starts playing automatically. 2 Select a desired portion.
Notes: ¡ When CX-DP880N or CX-DH801N is connected, a CD-RW disc is playable. ¡ Trouble may occur while playing CD-Rs. Refer to the section on “Notes on CD/CD Media (CD-ROM, CD-R, CD-RW)”. (a Operating Instructions) ¡ This unit does not support the following through the CD changer. ¡MP3 playback. 1 Press [MENU] to display the menu display. For using the remote control, hold down [SEL] (MENU) for 2 sec. or more.
C8405N_SU_01_eng.qxd 06.11.13 2:29 PM ページ10 Disc Changer (when DVDs or VCDs are loaded) Connected an optional DVD changer (CX-DH801N) can be controlled by this unit. 1 Load a magazine (discs). When a magazine is already loaded, press [SOURCE] to select the DVD changer mode. Operation Flow The unit recognizes the magazine and starts playing automatically. Notes: ¡ For DVD operations other than the above (i.e. DVD menu, closed caption, etc.), use the remote control unit supplied with the DVD changer.
Repeat play can be set. 1 Press [MENU] to display the menu disFor using the remote control, hold down [SEL] (MENU) for 2 sec. or more. : Off (default) : Playing the current chapter repeatedly. TITLE REPEAT : Playing the current title repeatedly. Note: The unit may not operate for some DVDs. For using the remote control, use [}] or [{]. 3 Press [PUSH SEL] to adjust. For using the remote control, use [BAND] (SET). 4 Press [MENU] to close the menu screen.
C8405N_SU_01_eng.qxd 06.11.13 2:29 PM ページ12 iPod Control Connection of the optional iPod adapter (Direct Cable for iPod) (CA-DC300N) allows users to operate the iPod including file selection and file sequence change with the buttons on this unit. Operation Flow 1 Connect the iPod. 2 Press [SOURCE] to select the iPod mode. Playback starts. Note: If playback does not start, press [BAND] (y / 5). 3 Select a desired portion.
Notes: The iPod equipped with a dock connector is exclusively connectable. Further information about the controllable iPod is described below. ¡Controllable iPod/software version ¡3rd generation iPod/ver. 2.3 ¡4th generation iPod/ver. 3.1.1 ¡5th generation iPod/ver. 1.1.2 (Video playback is not supported.) ¡iPod Photo/ver. 1.2.1 ¡iPod mini/ver. 1.4.1 ¡iPod nano/ver. 1.2 * Operation check has been completed with software available at the end of October, 2006.
C8405N_SU_01_eng.qxd 06.11.13 2:29 PM ページ14 Hands-Free Phone System Be sure to read “Safety Information” in the Operating Instructions for the Hands-Free Phone System before use. Connecting Hands-Free Phone System Preparation Connect the Hands-Free Phone System (CY-BT100N) and establish the pairing. Refer to the instruction manual for the Hands-Free Phone System for further information.
Notes: ¡ This item is not selectable by pressing [SOURCE], but activated by receiving an incoming call. ¡ Only outline is described here. Refer to the operating instructions for the Hands-Free Phone System for further information. ¡ The mute function is automatically canceled when receiving a call even at mute-on setting. ¡ This unit is not operable when receiving a call at power-off setting. ¡ We do not guarantee all the operations of connectable devices. English C8405N_SU_01_eng.qxd 06.11.
C8405N_SU_01_eng.qxd 06.11.13 2:29 PM ページ16 Troubleshooting If You Suspect Something Wrong Check and take steps as described below. If the described suggestions do not solve the problem, it is recommended to take the unit to your nearest authorized Panasonic Service Center. The product should be serviced only by qualified personnel. Please refer the checking and the repair to professionals.
Display Possible cause a Possible solution Your iPod has no playable music. a Download playable music to your iPod. Troubleshooting iPod Control The iPod cable was disconnected in the iPod mode. a Reconnect the iPod cable. English C8405N_SU_01_eng.qxd 06.11.
C8405N_SU_003_memo.qxd 06.11.
C8405N_SU_003_memo.qxd 06.11.
C8405N_SU_001_cover.qxd 06.11.13 2:28 PM ページ1 Matsushita Electric Industrial Co., Ltd. Web Site : http://panasonic.