WMA MP3 CD Player/Receiver Model: CQ-C8803N CQ-C8803N DM TA DISP PTY Operating Instructions Bedienungsanleitung Manuel d’instructions d instructions Gebruiksaanwijzing Bruksanvisning Manuale di istruzioni Manual de Instrucciones Brugsvejledning àÌÒÚÛ͈Ëfl ÔÓ ˝ÍÒÔÎÛ‡Ú‡ˆËË TEXT ¡Please read these instructions carefully before using this product and keep this manual for future reference.
Safety Information ■ Read the operating instructions for the unit and all other components of your car audio system carefully before using the system. They contain instructions about how to use the system in a safe and effective manner. Panasonic assumes no responsibility for any problems resulting from failure to observe the instructions given in this manual. This pictograph intends to alert you to the presence of important operating instructions and Warning installation instructions.
❑ Keep the sound volume at an appropriate level. Keep the volume level low enough to be aware of road and traffic conditions while driving. ❑ Do not insert or allow your hand or fingers to be caught in the unit. To prevent injury, do not get your hand or fingers caught in moving parts or in the disc slot. Especially watch out for infants. ❑ This unit is designed for use exclusively in automobiles. ❑ Do not operate the unit for a prolonged period with the engine turned off.
Safety Information CLASS 1 LASER PRODUCT Label Indications and Their Locations CAUTION LASER RADIATION WHEN OPEN. DO NOT STARE INTO BEAM. Laser Product Caution THIS PRODUCT IS A CLASS 1 LASER PRODUCT. USE OF CONTROLS OR ADJUSTMENTS OR PERFORMANCE OF PROCEDURES OTHER THAN THOSE SPECIFIED HEREIN MAY RESULT IN HAZARDOUS RADIATION EXPOSURE. DO NOT OPEN COVERS AND DO NOT REPAIR BY YOURSELF. REFER SERVICING TO QUALIFIED PERSONNEL. Do not take apart this unit or attempt to make any changes yourself.
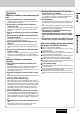
Before Reading These Instructions XXXXXXXXXXXXXXX XXXXXXXXXXXXXXXXX XXXXXXXXXXXXXX XXXXXXXXXXXXXXXX OO-OOOOO English XXXXXXXXXXXXXXX XXXXXXXXXXXXXXXXX XXXXXXXXXXXXXX XXXXXXXXXXXXXXXX OO-OOOOO System Upgrade Guidebook (YEFM285767) (YEFM262688) Q'ty: 1 Installation Instructions (YEFM294131) (YEFM294132) (YEFM294133) Q'ty: 1 PAN EUROPEAN GUARANTEE (Warranty Card) Q'ty: 1 Q'ty: 1 POWER SOURCE MENU SEL SRC VOL SET BAND MUTE 1 2 3 RANDOM SCAN REPEAT 4 5 7 8 9 0 DISP TUNE 6 TUNE #
Features CQ-C8803N WMA MP3 CD Player/Receiver Hands-Free Phone System Connection of the optional Bluetooth hands-free kit (Hands-Free Kit featuring Bluetooth® technology: CY-BT100N) allows users to talk on a handsfree cellular phone if the phone supports Bluetooth. Note: This unit is designed only for receiving calls. It cannot send calls. Bluetooth® The Bluetooth word mark and logo are owned by the Bluetooth SIG, Inc. and any use of such marks by Matsushita Electric Industrial Co.,Ltd. is under license.
Contents English 2 46 90 134 178 222 266 310 354 Common ¡Safety Information ¡Before Reading These Instructions ¡Features ¡Controls Layout ¡Preparation (ACC Setting etc.) ¡General ¡Sound Control 2 4 6 8 10 12 16 Each Source ¡Radio ¡Radio Data System (RDS) in FM Broadcasting ¡CD Player ¡MP3/WMA Player 19 22 26 28 As Needed Deutsch Français Nederlands Svenska Italiano Español Dansk êÛÒÒÍËÈ ¡Audio Setting ¡Function Setting (Security Function Setting etc.
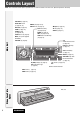
Controls Layout Main Unit Note: This instruction manual explains operations for use with the buttons on the main unit.
# Remote Control Unit NUMBER – 9 VOL Volume }:Up {:Down SEL Select MENU Number RANDOM 4 0 to 9 POWER SRC (SOURCE) RANDOM POWER SOURCE MENU SEL SRC SCAN 5 REPEAT 6 7 SCAN REPEAT 9 VOL SET BAND Pause/Play SET APM Auto Preset Memory BAND MUTE 1 2 3 RANDOM SCAN REPEAT 4 5 6 7 8 9 0 DISP TUNE TUNE TRACK (FILE) 8 MUTE SBC-SW Super Bass Control-Subwoofer TUNE # NUMBER DISP Display CAR AUDIO 0 Controls Layout 0 English Number Buttons Operations executable only wit
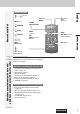
Cancellation of demonstration screen Preparation For the first use, the following screen may appear repeatedly. 5 Press [{] or [}] to select “DEMONSTRATION”. 1 Set your car's ignition switch to the ACC or On position. 2 Press [SRC] (PWR: POWER). The demonstration screen appears. 6 Press [BAND] (SET) to select “OFF” 7 Press [MENU]. For using the remote control, hold down [SEL] (MENU) for 2 sec. or more.
OFF ACC IGN The following functions are activated when the Security Function is ON. (a page 34) ¡ The security indicator lights up when removing the face plate. ¡ The alarm sounds and the message appears on the screen to warn you to remove the face plate at ACC off.
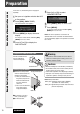
General This chapter explains how to turn on or off the power, how to adjust the volume, etc. Press [SRC] (PWR: POWER). CQ-C8803N DM TA (PWR: POWER) Power On/off Power on DISP PTY Power off Hold down [SRC] (PWR: POWER) until you hear a beep, then release it. Removing Mounting 1 Turn off the power (a page 12) 2 Press [ ] (Release). 1 Slide the left side of the face plate in place. (The face plate disengages with a click when it is removed.
When a disc is already loaded, the disc will automatically be ejected. CQ-C8803N DM TA DISP PTY Tilt Cautions: ¡ To avoid damaging the face plate, do not push it down or place objects on it while it is open. ¡ Do not pinch your finger or hand in the face plate. ¡ Do not insert foreign objects into the disc slots. ¡ For the following cases, the face plate automatically closes. Use caution not to catch your finger.
General The source changes as follows every time [SRC: SOURCE] is pressed. CQ-C8803N DM TA DISP PTY Radio FM1, FM2, FM3, AM (LW/MW) (a page 19) Player System-up Connector Device connected to the System-up Connector of the this unit When optional devices are connected: Shift to connected devices When an expansion module is connected: The devices connected to the ports 1 to 4 are activated in sequence after shifting to AUX2 (devices connected to the AUX terminal of the expansion module).
CQ-C8803N DM TA DISP PTY At power-on: Mode Display OFF All displays disappear in 5 seconds. Ordinary display + clock Ordinary display + graphic pattern Only graphic pattern General (DISP: DISPLAY) Folder hierarchy (MP3/WMA mode only.) Display Change English The display changes as follows every time [D] (DISP: DISPLAY) is pressed. Note: The graphic pattern and still image are selectable.
Sound Control This unit is equipped with CS AUTO technology as well as conventional tone adjustment. Select your favorite sound world. Sound control At CS Auto ON At CS Auto OFF CS AUTO (Circle Surround Automotive ) Available items ¡ Mode selectable from among MUSIC/CINEMA/ MONO (a page 16) Adjustable items in audio setting (a page 32) FRONT-TruBass, REAR-TruBass, SUB.W-TruBass, FRONT-FOCUS, REAR-FOCUS, F-R MIX The following items are available only at CS AUTO off.
CQ-C8803N DM TA English DISP PTY SQ changeover The SQ category is changed every time [SQ] (SOUND QUALITY) is pressed. Note: Setting of SQ, bass/treble and volume are influenced one another. If the influence mentioned above causes distortion to the audio signal, readjust bass/treble or volume. (a page 33) Lights when SQ is activated. SQ is adjustable in accordance with your taste.
Sound Control Substitutional Subwoofer 18 (SBC-SW: SUPER BASS CONTROL·SUBWOOFER) The rear speaker can be used as a substitutional subwoofer when a subwoofer is not connected. CQ-C8803N Holding down [MUTE] (SBC-SW) for 2 sec. or more toggles SBC-SW on and off. DM TA DISP PTY Off (default) On Notes: ¡ If ON is selected, the settings of subwoofer level adjustment and subwoofer low pass filter are activated. (a page 33) ¡ SBC-SW is not changeable when CS AUTO is enabled.
Radio This chapter explains how to listen to the radio. 1 Press [SRC] (SOURCE) to select the CQ-C8803N DM DISP PTY 2 Press [BAND] to select a band. Operation Flow 3 Select a station. Frequency adjustment []] (TUNE): Lower [[] (TUNE): Higher Preset station selection [{] (P·SET: PRESET): Lower preset number [}] (P·SET: PRESET): Higher preset number (APM: AUTO PRESET MEMORY P·SET: PRESET) Up to 6 stations can be preset in AM (LW/MW), FM1, FM2, and FM3 respectively.
Radio Radio Mode Display Band Frequency Preset Number Lights when LOCAL is activated. (a page 20) Lights while receiving an FM stereo signal. Lights when MONO is activated. (a page 20) In the AM mode, only AUDIO FILTER and LOCAL can be selected. Noise reduction when the signal strength decreases : Receiving in stereo (default) 1 Press [MENU] to : Receiving in mono and reducing the noise level display the menu display. For using the remote control, hold down [SEL](MENU) for 2 sec. or more.
CQ-C8803N DM TA DISP PTY 1 Receive an FM broadcast station via (D·M: DIRECT MEMORY) Via FM transmitter Frequency setting English You can register frequencies via an FM transmitter integrated in a mobile audio device. Then, you can call up those frequencies with a single touch of button from the CD mode, changer mode, etc. (default: FM 87.50 MHz) your FM transmitter. (a page 19) 2 Press [MENU] to call up the menu Listening to an FM station via an FM transmitter screen.
Radio Data System (RDS) in FM Broadcasting Useful functions such as AF, TA, PTY, etc. are available in the RDS (Radio Data System)-ready areas. Some FM stations are broadcasting added data compatible with RDS. This radio set offers convenient functions using such data. RDS service availability varies with areas. Please understand if RDS service is not available in your area, the following service is not available, either. The following functions are available when receiving RDS stations.
Program Service Name PTY on display English Lights when TA is activated. Receiving station PTY RDS mode display Lights when PTY is activated. Lights while receiving a TP station (that broadcasts TA). Lights when AF is activated. TA receiving display PI Seek (Program Identification Seek) (only by remote control unit) If reception becomes poor when tuning in a preset station, press the same preset number button. The same station with better reception will be searched for.
Radio Data System (RDS) in FM Broadcasting TA ON/OFF Pressing [TA] toggles TA on and off. CQ-C8803N DM TA DISP PTY (TA: TRAFFIC ANNOUNCEMENT) TA Notes: ¡ This operation is not adjustable by the remote control. ¡ Traffic information is available in monaural. ¡ Adjust the TA volume only while receiving a TA. Lights when TA is activated.
Holding down [D] (PTY) for 2 sec. or more toggles PTY mode on and off. 2 Press [BAND] (SET). Search starts. DISP PTY Notes: ¡ To stop searching, press [BAND] (SET). English PTY ON/OFF ¡ When there is no corresponding program type station, Program Search by PTY “NONE” is displayed. Press [}] or [{] to select PTY in the PTY mode.
CD Player When a disc is already loaded, press [SRC] (SOURCE) to select the CD mode. 1 Press [u] (OPEN) to open the face CQ-C8803N DM TA plate. When a disc is already loaded ( disc will automatically be ejected. DISP PTY lights), the Operation Flow 2 Load a disc with the printed side facing up. The face plate closes automatically, and the unit recognizes the disc and starts playing automatically, too. Printed side 3 Select a desired portion.
¡ Refer to the section on “Notes on CD/CD Media (CD-ROM, CD-R, CD-RW)” (a page 44). ¡ This unit does not support a MIX mode CD (a CD containing both CD-DA and MP3/WMA data). In case of using such a CD, problems may occur such as anacoustic playback. ¡ This unit does not support 8 cm discs. ¡ Do not use irregularly shaped discs. (a page 44) ¡ Do not use discs that have a seal or label attached. ¡ To avoid damaging the face plate, do not push it down or place objects on it while it is open.
MP3/WMA Player When a disc is already loaded, press [SRC] (SOURCE) to select the MP3/WMA mode. 1 Press [u] (OPEN) to open the face CQ-C8803N DM plate. TA DISP PTY When a disc is already loaded ( lights), the disc will automatically be ejected. 2 Load a disc with the printed side facing Operation Flow up The face plate closes automatically, and the unit recognizes the disc and starts playing automatically, too. (It may take several minutes to start for a disc that has a lot of files.
1 Press [MENU] to display the menu dis- RANDOM : Off (default) play. For using the remote control, hold down [SEL] (MENU) for 2 sec. or more. : Random playback (disc) DISP PTY FOLDER RANDOM : Off (default) 2 Press [}] or [{] to select a mode to be adjusted. 3 : Random playback (folder) REPEAT Press [BAND] (SET) to adjust. : Off (default) : Playing the current file repeatedly DISP PTY FOLDER REPEAT 4 Press [MENU] to confirm the adjustment.
MP3/WMA Player What is MP3/WMA? MP3 (MPEG Audio Layer-3) and WMA (Windows MediaTM Audio) are the compression formats of digital audio. The former is developed by MPEG (Motion Picture Experts Group), and the latter is developed by Microsoft Corporation. Using these compression formats, you can record the contents of about 10 music CDs on a single CD media (This figures refer to data recorded on a 650 MB CD-R or CD-RW at a fixed bit rate of 128 kbps and a sampling frequency of 44.1 kHz).
Supported file systems ISO 9660 Level 1/Level 2, Apple Extension to ISO 9660, Joliet, Romeo Note: Apple HFS, UDF 1.50, Mix CD and CD Extra are not supported. Compression formats (Recommendation: “Points to remember when making MP3/WMA files” on the previous page) Compression method Bit rate VBR Sampling frequency MPEG 1 audio layer 3 (MP3) 32 k – 320 kbps Yes 32, 44.1, 48 kHz MPEG 2 audio layer 3 (MP3) 8 k – 160 kbps Yes 16, 22.05, 24 kHz Windows Media Audio Ver.
Audio Setting 1 Set the CS AUTO mode to on. (a page 16) 2 Press [VOLUME] (PUSH SEL: SELECT) to display the menu display. 3 Press [VOL- UME] (PUSH SEL: SELECT) to select a mode to be adjusted. SUB.W-TruBass (Setting range: Lv 1 to Lv 10 and OFF, Default: Lv 4) q : Up w : Down FRONT FOCUS (Setting range: Lv 1 to Lv 10 and OFF, Default: Lv 5) q : Up w : Down Audio Setting (when CS AUTO activated) REAR FOCUS 4 Turn [VOLUME] clockwise or counterclockwise to adjust.
(a page 16) 2 Press [VOLUME] (PUSH SEL: SELECT) to display the AUDIO menu display. UME] (PUSH SEL: SELECT) to select a mode to be adjusted. 4 Turn [VOLUME] clockwise or counterclockwise to adjust. Note: f no operation takes place for more than 10 seconds in the audio menu (2 sec. in Main volume adjustment), the display returns to the regular mode.
Function Setting Adjustment to display on the FUNCTION menu 1 Press [MENU] to display the menu display. For using the remote control, hold down [SEL] (MENU) for 2 sec. or more. MUTE KEY Setting [MUTE] buttons’ functions : Volume off (default) : Volume down by 10 steps DISP PTY : Volume down by 5 steps 2 Press []] or [[] to display the FUNCTION menu. EXT.
Display Setting Adjustment to display on the DISPLAY menu display. For using the remote control, hold down [SEL] (MENU) for 2 sec. or more. (Setting range: 5 types, Default: All) Switching by []] or [[] DISP PTY All: Sequential display from pattern A to D. Pattern A-D English GRAPHIC PATTERN 1 Press [MENU] to display the menu 2 Press []] or [[] to display the DISPLAY menu. 3 Press [}] or [{] to select a function to be adjusted.
Customize the Display (Customize Function) You can edit the moving images and still images that are initially stored in the unit. You also can use the data that is downloaded from the Panasonic Web site and the data that is stored with a digital camera or other devices and processed with exclusive software, IMAGE STUDIO. See “Notes on Customize function” (a page 37) as well. Note: Visit Panasonic Web site (http://panasonic.co.jp/pas/en/software/customize/index.html) for details.
At Customizing The download service may be suspended or stopped without advance notice. The download service is not available in some areas. Please visit the site below for further information. Panasonic Web site: (http://www.panasonic.co.jp/global/) Download site: ¡ This download service is not available in some areas. For details, please access the Panasonic website. ¡ IMAGE STUDIO is available only by downloading from the address below. It is not bundled with this unit.
Troubleshooting If You Suspect Something Wrong Check and take steps as described below. If the described suggestions do not solve the problem, it is recommended to take the unit to your nearest authorized Panasonic Service Centre. The product should be serviced only by qualified personnel. Please refer the checking and the repair to professionals. Panasonic shall not be liable for any accidents arising out of neglect of checking the unit or your own repair after your checking.
Common (continued) No sound from speaker(s) The speaker channels are reversed between right and left. The sound field is not clear in the stereo mode. Central sound does not settled. The power fails unintentionally. Poor reception or noise Some operations are not executable in particular modes such as menu mode. a Read the operating instructions carefully and cancel the mode. If the unit is still out of order, consult your dealer. English Some operations are not executable.
Troubleshooting RDS Problem 40 Possible cause a Possible solution PS does not appear even if an RDS station is tuned in to. (“NO PS” appears.) A PS code cannot be received for the reason of bad receiving conditions, etc. a A PS code appears if it is received. Wait for a while until conditions change. Receiving programs differs from PTY that was already set up. When the station changed between programs, the unit could not receive the PTY code.
No playback or disc ejected CD Sound skipping or noise Sound skipping due to vibration Disc unejectable Possible cause a Possible solution The disc is inserted upside down. a Insert a disc correctly. There is a flaw or foreign material on the disc. a Remove the foreign material, or use a flawless disc. English Problem There is a flaw or foreign material on the disc. a Remove the foreign material, or use a flawless disc. The unit is not sufficiently secured. a Secure the unit to the console box.
Troubleshooting Remote control unit Problem 42 Possible cause a Possible solution The battery is inserted in the wrong direction. A wrong battery is inserted. aInsert a correct battery in the correct direction. The battery is weak. aReplace the battery with new one. No response to pressing buttons The aiming direction of the remote control unit is wrong. aAim the remote control unit at the sensor of the unit and press buttons. The sensor is exposed to direct sunlight.
Error Display Messages Display English Possible cause a Possible solution The disc is dirty, or is upside down. a Check the disc. The disc has scratches. a Check the disc. The player for some reason cannot read the file you are trying to play. (File recorded in an unsupported file system, compression scheme, data format, file name extension, damaged data, etc.) a Select a file that the player can read. Check the type of data recorded on the disc. Create a new disc if necessary.
Notes on CD-Rs/RWs Notes on CD/CD Media (CD-ROM, CD-R, CD-RW) Notes on Discs If you use commercial CDs, they must have either of these labels shown at right. Some copy-protected music CDs are not playable. TEXT How to hold the disc Printed side ¡ Do not touch the underside of the disc. ¡ Do not scratch on the disc. ¡ Do not bend the disc. ¡ When not in use, keep disc in the case. Do not use irregularly shaped discs.
Sampling Frequency DA Converter Pick-Up Type Light Source Wavelength Frequency Response Signal to Noise Ratio Total Harmonic Distortion Wow and Flutter Channel Separation 8 times oversampling 4 DAC System Astigma 3-beam Semiconductor laser 790 nm 20 Hz – 20 kHz (±1 dB) 96 dB 0.
Matsushita Electric Industrial Co., Ltd. Web Site : http://www.panasonic.co.