WMA MP3 CD Player/Receiver Model: CQ-C3305N Operating Instructions Bedienungsanleitung Manuel d’instructions Gebruiksaanwijzing Bruksanvisning Manuale di istruzioni Manual de Instrucciones Brugsvejledning Instrukcja obsługi Návod k obsluze Használati utasítások • Please read these instructions carefully before using this product and keep this manual for future reference.
Safety Information This pictograph intends to alert you to the presence of important operating instructions and installation instructions. Failure to heed the Warning instructions may result in severe injury or death. This pictograph intends to alert you to the presence of important operating instructions and installation instructions. Failure to heed the instructions may Caution result in injury or material damage. Caution Observe the following cautions when using this unit.
Before Reading These Instructions CLASS 1 LASER PRODUCT CAUTION LASER RADIATION WHEN OPEN. DO NOT STARE INTO BEAM. The instruction manual consists of 2 books. One is “Operating Instructions” describing the operations of the main unit. The other is “System Upgrade Guidebook” describing the optional devices such as CD changer.
Features Hands-Free Phone System Connection of the optional Hands-Free Phone System (HandsFree Kit featuring Bluetooth® technology: CY-BT100N) allows users to talk on a handsfree cellular phone if the phone supports Bluetooth. Note: This unit is designed only for receiving calls. It cannot send calls. Bluetooth® The Bluetooth word mark and logo are owned by the Bluetooth SIG, Inc. and any use of such marks by Matsushita Electric Industrial Co., Ltd. is under license.
Controls Layout Preparation Note: This instruction manual explains operations for use with the buttons on the main unit.
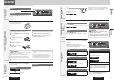
General Mounting 1 Turn off the power. ( above) [OPEN]. The face plate will be 2 Press opened. the face plate with its left hole on the 1 Fit left pin provided on the main unit. the other hole on the other pin 2 Fit applying slight pressure. the face plate to 3 Push the left. Cancel Press [MUTE] again. Note: You can select mute or attenuation. ( page 27) Caution • Set the volume level to low enough before the AUX connection is completed.
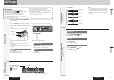
Radio This chapter explains how to listen to the radio. Press [DISP]. Operation Flow 3 Select a station. Frequency Adjustment [] (TUNE): Higher [] (TUNE): Lower Note: Hold down for 0.5 sec. or more and release for station search. AM (LW/MW) (DISP: Display) Display Change English [SOURCE] to select the radio 1 Press mode. 2 Press [BAND] to select a band.
Radio Data System (RDS) in FM Broadcasting Useful functions such asAF, TA, PTY are available in the RDS (Radio Data System)-ready areas. AF (Alternative Frequency) The following functions are available when the PTY mode is active. ( page 17) • The PTY of receiving station appears. • Programs can be searched for by PTY. Lights when TA is activated. Programme service name Lights when AF is activated.
Radio Data System (RDS) in FM Broadcasting TA On/Off PTY On/Off Programme Search by PTY Programs can be searched for by use of PTY that has been originally preset. The following functions are available when the TA mode is active. • A TP station is automatically searched for and received at the instant of toggling the TA mode on if you are receiving a non-TP station or a TP station with poor reception. • When executing seek tuning or APM, only TP stations are selected.
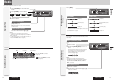
1 Press [OPEN] to open the face plate. a disc with the printed side facing 2 Load up. Track/play time Disc title (DISP: Display) When a disc is already loaded, press [SOURCE] to select the CD mode. Press [DISP]. Display Change Cautions • This unit does not support 8 cm discs. indicator lights • Do not insert a disc when because a disc is already loaded. • Do not use irregularly shaped discs. ( page 32) • Do not use discs that have a seal or label attached.
Cautions • This unit does not support 8 cm discs. indicator lights • Do not insert a disc when because a disc is already loaded. • Do not use irregularly shaped discs. ( page 32) • Do not use discs that have a seal or label attached. • To avoid damaging the face plate, do not push it down or When a disc is already loaded, press [SOURCE] to select the MP3/WMA mode.
MP3/WMA Player *MPEG Layer-3 audio coding technology licensed from Fraunhofer IIS and Thomson. Note: MP3/WMA encoding and writing software is not supplied with this unit. Points to Remember When Making MP3/WMA Files Notes on MP3/WMA Common • High bit rate and high sampling frequency are recommended for high quality sounds. • Selecting Variable Bit Rate (VBR) is not recommended because playing time is not displayed properly and sound may be skipped.
Audio Setting Adjustment to each speaker and an optional subwoofer Press [VOL] (PUSH SEL: Select) to 2 select a mode to be adjusted. [VOL] clockwise 3 Turn or counterclockwise to adjust. The equalizer curve is selectable from among 4 types (FLAT, ROCK, POP and VOCAL) depending on your listening category. Balance Adjustment (Setting range: L (left) 15 to R (right) 15 and Centre, Default: Centre) : Right enhanced : Left enhanced English Press [VOL] (PUSH SEL: 1 Select) to open the menu.
Function Setting [VOL] clockwise 3 Turn or counterclockwise to Function Menu Display adjust. Notes: • The sequence and contents of setting items may depend on the conditions of devices to be connected. For further information, refer to the System Upgrade Guidebook or the instruction manuals for the devices to be connected. • To return to the regular mode, press [DISP]. • If no operation takes place for more than 5 seconds in function setting, the display returns to the regular mode.
Troubleshooting • Do not use the unit in an irregular condition, for example, without sound, or with smoke or a foul smell, which can cause ignition or electric shock. Immediately stop using the unit and consult your dealer. • Never try to repair the unit by yourself because it is dangerous to do so. Possible cause Possible solution Problem The power cord (battery, power and ground) is connected in the wrong way. Check the wiring. Fuse blows out.
Troubleshooting A PS code cannot be received for the reason of bad receiving conditions, etc. A PS code appears if it is received. Wait for a while until conditions change. Receiving programs differs from PTY that was already set up. When the station changed between programs, the unit could not receive the PTY code. An appropriate programme is searched for and tuned in to after receiving a corresponding PTY code. Therefore, wait for a while. “NONE” appears when selecting PTY.
• • • • Do not touch the underside of the disc. Do not scratch on the disc. Do not bend the disc. When not in use, keep disc in the case.
ATEST 8 SD 2131 Tento výrobek je shodný s typem schváleným Ministerstvem dopravy a spojů České republiky pod číslem 2131 č.j. 1964/2004-150-SCH2. Matsushita Electric Industrial Co., Ltd. Web Site: http://panasonic.
Consult a professional for installation. Exclusively operated with 12 V battery with negative (–) ground. Connect the power lead (red) very last. (for non-ISO connector) Connect the battery lead (yellow) to the positive (+) terminal of the battery or fuse block terminal (BAT). (for non-ISO • Verify the radio using the antenna and speakers before installation. Wenden Sie sich zum Einbau an einen Fachmann. • Probieren Sie den Radiobetrieb vor dem Einbau mit Antenne und Lautsprechern aus.
Installation/Einbau/Montage/Installatie How to install the unit/Einbau des Gerätes/Mode de montage de l’appareil/Installeren van het toestel Caution • Wear gloves for safety. • Make sure that wiring is completed before installation. Vorsicht • Tragen Sie Handschuhe, um sich vor Verletzungen zu schützen. • Achten Sie vor dem Einbau darauf, dass die Verdrahtung fertiggestellt ist. Attention Let op • Porter des gants à des fins de sécurité. • S’assurer que le câblage est terminé avant l’installation.
Wiring/Verdrahtung/Câblage/Bedrading Caution To prevent damage to the unit, do not connect the power connector until the whole wiring is completed. Vorsicht Um Beschädigung des Gerätes zu vermeiden, schließen Sie den Versorgungsstecker erst an, nachdem die gesamte Verdrahtung vollständig beendet wurde. Attention Ne pas introduire la prise d’alimentation secteur dans l’appareil tant que le câblage n’est pas complètement terminé afin de ne pas risquer d’endommager l’appareil.
System Upgrade Example: Connecting with the CD changer/Beispiel für ein System-Upgrade: Anschluss an den CD-Wechsler/ Exemple de mise à niveau de système: Raccordement à un changeur de disque CD/Voorbeeld systeemuitbreiding: Aansluiten van een CD-wisselaar CX-DP880N (Optional) (Option) (en option) (Optioneel) Ground Lead Massekabel Fil de mise à la masse Aarding CQ-C3305N System-up Connector System-Upgrade-Stecker Connecteur de mise à niveau de système Systeemuitbreidingsaa nsluiting Battery Lead Batteri
System Upgrade Guidebook System-Upgrade-Handbuch Guide pratique de mise à niveau de système Systeemuitbreidingsgids Guidebok om systemuppgradering Guida per il potenziamento del sistema Guía de mejora del sistema Systemopgraderingsvejledning Przewodnik rozbudowy systemu Návod k modernizaci systému Rendszerfejlesztési kézikönyv Инструкция по расширению системьı Model: CQ-C5355N/ CQ-C3355N/ CQ-C3305N • For upgrading your system, read this manual carefully before use.
Safety Information This pictograph intends to alert you to the presence of important operating instructions and installation instructions. Failure to heed the Warning instructions may result in severe injury or death. This pictograph intends to alert you to the presence of important operating instructions and installation instructions. Failure to heed the instructions may Caution result in injury or material damage. Caution Observe the following cautions when using this unit.
About this Book Before Reading These Instructions This book is an instruction manual that explains how to operate your purchased head unit and its remote control as an accessory when the head unit is connected to optional devices.
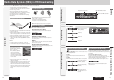
General English The source changes as follows every time [SOURCE] is pressed. When an Expansion Module is Connected to System-up Connector When an Optional Device is Connected to System-up Connector Radio Radio CD or MP3/WMA Player CD or MP3/WMA Player AUX1 AUX1 Expansion Module (Hub Unit) You can connect the optional Expansion Module (hub unit) (CY-EM100N). Connection of the Expansion Module allows you to simultaneously connect optional devices mentioned before as well as other AV devices.
[CQ-C3355N] [CQ-C3305N] The source changes as follows every time [SOURCE] is pressed. The source changes as follows every time [SOURCE] is pressed.
CD Changer \CQ-C5355N] 1 Load a magazine (discs). Notes: • Trouble may occur while playing CD-Rs. Refer to the section on “Notes on CD/CD Media (CD-ROM, CD-R, CD-RW)”. ( Operating Instructions) When a magazine is already loaded, press [SOURCE] to select the CD changer mode. The unit recognizes the magazine and starts playing automatically. Disc Selection Random Play [] (DISC): Next disc [] (DISC): Preceding disc Play Mode indicators Lights when each mode is activated.
CD Changer [CQ-C3355N/CQ-C3305N] 1 Load a magazine (discs). Notes: • Trouble may occur while playing CD-Rs. Refer to the section on “Notes on CD/CD Media (CD-ROM, CD-R, CD-RW)”. ( Operating Instructions) When a magazine is already loaded, press [SOURCE] to select the CD changer mode. The unit recognizes the magazine and starts playing automatically. • This unit does not support the following through the CD changer. • CD-RW playback. (except when CX-DP880N is connected) • MP3/WMA playback.
iPod Control \CQ-C5355N] 1 Connect the iPod. 2 Press [SOURCE] to select the iPod mode. Playback starts. Operation Flow Note: If playback does not start, press [BAND] (). 3 Select a desired portion. File Selection Pause []: Next file []: Beginning of the current file For the preceding file, press twice. Notes: • Hold down for fast forward/reverse.
[CQ-C3355N/CQ-C3305N] iPod Control 1 Connect the iPod. 2 Press [SOURCE] to select the iPod mode. Playback starts. Operation Flow Note: If playback does not start, press [BAND] (). 3 Select a desired portion. File Selection Pause []: Next file []: Beginning of the current file For the preceding file, press twice. Notes: • Hold down for fast forward/reverse.
Hands-Free Phone System Connect the Hands-Free Phone System (CY-BT100N) and establish the pairing. Refer to the instruction manual for the Hands-Free Phone System for further information. Note: This unit is designed only for receiving calls. It cannot send calls.
\CQ-C5355N] If You Suspect Something Wrong Check and take steps as described below. If the described suggestions do not solve the problem, it is recommended to take the unit to your nearest authorized Panasonic Service Centre. The product should be serviced only by qualified personnel. Please refer the checking and the repair to professionals. Panasonic shall not be liable for any accidents arising out of neglect of checking the unit or your own repair after your checking.
Memorandum 242 CQ-C5355N/C3355N/C3305N Memorandum CQ-C5355N/C3355N/C3305N 243
Matsushita Electric Industrial Co., Ltd. Web Site: http://panasonic.