
Operating instructions


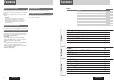


CQ-C3305N
8
CQ-C3305N
9
English
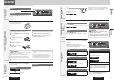
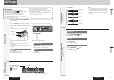
Controls Layout
Note: This instruction manual explains operations for use with the buttons on the main unit. (Different operations excluded)
Main Unit
VOL Volume
(
page 11)
PUSH SEL Select
(
page 24, 26)
LIST (
P16 of System Upgrade Guidebook)
DISC (
P12 of System Upgrade Guidebook)
FOLDER (
page 20)
MUTE (
page 11)
SQ Sound Quality (
page 25)
Remote control sensor
TA Traffi c Announcement ( page 16)
AF Alternative Frequency (
page 15)
SOURCE (
page 11)
PWR Power (
page 10)
TUNE (
page 12)
TRACK (FILE) (
page 18, 20)
BAND (
page 12)
Play/Pause
(
page 18, 20)
APM Auto Preset Memory
(
page 13)
OPEN (
page 18, 20)DISP Display ( page 10)
PTY Programme Type
(
page 17)
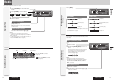
Remote Control Unit (Option)
Controls Layout, Preparation
AUX1 ( page 11)1 to 6 ( page 12)
3 (SCROLL) (
page 19, 21)
4 (RANDOM) (
page 19, 21)
5 (SCAN) (
page 19, 21)
6 (REPEAT) (
page 19, 21)
Notes:
• Remote Control Unit for CQ-C3305N is option (CA-RC80N).
• The optional remote control is available from your local dealer. (CA-RC80N)
Power
Mode
(Source)
Tune
Track selection
Fast forward/fast reverse
(CA-RC80N)
Mute/attenuation
Volume
Band
Pause
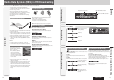
Preparation
The demonstration message appears for initial use.
1
Set your car’s ignition switch to the
ACC or ON position.
2
Press [PWR] (Power).
The demonstration screen appears.
3
Hold down [VOL] (PUSH SEL: Select)
for 2 sec. or more to open the menu.
4
Press [VOL] (PUSH SEL: Select) to
select the Demonstration setting.
(“DEMO” is displayed.)
5
Tur n [VOL] counterclockwise.
Notes:
• To return to the regular mode, press [DISP].
• Refer to the section on “Function Setting” (
page
26).
• When “NO DISC” is displayed, the Demonstration
cannot be cancelled.
Cancellation of DemonstrationACC Setting
The 24-hour system is used for the clock.
1
Press [PWR] (Power).
2
Select the radio AM (LW/MW) mode.
(page 12)
3
Hold down [DISP] for 2 sec. or more.
4
Adjust the hour and press [DISP].
[]: Forward
[]: Backward
5
Adjust the minute and press [DISP] to
confi rm the adjustment.
[]: Forward
[]: Backward
Notes:
• Adjust the clock when “NO CT” appears on the display.
• Hold down [] or [] to change numbers
rapidly.
• When a broadcast of FM Radio Data System is
received, the clock is adjusted automatically by the
Clock Time service. (
page 14)
Clock Adjustment
Caution
• Be sure to select OFF when your car has
no ACC position in the ignition switch.
Failure to do this could cause the battery
to go dead.
For an ACC-equipped car, select ON. (
page 27) The
following functions are available. (Default: off)
• The power is turned on automatically when inserting a
disc.
• The clock can be displayed even if the power is off. (
page 10)
: ACC not equipped
(Default)
: ACC equipped
OFF
ACC
IGN