MP3 WMA CD Player/Receiver with Full Dot Matrix Display and CD Changer Control CQ-C9800N/C9700N CQ-C9800N BAND (CQ-C9800N) Operating Instructions Bedienungsanleitung Manuel d d’instructions instructions Gebruiksaanwijzing Bruksanvisning Manuale di istruzioni Manual de Instrucciones TEXT Matsushita Electric Industrial Co., Ltd. Web Site: http://www.panasonic.co.
Features Contents Panasonic welcomes you to their constantly growing family of electronic products owners. We endeavor to give you the advantages of precise electronic and mechanical engineering, manufactured with carefully selected components, and assembled by people who are proud of the reputation their work has built for our company.
Before Use For your driving safety, keep the volume level low enough to be aware of road and traffic conditions. Precautions Car Washing To avoid electrical shorts which may cause fire, or other damage, do not expose this product (including the speakers and CDs) to water or excessive moisture. Car Ventilation If your car is parked for several hours in direct sunlight, the temperature inside the car may become very high.
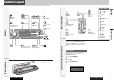
Controls Layout Note: This instruction manual explains operations for use with the buttons on the main unit.
BAND The demonstration screen appears. 2 Press [DISP] (Display). The demonstration screen is cancelled, and no more appears. Caution: Improper use of batteries may cause overheating, an explosion or ignition, resulting in injury or a fire. q Pull out the battery case while pushing the tab. w Put a battery in the case with (+)-side facing up. e Put the case back. w e Note: If you would like to turn on the power and make the demonstration message appear, hold down [SOURCE] (PWR: Power) for 4 sec.
General This chapter explains how to turn on or off the power, how to adjust the volume, etc. Power off Hold down [SOURCE] (PWR) until you hear a beep, then release it. Note: The ending screen appears at ACC on setting. You can overwrite the ending screen with new one. (a page 34) You can remove the face plate to prevent it from being stolen. 3 Put the face plate in the case. Tilt Cautions: ¡ To avoid damaging the front panel, do not push it down or place objects on it while it is open.
General The source changes as follows every time [SOURCE] is pressed. The sound type each of which is adjusted with 9 bands changes every time you press [SQ].
General The illumination color changes as follows every time [COLOR] is pressed. Folder hierarchy (MP3/WMA mode only.) (DISP: Display) Display Change Ordinary display + clock Ordinary display + graphic pattern Only still image The color varies in conjunction with time. (COLOR) Display Color Setting Display OFF All displays disappear in 5 seconds. Purple The peripheral color decoration lights up and goes out according to the bass volume.
Radio A radio DSP is integrated into this unit. The IF filter allows the radio to adjust the bandwidth automatically to maintain optimum reception. mode. BAND []] (TUNE): [[] (TUNE): Lower Higher Note: Hold down for 0.5 sec. or more and release for station search. Station Preset Frequency adjustment Preset station selection conditions are good in the station search, set LOCAL to ON. (a page 17) ¡ For reducing noise when a receiving FM stereo wave is weak, set FM MONO to ON.
Radio Data System (RDS) in FM Broadcasting Useful functions such as AF, TA, PTY, etc. are available in the RDS (Radio Data System)-ready areas. The following functions are available when the PTY mode is active (a page 21). ¡ The PTY of receiving station appears. ¡ Programs can be searched for by PTY. Note: PTY language can be selected (a page 21). English Lights while receiving a TP station (that broadcasts TA).
Radio Data System (RDS) in FM Broadcasting PTY ON/OFF Pressing [TA] toggles TA on and off. Note: This operation is not adjustable by the remote control. Holding down [DISP] (PTY) for 2 sec. or more toggles PTY mode on and off. CQ-C9800N 2 Press [BAND] (SET). English TA ON/OFF CQ-C9800N Search starts. BAND Notes: ¡ To stop searching, press [BAND] (SET). TA Volume Adjustment Hold down [SEL] for 2 sec. or more while receiving an FM broadcast.
1 Press [ ] (OPEN/Eject) to open the front panel. lights), the disc CQ-C9800N The front panel closes automatically, and the unit recognizes the disc and starts playing automatically, too. BAND 3 Select a desired portion. Track selection Pause Note: The power is turned on automatically when inserting a disc at ACC on setting. (a page 8) Press [BAND] (h / 5). Press again to cancel. 4 Press [ ] (OPEN/Eject) to eject the disc.
MP3/WMA Player CQ-C9800N BAND lights), the disc 3 Select a desired portion. [}] (FOLDER): Next folder [{] (FOLDER): Preceding folder File selection [7] (TRACK): Next file [6] (TRACK): Preceding file (press twice) When a disc is already loaded, press [SOURCE] to select the CD mode. Note: The power is turned on automatically when inserting a disc at ACC on setting. (a page 8) Note: Press and hold for fast forward/reverse. Pause Press [BAND] (h / 5). Press again to cancel.
MP3/WMA Player Notes: ¡ MP3/WMA encoding and writing software is not supplied with this unit. ¡ CD writing software is not supplied with this unit. Points to remember when making MP3/WMA files Notes on MP3/WMA Common ¡ High bit rate and high sampling frequency are recommended for high quality sounds. ¡ Selecting VBR (Variable Bit Rate) is not recommended because playing time is not displayed properly and sound may be skipped. ¡ The playback sound quality differs depending on the encoding circumstances.
CD Changer Control CQ-C9800N When a magazine is already loaded ( lights), press [SOURCE] to select the CD changer mode. BAND 2 Select a desired portion. Note:To connect two CD changers to it, the Dual CD Changer Selector CA-CD55EN is necessary. Disc selection Track selection [7]: Next track [6]: Preceding track (press twice) Note: Press and hold for fast forward/reverse.
Audio Setting Adjustment to each speaker and an optional subwoofer 1 Hold down [SQ] (Sound Quality) for 2 sec. or more to display the audio menu display. (Setting range: L15 to R15 and Centre, Default: Centre) q : Right enhanced w : Left enhanced SQ ADJUSTMENT 2 Press [VOLUME] (SEL: Select) to select a mode to be adjusted. 3 Turn [VOLUME] (Volume) clockwise or counterclockwise to adjust. You can make a fine adjustment to the currently selected SQ presetting in each type (except FLAT).
Function Setting Display Setting Adjustment to display on the DISPLAY menu 1 Press [MENU] to display the menu dis- play. For using the remote control, hold down [MENU] for 2 sec. or more. play. For using the remote control, hold down [MENU] for 2 sec. or more. CQ-C9800N BAND MUTE KEY Setting [MUTE] buttons’ functions : Volume off (Default) 2 Press []] or [[] to display the FUNC- : PLAY menu. 3 Press [}] or [{] to select a function to EXT.
Customize the Display (Customize Function) The download service may be suspended or stopped without advance notice. The download service is not available in some areas. Please visit the site below for further information. Panasonic Web site: (http://www.panasonic.co.jp/global/) 6 Select a file. Example: GRAPHIC PATTERN 1 If there is a disc inside, take out the 3 Hold down [SEL] for 4 sec. or more to display the menu screen.
Troubleshooting If the described suggestions do not solve the problem, it is recommended to take the unit to your nearest authorized Panasonic Service Centre. The product should be serviced only by qualified personnel. Some operations are not executable. Problem No power to the unit Possible cause a Possible solution The power cord (battery, ACC and ground) is connected in the wrong way. a Check the wiring. Fuse blowout a Eliminate the cause of fuse blowout and replace the fuse with new one.
Troubleshooting Preset stations cannot be stored. No playback or disc ejected The LOCAL mode is active. a Cancel the LOCAL mode. Sound skipping or noise The contact of the battery lead is poor, or the battery lead is not always powered. a Make sure that the battery lead is connected securely, and preset stations again. PS does not appear even if an RDS station is tuned into. (“NONE” appears.
Disc is dirty, or is upside down. Disc has scratches. CD/MP3/WMA No operation by some cause. a Call the store where you purchased the unit, or your nearest Panasonic Service Centre. The file is not readable. (After 5 seconds) To next file automatically (After 5 seconds) To next file automatically If there is no playable file on the disc, the E4 display stays. a Eject the disc. A WMA file can be copyrighted. a The file protected by copyright is not playable.
General Use fuses of the same specified rating (15 A). Using different substitutes or fuses with higher ratings, or connecting the unit directly without a fuse, could cause fire or damage to the unit. If the replacement fuse fails, contact your nearest authorized Panasonic Service Centre. CD Player Fuse Cleaning the Unit Your product is designed and manufactured to ensure the minimum of maintenance. Use a soft cloth for routine exterior cleaning. Never use benzine, thinner, or other solvents.
Exclusively operated with 12-volt battery with negative (–) ground. Dieses Gerät ist ausschließlich für den Anschluss an Bordnetze mit 12 V Batterie und negativer Klemme an Masse bestimmt. Alimentez l’appareil absolument par la batterie de 12 volts avec sa polarité négative (–) mise à la masse. Uitsluitend voor gebruik met een 12 Volt accusysteem met negatieve (–) aarding. Wenden Sie sich zum Einbau an einen Fachmann. ●Probieren Sie den Radiobetrieb vor dem Einbau mit Antenne und Lautsprechern aus.
Wiring/Verdrahtung/Câblage/Bedrading CQ-C9800N t ISO Antenna Adapter (If needed) t ISO-Antennen-adapter (falls erfor derlich) t Adaptateur d'antenne ISO (si nécessaire) t ISO antenne-adapter (Indien nodig) CD Changer Control Connector The DIN cord of a CD changer (ex. CX-DP880N) should be connected. The DIN cord of a dual CD changer selector (ex. CA-CD55EN) should be connected when the selector is incorporated into the system.