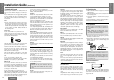
Removable Full Front CD player/ Receiver with CD Changer Control SCAN AUTO•P CQ-DF302W REMOTE 45W X 4 OPEN RANDOM VOL SEL BAND REP PWR TUNE TRACK LOUD SOURCE CQ-DF302W Operating Instructions CD RECEIVER WITH CHANGER CONTROL MONO/LOC MUTE 7 1 8 2 9 3 10 4 11 5 12 6 CLOCK DISP LEVL DIMMER ≥ Please read these instructions carefully before using this product and save this manual for future use.
Panasonic welcomes you to our ever growing family of electronic product owners. We know that this product will bring you many hours of enjoyment. Our reputation is built on precise electronic and mechanical engineering, manufactured with carefully selected components and assembled by people who take pride in their work. Once you discover the quality, reliability, and value we have built into this product, you too will be proud to be a member of our family.
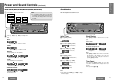
E N G L I S H Power and Sound Controls 1 Turn the key in the ignition until the accessory indicator lights. Power on: Press [SOURCE] (PWR). Power off: Press [SOURCE] (PWR) again and hold. E N G L I S H Power 2 ACC ON Note: ≥ When the power is switched on for the first time, a demonstration message appears on the display. To cancel this display, press [DISP].
E N G L I S H 3 Power and Sound Controls (Continued) Audio Mode (Bass/Treble/Balance/Fader/Subwoofer) 1 Press [SEL] to select the audio mode. Volume Bass Treble Subwoofer Fader Balance SCAN AUTO •P Clock Basics Note: ≥ If no operation takes place for more than 5 seconds in audio mode (2 seconds in volume mode), the display returns to the regular mode. Regular Mode CQ-DF302W REMOTE E N G L I S H 45W X 4 4 The 12-hour system is used for the clock.
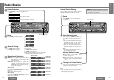
E N G L I S H 5 Radio Basics Selection 1 Mode Press [SOURCE] to change to the radio mode. Preset Station Setting Up to 6 stations each can be saved in the FM1, FM2, FM3 and AM preset station memories. Source Radio CD changer control SCAN AUTO •P Press [BAND] to select a desired band. (➡ page 14) (When a CD changer is connected.
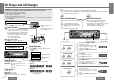
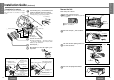
E N G L I S H 7 CD Player and CD Changer Cautions: ≥ Only 12 cm CD, CD-DA data recorded CD-R and CD-RW discs are available for this unit. ≥ This unit does not support CD text display. ≥ This unit does not support MP3 disc playback. ≥ Refer to page 30 for this unit. ≥ This unit is not designed for any 8 cm CD. ≥ If you insert an 8 cm CD and can not eject it, turn ACC of your car off once and turn it on again, then press [<] (EJECT). Disc Insert and Playback 1 Open the front panel.
E N G L I S H Remote Control Unit Preparation 9 1 Remove the battery holder. Pull the holder by the position B while pushing position A in the direction indicated by the arrow. 2 Install the battery on the battery holder. Set a new battery properly with its (i) side facing up as shown in the figure. 3 Insert the battery holder. Push in the battery holder back into its original position.
E N G L I S H 11 Installation Guide (Continued) ❐ Identify All Leads The first step in installation is to identify all the car wires you’ll use when hooking up your sound system. As you identify each wire, we suggest that you label it using masking tape and a permanent marker. This will help avoid confusion when making connections later. Note: ≥ Do not connect the power connector to the stereo unit until you have made all connections.
E N G L I S H 13 Installation Guide (Continued) ❐ Installation Procedures First complete the electrical connections, and then check them for correctness. (➡ pages 25, 26) 1 Insert mounting collar 1 into the dashboard, and bend the mounting tabs out with a screwdriver. Make sure that the lock lever (§) is flush with the mounting collar 1 (not projecting outward). Lock lever (§) Remove the Unit E N G L I S H Switch off the power of the unit. 14 the removable face plate. 1 Remove 1 Press [OPEN].
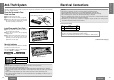
E N G L I S H 15 Anti-Theft System Electrical Connections This unit is equipped with a removable face plate. Removing this face plate makes the radio totally inoperable. The security indicator will blink. Place the Removable Face Plate into Case 1 Switch off the power of the unit. 2 Remove the removable face plate. (➡ page 23) 3 Gently press the button of the case and open the cover. Place the face plate into the case and take it with you when you leave the car.
E N G L I S H Electrical Connections (Continued) Troubleshooting ❐ Wiring Diagram Preliminary Steps Check and take steps as described in the tables below. 17 CD changer CX-DP88 If You Suspect Something Wrong Immediately switch power off. Disconnect the power connector and check that there is neither smoke nor heat from the unit before asking for repairs. Never try to repair the unit by yourself because it is dangerous to do so.
E N G L I S H 19 Troubleshooting (Continued) ❐ CD ❐ Remote Control Trouble Disc is in the CD compartment but no sound is made, or disc is ejected automatically. Cause/Step Cause/Step Battery poles (i) (j) are reversed. ➡Insert the battery correctly. ≥ Disc is dirty. ≥ Disc has scratches. Wrong the battery. ➡Check the battery. ➡Clean disc, referring to the section on “Notes on CD/CD media (CD-R, CD-RW)”. Buttons are operation. invalid for Remote control is in the wrong direction.
E N G L I S H 21 Maintenance Maintenance Care of the Unit Your product is designed and manufactured to ensure a minimum of maintenance. Use a soft cloth for routine exterior cleaning. Never use benzine, thinner or other solvents. ❐ Cleaning this Unit ❐ Caution on Cleaning Use a dry, soft cloth to wipe. Never use solvents such as benzine, thinner as they may mar the surface of the unit.