
Operating instructions


E
N
G
L
I
S
H
8
CQ-DFX972U
23
E
N
G
L
I
S
H
7
CQ-DFX972U
22
CD Player
Note:
≥ Loading a disc when the power is off allows the
power to be turned on.
≥ It may take some time to distinguish CD-DA and
MP3 before playback starts.
≥ The title information can be displayed. (➡ page 24)
Track Selection
[TRACK 5]/[5]:Advance to the next track.
[TRACK 6]/[6]:Back to the beginning of the
current track.
Back to the previous track.
(Press twice.)
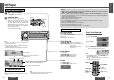
Open the front panel.
Press [OPEN] on the front panel.
1
Insert the disc.
The display changes as shown below.
Playback will start automatically after the unit
recognizes the loaded disc as an ordinary
music CD. (When a CD-R or CD-RW which has
CD-DA formatted data as the same as an ordi-
nary music CD is loaded, this unit recognizes it
as an ordinary music CD.)
Close the front panel manually.
2
CD Player Mode
(When CD is in the player.)
Press [SRC] (SOURCE)/[SOURCE] to change to CD
player mode.
Playback will start automatically.
Listening to a CD
Disc Insert and Playback
Stop and Disc Eject
1 Press [OPEN] on the front panel.
2 Press [<] (eject) to stop CD play and eject the
disc.
(Eject)
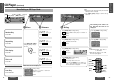
<
Label side
Close
CD player mode display
≥ Do not insert a disc when this indicator lights.
≥ Lights when the disc is loaded/played.
Scan, random and repeat indicator
Track Search
Press and hold.
[TRACK 5]/[5]: Fast forward
[TRACK 6]/[6]: Fast backward
Release to resume the regular play.
Note:
≥ Ejecting the disc when the unit is in the CD player
mode allows the power to be turned off.
Caution:
≥ Only 5z (12 cm) CD, CD-DA data recorded CD-R and CD-RW discs, MP3 data recorded CD media (CD-
ROM, CD-R, CD-RW) are available for this unit.
≥ If a disc contains both CD-DA and MP3 data, only one type of data will be played back. For example, if
the disc starts with CD-DA data, it will be recognized as an ordinary music CD, if it starts with an MP3 file,
it will be recognized as an MP3.
≥ Refer to page 51 about notes on CD-Rs/RWs.
≥ Refer to page 42 about notes on MP3.
≥ To avoid damaging the front panel, do not push it down or place objects on it while it is open.
≥ Do not use irregular shaped discs.
≥ Do not use discs that have a seal or label attached.
≥ Do not insert foreign matter into the disc slot.
≥ Do not watch the scroll display while driving a car. (➡ page 24)
Track number Track playing time
Direct Track Selection
Example: track number 10
1 Press [„] (NUMBER).
2 Press [1] [0].
3 Press [BAND] (SET) to set.
The corresponding track starts playing.
Note:
≥ Press [DISP] (display) or [„] (NUMBER) to re-
turn to the regular mode.
≥ Random, repeat and scan play are canceled when
entering direct track selection.
Only for the remote control unit
Pause
Press [BAND] (
[ [
/1).
Press [BAND] (
[ [
/1) again to cancel.
SRC
DISP
P
.
SET/DISC
CQ-DFX972U
N
5
O
6
W
X
;
/ 1
OPEN
BAND
TUNE
TRACK
PW
R
M
U
T
E
P
U
S
H
CD RECEIVER WITH FULL DOT MATRIX DISPLAY
FOLDER
SET/APM
M
E
N
U
VOLUM
E
SOURCE
T E X T
[SRC] (SOURCE)
MOSFET
50W
X
4
[SOURCE]
[BAND] (SET)
(Pause)
[fl] (NUMBER)
[0] to [9]
(Track number)
[DISP] (Display)
64
97
5
Car Audio
SOURCE
MUTE
POWER
RAND
VOL
312
DISPBAND
REP
6
5
SET
SEL
#
SCAN
MENU
NUMBER
8
0
[6] [5]
(Track)
(Data reading.)
(Ordinary music CD recognized and
playback starts.)