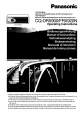
T 3] Panasonic welcomes you to their constantly growing family of electronic products owners. We endeavor to give you the advantages of precise electronic and mechanical engineering, manufactured with carefully selected components, and assembled by people who are proud of the reputation their work has built for cur company.
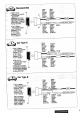
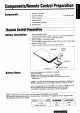
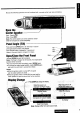
Components/Remote Control Preparation .1 set (» page 39} TH-roe Mm Components 1. Operating instruction. 2. Supplied Hardware 3. Power Connector. 4. Re mate Control o . 5. Lithium battery (CR2025). 8, Warranty Card "Remote Control Preparation Battery Installation 1 Follows e bear holder Take hold of the holder at position B and pull it out to remove the battery by pushing position A in the direction shown by the row. 2. Install the battery on the battery holder.
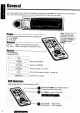
L N 1] General —— This manual explains mainly remote control operations. However, some operations are nof functions with a remote contra. In such cases, the manual gives you how to operate the functions using main unit buttons. Nol;TWH;n thrower: Power is switched on for the —] Turn the key in the ignition until the accessory indicator fights. first time, a demonstration : Press [PW. son message appears on Off : Press again. the display. To sans! this display, press Volume [DISPEL.
Because the following operations are not functioned with a remote control, use main unit buttons. Open the Center Speaker Open : Press [ /&7 1. Loss : Press again. Note: The center speaker can not be opened or closed while ths front panel is opened completely. Panel Angle (Tilt) Press and hold OPEN] (TILT) for more than 1 second until signal sound is heard, then release. Each time the button is pressed for 1 second and release it, the panel angle is changed (in 3 steps).
pfo R o4y ] ) m Panasonic ooy Press [SOURCE] to change to radio mode. Press [BAND]. — Tuning e ) . Note: The stereo indicator fights during reception Down FM stereo broadcast, Press and hold or for more than 0.
Selection of a registered station in a one-touch action Up to 6 stations each can be saved i the FMT, FM2, FM3 and AM (LW/MW) preset station memories. Select a band {step @ on the previous page) Press and hold [A] or [V] for more than 2 seconds. 9 Press [A}or [V] e Crass Crass and hold [A] or [V for more than 2 seconds. preset number blinks blinks once Select a band (step @, @ on the previous page} Press and hold [BAND] for more than 2 seconds.
Rad i 0 {continued) To-r-Ozzie ~ PRECINCT Panasonic: Mflnaul‘al Mode o Cross and hold for more than 2 seconds. Monaural reception. Turn Mono On to reduce 9 Press [SEL] to select “MONO SELECT”, noise when receiving a stereo broadcast. 9 Press [ma] of [wa] to switch Mono o of off, Local Mode 0 Press and hold for mare than 2 seconds. Tunes in strong stations only g Crass [SEL] to select “LEGAL SELECT".
Radio Data System (RDS) The following functions are available when receiving RDS stations. 3 Program Service Clock Time Service Alternative Name Display (cT Service) Frequency (Ballplayer) p v When receiving an RDS station, the CT (Clock 1AF) A0S Time) service automatically adjusts the time en reception is poor, an The name of station is displayed and date. station broadcasting the same instead of the frequency. *NO CT is displayed in arcs where CT service pr(égtam_ \sunned in is not available.
L7 E T t-24) 14 Radio Data System (RDS) (cortisone He I Some RDS FM stations periodically provide traffic information, Traffic Program Broadcasting of traffic information Traffic Announcements (1) Radio announcements on traffic conditions TA Mode Press [ = ] (TA] to switch TA mods o0 or off. . L TAG -+ Receive traffic programs automatically, ¢ Following functions are activated. TR S Note: Sask lining and auto preset memory work only for TP stations when TA mode is on.
Program Type (PTY) RDS FM stations provide a program type [identification signal. Example: news, rock, classical music, etc. program Type Display PTY Mode Press and hold [DIPTYCH) for more than seconds to switch PTY display mode on or off. ! PTY Selection 0 Press [TRACK w»-] to change the program type as folios. : opposites direction) SPEECH Info Culture Rock W Other M Social Leisure Oldies » x MUSIC Sport Science Easy M Weather Religion Jan Talk ¥ PTY display mode Following functions are activated.
Radii Data system (RDS) {continued) M Program Type Display PTY Preset Program types are stored in memory under preset numbers 116 8 § shown in the table below. To tune in the desired program type, call one of the preset numbers pressing [VP.SET] or [PESETA. Preset Program Type Display 1 News Vi News Affairs / info / Educate / Drama / Cultures/ Science 2 Speech Varied / Weather / Finance / Children / Social Religion / Phone In/ Travel / Leisure / Document 3 Sport TR | Sport 4 Pop.
T Ozzie 12 PTY Preset Change @ st problem Press and hold [\ P.SET] or [PESETA] for more than 2 » seconds. © proprietress 0 [P STEAL @) Pres anc o VP .SET] ar [PESETA] for mare than 2 seconds. Enhanced Other Networks (EON) Emergency Announcement Wren EON data is received, the EON indicator its and tie TA and Reception AF functions are expanded as follows. ; TA : Traffic information from the current and other network stations s can ba received. itched that broadcast.
3 CD Player (only for ca-DRX900N) Open the front panel L Press [OPEN] on the front panel. Disc Insert Close the front panel automatically, then playback starts, Track Selection ] Next track, [« : Beginning of the current track, Previous track. (Press tics) To eject the disc press [4A)] *Track Search Crass and hold. When CD is in the player [wa] : fast forward Press [SOURCE] to change to GD player =] : fast backward mode. Guess [DIPS] 6 charring i splay. Display.Change Track.
Various Way of Listening Press [SCAN] With the scanning of all tracks over, the original program starts playing from the beginning. Press [SCAN] again to cancel. Press [RAND] i Press [RAND} again to cancel. Press [REP] Press [REP] again to cancel. Cautions: « Do not apply a strong downward force profit the face plate and do not put anything on it while it is open, or it might be damaged.
= 3 20 Cassette Tape Player (only for co-FRX920N) Open the front panel Press [OPEN] on the front panel. YA Tape Insert Close the front panel automatically, then playback starts. Rewind Fast forward To eject the cassette tape press [4] while rewind or fast forward resume regular playback. When a tape is in the player ®While regular playback press [SOURCE] to change to cassette tape made, change playing side.
Various Way of Listening Crass and hold for more than 2 seconds. Press and hold again to cancel. Press {REP} Press [REP] again to cancel. Example Select the next 3rd program @ Press (V1 Q Press ] three times.
e/ B o 032 411 3 22 CD Changer RO Notes : # (D changer functions are designed for optional Panasonic GD changer unit, # Digital Audio Broadcasting (DAB) can be connected to this unit by using GD changer connector. 1 CD Changer Mode Press [SOURCE] to change to CD changer mode. e Disc Selection {A]: Next disc. [V] : Previous disc. e Track Selection : Next track. [« : Beginning of the current track. Previous track. (Press twice) Dual CD Changer An optional dual CD changer control unit (CA-LAS) is necessary. .
Various Way of Listening Press [SCAN] With the scanning of ail tracks over, the original program starts playing {ram the beginning. Press [SCAN] again to cancel. With the scanning of all tracks over, the original disc starts playing from Press and hood [SCAN] the beginning. for more than 2 seconds. Press and hold [SCAN] again to cancel. Press [RAND] again to cancel. 2L Press and hold [RAND] Press and hold [RAND] again to for more than 2 seconds. cancel. N Press [REP] again to cancel.
Useful Functions 2R oS @ Spectrum Analyses Display Default : WAVE Variety @11 types h 4 Display Brightness Setting range ; (Dimmer) é Press . ‘ L and hold [sfffifig LEVY @ Press \ e e, Volume Down {Attenuation) 3 The volume decreases depending on which sating you selected Mute or ATT, (= page 34} Default : Off 24
H Note : @ Cross 1o change the spectrum analyses display. opposite direction) WAVE, AURORA, -, BLANK SPEARS, ALL DIPS OFF, etc. BLANK SPEARS Turn off the Spectrum Analyzer display only. e Turn oft the whole display. (The display is muted on during perorations. Then the display is turned off 5 seconds after operations.) DIMMER SEL —» DIMMER LEV 3 DIMMER LEV 2 4 DIMMER LEV 1 @ Press [] {DIMMER} to change the dimmer elev! as follows.
= R wok-4 0] » Sound Settings and Sound Space g ! Tone Quality [ __Fireguard ] (Human Equalization) ! 49 patterns are already prepared, so that you BIOGRAPHIC can make complicated adjustment easily. fi Default : FLAT(0} BALDFACED Setting range © 1~ 3 for cache patterns (49 pat‘I — terns} POSITION SEL SUPER BASS BOBS SELECT 7 Press [SEL] to select an operation Registering Your Desired Tone Quality {Graphs Equalizer) The level in each of 7 frequency bands from bags to treble can be adjusted.
fl Press [SEL] {A]: Heavy bass [v1: Light bass : Sharp treble <] : Soft tree > Recreation + Stress relieving + Enjoyable drive + Refresh Listen to the music scrivener Light + Calm down + Rhythmical + Concentration Awakening Crass [A] to select one of the preset numbers 15, and the preset phone quality is recalled. ([V] : opposite direction) Otter selecting one of the preset numbers Press and hold [SEL] for more then 2 seconds to change to graphic equalizer preset made. 2> Adjust the elev! for each frequency.
Tn~rQZEm » @ 28 Sound Settings and Sound Space continent Regular Made X HUMAN EQ [ Graphic POSITION SEL DAB SELECT CENTER LEVEL select an operation Press [SEL] to g Balance and Wader {Overbalance) You can adjust the sound balance among the front, rear, right and left speakers. Default : B(Balance} : Cementer) Freeloader) : Cementer) Melting range : 15 levels for each et sstsstensmsossmssstsnsnsntmmmissmssmc [ Sound Image (Position) You can adjust the sound image in accordance with a fastener position.
Regular Mode (»l HUMAN EQ " GRAPHED 3 BALDFACED POSITION SEL SUPER BASS WEBMASTER BSD SELECT ‘ [ CENTERPIECE Press [SEL] to select ©setup Up % Down R R Sound Settings and Sound Space (opines Center Speaker Output Sound image is raised and oriented toward 1he center forward. e Adjust the center speaker volume (Center Speaker Volume Level) Default: 6 Setting range © -e0, <1010 +10 by 2dB {decibel) step | Adjust the sense of distance {Center Speaker Delay Time) Default : Setting range : ~10to +10 1 step = 0.
@ Press [SEL) CENTER LEVEL Adjustment Procedure Open the center speaker. (sage 9) 1.Adjust the center speaker volume. Adjust the volume so that middle tone such as coral is oriented toward the center forward without adding DSP effect to the center speaker. (Center speaker delay time :0, sound space : Space off) 2.Adjust the sound space and the center speaker delay time. 3.Adjust the center speaker volume again. Adjust the volume to suit with the sound space setting.
[ Sound Settings and Sound Space e Sound Space Reproduction (Space) Cancer hall presence in your car Default : Off e Select sub'woofer output (Digital Dynamic Bass Controlled) This adjustment is effective when Sub-woofer is connected or wham the rear speakers are used as Sub-Woofer. {m page Press and doth [ 1 Sub-Woofer Volume for more than 2 seconds. (BBC Volume Level) Default: 0 Setting range : -c0, ~1010 +10 0 Press 1o by 2dB step select an Operation N Sense of Distance {DB Delay Time) .
Crass to change space as follows. : opposite direction) SPACE OFF — STADIUM | CONCERT HALL < VOCAL Note: Space settings are respectively stored in the memory for sate source mode. A1 Up {V]: Down -0 © Wo Sub-Woofer sound [A] : Delay time longer (Sub-Woofer output gets later.) V] : Delay time shorter (Sub-Woofer output gets earlier.) 01 Both outputs between speakers and Sub-woofer get synchronized Press to change the cut off frequency.
Other Settings MUTE KEY SEL TITLE SCROLL CONTRAST SEL. AUX INSET S-LED SEL [T SEL T AGU SELECT Press and hold [SEL] for more than 2 seconds 0 Press [SEL] to select an operation BRI Operation Sound {Signalmen sound) You ¢an select a sound {operation sound) that comes from the center speaker when pressing the buttons and adjust the volume.
m Sorceress] or @ Press [sEL] A Up {V]: Down (Setting range : Laval 1 to Level 3) Sound varies with operation Esp SIGNAL OFF No sound e While navigation voice guidance comes out. UNREMITTING © ]t sound il Decrease to half MUTING OFF Unchanged Note: “MUTING is displayed (when MUTING ON or HALF) SPEARS SPEED Faster <.
Ow-rEm 4 36 Ethel' settings {continued) SIGNAL SEL MUTING SEL SPEARS SPEED | [stein s | MUTE KEY SEL [ SCROLL Press and hold [SEL] for more than 2 seconds Press [SEL] to select an operation e Set Up Downtown Up/On Contrast Contrast adjustment makes it easier to watch the display, Default : Level 3 Setting range : Level 1 ta Level Removing AUX-IN from Source Selection AUX will be excluded not to be selected.
@ press [SEL] © Press 1 or <] >1:Up Select a level for says watch. o AUX-IN SET o [>1: AUX-IN On External input (AUX-IN) is an object of source selection <1 : AUX-IN Off External input (AUX-1) is nat an object of source selection, With AUX-IN set to OFF, AUX-IN will not be selected when [Squires pressed.{= page § about source select) On The indicator blinks when the panel is removed. 3 The panel removal alarm will be active. o S-LED El’ [<1: S-LED 0 The indicator doss not blink when the panel is removed.
TP Oz Mm P & 38 Installation « Before Installation, check the radio operation with antenna and speakers, * Disconnect the cable from the negative battery terminal {see caution below). # Unit should be installed in a horizontal position with the front end up at a convenient angle, but not more than 30°. First complete the electrical connections, and then sack them for correctness.
Insert Mounting Collar (D) Into the dashboard, and bend the mounting tabs out with a screwdriver. Mounting Tabs — Mounting Bolt @ Secure the rear of the unit. After fixing Mounting Bait (2 and Power Connector (2, fix the rear of the unit to the car body by either method (a) o (b) shown at right. -@ Insert Trim Plate ®. After installation reconnect the negative battery terminal. Supplied Hardware No.
Installation {continued) To Remove the Unit Remove the removable face plate. {2) Switch off the power of the unit. James When ACC select BEES is on and pang angle is changed, return the panel angle to vertical. | {b} Press the release -~ button. {c) Pull on the right side of the unit. fain Unit ~ 9 Remove the trim plate & with a screwdriver. Pull ot the unit while pushing down the lock Lock Lever lever with a screwdriver. Screwdriver o Remove the unit pulling with both hands.
Anti-Theft System This unit is equipped with a removable face plate. Removing this face plate makes the radio totally inoperable. The security indicator will blink. Place Removable Face Plate into Case @ Switch off the power of the unit. @ Remove the removable faces plate. (> page 40.) © Gently press the hat tom of the case and pan the cover, Place the face plate into the case and take it with you when you leave the car, (4 Removable Saga Plats Ease Cautions: . #This face-late Is not water-proof.
OOz 42 Electrical Connections Gable Wiring Diagram * This unit can be connected to an optional CD changer or CX-DPGO1EN) and optional extension cord. # For befalls consult your nearest authorized Panasonic Dealer.
IR o %40 System Upgrade Example 2: Connecting a Changer and DAB Receiver Combination: CD changer (CX-DPSOB1EN), DAB Receiver {CY-DAB2000N). « To connect a changer and DAB receiver, the optional dual changer control unit (CA-LAD) Is necessary. « To use DAB receiver only, connect it as indicated by the void €D Text recognizable CD Changer CX-DPSOG1EN Extension Cord . (DINBATT/RCA/GND) Ground Lead DIN Cord Fosse (3.
Tn—rZm b3 46 Troubleshooting Preliminary Steps Check and take steps as described in the tables below. If You Suspect Something Wrong Immediately switch power off, Disconnect the power cable and check that thees Is neither smoke nor heat from the unit before asking for repairs, Neva fry to repair the unit yourself because it is dangerous to do s, Caution: Do not Use the Unit If 1t Malfunctions or Is Something Wrong.
M Panel Trouble: Gauss Step . Panel angle nonadjustable Panel angle is set fixed. Change tilt setting to ON. M Radio ¢ Outlet Cause Sta Much noise in FM stern and monaural broadcasts Station is 100 far, or signals are 100 weak. Select other stations of higher signal level. Preset station is reset. Battery cable is not correctly connected. Connect the battery cabs to the terminal that Is always five. mCD ¥ 2 Troubles Cause . syl CD is inside but no sound GD is upside down.
M Cassette Tape Terrible’ ’ Cigse™ ' . Sta . Heads are dirty. Clean heads. (Ask a service representative for advice.) Tape sound duality is para. Poor quality tape Use better quality tape. M Sound Setting = Troubles Gauss i C Step Left and right balance, or front No sand from lat, and rear phalanges is off on ong Adjust BALLAD as appropriate. right, front, or rear side. speaker Cables are not correctly connected, Connect the cables correctly.
T ———N Error Display Messages Videocassette Tape Example of Display [ Cause : ‘Operation Check/Step Dist is dirty, or is upside down, May be e . Momentarily Check disc. Disc has scars. erected. Open the panel and press [A]. If failure No operation by some _ persists, press the reset switch. If cause normal operation is not restored yet, call and ask for repairs, POLS EJECT Action was taken to start . .\ ~ playing before disc is — Open the panel and press [4A]. NIPPLES EJECT fully ejected.
LRk koA ] 50 Troubleshooting g {continued) Reset switch Insert a har slender stick into the hale and push the switch. ® The unit returns to the default state when the trouble is reset. Remember, the data and settings stored in the memory are deleted. Important Push the switch only when the unit falls to operate with any buttons.
Maintenance Cleaning this unit Caution on cleaning H Use a dry, soft cloth to wipe. Never use solvents such as benzine, thinner as they may mar the surface of the unit. a6 ] COMPACT ONLY USE DISCS CARRYING THE LABEL DIGITAL DAUB How to hold the CD Label side ® Do not touch the underside of the disc. \ # Do not make scratches on the disc. * Do not bend disc, & When not in use, keep CD in the case.
Fuse Use fudges of the same specified rating (15 A). Using different substitutes or fuses with higher ratings, or connecting the unit directly without a fuse, could cuss fire or damage 1o the unit. !t the replacement fuse fails, contact your nearest authorized Panasonic Service Center, Specifications General Power Supply :DC 12V (11V 16 V), test vantage 14.4 V, negative ground Current Consumption + Less than 8.5A (CD/tape mode, 0.
Specifications e FM Stern Radio Frequency Range 1 87.
Operating Instructions Correction: Please correct according to the following table. Page WRONG CORRECT DC-DC Converter Unit DC-DC Converter Unit 6 The CD-DC converter unit may become hot if the The DC-DC converter unit may become hot if the unit is operated at high output continuously. unit is operated at high output continuously.