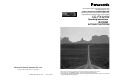
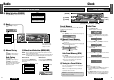
BAND CQ-FW323W PRG OPEN CASSETTE RECEIVER WITH CHANGER CONTROL REVEL VOL DIMMER TUNE TRACK CLOCK DISP super bright display with level meters RE M O L SE TE MUTE SOUR CE PWR MONO/LOC RANDOM DISC 1 MTL NR 2 3 TPS 4 SCAN 5 B·S REPEAT REP 6 LOUD Removable Full Front Cassette Player/Receiver with CD Changer Control 可控制CD換片器的可拆式面板磁帶放音機/收音機 ë˙ÂÏ̇fl ͇ÒÒÂÚ̇fl χ„ÌËÚÓ· Ò ÙÓÌڇθÌÓÈ Á‡„ÛÁÍÓÈ Í‡ÒÒÂÚ, Ô‰ÛÒχÚË‚‡˛˘‡fl ‚ÓÁÏÓÊÌÓÒÚ¸ ÛÔ‡‚ÎÂÌËfl CD-˜ẨÊÂÓÏ APM CQ-FX323W Operating Instructio
E N G L I S H 中 國 Safety Information 安全須知 àÌÙÓχˆËfl ‰Îfl ·ÂÁÓÔ‡ÒÌÓÒÚË WARNING: TO REDUCE THE RISK OF FIRE OR ELECTRIC SHOCK, DO NOT EXPOSE THIS PRODUCT TO RAIN OR MOISTURE. è‰ÛÔÂʉÂÌËÂ: óÚÓ·˚ ËÁ·Â„‡Ú¸ ËÒ͇ ÔÓʇ‡ ËÎË ˝ÎÂÍÚÓ¯Ó͇, ӷ„ËÚ ‡ÔÔ‡‡Ú ÓÚ ‚ÎËflÌËfl ‰Óʉfl ËÎË ‚·„Ë. TO REDUCE THE RISK OF FIRE OR ELECTRIC SHHOCK, AND ANNOYING INTERFERENCE, USE ONLY THE INCLUDED COMPONENTS. óÚÓ·˚ ËÁ·Â„‡Ú¸ ËÒ͇ ÔÓʇ‡ ËÎË ˝ÎÂÍÚÓ¯Ó͇, ËÒÔÓθÁÛÈÚ ÚÓθÍÓ ÍÓÏÔÓÌÂÌÚ˚, ‚ıÓ‰fl˘Ë ‚ ÍÓÏÔÎÂÍÚ.
各部名稱及其功能 主機 安裝及配線應請專門的技術人員 進行 本機的安裝及配線需要專門的技術 和經驗。 為確保安全,請委託經銷處進行安 裝及配線。 [OPEN] 打開面板 [BAND](PRG) ¡BAND選擇 ¡換面播放 [VOL] ¡音量 } { 應請專門的技術人員更換保險絲 [LEVEL](DIMMER) ¡電平表 ¡弱光 [Tune], [Track], [2], [1], [}], [{] ¡調諧頻率 ¡音軌選擇 ¡快退和快進 如果使用非指定的保險絲的話,有 冒煙、起火或造成故障的危險。應 請經銷處來修理或更換保險絲。 BAN CQ-FW323W D PRG OPEN CASSETTE RECEIVER WITH CHANGER CONTROL LEVEL 中 國 語 切勿進行解體或改裝 嚴禁將本機解體或進行改裝,或者 將電源線的鎧裝切開與其他電源連 接,這會有冒煙、起火、觸電或造 成故障的危險。 當出現故障及異常時不要繼續使用 當在不能發出聲音、冒煙、出現異 味等異常情況下繼續使用的話,有 起火及觸電的危險。應立即停止使 用並與經銷處取得聯系。 切勿使異物進入本機
E N G L I S H ENGLISH.................................................... 6-25 CHINESE........................................................ 26-45 RUSSIAN........................................................ 46-65 Panasonic welcomes you to their constantly growing family of electronic products owners.
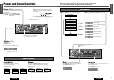
E N G L I S H 3 Power and Sound Controls Power (PWR) Note: If no operation takes place for more than 5 seconds in audio mode (2 seconds in Volume mode), the display return to Regular Mode. Note: When the power is switched on for the first time, a demonstration message appears on the display. Turn the key in the ignition until the accessory indicator lights. Power on : Press [SOURCE] (PWR). Power off : Press and hold [SOURCE] (PWR) again. Audio Mode q Press [SEL](select) to select the audio mode.
E N G L I S H 5 Radio Clock Clock Setting How to listen to the radio q Mode Selection (SOURCE) 6 Radio Press [SOURCE] to change to the radio mode.
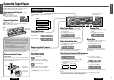
Cassette Tape Player E N G L I S H Caution: Do not insert a tape when lights because a tape is already inserted. 7 Tape Insert and Playback q Open the front panel. w Insert a cassette tape. e Close the front panel manually. Play back will start automatically. (tape indicator) Open E N G L I S H Listening to a Cassette Tape Mode Selection Press [SOURCE] to change to Cassette tape play mode. OPEN Stop and Tape Eject q Open the front panel. w Press [u] to stop tape play and eject the cassette tape.
E N G L I S H 9 CD Changer Control E N G L I S H Note: The CD Changer functions are designed for an optional CD Changer unit. How to listen to CDs Playing Mode 10 Mode Selection Display Change Press [SOURCE] to change to the CD Changer mode. Press [DISP] to switch the clock display. Press again to resume.
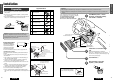
E N G L I S H 11 Installation Preparation ¡Before installation, check the radio operation with antenna and speakers. ¡Disconnect the cable from the negative (–) battery terminal (see caution below). ¡Unit should be installed in a horizontal position with the front end up at a convenient angle, but not more than 30°. 30° or less Supplied Hardware No. q Item Diagram 1 Mounting Collar w Mounting Bolt (5 mmø) 1 e Tapping Screw (5 mmø x 16 mm) 1 r Rear Support Strap 1 t Hex.
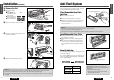
E N G L I S H Installation (continued) To Remove the Unit q Remove the removable face plate. q Press [OPEN]. The removable face plate will be opened. w Push the face plate to either the right or left. e Pull it out toward you. 13 Anti-Theft System This unit is equipped with a removable face plate. Removing this face plate makes the radio totally inoperable.
E N G L I S H Electrical Connections Cable Wiring Diagram Example : Connection with CD Changer CX-DP88N (Option).
E N G L I S H Speaker Connections Troubleshooting E N G L I S H Preliminary Steps Caution: Please follow the instructions given below. Failure to do so will cause damage to the unit and speakers. Check and tape steps as described in the tables below. 17 18 L + - R+ - (White) + - (White w/black stripe) (Gray) + - (Gray w/black stripe) If You Suspect Something is wrong. ¡Use ungrounded speaker only. ¡The maximum speaker input should be 45 W or more.
E N G L I S H Specifications Troubleshooting (continue) Radio General Trouble Cause Station is too far, or signals are too weak. 19 Much noise in FM stereo and monaural broadcasts. Extend the radio antenna. The motor antenna relay control lead is not connected correctly. If there is a motor antenna in the car, connect the antenna control lead to the motor antenna lead that is installed in the car correctly. Battery cable is not correctly connected.