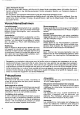
Contention Precaution. .o Gourmand di sentimentalize e del summon. Fundamentalist Della adios .. Fundamental Della plaster cassette. . Operation fundamental del caddishness CD .. 109 Precautions. . Alimentary y man dos de sonic. i Panasonic welcomes you 1o their constantly growing family of electronic products owners, ! We endeavor to give you the advantages of precise electronic and mechanical engineering, manufactured .
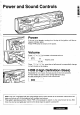
“Power and Sound Controls = Power if the car is not already running, turn the key in the ignition until the accessory indicator fights, Crass PWR butter to switch on the prows. Volume Press Increase or decrease volume. [ giggle' — i i Volume Level Toto 40 Press more than a half second to sequentially change numeric levels on the display.
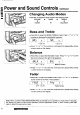
Changing Audio Modes Press SEL to switch the audio mode in the following order. VOLUME » BASS -» TREBLE £ $ FARED BALANCE Bass and Treble & Press SEL to select the BASS (TREBLE) mode. Press increase or decrease the ambassadress response. RS s | IRE —12th 12 —12th 12 @ Press for more than a half second to sequentially change numeric levels on the display. Balance » Press SEL 1o select the BALANCE mode. Press “ /A" or to shift the sound volume ta the right or left speakers. _BALE s .
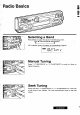
‘ Radio Basics B lapin Selecting a Band Press BAND to select the bands in the following order, FM1 m FM2 = FM3 = AMLW/MW) . 3 "ST indicator lights if the station is broadcasting in stereo. 102 0 2 Manual Tuning Press “\ TUNE/TRACK™ or "/COUNTERATTACK” to move 1o a lower or higher frequency, ~ Seek Tuning Crass and hold TUNE/TRACK" or A\ TUNE/TRACK for more than a half second, then release. The radio automatically stops on the next station.
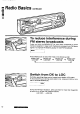
winds T R Radio Basics continued r— To reduce interference during FM stereo broadcasts Press and hold the MONOCLONAL for more than 2 seconds 1o switch monaural reception in case much interference is preset in an FM stereo signal or t¢ improve the listening quality of weak FM broadcasts. i i Press MONOCLONAL to switch the mode in the following order. MONO OFF MONO ON MONO ON _ MONO OFF LOGOFF ™ LOGOFF ™ (ICON * COLON Switch from DX to LOC Normally, searching slops even at a weak wave station.
“ ‘Preset Station Setting Up fo 20 stations narc be preset in the station memory as follows; FM3 § stations & stations £-6 stations Manual Station Preset T Press BAND 1o select a desired band, Use manual or seek tuning to find a station that you want ta program into memory. -3 Press and hold one of the station selector buttons 1 through 5 until the display blinks. Repeal the process to set other stations for the FM1 to AM bands. ] .
REWIND FAST FORWARD PRESS BOTH Loading a Cassette Gently insert the cassette with the exposed tape facing to the right until the mechanism captures 1, and playback starts ! TAPE 7 T PROGRAM INDICATOR Rewind and Fast Forward Press and engage either -« (REW] to rewind or »» (FF) to fast forward the tape. To stop rewind or tacit forward, gently press the button that is not in use. The tape will resume playing from that position.
Metal Tape Mode Press MTL when playing metal or chromium dioxide (Cr) tapes. “To turn it off, press MTL again. ML Note: Playing non-metal tapes in MTL mode causes high frequency imbalance, which affects tone quality. Stopping and Ejecting the Tape Once inserted into the unit, your tape will play continuously until you eject it. i you press and engage EJECT, the unit clears the tape and rectums to radio operation. When you shut off the car engine, the tape will sip but not eject .
CD Changer Basics Note: CO changer controls are applicable to units with optional CD changer unit (dots separately). To start the CD Player With & disc magazine inserted in the CD Changer, press £0-C. The disc then plays, starting with the first track. ~ Lo Ad Note: The cassette, if loaded, should be removed. Otherwise, the CD play won't start Selecting a Disc Tress "CODY” or *CD4" to select discs in descending or ascending order.
Searching a Track Press and hold “TRACK TACK" for more than a half second to activate fast forward or reverse through & track, Release “TRACK.AT or “\ TRACK” 1o resume the normal CD play from that position. W ERE IRE Repeating a Track Press REP to repeat the current selection. “REPEAT" indicator fights. The current selection continues to repeat until you press REP again. Random Selection Press R . “RANDOM" indicator fights. A random selection of music is played from all available CDs.
CD Changer Basic$ continued Error Display Messages Displays when the compact disc is dirty or upside down. Selects the next available compact disc. Displays when compact disc is scratched. Selects next available compact disc. Displays when the unit stops operating for some reason, Press RESET on the CD Hangar {(optional). Displays when there is no disc in the magazine.
Anti-Theft System = This unit is equipped with a removable control unit. By removing this unit when the vehicle is unattended the =radio corniness totally inoperable. To Remove the Removable Face Plate (@ Switch off the power. @ Slide down the release button (7). The removable face plate will be released. SLIDE DOWN §° Fig.1 @ Remove the removable face plate by pulling on the right side of the unit. Place the removable face plate in a supplied sacs. "™ Main Uit Contacts .| Fig.2 Security Indicator .
4. As shown in Fig.3, gently push the lower side of the case and peen its cover. Keep the removals face plate in the case. Then, you can bring the piste safely. ® Open 11 Removable Face Plate Case Flag To install the Removable Face Plate 1. Slide the left side of the removable face plate in place, Plastic Tab Removable Face Plate Flag / Cutout 2. Press the right end of removable face plate unfit it locks in place. ' Caution: 1. Before reproving the removable face plate, make sure the power is off, 2.
Installation Preparation » Before installation check the radio operation with antenna and speakers. a Disconnected the cable from the negative battery terminal (see caution below). Caution; "= For installation o cars with trip or navigational computers, all electronic memory settings previously registered in the computer wit be lost when the battery terminal is disconnected. For this type of car, battery could not be disconnected. Therefore, extra care should be taken to prevent short circuiting.
Installation continued installation Procedures 1. Secure the Mounting Collar T Insert Mounting Collar 72" into the car's dashboard, and bend mounting tabs out with a screwdriver. > Mounting Collar ~ — Dashboard Mounting Tab 2. Secure the rear of the unit. a) Check the electrical connection by referring to this operating Instructions b} Connect the Mounting Brit d) Secure the rear of the unit to the car by either of the two recommended methods on the next page.
Using the Rear Support Strap & Affix one end of the Rear Support Strap 5 to the rear of the unit, and the other end to the Fire Wall of Car, or some other metallic area. &5 Plain Washer Fire Wall of Car / Hex, Bolt AR\ @) Toothed Lock Washer @ Spring Washer @ Hex. Nut & @/Q @ Spring Washer .G Plain Washer \@ Rear Support Strap Ml Using the Rubber Cushion (Optional) (if there is an existing Rear Support Bracket on the Fire Wall of Car.}.
Installation continued 3. Plug the Power Connector 0. 1§ Power Connector 4. Otter installation reconnect the negative battery terminal. To Remove the Unit a} Insert Dismounting Pin into the right hole of the escutcheon. Push the Pin as far as possible. e 5 Dismounting Pin Pull the Pin to remove the ult from the car's dashboard. Supporting the left end of the unit with your other hand, will facilitate its removal. Hate: Do not lose the Dismounting Pin.
_Electrical Connection = This unit can be connected to an optional CD Changer For details consult your nearest ™ -: Panasonic dealers. = For connection to a CD changer, refer to the operating Instructions of the CD Changer (CX-DPBOEN). To prevent damage 1o the unit, be sure 1o follow the connection diagram below.
Speaker Connections | caution: ] 1. Use grounded speakers only. } 2. Tha speakers to bs used with this unit should be able to handle mare than 22W of audit power. If an optional am| pithier is used, the speaker should be able to handier the maximum autistic power of the amplifier. Use of speaks with small input ratings can cuss damages to the speakers. i 3, The speaker impedance should ohms.
Fuse I Be sure 1o use & fuse of the specified rating (1A, 10A) when replacing a blown fuse. Fuses with higher capacity 1y ratings, use of any substitute, or connection without a fuse may result in a fire hazard or damage to the unit. }! the replacement fuse fails, conduit your nearest authorized Panasonic Service Enter, ~Maintenance To clean the exterior of this unit, use a soft cloth 1o wipe the surface.Do not use benzine, thinner, or any other _ _ type of solvents.