Operating Instructions Panasonic AC Smart Cloud Model No. CZ-CSWSCC2 ENGLISH Before operating the unit, read these operating instructions thoroughly and keep them for future reference. Panasonic Corporation http://www.panasonic.
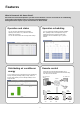
Features What is Panasonic AC Smart Cloud? Panasonic AC Smart Cloud provides you with several "Remote" services to control the air conditioning units (indoor units/outdoor units) via internet and Cloud Adaptors. Setting data will be kept for 3 years at Panasonic AC Smart Cloud. Operation and status Operation scheduling You can check the operational status (ON/OFF, operating mode, alarms, etc.) of all indoor units and outdoor units in real time. You can also select indoor units to change their settings.
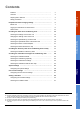
Contents 2 Contents ………………………………………………………………….. 3 Simple guide to features ………………………………………………… 4 Safety precautions ……………………………………………………….. 5 6 Before use ………………………………………………………………… 7 Logging into Panasonic AC Smart Cloud ……………………………… 8 Home screen ……………………………………………………………… 11 Checking the status of air conditioning units ………………………… 13 Checking the settings on the indoor unit ……………………………….. 14 Changing the settings on the indoor unit ………………………………..
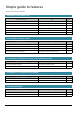
Simple guide to features This guide only shows the main features.
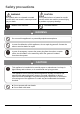
Safety precautions WARNING CAUTION This symbol refers to a hazard or unsafe practice which can result in severe personal injury or death. This symbol refers to a hazard or unsafe practice which can result in personal injury or product or property damage. Matters to be observed Prohibited matters WARNING Do not use this appliance in a potentially explosive atmosphere. In case of malfunction of this appliance, do not repair by yourself. Contact the sales or service dealer for repair.
Preparations Preparations before changing settings This chapter describes some basic operations.
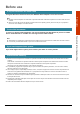
Before use To log into Panasonic AC Smart Cloud To log into Panasonic AC Smart Cloud, use Windows Internet Explorer 11 or later versions. Windows and Internet Explorer are trademarks or registered trademarks of Microsoft Corporation in the United States and other countries. While you may be able to view the website in another browsers and operating systems, please note that you may experience issues such as an inability to use certain functions.
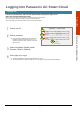
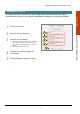
Logging into Panasonic AC Smart Cloud Logging into Launch your web browser and enter the specified URL to display the login screen. (https://ac.smartcloud.panasonic.com/) Enter a user ID. 2 Enter a password. 1 2 3 If the password is entered incorrectly 10 times, the Password entry field is locked for one hour, and password cannot be entered. (The lock is removed after one hour.) 3 Select a language. (English, Italian, German, French or Spanish) 4 Select [Sign In] to log in.
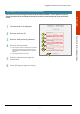
Logging into Panasonic AC Smart Cloud Changing the initial user ID and initial password The initial user ID is displayed. 2 Enter the new user ID. 3 Enter the initial (current) password. 4 Enter the new password. 1 2 3 4 The account ID cannot be included in the password. A password must be 8 to 20 characters long and include at least one alphabetic and one numerical character. The old password cannot be used. 5 Enter the new password again for confirmation.
Logging into Panasonic AC Smart Cloud Changing the password The effective period for a password is 60 days. Change the password periodically. If the effective period has been exceeded, a screen appears automatically prompting you to change the password. Confirm the user ID. 2 Enter the current password. Preparations 1 1 3 Enter the new password. 3 The account ID cannot be included in the password.
Home screen After you log in, the Home screen appears similar to the image indicated below. B A Preparations E C D G J K H I Name Explanation A User Information Displays the User ID and User type.
Home screen Name G Weather information Explanation H You can switch the bottom 3 screens by selecting [ ]. Displays the comparison result of the energy consumption for today and yesterday. J Efficiency Displays the efficiency by using arrows at 10% increments. 0 ~ 10% is displayed as 10%. For more than 10%, the value is displayed in increments of 10%.
Checking the status of air conditioning units This chapter explains how to check the setting status of air conditioning units (indoor units / outdoor units) and Cloud Adaptors.
Checking the settings on the indoor unit You can check the setting status of all indoor units connected in a list. You can also change the display to show by area. 1 4 3 5 Operation/Status 2 Hide the apply selection tab. 1 2 Select [AC Settings]. Select a group for the control equipment, or buildings from [AC Configuration]. Select [Apply Selection]. Select [IDU Details]. The indoor unit list is displayed. Check the status of settings.
Checking the settings on the indoor unit “IDU Details screen” The details of indoor units (IDU) are displayed and automatically updated every 3 minutes. A C D E A: The settings of the indoor units are displayed in a list. (The screen will allow you to scroll up or down.) Each time you select the item name, the order switches between ascending (▲) and descending (▼). Some items are not displayed for some models.
Changing the settings on the indoor unit You can select indoor units to change settings, for example, start or stop them, or change their set temperature, etc. Change settings in the “AC Remote Control” dialogue. You can also select multiple indoor units and operate them using the same settings. 1 2 3 Select a group for the control equipment or buildings from [AC Configuration] and select [Apply Selection]. (P. 14) 2 1 3 Select [IDU Details]. 4 Put a check mark in the box.
Changing the settings on the indoor unit Set whether to allow or prohibit use of the local remote controller. (Accept/Prohibit) e.g.) When “Mode” is only prohibited. Set the direction of the airflow. (F1/F2/F3/F4/F5/Swing/Swing Stop) e.g.) When “Swing” is selected. Enable or disable energy saving operation. (OFF/ON) e.g.) When “On” is selected. Select [Apply Setting] to store the settings. Operation/Status 5 Note The indoor unit cannot be controlled while performing the service check.
Checking the operational log of indoor units You can check the operational status of indoor units (remaining filter time, number of operation cycles, etc.) in a list. You can also change the ventilation system and demand control settings (ON or OFF only). 1 2 3 Select a group for the control equipment or buildings from [AC Configuration] and select [Apply Selection]. (P. 14) 2 Select [IDU Details]. 3 1 Put a check mark in the box. 4 Select the indoor units whose log you want to check.
Checking the operational status of the outdoor unit You can check the details about the outdoor units (outdoor temperatures, etc.) in a list. 1 1 Select [AC Settings]. 2 Select [ODU Details]. 3 Check the status of settings. (P. 20) Select a group for the control equipment or buildings from [AC Configuration] and select [Apply Selection]. (P. 14) 2 3 The outdoor unit list is displayed. 2 Enter the keyword to search. 1 Check the status of air conditioning units 1 Select the [Search] box.
Checking the operational status of the outdoor unit “ODU Details screen” The details of outdoor units (ODU) are displayed and automatically updated every 3 minutes. A Operation/Status B A: The settings of the outdoor units are displayed in a list. (You can scroll up or down by swiping or flicking the screen.) Each time you select the item name, the order switches between ascending (▲) and descending (▼). Some items are not displayed for some models. Explanation The S-Link Address is displayed.
Checking the status of Cloud Adaptors You can check the operational status of Cloud Adaptors (CA) (Pulse meter, etc.) in a list. 1 2 1 Select [AC Settings]. Select a group for the control equipment or buildings from [AC Configuration] and select [Apply Selection]. (P. 14) 2 Select [Cloud Adaptors (CA) Details]. 3 Check the status of Cloud Adaptors. (see below) 3 Searching Cloud Adaptors from “Cloud Adaptors (CA) Details” 1 2 Enter the keyword to search. The results can be viewed immediately.
Checking the status with the floor map You can check the operational status of the indoor units with the floor map. 2 1 1 Select [AC Settings]. Select a group for the control equipment or buildings from [AC Configuration] and select [Apply Selection]. (P. 14) 2 Select [Map View]. 3 Check the floor map. 3 Operation/Status “Map View” The floor map is displayed and automatically updated every 3 minutes. A B A: Select a location to view.
Checking the efficiency value of air conditioning units visually This chapter explains how to check the efficiency value of air conditioning units by visualization.
Checking the Statistics of efficiency value You can check the efficiency value graphically by groups/refrigerant circuits/indoor units. You can also rank the buildings by using the efficiency value. 1 4 3 Operation/Status 2 Hide the apply selection tab. 1 Select [Visualization]. 2 Select a group for the control equipment or buildings from [AC Configuration]. 3 Select [Apply Selection]. 4 Select a tab.
Checking the Statistics of efficiency value Statistics (By Group) Displays the efficiency value graph by group. 1 1 2 3 Select a parameter. 4 Electricity Consumption Gas Consumption Capacity Operation Efficiency 5 3 Select a comparison target. 4 Set a comparison period. 5 Select [Apply Selection] to display the graph.
Checking the Statistics of efficiency value Statistics (Refrigerant Circuit) Displays the efficiency value graph by refrigerant circuit. 1 1 2 Select a parameter. Electricity Consumption Gas Consumption Capacity Operation Efficiency Working Hours 3 4 5 Select a displaying type. 3 Set a comparison period. 4 Put a check mark in the refrigerant circuit name. 5 Select [Apply Selection] to display the graph.
Checking the Statistics of efficiency value Statistics (By Aircon) Displays the efficiency value graph by indoor unit. 1 1 3 Select a parameter. Electricity Consumption Gas Consumption Working Hours Temp. Differential: The difference between room temperature and setting temperature Indoor Temperature: The room temperature and setting temperature 4 6 5 A Select a displaying type.
Checking the Statistics of efficiency value Efficiency Ranking Displays the ranking of buildings by comparing the efficiency value. 1 2 Select a comparison target. 3 Select [Apply Selection] to display the graph. 3 2 Current Year Current Month Current Week Current Day Past 24 Hours Date Range Configure the start and end date using calendar when you set "Date Range". Country State Town Area Street Building The comparison targets vary depending on "AC Configuration" and access privileges.
Checking the notification message of air conditioning units This chapter explains how to check the notification message of air conditioning units.
Checking the notification details You can check the chronological list of warnings, advance warnings and notifications. 4 1 3 Operation/Status 2 5 Hide the apply selection tab. 1 2 Select [Notification]. Select a group for the control equipment or buildings from [AC Configuration]. Select [Apply Selection]. 4 5 Select [Notification Details]. Check the details of notifications. The notification is not available while performing the service check.
Checking the notification details “Notification Details” The details of notifications are displayed and automatically updated every 3 minutes. A A: The details of notifications are displayed in a list. (You can scroll up or down by swiping or flicking the screen.) Each time you select the item name, the order switches between ascending (▲) and descending (▼). Some items are not displayed for some models. Item Operation/Status B Explanation The site name is displayed.
Checking the notification graphically You can view the overview of the warnings occurred for each group level graphically. The warnings are classified by their status (New/Fixed) and graphed by their numbers. 4 1 3 6 7 5 A A: Downloads the notification overview in CSV format. Select [Notification]. 2 Select a group for the control equipment or buildings from [AC Configuration].
Checking the maintenance settings You can check and set the maintenance notification settings. 1 5 3 4 Operation/Status 2 1 Select [Notification]. 2 Select a group for the control equipment or buildings from [AC Configuration]. 5 Select [Apply Selection]. Select [Maintenance Settings]. Select a tab. (AC Maintenance / Notification Settings) Searching Cloud Adaptors from “AC Maintenance” 1 1 Select the [Search] box. 2 Enter the keyword to search. The results can be viewed immediately.
Checking the maintenance settings “AC Maintenance” The settings of notification time for maintenance are displayed. A C D A: The details of settings are displayed in a list. (You can scroll up or down by swiping or flicking the screen.) Each time you select the item name, the order switches between ascending (▲) and descending (▼). Some items are not displayed for some models. Item Operation/Status B Explanation The site name is displayed. The S-Link Address is displayed.
Checking the maintenance settings “Notification Settings” The settings of notification time for maintenance are displayed. 1 2 3 Operation/Status Select AC group. 2 Set each item for notification settings. (VRF/PAC / GHP / Cloud Adaptor (CA) / Notification Pop Up) VRF/PAC: Select a VRF/PAC and set the notification On/Off. GHP: Select a GHP and set the notification On/Off. Cloud Adaptor (CA) : Select a Cloud Adaptor and set the notification On/Off. Notification Pop Up: Set the notification pop-up.
Checking the notifications with the floor map You can check the notifications with the floor map. 1 Select [Notifications]. 3 Operation/Status 1 2 3 2 Check the floor map. Select [Map View]. “Map View” The floor map is displayed and automatically updated every 3 minutes. B C A: Select a location to view. B: The current settings of indoor/outdoor units are displayed. When selecting an indoor unit, the current configuration and warning content of indoor unit is displayed.
System settings This chapter explains how to set CO2 conversion factor, area allocations, Billing Cut Off requests, etc.
Configuring the system settings You can set the CO2 conversion factor, area allocations, Billing Cut Off requests, distribution-group, etc. from “System Settings”. 1 3 Hide the apply selection tab. 1 Select [System Settings]. 2 Select a group for the control equipment or buildings from [AC Configuration]. 3 Select [Apply Selection]. 4 Select a tab.
Configuring the system settings System Configuration Sets the CO2 conversion factor. CO2 emission is converted from VRF power consumption using the CO2 conversion factor entered into the system, and then displayed on the Home screen. 1 1 Select a site. 2 3 4 3 Set the Electricity CO2 conversion factor. 4 Set the GHP CO2 conversion factor. 5 Enter the higher heating value. 6 Select [Apply] to store the settings. 6 5 System settings 2 Set the start date using the calendar.
Configuring the system settings Distribution Group Overview Displays an overview of distribution groups. You can add and delete distribution groups. “Delete Distribution Group” 1 2 1 2 Select a distribution group. A If an existing distribution group is selected for “Distribution Group”, you can delete this distribution group by selecting [Remove CA]. B B: Distribution Group Indoor Unit A: Distribution Group Pulse Meter Item Pulse meter name is displayed. Site is displayed. Port is displayed.
Configuring the system settings Distribution Group Details Displays the details of distribution groups. 2 1 1 Select a site. 2 Select Cloud Adaptor. 3 Select [Add/Update] to update the settings. A B 3 A: Distribution Group Pulse Meter Item Explanation Item Port is displayed. Pulse meter type is displayed. Pulse meter name is displayed. Select the Distribution group of the pulse meter. Explanation S-Link Device Name AC Type Distribution Group S-Link address is displayed.
Configuring the system settings “Create Area” 1 1 2 3 2 3 Select [Create Area] to add a new area. Enter the name of the new area. Select [Create Area] to store the settings. System settings “Remove Area” 1 3 3 Select [Remove Area] to delete a new area. Select the existing area. Select [Remove Area] to store the settings.
Configuring the system settings Cut Off Request Sets Billing Cut Off requests. 1 Set the Billing Cut Off period using the calendar. 2 Select [Request] to request the selected period. 1 A 2 The result while performing the service check is counted as next period. B Item Explanation Transaction ID Site Result Transaction Date/Time Transaction ID is displayed. Sites are displayed. The status for the cutoff report is displayed. Starting Date Starting date is displayed.
Configuring the system settings Group Display Displays the control group. 1 B Select a site / group / indoor unit, and click the right mouse button to open the menu. 1 A C “Add IDU” D 2 A: Editing items 3 Item Create 3 Select [OK] to add the indoor unit. Create the logical group. Control Group Create the control group. Rename Edit the name of the group. Delete Delete the group. Add IDU Add the indoor unit to the group. B: Select the [Search] box and enter the keyword to search.
Configuring the system settings Software Version Displays the software version.
User account settings This chapter explains how to set user account (including new user registration), update the user IDs, list user IDs, etc.
Configuring the user account settings You can set user account (including new user registration), update the user IDs, list user IDs, etc. from “User Account” screen. 1 2 Select [User Account]. 2 Select a tab.
Configuring the user account settings New User Registration Registers a new user account. 1 3 2 4 1 Select [New User Registration]. Select [Generate] to generate a new user ID. 3 4 Select a role in “Role List”. 5 Select [Register] to store the user ID. The 7-digit number is generated automatically by the system, as initial user ID. Select the accessible sites by the user on “Please Select User Accessibility Site” screen. Select [Reset Selection] to reset the items.
Configuring the user account settings Update User Updates the user settings. 1 4 3 2 5 Select [Update User]. Select a user ID. Select a role in “Role List”. Select the account status (Valid/Invalid/Locked). Valid: On Invalid: Off Locked: Locked Settings 1 2 3 4 User account settings 6 5 Select the accessible sites by the user on “Please Select User Accessibility Site” screen. 6 Select [Update] to update the user ID settings. Select [Reset Group] to reset the items.
Configuring the user account settings “User Updated History” A B Item Date/Time User ID Company Name Role Type Role Name Updated Data Updated By Explanation Date and time are updated and displayed. User ID is updated and displayed. The company name is displayed. The role type is displayed. The role name is displayed. Updated contents are displayed. The user ID who updated is displayed. User account settings A: Select the [Search] box and enter the keyword to search.
Configuring the user account settings User List Displays a list of user IDs. 1 2 3 3 Select [User List]. Select the [Search] box and enter the keyword to search. The results can be viewed immediately. You can narrow down your search by entering multiple words. User account settings 1 2 The list of user IDs is displayed. Item Explanation Date and time are updated and displayed. User ID is updated and displayed. The company name is displayed. The role type is displayed.
Configuring the user account settings Role List Displays a role list, and you can edit or delete the roles. 1 A 2 B 3 C 1 Select [Role List]. 2 Edit the name of role. 3 Select and enter the name of role. (Home_Cust/AC Settings_Cust/Visualization_Cust/Notification_Cust/ System Settings_Cust_Admin/UserAcct_Cust_Admin/Schedule_Cust) 52 Settings Home_Cust: Home screen can be accessible. AC Settings_Cust: AC Settings screen can be accessible.
Configuring the user account settings “Role History” A B Item Action Role Name Function Group Action By Date/Time Explanation The role action is displayed. The role name is displayed. Function groups of the role are displayed. The user ID who set the role is displayed. Date and time of the role is displayed. User account settings A: Select the [Search] box and enter the keyword to search. The results can be viewed immediately. You can narrow down your search by entering multiple words.
Setting a schedule This chapter explains how to set schedules. You can register a single day’s schedule as a pattern and then allocate to a date on the calendar. Indoor units can be registered in groups or individually.
Overview of the schedule setting This is the overview of the schedule setting. 1 Select a date from [Schedule Setting]. (P.56) Select a date to set. 2 Select “Timer Detail” to set the detail in [Daily Setting]. (P.57) 3 Setting a schedule Select “Timer Detail” for the target indoor unit. Set the detail in [Timer Setting]. (P.59) ] Timer settings are registered as M1 to M50, and it can be copied to another date. You can also set the schedule weekly. (P.
Configuring the schedule settings You can check and set a scheduled operation. 4 3 5 1 6 A B Hide the apply selection tab. 1 Select [Schedule]. 5 Select a site. 2 Select a group for the control equipment or buildings from [AC Configuration]. 6 Select a date to set using the calendar. When selecting the mode which is set for multiple dates, the following screen will be displayed. And you can edit the schedule of the selected date, or the mode itself for all set dates. (P.
Configuring the schedule settings Daily Setting You can set the daily schedule and store the mode. B C A 1 2 3 A: List of schedule Item IDU Name The installation location (Control Group name) is displayed. The Indoor unit name is displayed. Time Zone Time zone is displayed. Task Schedule time is displayed. Location 2 3 Enter the memo for the daily setting. Select [Apply] to apply the setting. Explanation Setting a schedule 1 Select [Timer Detail] and set the details (P. 59).
Configuring the schedule settings Mode Setting You can check the mode and edit the mode. B C A 1 2 3 A: List of schedule Item IDU Name The installation location (Control Group name) is displayed. The Indoor unit name is displayed. Time Zone Time zone is displayed. Task Schedule time is displayed. Location 2 3 Enter the memo for the daily setting. Select [Apply] to apply the setting. Explanation Setting a schedule 1 Select [Timer Detail] and set the details (P. 59).
Configuring the schedule settings Timer Setting Sets the schedule operation task for a specific time of a selected indoor unit of selected site and plan. 1 2 3 4 Select [Add Schedule] to add the schedule. 2 Set the schedule operation task. Setting a schedule 1 : Add the schedule. : Delete the schedule. : Edit the schedule. : Save the edited schedule. : Cancel the edited schedule. Item Time ON/OFF Status Explanation The schedule time is displayed.
Configuring the schedule settings Weekly Setting Sets the schedule operation task weekly. 1 2 3 4 Setting a schedule 1 2 3 4 Select start date for the weekly setting. Enter the end date. Copy and paste the set mode for each day. Select [Apply] to apply the setting.
Checking the schedule results You can check and set a scheduled operation. 4 3 5 1 6 A 2 Select [Schedule]. 2 Select a group for the control equipment or buildings from [AC Configuration]. Item Site Name Location IDU Name Time Zone Explanation The site name is displayed. The installation location (Control Group name) is displayed. The Indoor unit name is displayed. Time zone is displayed. The operating results are displayed as the color bar as following.
© Panasonic Corporation