DC-GH5LBodyP-DVQX1052_eng.book 1 ページ 2017年2月2日 木曜日 午後3時21分 Basic Owner’s Manual Digital Camera/ Lens Kit/Body Model No. DC-GH5L DC-GH5 Please read these instructions carefully before using this product, and save this manual for future use. More detailed owner's manual is available in “Owner’s Manual for advanced features (PDF format)”. To read it, download it from the website. (P123) Register online at http://shop.panasonic.com/support (U.S.
DC-GH5LBodyP-DVQX1052_eng.book 2 ページ 2017年2月2日 木曜日 午後3時21分 Dear Customer, Thank you for choosing Panasonic! You have purchased one of the most sophisticated and reliable products on the market today. Used properly, we’re sure it will bring you and your family years of enjoyment. Please take time to fill in the information below. The serial number is on the tag located on the underside of your camera. Be sure to retain this manual as your convenient camera information source.
DC-GH5LBodyP-DVQX1052_eng.book 3 ページ 2017年2月2日 木曜日 午後3時21分 ∫ Product identification marking Product Location Digital camera Bottom Battery charger Bottom THE FOLLOWING APPLIES ONLY IN THE U.S.A. FCC Note: This equipment has been tested and found to comply with the limits for a Class B digital device, pursuant to Part 15 of the FCC Rules. These limits are designed to provide reasonable protection against harmful interference in a residential installation.
DC-GH5LBodyP-DVQX1052_eng.book 4 ページ 2017年2月2日 木曜日 午後3時21分 THE FOLLOWING APPLIES ONLY IN THE U.S.A. Certification and Compliance See Camera for the certification and compliance mark specific to that device. 1 2 3 Select [Wi-Fi] in the [Setup] menu. Select [Wi-Fi Setup] in the [Wi-Fi] menu. Press 3/4 to select [Approved Regulations], and press [MENU/SET]. Contains FCC ID: VPYLB1JS955 This transmitter must not be co-located or operated in conjunction with any other antenna or transmitter.
DC-GH5LBodyP-DVQX1052_eng.book 5 ページ 2017年2月2日 木曜日 午後3時21分 ∫ About the battery charger CAUTION! To reduce the risk of fire, electric shock or product damage, • Do not install or place this unit in a bookcase, built-in cabinet or in another confined space. Ensure this unit is well ventilated. Battery charger This battery charger operates on AC between 110 V and 240 V. But • In the U.S.A. and Canada, the battery charger must be connected to a 120 V AC power supply only.
DC-GH5LBodyP-DVQX1052_eng.book 6 ページ 2017年2月2日 木曜日 午後3時21分 • Before cleaning the camera, remove the battery or the DC coupler (DMW-DCC12: optional), or disconnect the power plug from the outlet. • Do not press the monitor with excessive force. • Do not press the lens with excessive force. • Do not spray the camera with insecticides or volatile chemicals. • Do not keep rubber or plastic products in contact with the camera for a long period of time.
DC-GH5LBodyP-DVQX1052_eng.book 7 ページ 2017年2月2日 Contents Information for Your Safety..........................2 Preparation/Basic Care of the camera .....................................8 Standard Accessories .................................9 About cards that can be used with this unit......................................................10 About the Lens .......................................... 11 Quick Start Guide ......................................12 Names and Functions of Components ......
DC-GH5LBodyP-DVQX1052_eng.book 8 ページ 2017年2月2日 木曜日 午後3時21分 Preparation/Basic Care of the camera Do not subject to strong vibration, shock, or pressure. • The lens, monitor, or external case may be damaged if used in the following conditions. It may also malfunction or image may not be recorded if you: – Drop or hit the camera. – Press hard on the lens or the monitor.
DC-GH5LBodyP-DVQX1052_eng.book 9 ページ 2017年2月2日 木曜日 午後3時21分 Preparation/Basic Standard Accessories Check that all the accessories are supplied before using the camera. Product numbers correct as of February 2017. These may be subject to change. Digital Camera Body (This is referred to as camera body in this owner’s manual.
DC-GH5LBodyP-DVQX1052_eng.book 10 ページ 2017年2月2日 木曜日 午後3時21分 Preparation/Basic • SD Memory Card, SDHC Memory Card and SDXC Memory Card are indicated as card in the text. • The card is optional. • Description in this owner’s manual is based on the interchangeable lens (H-ES12060). • If accessories are lost, customers can visit us at http://shop.panasonic.com/support for further information about obtaining replacement parts.
DC-GH5LBodyP-DVQX1052_eng.book 11 ページ 2017年2月2日 木曜日 午後3時21分 Preparation/Basic About the Lens This unit can use the dedicated lenses compatible with the Micro Four ThirdsTM System lens mount specification (Micro Four Thirds mount). You can also use a lens of any of the following standards by attaching a mount adaptor.
DC-GH5LBodyP-DVQX1052_eng.book 12 ページ 2017年2月2日 木曜日 午後3時21分 Preparation/Basic “Quick Start Guide” Quick Start Guide • Check that the camera is turned off. 1 Attaching the Shoulder Strap • We recommend attaching the shoulder strap when using the camera to prevent it from dropping. • Perform steps 1 to 8 and then attach the other side of the shoulder strap. • Use the shoulder strap around your shoulder. – Do not wrap the strap around your neck. It may result in injury or accident.
DC-GH5LBodyP-DVQX1052_eng.book 13 ページ 2017年2月2日 木曜日 午後3時21分 Preparation/Basic “Quick Start Guide” ∫ Charging time Charging time Approx. 220 min • The indicated charging time is for when the battery has been discharged completely. The charging time may vary depending on how the battery has been used. The charging time for the battery in hot/cold environments or a battery that has not been used for a long time may be longer than normal.
DC-GH5LBodyP-DVQX1052_eng.book 14 ページ 2017年2月2日 木曜日 午後3時21分 Preparation/Basic “Quick Start Guide” Card access indicators Access lamp Access indication Lights up while the card is being accessed (during recording, deletion, formatting, etc.). Lights up red while an image is being recorded to the card. • During access (i.e., while the access lamp is lit up or [ ]/[ ] is displayed), do not turn this unit off, remove the battery, card or disconnect the AC adaptor (optional).
DC-GH5LBodyP-DVQX1052_eng.book 15 ページ 2017年2月2日 木曜日 午後3時21分 Preparation/Basic 6 “Quick Start Guide” Opening the Monitor At the time when this camera is purchased, the monitor is stowed in the camera body. Bring out the monitor as shown below. 1 Open the monitor. (Maximum 180o) 2 It can be rotated 180o forward. 3 Return the monitor to its original position. • When rotating the monitor, be careful not to apply too much force. Doing so may cause damage.
DC-GH5LBodyP-DVQX1052_eng.book 16 ページ 2017年2月2日 木曜日 午後3時21分 Preparation/Basic “Quick Start Guide” 8 Diopter adjustment Adjust the diopter to suit your vision so that you can see the characters displayed in the viewfinder clearly. 9 Formatting the card (initialization) Format the card before recording a picture with this unit. Since data cannot be recovered after formatting, make sure to back up necessary data in advance.
DC-GH5LBodyP-DVQX1052_eng.book 17 ページ 2017年2月2日 木曜日 午後3時21分 Preparation/Basic 2 3 “Quick Start Guide” Press the shutter button halfway to focus. A Aperture value B Shutter speed C Focus indication • Aperture value and shutter speed are displayed. (It will flash in red if the correct exposure is not achieved, except when set to flash.) • Once the subject is in focus, the focus indication is displayed. (When the subject is not in focus, the indication flashes.) 2.
DC-GH5LBodyP-DVQX1052_eng.book 18 ページ 2017年2月2日 木曜日 午後3時21分 Preparation/Basic Names and Functions of Components ∫ Camera body 12 3 1314 15 16 17 8 9 10 11 12 18 19 20 21 19 4 5 6 7 22 24 30 29 28 27 1 WIRELESS connection lamp (P88) 2 Status indicator (P15) 26 25 Hot shoe (Hot shoe cover) (P55) 16 • Keep the hot shoe cover out of reach of children to prevent swallowing.
DC-GH5LBodyP-DVQX1052_eng.
DC-GH5LBodyP-DVQX1052_eng.book 20 ページ 2017年2月2日 木曜日 午後3時21分 Preparation/Basic ∫ Lens H-ES12060 1 2 345 6 7 8 9 10 1 Lens surface 2 Tele 3 Focus ring (P37) 4 Zoom ring 7 [AF/MF] switch • When either the [AF/MF] switch of the lens or the setting of the camera is set to [MF], Manual Focus (MF) is enabled. 8 Contact point 5 Wide 9 Lens mount rubber 6 O.I.S.
DC-GH5LBodyP-DVQX1052_eng.book 21 ページ 2017年2月2日 木曜日 午後3時21分 Preparation/Basic Basic Operations Cursor buttons/[MENU/SET] button Pressing the cursor button: Selection of items or setting of values etc., is performed. Pressing [MENU/SET]: Confirmation of setting contents, etc., is performed. • This owner’s manual expresses the up, down, left, and right of the cursor button as 3/4/2/1. Control Dial Rotating the control dial: Selection of items or setting of values etc., is performed.
DC-GH5LBodyP-DVQX1052_eng.book 22 ページ 2017年2月2日 木曜日 午後3時21分 Preparation/Basic Joystick The joystick can be operated in two ways: it can be moved up, down, left or right, or it can be pressed. The joystick provides the same functions as the cursor buttons/[MENU/SET] button. Moving: Selection of items or setting of values etc., is performed. Pressing: Confirmation of setting contents, etc., is performed.
DC-GH5LBodyP-DVQX1052_eng.book 23 ページ 2017年2月2日 木曜日 午後3時21分 Preparation/Basic Aperture-Priority AE Mode • Rotate the front/rear dial to display The shutter speed is automatically determined the Exposure Meter A. Unsuitable by the aperture value you set. areas of the range are displayed in red. / : Aperture value (B) (Example: In Manual Exposure Shutter-Priority AE Mode Mode) The aperture value is automatically determined by the shutter speed you set.
DC-GH5LBodyP-DVQX1052_eng.book 24 ページ 2017年2月2日 木曜日 午後3時21分 Preparation/Basic [LVF] button (Switching the Monitor/Viewfinder) Press [LVF]. A [LVF] button B Eye sensor • The monitor/viewfinder will switch as follows: – Automatic viewfinder/monitor switching¢ – Viewfinder display¢ – Monitor display ョㄏブ ¢ If [Eye Sensor AF] in the [Custom] ([Focus / Release Shutter]) menu is set to [ON], the camera automatically adjusts the focus as the eye sensor is activated.
DC-GH5LBodyP-DVQX1052_eng.
DC-GH5LBodyP-DVQX1052_eng.book 26 ページ 2017年2月2日 木曜日 午後3時21分 Preparation/Basic Touch screen (Touch operations) Touch screen of this unit is capacitive. Touch the panel directly with your bare finger. ∫ Touch To touch and release the touch screen. Fn7 Fn8 Fn9 Fn10 OFF Fn11 OFF ∫ Drag A movement without releasing the touch screen. A ∫ Pinch (enlarge/reduce) Pinch the touch screen apart (enlarge) or together (reduce) with two fingers. B 2.0X ∫ Taking Pictures Using the Touch Function 1 Touch [ ].
DC-GH5LBodyP-DVQX1052_eng.book 27 ページ 2017年2月2日 木曜日 午後3時21分 Preparation/Basic Setting menu items 1 Press [MENU/SET]. / [Intelligent Auto] (P76) [Creative Video] (P76) [Custom Mode] (P23) [Creative Control] (P76) 2 3 These menus let you set the functions available only for their corresponding Recording Modes. These menus are displayed only for their corresponding Recording Modes. [Rec] (P76) This menu lets you set picture settings.
DC-GH5LBodyP-DVQX1052_eng.book 28 ページ 2017年2月2日 木曜日 午後3時21分 Preparation/Basic • Menu items that are not available are displayed in gray. When a gray item is selected, if you press [MENU/SET], a message indicating that the item cannot be set is displayed along with the reason why it cannot be set under certain conditions. ∫ Switching to other menus 1 2 3 Press 2. Press 3/4 to select a menu selector icon, such as [ ]. • You can also select the menu toggle icons by rotating the front dial.
DC-GH5LBodyP-DVQX1052_eng.book 29 ページ 2017年2月2日 木曜日 午後3時21分 Preparation/Basic Assigning frequently used functions to the buttons (function buttons) You can assign recording functions, etc. to specific buttons and icons. • Some functions cannot be assigned depending on the function button. 1 Select the menu.
DC-GH5LBodyP-DVQX1052_eng.book 30 ページ 2017年2月2日 木曜日 午後3時21分 Preparation/Basic ∫ Functions that can be assigned in [Setting in REC mode] [Rec] menu – [Wi-Fi] (P88): [Fn7]¢ – [Q.MENU] (P28): [Fn2]¢ – [LVF/Monitor Switch] (P24): [Fn5]¢ – [LVF/Monitor Disp.
DC-GH5LBodyP-DVQX1052_eng.book 31 ページ 2017年2月2日 木曜日 午後3時21分 Recording Taking Pictures using the Automatic Function (Intelligent Auto Mode) Recording Mode: In this mode, the camera makes the optimal settings for the subject and scene. 1 Set the mode dial to [¦]. 2 Align the screen with the subject. • The camera will switch to either the most recently used of Intelligent Auto Mode or Intelligent Auto Plus Mode. At the time of purchase, the mode is set to Intelligent Auto Plus Mode.
DC-GH5LBodyP-DVQX1052_eng.book 32 ページ 2017年2月2日 木曜日 午後3時21分 Recording Taking pictures with customized color, defocus control, and brightness settings Recording Mode: ∫ Setting brightness 1 2 OFF Press [ ]. Rotate the rear dial to adjust brightness. • You can adjust the Exposure Bracket setting by pressing 3/4 while the brightness setting screen is displayed. (P50) • Press [ +1 -5 -4 -3 -2 -1 0 +1 +2 +3 +4 +5 ] again to return to the recording screen. ∫ Setting color 1 Press [ ].
DC-GH5LBodyP-DVQX1052_eng.book 33 ページ 2017年2月2日 木曜日 午後3時21分 Recording Setting the Focus Mode (AFS/AFF/AFC) Applicable modes: The method for achieving focus when the shutter button is pressed halfway is set. Set the focus mode lever. Item Scene (recommended) [AFS] (Auto Focus Single) [AFS/ AFF] Subject is still (Scenery, anniversary photograph, etc.) [AFF] Movement cannot (Auto be predicted Focus (Children, pets, etc.) Flexible) “AFS” is an abbreviation of “Auto Focus Single”.
DC-GH5LBodyP-DVQX1052_eng.book 34 ページ 2017年2月2日 木曜日 午後3時21分 Recording ∫ Adjusting the AF Custom settings 1 2 Press 2/1 to select the AF Custom setting. Press 3/4 to select the items, and then press 2/1 to adjust. • Pressing [DISP.] will return the default setting. 3 [AF Sensitivity] Sets the sensitivity to be applied when adjusting the focus according to the movement of the subject.
DC-GH5LBodyP-DVQX1052_eng.book 35 ページ 2017年2月2日 木曜日 午後3時21分 Recording ([225-Area]) , etc. ([Custom Multi]) Up to 225 AF areas can be focused. This is effective when a subject is not in the center of the screen. From among 225 AF areas, you can freely set the optimum shape of the AF area for the subject. The camera focuses on the subject in the AF area on the screen. ([1-Area]) ([Pinpoint]) You can achieve a more precise focus on a point that is smaller than [Ø].
DC-GH5LBodyP-DVQX1052_eng.book 36 ページ 2017年2月2日 木曜日 午後3時21分 Recording ∫ When selecting [ 1 2 3 4 ] Press [ ]. Select [ ] and press 4. Press 3/4/2/1 to set the focus position and then press [MENU/SET]. Move [+] to the position to be in focus. Button operation Touch operation 3/4/2/1 Touching / Description of operation Moves [+]. Pinching out/in Enlarges/reduces the screen. Switches the enlarged display (windowed/full screen). [DISP.] [Reset] Returns you to the screen in step 3.
DC-GH5LBodyP-DVQX1052_eng.book 37 ページ 2017年2月2日 木曜日 午後3時21分 Recording Adjusting Focus Manually Applicable modes: Use this function when you want to fix the focus or when the distance between the lens and the subject is determined and you do not want to activate Auto Focus. 1 2 3 4 Set the focus mode lever to [MF]. Press [ ]. Press 3/4/2/1 to adjust the focus position, and press [MENU/SET]. Adjust the focus.
DC-GH5LBodyP-DVQX1052_eng.book 38 ページ 2017年2月2日 木曜日 午後3時21分 Recording Fixing the Focus and the Exposure (AF/AE Lock) Applicable modes: This is useful when you want to take a picture of a subject outside the AF area or the contrast is too strong and you cannot achieve appropriate exposure. 1 2 Align the screen with the subject. Press and hold [AF/AE LOCK] to fix the focus or exposure. • If you release [AF/AE LOCK], AF/AE Lock is canceled. • Only the exposure is locked in the default setting.
DC-GH5LBodyP-DVQX1052_eng.book 39 ページ 2017年2月2日 木曜日 午後3時21分 Recording Setting the Light Sensitivity Applicable modes: This allows the sensitivity to light (ISO sensitivity) to be set. Setting to a higher figure enables pictures to be taken even in dark places without the resulting pictures coming out dark. 1 2 3 4 Press [ ]. Select the ISO sensitivity by rotating the rear dial. ISO LIMIT • You can switch the functions between the rear dial and the front dial by pressing [DISP.].
DC-GH5LBodyP-DVQX1052_eng.book 40 ページ 2017年2月2日 木曜日 午後3時21分 Recording Adjusting the White Balance Applicable modes: In sunlight, under incandescent lights or in other such conditions where the color of white takes on a reddish or bluish tinge, this item adjusts to the color of white which is closest to what is seen by the eye in accordance with the light source. 1 2 Press [ ]. Rotate the rear dial or front dial to select the White Balance.
DC-GH5LBodyP-DVQX1052_eng.book 41 ページ 2017年2月2日 木曜日 午後3時21分 Recording Select a Drive Mode Applicable modes: You can change what the camera will do when you press the shutter button. Rotating the drive mode dial. [Single] When the shutter button is pressed, only one picture is recorded. Recordings are made in succession while the shutter button is pressed. [Burst] 1 Set the drive mode dial to [ ]. 2 Focus on the subject and take a picture.
DC-GH5LBodyP-DVQX1052_eng.book 42 ページ 2017年2月2日 木曜日 午後3時21分 Recording 1 2 Set the drive mode dial to [ MENU > [Rec] > [6K/4K PHOTO] > [Picture size / Burst speed] [6K 18M] [4:3]: (4992k3744) [3:2]: (5184k3456) 30 pictures/second [4K H 8M] [4:3]: (3328k2496) [16:9]: (3840k2160) [3:2]: (3504k2336) [1:1]: (2880k2880) 30 pictures/second [4K 8M] 3 60 pictures/second Select the recording method. (P27) MENU [ ]. Select the picture size and burst speed.
DC-GH5LBodyP-DVQX1052_eng.book 43 ページ 2017年2月2日 木曜日 午後3時21分 Recording • The camera will perform burst recording of a 6K/4K photo and saves it as a 6K/4K burst file with a [Rec Format] setting of [MP4]. • When [Auto Review] is enabled, the picture selection screen will be displayed automatically. • When [6K/4K Pre-Burst] or [Pre-Burst Recording] is set, the battery drains faster and the camera temperature rises. Use these functions only when recording with them.
DC-GH5LBodyP-DVQX1052_eng.book 44 ページ 2017年2月2日 木曜日 午後3時21分 Recording 3 Drag the frames to select the frame you want to save as a picture. • Touch and hold [ frame-by-frame. 4 Touch [ ]/[ ] or [ ] to continuously rewind/forward ] to save the picture. • A confirmation screen will be displayed. • The picture will be saved in JPEG format.
DC-GH5LBodyP-DVQX1052_eng.book 45 ページ 2017年2月2日 木曜日 午後3時21分 Recording Controlling Focus After Recording (Post Focus/Focus Stacking) Applicable modes: The camera can perform Burst recording in the same picture quality as 6K/4K photo recording while automatically shifting the focus to different areas. With Post Focus, after recording is finished, you can select the desired points on the screen and save pictures in which the selected points are in focus.
DC-GH5LBodyP-DVQX1052_eng.book 46 ページ 2017年2月2日 木曜日 午後3時21分 Recording Selecting the desired focus area and saving a picture 1 2 Select an image with the [ ] icon on the playback screen, and press 3. Touch the desired focus area. Fn1 • If a picture that is in focus is not available for the selected area, a red frame will be displayed. You cannot save a picture in this case. • You cannot select the edges of the screen. Fn2 • Touching [ ] will enlarge the display.
DC-GH5LBodyP-DVQX1052_eng.book 47 ページ 2017年2月2日 木曜日 午後3時21分 Recording Taking Pictures with Time Lapse Shot/Stop Motion Animation Applicable modes: You can take pictures with Time Lapse Shot or Stop Motion Animation. In addition, the pictures taken can be combined into a motion picture. • Set the date and time settings in advance. (P15) • Recorded pictures are displayed as group pictures.
DC-GH5LBodyP-DVQX1052_eng.book 48 ページ 2017年2月2日 木曜日 午後3時21分 Recording Creating Stop Motion Pictures ([Stop Motion Animation]) A stop motion picture is created by splicing pictures together. 1 2 Set the drive mode dial to [ Select the menu. (P27) MENU 3 > ]. [Rec] > [Time Lapse/Animation] > [Mode] > [Stop Motion Animation] Press 3/4 to select an item and set. [Auto Shooting] [Shooting Interval] 4 5 6 [ON] Takes pictures automatically at a set recording interval.
DC-GH5LBodyP-DVQX1052_eng.book 49 ページ 2017年2月2日 木曜日 午後3時21分 Recording Taking Pictures While Adjusting a Setting Automatically (Bracket Recording) Applicable modes: You can take multiple pictures while automatically adjusting a setting by pressing the shutter button. 1 Select the menu. (P27) MENU ¢ ¢ > [Rec] > [Bracket] > [Bracket Type] Exposure Bracket Press the shutter button to perform recording while adjusting the exposure. (P50) • This is disabled when recording using the flash.
DC-GH5LBodyP-DVQX1052_eng.book 50 ページ 2017年2月2日 木曜日 午後3時21分 Recording Exposure Bracket ∫ About [More settings] (step 2 in P49) [Step] [Sequence] [Single Shot Setting]¢ Sets the number of pictures to be taken and the exposure compensation range. [3•1/3] (Takes three pictures with an interval of 1/3 EV) to [7•1] (Takes seven pictures with an interval of 1 EV) Sets the order in which pictures are taken. [ ]: Takes one picture each time you press the shutter button.
DC-GH5LBodyP-DVQX1052_eng.book 51 ページ 2017年2月2日 木曜日 午後3時21分 Recording White Balance Bracket ∫ About [More settings] (step 2 in P49) Rotate the control dial to adjust the correction range, and press [MENU/SET]. G : Horizontal ([A] to [B]) A : Vertical ([G] to [M]) • You can also set the correction range by touching [ [ ]/[ ]. B M ]/[ ]/ White Balance Bracket (Color Temperature) ∫ About [More settings] (step 2 in P49) Rotate the control dial to adjust the correction range, and press [MENU/SET].
DC-GH5LBodyP-DVQX1052_eng.book 52 ページ 2017年2月2日 木曜日 午後3時21分 Recording Image Stabilizer The camera can activate either the In-Lens Image Stabilizer or In-Body Image Stabilizer, or it can activate both of them and reduce jitter even more effectively. (Dual I.S. Mode) Dual I.S.2 ( , , ), which provides more effective correction, is also supported.
DC-GH5LBodyP-DVQX1052_eng.book 53 ページ 2017年2月2日 木曜日 午後3時21分 Recording Applicable modes: • When using an interchangeable lens with O.I.S. switch (such as H-ES12060), stabilizer function is activated if the O.I.S. switch of the lens is set to [ON]. ([ ] is set at the time of purchase) Select the menu. (P27) MENU > [Rec] > [Stabilizer] [ ] ([Normal]) Camera shake is corrected for up/down, left/right, and rotational movements. Camera shake is corrected for up/down movements.
DC-GH5LBodyP-DVQX1052_eng.book 54 ページ 2017年2月2日 木曜日 午後3時21分 Recording Raising the telescopic effect Applicable modes: Extended Tele Conversion enables you to take pictures that are further enlarged without deteriorating the picture quality. When taking pictures [Ex. Tele Conv.] ([Rec]) 1.4k: [ M] 2.0k: [ S] 1.4k: When recording 6K/4K photos¢ ([16:9]/[1:1]) 1.5k: When recording 6K/4K photos¢ ([3:2]) 1.
DC-GH5LBodyP-DVQX1052_eng.book 55 ページ 2017年2月2日 木曜日 午後3時21分 Recording Taking Pictures with the External Flash (Optional) Applicable modes: You can attach a flash (DMW-FL580L/DMW-FL360L/DMW-FL200L: optional) and take pictures with it. • Read the operating instructions of the external flash for how to attach the external flash. ∫ Removing the Hot Shoe Cover The camera comes with a hot shoe cover attached to the hot shoe.
DC-GH5LBodyP-DVQX1052_eng.book 56 ページ 2017年2月2日 木曜日 午後3時21分 Recording Recording Motion Picture Applicable modes: The camera can record 4K motion pictures in MP4 or MOV format or full high definition motion pictures that comply with the AVCHD standard. Audio is recorded in stereo. 1 Start recording by pressing the motion picture button. A Elapsed recording time B Available recording time 2 • Recording of motion picture appropriate for each mode is possible.
DC-GH5LBodyP-DVQX1052_eng.book 57 ページ 2017年2月2日 木曜日 午後3時21分 Recording ∫ Setting the format, size and recording frame rate MENU > [Motion Picture] > [Rec Format] [AVCHD] This data format is suitable for when playing back on a high-definition TV, etc. [MP4] This data format is suitable for when playing back on a PC, etc. [MP4 (LPCM)] The MP4 data format for image editing. [MOV] MENU > Data format for image editing.
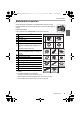
DC-GH5LBodyP-DVQX1052_eng.book 58 ページ 2017年2月2日 木曜日 午後3時21分 Recording When [MP4 (LPCM)], [MOV] is selected System frequency Item [C4K/10bit/150M/24p] Size Frame rate Bit rate YUV/bit Image compression 4096k2160 23.98p 150 Mbps 4:2:2/10 bit Long GOP [C4K/8bit/100M/24p] 4096k2160 23.98p 100 Mbps 4:2:0/8 bit Long GOP [4K/8bit/150M/60p] 3840k2160 59.94p 150 Mbps 4:2:0/8 bit Long GOP [4K/10bit/150M/30p] 3840k2160 29.
DC-GH5LBodyP-DVQX1052_eng.book 59 ページ 2017年2月2日 木曜日 午後3時21分 Recording How to set focus when recording a motion picture ([Continuous AF]) Applicable modes: Focusing changes depending on the Focus Mode setting (P33) and the [Continuous AF] setting in the [Motion Picture] menu. Focus mode [Continuous AF] [AFS]/[AFF]/ [AFC] [MF] Description of settings [ON] The camera automatically keeps focusing on subjects during recording. [OFF] The camera maintains the focus position at the start of recording.
DC-GH5LBodyP-DVQX1052_eng.book 60 ページ 2017年2月2日 木曜日 午後3時21分 Recording MENU > [Time Code Display] [Count Up] [Time Code Value] [Time Code Mode] [HDMI Time Code Output] [Motion Picture] > [Time Code] Set whether or not the time code is displayed on the recording screen/ playback screen. Sets the time code count method. [REC RUN]: Counts the time code only when recording motion pictures. [FREE RUN]: Counts the time code even when not recording (including when this unit is turned off).
DC-GH5LBodyP-DVQX1052_eng.book 61 ページ 2017年2月2日 木曜日 午後3時21分 Recording Recording Motion Pictures in Creative Video Mode Recording Mode: It is possible to manually change the aperture, shutter speed and ISO sensitivity and record motion pictures. 1 2 Set the mode dial to [ MENU 3 ]. Select the menu. (P27) > [Creative Video] > [Exposure Mode] > [P]/[A]/[S]/[M] • The operation for changing the aperture value or shutter speed is the same as the operation for setting the mode dial to , , or .
DC-GH5LBodyP-DVQX1052_eng.book 62 ページ 2017年2月2日 木曜日 午後3時21分 Recording Recording with minimum white saturation by compressing overexposed portions (Knee) In Creative Video Mode, you can use [Like709] in [Photo Style], which compresses overexposed portions to enable recording with minimum saturation. 1 2 Set the mode dial to [ ]. Select the menu. (P27) MENU 3 4 > [Motion Picture] > [Photo Style] Press 2/1 to select [Like709] and then press [Fn2].
DC-GH5LBodyP-DVQX1052_eng.book 63 ページ 2017年2月2日 木曜日 午後3時21分 Recording 3 Select the menu. (P27) MENU 4 5 > [Creative Video] > [Variable Frame Rate] > [ON] Press 2/1 to select the frame rate you will record the item with. Press [MENU/SET]. • Auto Focus does not work. • Audio is not recorded when the frame rate is different from that of [Rec Quality].
DC-GH5LBodyP-DVQX1052_eng.book 64 ページ 2017年2月2日 木曜日 午後3時21分 Recording Reducing flickering and horizontal stripes on images ([Synchro Scan]) • This function is available when [Exposure Mode] is set to either [S] or [M] in Creative Video Mode. 1 Select the menu. (P27) MENU 2 > [Creative Video] > [Synchro Scan] > [ON] Select Shutter Speed with 2/1, and then press [MENU/SET]. • Adjust the shutter speed while looking at the screen so that flickering and horizontal stripes will be minimized.
DC-GH5LBodyP-DVQX1052_eng.book 65 ページ 2017年2月2日 木曜日 午後3時21分 Recording 8 Press the motion picture button (or shutter button) to start recording. • If you have enabled [Focus Transition Rec], Focus Transition will start when you start recording a motion picture. 9 Touch [POS 1], [POS 2], or [POS 3] to start Focus Transition. 10 POS 1 POS 1 POS 2 POS 3 • The same operation can be performed by pressing 2/1 to select the position and pressing [MENU/SET].
DC-GH5LBodyP-DVQX1052_eng.book 66 ページ 2017年2月2日 木曜日 午後3時21分 Recording 3 Set the cropping start frame. A Cropping start frame • When making settings for the first time, a cropping start frame of size 1920k1080 is displayed. (After setting the cropping start frame and end frame, the start frame and end frame that you set immediately before will be displayed.) • The camera will remember the frame position and size even when the camera is turned off.
DC-GH5LBodyP-DVQX1052_eng.book 67 ページ 2017年2月2日 木曜日 午後3時21分 Recording Recording Motion Pictures Using a Connected External Device External monitor/recorder (HDMI output during recording) You can connect the camera’s [HDMI] socket and an external monitor or recorder with an HDMI cable. HDMI output is controlled separately for recording and playback. This section describes the HDMI output control for recording.
DC-GH5LBodyP-DVQX1052_eng.book 68 ページ 2017年2月2日 木曜日 午後3時21分 Recording 5 Connect the HDMI cable to the [HDMI] socket (8). B Leave some slack so that this section has a length of at least 10 cm (0.33 feet). • You can also connect the HDMI cable and USB connection cable at the same time when the cable holder is attached. Removing the cable holder To remove the cable holder, follow the steps for attaching it in the reverse order.
DC-GH5LBodyP-DVQX1052_eng.book 69 ページ 2017年2月2日 木曜日 午後3時21分 Recording ∫ Setting the picture quality (size/frame rate) for HDMI output Down-convert the size/frame rate when the motion picture size is set to [4K] or [C4K] in [Rec Quality]. MENU > [AUTO] [4K/30p] ([4K/25p]) [Motion Picture] > [HDMI Rec Output] > [Down Convert] Down-converts the size/frame rate setting of images to that of the connected device to output them.
DC-GH5LBodyP-DVQX1052_eng.book 70 ページ 2017年2月2日 木曜日 午後3時21分 Recording External Microphone (optional) Using a stereo shotgun microphone (DMW-MS2: optional) or stereo microphone (VW-VMS10: optional), you can record sounds with quality superior to those recorded with the built-in microphone. Using the stereo shotgun microphone (DMW-MS2: optional), you can switch between the gun (ultra-directional) recording and the wide range stereo recording.
DC-GH5LBodyP-DVQX1052_eng.book 71 ページ 2017年2月2日 木曜日 午後3時21分 Recording XLR Microphone Adaptor (optional) By attaching an XLR microphone adaptor (DMW-XLR1: optional) to the camera, you can use a commercially-available XLR microphone to enable the recording of superior-quality high-res/stereo sound. A Hot shoe B XLR microphone adaptor (DMW-XLR1: optional) C Commercially available XLR microphone Preparations: • Turn this unit off. • Remove the hot shoe cover that is attached to the camera.
DC-GH5LBodyP-DVQX1052_eng.book 72 ページ 2017年2月2日 木曜日 午後3時21分 Playback Playing Back Pictures 1 2 Press [(]. Press 2/1. 2: 1: Play back the previous picture Play back the next picture A Card slot • If you press and hold 2/1, you can play back the pictures in succession. • You can switch the card selected for playback by forwarding/rewinding pictures continuously.
DC-GH5LBodyP-DVQX1052_eng.book 73 ページ 2017年2月2日 木曜日 午後3時21分 Playback Switching the Playback Method Using the Playback Zoom Rotate the rear dial right. 1k 2k 4k 8k 2.0X 16k • If the rear dial is rotated to the left after the image is enlarged, the magnification will be reduced. • You can move the enlarged part by pressing 3/4/2/1 or dragging the screen. (P26) Displaying multiple screens (Multi Playback) Rotate the rear dial left.
DC-GH5LBodyP-DVQX1052_eng.book 74 ページ 2017年2月2日 木曜日 午後3時21分 Playback Playing Back Group Pictures A picture group consists of multiple pictures. You can play back pictures in a group either continuously or one by one. • You can edit or delete all pictures in a group at once. [ ]: A picture group saved at once with [6K/4K PHOTO Bulk Saving]. (P44) [ ]: A picture group consisting of pictures taken with Focus Bracket. (P50) [ ]: A picture group consisting of pictures taken in a Time Lapse Shot.
DC-GH5LBodyP-DVQX1052_eng.book 75 ページ 2017年2月2日 木曜日 午後3時21分 Playback Deleting Pictures Once deleted, pictures cannot be recovered. To delete a single picture 1 In Playback Mode, select the picture to delete and then press [ ]. • The same operation can be performed by touching [ 2 ]. Press 3 to select [Delete Single] and then press [MENU/SET]. ョㄏフ To delete multiple pictures (up to 100) or all the pictures • Picture groups are treated as a single picture.
DC-GH5LBodyP-DVQX1052_eng.book 76 ページ 2017年2月2日 木曜日 午後3時21分 Menu Menu list To display explanations of the menu items. If you press [DISP.] while a menu item or setting is selected, a description of the menu is displayed.
DC-GH5LBodyP-DVQX1052_eng.book 77 ページ 2017年2月2日 木曜日 午後3時21分 Menu [Motion Picture] [Rec Format] [i.Dynamic] [Mic Level Disp.] [Rec Quality] [i.Resolution] [Mic Level Adj.] [Time Code] [ISO Sensitivity (video)] [Mic Level Limiter] [AFS/AFF] [Shading Comp.] [Wind Noise Canceller] [Continuous AF] [Diffraction Compensation] [Wind Cut] [AF Custom Setting(Video)] [Stabilizer] [Lens Noise Cut] [Photo Style] [Flkr Decrease] [Special Mic.] [Filter Settings] [Ex. Tele Conv.
DC-GH5LBodyP-DVQX1052_eng.book 78 ページ 2017年2月2日 木曜日 午後3時21分 Menu [Setup] [Online Manual] [Monitor Display]/ [Viewfinder] [Folder / File settings] [Cust.Set Mem.] [Clock Set] [Monitor Luminance] [Save/Restore Camera Setting] [World Time] [Eye Sensor] [No.
DC-GH5LBodyP-DVQX1052_eng.book 79 ページ 2017年2月2日 木曜日 午後3時21分 Menu [Picture Size] Applicable modes: Set the number of pixels. The higher the numbers of pixels, the finer the detail of the pictures will appear even when they are printed onto large sheets. > MENU [Rec] > [Picture Size] When the aspect ratio is [4:3]. When the aspect ratio is [3:2].
DC-GH5LBodyP-DVQX1052_eng.book 80 ページ 2017年2月2日 木曜日 午後3時21分 Menu [Metering Mode] Applicable modes: Type of optical measurement to measure brightness can be changed. MENU > [Rec] > [Metering Mode] [ ] (Multiple) This is the method in which the camera measures the most suitable exposure by judging the allocation of brightness on the whole screen automatically. Usually, we recommend using this method.
DC-GH5LBodyP-DVQX1052_eng.book 81 ページ 2017年2月2日 木曜日 午後3時21分 Menu [Shutter Type] Applicable modes: Select the shutter to be used for taking pictures. MENU > [Rec] > [Shutter Type] Settings: [AUTO]/[MSHTR]/[EFC]/[ESHTR] Mechanical shutter Description The camera starts and ends an exposure with the mechanical shutter. Electronic Front Curtain The camera starts an exposure electronically, and ends it with the mechanical shutter.
DC-GH5LBodyP-DVQX1052_eng.book 82 ページ 2017年2月2日 木曜日 午後3時21分 Menu [Zebra Pattern] Indicates parts that may become white saturated through overexposure in a zebra pattern. MENU > [Custom] > [Monitor / Display] > [Zebra Pattern] [ZEBRA1] [ZEBRA2] Select [SET] to set the brightness to be processed as a zebra pattern. • You can select a brightness value between [50%] and [105%]. In [Zebra 2], you can select [OFF].
DC-GH5LBodyP-DVQX1052_eng.book 83 ページ 2017年2月2日 木曜日 午後3時21分 Menu [System Frequency] You can change the system frequency of the motion pictures you record and play back. MENU > [Setup] > [System Frequency] [59.94Hz (NTSC)] [50.00Hz (PAL)] [24.00Hz (CINEMA)] For regions where the TV broadcasting system is NTSC For regions where the TV broadcasting system is PAL This system frequency is for creating films • After changing the setting, turn the camera off and on.
DC-GH5LBodyP-DVQX1052_eng.book 84 ページ 2017年2月2日 木曜日 午後3時21分 Menu MENU > [Setup] > [Folder / File settings] [Select Folder]¢ Specifies the folder to which images are to be saved. • The folder name is indicated with the number of files that can be stored. [Create a new folder] [OK] Creates a new folder with the same 5-digit user-defined segment as the current folder name setting. [Change] Allows you to redefine the 5-digit user-defined segment before creating a new folder.
DC-GH5LBodyP-DVQX1052_eng.book 85 ページ 2017年2月2日 木曜日 午後3時21分 Menu Notes on the Backup Rec. function • We recommend using cards with the same Speed Class rating and capacity. • When recording a motion picture in [AVCHD] format, backup recording of motion picture is not possible. Data will be recorded only to the one card.
DC-GH5LBodyP-DVQX1052_eng.book 86 ページ 2017年2月2日 木曜日 午後3時21分 Menu [RAW Processing] You can process the pictures taken in RAW format. The processed pictures will be saved in JPEG format. MENU 1 > [Playback] > [RAW Processing] Select RAW images with 2/1, and then press [MENU/SET]. Press 3/4 to select an item. 2 3 4 [White Balance] [Highlight] [Brightness correction] [Shadow] [i.Resolution] [Sharpness] [Photo Style] [Saturation]/[Color Tone] [Setup] [i.
DC-GH5LBodyP-DVQX1052_eng.book 87 ページ 2017年2月2日 木曜日 午後3時21分 Menu On the comparison screen, you can use the following operations to make adjustments: A Current setting Button operation 2/1 / Touch operation Dragging Description of operation 0 Selects a setting. [DISP.] [DISP.] Returns you to the setting screen. [MENU/SET] [Set] Sets the adjusted level and returns you to the item selection screen. • If you touch the picture at the center, it will be enlarged.
DC-GH5LBodyP-DVQX1052_eng.book 88 ページ 2017年2月2日 木曜日 午後3時21分 Wi-Fi/Bluetooth What you can do with the Wi-Fi®/Bluetooth® function • The camera cannot be used to connect to a public wireless LAN connection.
DC-GH5LBodyP-DVQX1052_eng.book 89 ページ 2017年2月2日 木曜日 午後3時21分 Wi-Fi/Bluetooth Steps for pressing [Wi-Fi] (in Recording Mode) 1 Touch [ ]. 2 Touch [ Fn7 Fn7 Fn8 ]. Fn9 Fn10 OFF Fn11 OFF ∫ Use the camera as a wireless LAN device When using equipment or computer systems that require more reliable security than wireless LAN devices, ensure that the appropriate measures are taken for safety designs and defects for the systems used.
DC-GH5LBodyP-DVQX1052_eng.book 90 ページ 2017年2月2日 木曜日 午後3時21分 Wi-Fi/Bluetooth Connecting to a smartphone/tablet Installing the smartphone/tablet app “Image App” The “Panasonic Image App” (hereafter “Image App”) is an application provided by Panasonic. • OS App for AndroidTM: Android 4.1 or higher (Android 5.0 or higher is required to use the Bluetooth function) App for iOS: iOS 8.0 or higher (The Bluetooth function cannot be used with the iPad 2) 1 2 Connect the smartphone to a network.
DC-GH5LBodyP-DVQX1052_eng.book 91 ページ 2017年2月2日 木曜日 午後3時21分 Wi-Fi/Bluetooth On the camera Select the menu. (P27) MENU > [Setup] > [Bluetooth] > [Bluetooth] > [SET] > [Pairing] • The camera enters pairing standby mode and displays its device name. On your smartphone 1 2 3 4 Start “Image App ”. • If a message is displayed indicating that the smartphone is searching for cameras, close the message. Select [Bluetooth]. Turn on the Bluetooth.
DC-GH5LBodyP-DVQX1052_eng.book 92 ページ 2017年2月2日 木曜日 午後3時21分 Wi-Fi/Bluetooth ∫ Connecting to the paired smartphone (connecting for the second and subsequent times) On the camera Select the menu. (P27) MENU > [Setup] > [Bluetooth] > [Bluetooth] > [ON] On your smartphone 1 Start “Image App”. • If a message is displayed indicating that the smartphone is searching for cameras, close the message. 2 3 4 Select [Bluetooth]. Turn on the Bluetooth.
DC-GH5LBodyP-DVQX1052_eng.book 93 ページ 2017年2月2日 木曜日 午後3時21分 Wi-Fi/Bluetooth On your smartphone 1 2 3 Turn on the Wi-Fi function in the setting menu. On the Wi-Fi setting screen, select the SSID displayed on the camera. Start “Image App ”. • When the connection confirmation screen is displayed on the camera, select [Yes] to connect. (For first time connection only) Wi-Fi 0123456789ABC At the time of purchase, [Wi-Fi Password] is set to [OFF].
DC-GH5LBodyP-DVQX1052_eng.book 94 ページ 2017年2月2日 木曜日 午後3時21分 Wi-Fi/Bluetooth Terminating the Wi-Fi connection 1 2 Set the camera to Recording Mode. Select the camera’s menu items to terminate the Wi-Fi connection. MENU > [Setup] > [Wi-Fi] > [Wi-Fi Function] > [Yes] • You can also terminate the connection by pressing [Wi-Fi] on the camera. (P88) 3 On the smartphone, close “Image App”. (If you are using an iOS device) On the screen of “Image App”, press the home button to close the app.
DC-GH5LBodyP-DVQX1052_eng.book 95 ページ 2017年2月2日 木曜日 午後3時21分 Wi-Fi/Bluetooth 1 2 Make a Bluetooth connection to the smartphone. (P90) Select the camera’s menu. (P27) MENU 3 4 5 > [Setup] > [Bluetooth] > [Remote Wakeup] > [ON] Set the camera on/off switch to [OFF]. On the smartphone, start up the “Image App”, and set the Bluetooth function to a state in which a connection can be made (standby state). Operate the smartphone. 1 Select [ ]. 2 Select [Remote operation].
DC-GH5LBodyP-DVQX1052_eng.book 96 ページ 2017年2月2日 木曜日 午後3時21分 Wi-Fi/Bluetooth ∫ Changing the camera’s dial settings, etc. with your smartphone MENU > [Setup] > [Wi-Fi] > [Wi-Fi Setup] > [Priority of Remote Device] [Camera] [Smartphone] Allows you to perform operations with both the camera and the smartphone during remote recording. • The camera’s dial settings, etc. cannot be changed with the smartphone. Allows you to perform operations only with the smartphone during remote recording.
DC-GH5LBodyP-DVQX1052_eng.book 97 ページ 2017年2月2日 木曜日 午後3時21分 Wi-Fi/Bluetooth Backing up images to a Cloud Storage automatically (Auto Cloud Backup) Wireless connectivity required: Bluetooth Wi-Fi The camera detects the connection between the smartphone and wireless access point and backs up images stored on the camera to a preset Cloud Storage. • Check the “FAQ/Contact us” on the following site for compatible Cloud Storage. http://lumixclub.panasonic.
DC-GH5LBodyP-DVQX1052_eng.book 98 ページ 2017年2月2日 木曜日 午後3時21分 Wi-Fi/Bluetooth ∫ Setting up “LUMIX CLUB” (Setup 2) Preparations: • Create an account for the Cloud Storage you want to use, and have the login information available. • Register to “LUMIX CLUB”. Register to “LUMIX CLUB” in the camera’s menu item below. MENU > [Setup] > [Wi-Fi] > [Wi-Fi Setup] > [LUMIX CLUB] > [Set/Add Account] > [New account] You can also use the login ID registered with your PC or smartphone for the camera.
DC-GH5LBodyP-DVQX1052_eng.book 99 ページ 2017年2月2日 木曜日 午後3時21分 Wi-Fi/Bluetooth Start up the “Image App” in foreground (a state in which the app can be operated), and run a backup. • A backup will start if the smartphone is connected to the wireless access point set up in “(Setup 3)”. • It may be possible to run a backup even if the app is running in background (a state in which it cannot be operated). • The first job backs up all images on the card.
DC-GH5LBodyP-DVQX1052_eng.book 100 ページ 2017年2月2日 木曜日 午後3時21分 Wi-Fi/Bluetooth • When [Auto Transfer] is set to [ON], [Wi-Fi Function] in [Wi-Fi] in the [Setup] menu cannot be used. • If the [Bluetooth] and [Auto Transfer] settings of the camera are [ON], the camera automatically connects to the smartphone via Bluetooth and Wi-Fi when you turn on the camera. Start up the “Image App” to connect to the camera.
DC-GH5LBodyP-DVQX1052_eng.book 101 ページ 2017年2月2日 木曜日 午後3時21分 Wi-Fi/Bluetooth Synchronizing the camera’s clock with a smartphone Wireless connectivity required: Bluetooth Synchronize the clock and the time zone setting of the camera with those of a smartphone. 1 2 Make a Bluetooth connection to the smartphone. (P90) Select the camera’s menu.
DC-GH5LBodyP-DVQX1052_eng.book 102 ページ 2017年2月2日 木曜日 午後3時21分 Wi-Fi/Bluetooth Setting up a connection to a PC via a wireless access point To create a folder that receives images • Create a PC account name (up to 254 characters) and password (up to 32 characters) consisting of alphanumeric characters. An attempt to create a receive folder may fail if the account name includes non-alphanumeric characters. ∫ When using “PHOTOfunSTUDIO ” (For Windows) 1 Install “PHOTOfunSTUDIO ” to the PC.
DC-GH5LBodyP-DVQX1052_eng.book 103 ページ 2017年2月2日 木曜日 午後3時21分 Wi-Fi/Bluetooth 3 4 Select [PC]. Select the connection method. Example: Selecting [WPS (Push-Button)] to set up a connection 1 Select [Via Network]. 2 Select [WPS (Push-Button)]. 3 Press the wireless access point WPS button until it switches to WPS mode. 5 On the camera, perform the operation that matches your purpose.
DC-GH5LBodyP-DVQX1052_eng.book 104 ページ 2017年2月2日 木曜日 午後3時21分 Others Playing Back Pictures on a TV Screen Preparations: Turn this unit and the TV off. 1 Connect the camera and a TV. • Check the direction of the terminals and plug in/out straight holding onto the plug. (It may result in malfunction by the deforming of the terminal if it is plugged in obliquely or in wrong direction.) Do not connect devices to incorrect terminals. Doing so may cause malfunction.
DC-GH5LBodyP-DVQX1052_eng.book 105 ページ 2017年2月2日 木曜日 午後3時21分 Others • Download expiration: March 2022 • For 4K motion pictures and 6K/4K photos, a 64 bit OS version of Windows 7/Windows 8.1/ Windows 10 is required. • For details about information such as the operating environment or operating method, refer to the “Owner’s Manual for advanced features (PDF format)” or the operating instructions for the respective software programs. • “PHOTOfunSTUDIO” is not compatible with Mac.
DC-GH5LBodyP-DVQX1052_eng.book 106 ページ 2017年2月2日 木曜日 午後3時21分 Others 2 3 Press 3/4 to select [PC], and then press [MENU/SET]. • If [USB Mode] is set to [PC] in the [Setup] menu in advance, the camera will be automatically connected to the PC without displaying the [USB Mode] selection screen. Copy the images to a PC using “PHOTOfunSTUDIO ”. • Do not delete or move copied files or folders in Windows Explorer. When viewing in “PHOTOfunSTUDIO”, you will not be able to play back or edit.
DC-GH5LBodyP-DVQX1052_eng.book 107 ページ 2017年2月2日 木曜日 午後3時21分 Others Monitor Display/Viewfinder Display • The following images are examples of when the display screen is set to [ style) in the monitor. ] (monitor In recording MOV 8bit FHD 24p 4:3 BKT AFS L ラュン Fn7 × Fn8 F MINI SS Fn9 Fn10 OFF BKT AEL 3.
DC-GH5LBodyP-DVQX1052_eng.book 108 ページ 2017年2月2日 木曜日 午後3時21分 Others 2 4 A› AFS AFF AFC MF BKT AFS š Ø Quality (P79) AF area (P35) Focus Mode (P33, 37) Spot metering target Focus Bracket (P50) Center marker display Post Focus (P45) Self-timer AF Mode (P34) AFL Mic level display LMT OFF Mic Level Limiter (OFF) Face Recognition TC 00:00:00:00 Time Code (P59) AF Lock (P38) XLR 96kHz/24bit Burst Silent Mode (P80) 6K/4K Photo (P41) Self-timer External Microphone (P70) AE 3.5 BKT 3.
DC-GH5LBodyP-DVQX1052_eng.
DC-GH5LBodyP-DVQX1052_eng.book 110 ページ 2017年2月2日 木曜日 午後3時21分 Others In recording On-monitor recording information 3 F 3.5 1/60 Single 0 ISO AUTO 4:3 AFS Burst 0 0 L OFF AWB 6K/4K Photo (P41) Fn 98 98 Post Focus (P45) Self-timer AFS AFF AFC MF š Ø 1 C1 AF Mode (P34) 4:3 F3.
DC-GH5LBodyP-DVQX1052_eng.book 111 ページ 2017年2月2日 木曜日 午後3時21分 Others Message Display Confirmation messages or error messages will be displayed on the screen in some cases. • Please also refer to the “Owner’s Manual for advanced features (PDF format)”, which describes more detailed information. [Some pictures cannot be deleted]/[This picture cannot be deleted] • This feature can only be used with pictures that comply with the DCF standard.
DC-GH5LBodyP-DVQX1052_eng.book 112 ページ 2017年2月2日 木曜日 午後3時21分 Others Troubleshooting First, try out the following procedures. If the problem is not resolved, it may be improved by selecting [Reset] on the [Setup] menu. • Please also refer to the “Owner’s Manual for advanced features (PDF format)”, which describes more detailed information. When I shake the camera, I hear a rattling sound. • The sound is caused by the In-Body Image Stabilizer. This is not a malfunction.
DC-GH5LBodyP-DVQX1052_eng.book 113 ページ 2017年2月2日 木曜日 午後3時21分 Others Striping or flicker may appear under lighting such as fluorescent lighting and LED lighting fixture. • This is characteristic of MOS sensors which serve as the camera’s pickup sensors. This is not a malfunction. • When using the electronic shutter, lowering the shutter speed may reduce the effect of the horizontal stripes.
DC-GH5LBodyP-DVQX1052_eng.book 114 ページ 2017年2月2日 木曜日 午後3時21分 Others Even when the camera is put in sleep mode, the external flash does not enter sleep mode. Even when the camera is turned off, the external flash does not turn off. • When [Sleep Mode], [Sleep Mode(Wi-Fi)], or [Power Save LVF Shooting] (P82) is activated, the external flash may not enter sleep mode automatically. When the camera is turned off, the external flash may not turn off automatically.
DC-GH5LBodyP-DVQX1052_eng.book 115 ページ 2017年2月2日 木曜日 午後3時21分 Others When I try to set up a Wi-Fi connection with a Windows 8 PC, my user name and password are not recognized, so I cannot connect to the PC. • Some OS versions, including Windows 8, use two types of accounts: a local account and a Microsoft account. > Be sure to use the user name and password for the local account. The PC is not recognized when I use a Wi-Fi connection. The camera cannot be connected to PC via Wi-Fi connection.
DC-GH5LBodyP-DVQX1052_eng.book 116 ページ 2017年2月2日 木曜日 午後3時21分 Others Specifications Specifications are subject to change without notice. Digital Camera Body (DC-GH5): Information for your safety Power Source: DC 8.4 V (8.4 V Power Consumption: 4.1 W (When recording with Monitor) [When the Interchangeable lens (H-ES12060) is used] ) 3.
DC-GH5LBodyP-DVQX1052_eng.book 117 ページ 2017年2月2日 木曜日 午後3時21分 Others ISO sensitivity (Standard Output Sensitivity) Still picture: AUTO/ /100¢/200/400/800/1600/3200/6400/12800/25600 Creative Video Mode: AUTO/100¢/200/400/800/1600/3200/6400/12800 ¢ Only available when [Extended ISO] is set. (1/3 EV step change possible) Minimum Illumination Approx. 3 lx [when i-Low light is used, the shutter speed is 1/30th of a second (When [System Frequency] is set to [59.
DC-GH5LBodyP-DVQX1052_eng.book 118 ページ 2017年2月2日 木曜日 午後3時21分 Others Monitor 3.2q TFT LCD (3:2) (Approx. 1,620,000 dots) (field of view ratio about 100%) Touch screen Viewfinder OLED Live Viewfinder (4:3) (Approx. 3,680,000 dots) (field of view ratio about 100%) [Magnification approx. 1.52k, 0.76k (35 mm film camera equivalent), with 50 mm lens at infinity; j1.
DC-GH5LBodyP-DVQX1052_eng.book 119 ページ 2017年2月2日 木曜日 午後3時21分 Others Recording file format Still Picture RAW/JPEG (based on “Design rule for Camera File system”, based on “Exif 2.31” standard, DPOF corresponding) 6K/4K photo (burst file) 6K photo: MP4 (H.265/HEVC, AAC (2 ch)) 4K photo: MP4 (H.
DC-GH5LBodyP-DVQX1052_eng.book 120 ページ 2017年2月2日 木曜日 午後3時21分 Others Operating humidity 10%RH to 80%RH Dust-proof and splash-proof Yes Language select [ENGLISH]/[DEUTSCH]/[FRANÇAIS]/[ESPAÑOL]/ [PORTUGUÊS]/[ITALIANO]/[繁體中文]/[¢] Wireless transmitter Wireless LAN Compliance standard IEEE 802.
DC-GH5LBodyP-DVQX1052_eng.book 121 ページ 2017年2月2日 木曜日 午後3時21分 Others Interchangeable Lens H-ES12060 “LEICA DG VARIO-ELMARIT 12–60 mm/F2.8–4.0 ASPH./ POWER O.I.S.” Focal length f=12 mm to 60 mm (35 mm film camera equivalent: 24 mm to 120 mm) Aperture type 9 diaphragm blades/circular aperture diaphragm Maximum aperture F2.8 (Wide) to F4.
DC-GH5LBodyP-DVQX1052_eng.
DC-GH5LBodyP-DVQX1052_eng.book 123 ページ 2017年2月2日 木曜日 午後3時21分 Others Reading the Owner’s Manual (PDF format) More detailed owner’s manual is available in “Owner’s Manual for advanced features (PDF format)”. To read it, download it from the website. http://panasonic.jp/support/dsc/oi/ index.html?model=DC-GH5&dest=P • Click the desired language. ∫ To check the URL and QR code on the camera Select the menu.
DC-GH5LBodyP-DVQX1052_eng.book 124 ページ 2017年2月2日 木曜日 午後3時21分 Others Limited Warranty (ONLY FOR U.S.A.
DC-GH5LBodyP-DVQX1052_eng.book 125 ページ 2017年2月2日 木曜日 午後3時21分 Others IF REPAIR IS NEEDED DURING THE WARRANTY PERIOD, THE PURCHASER WILL BE REQUIRED TO FURNISH A SALES RECEIPT/PROOF OF PURCHASE INDICATING DATE OF PURCHASE, AMOUNT PAID AND PLACE OF PURCHASE. CUSTOMER WILL BE CHARGED FOR THE REPAIR OF ANY UNIT RECEIVED WITHOUT SUCH PROOF OF PURCHASE.
DC-GH5LBodyP-DVQX1052_eng.book 126 ページ 2017年2月2日 木曜日 午後3時21分 Others PARTS AND SERVICE, WHICH ARE NOT COVERED BY THIS LIMITED WARRANTY, ARE YOUR RESPONSIBILITY.
DC-GH5LBodyP-DVQX1052_eng.book 127 ページ 2017年2月2日 木曜日 午後3時21分 Others • G MICRO SYSTEM is a lens exchange type digital camera system of LUMIX based on a Micro Four Thirds System standard. • Micro Four Thirds™ and Micro Four Thirds Logo marks are trademarks or registered trademarks of Olympus Imaging Corporation, in Japan, the United States, the European Union and other countries.
DC-GH5LBodyP-DVQX1052_eng.book 128 ページ 2017年2月2日 木曜日 午後3時21分 • QuickTime and the QuickTime logo are trademarks or registered trademarks of Apple Inc., used under license therefrom. • The Wi-Fi CERTIFIED™ Logo is a certification mark of Wi-Fi Alliance®. • The Wi-Fi Protected Setup™ Identifier mark is a certification mark of Wi-Fi Alliance®. • “Wi-Fi®” is a registered trademarks of Wi-Fi Alliance®. • “Wi-Fi Protected Setup™”, “WPA™”, and “WPA2™” are trademarks of Wi-Fi Alliance®.