
Operating Instructions


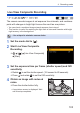
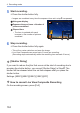
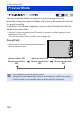


Table Of Contents
- About Operating Instructions
- Chapters
- Contents
- Contents by Function
- 1. Introduction
- 2. Getting Started
- 3. Basic Operations
- 4. Recording mode
- 5. Image Recording
- 6. Focus/Zoom
- 7. Drive/Shutter/Image Stabilizer
- Selecting the Drive Mode
- Taking Burst Pictures
- 4K Photo Recording
- Selecting Pictures from a 4K Burst File
- Post-Focus Recording
- Recording Using the Self-timer
- Recording with Time Lapse Shot
- Recording with Stop Motion Animation
- Time Lapse Shot/Stop Motion Animation Videos
- Bracket Recording
- [Silent Mode]
- [Shutter Type]
- Image Stabilizer
- 8. Brightness (Exposure)/Coloring/Picture effect
- 9. Flash
- 10. Recording Videos
- 11. Playing Back and Editing of Images
- 12. Camera Customization
- 13. Menu Guide
- 14. Wi-Fi/Bluetooth
- 15. Connecting to Other Devices
- 16. Materials
- Using Optional Accessories
- Monitor/Viewfinder Displays
- Message Displays
- Troubleshooting
- Cautions for Use
- Number of Pictures That Can Be Taken and Available Recording Time with the Battery
- Number of Still Images That Can Be Taken and Video Recording Time with Cards
- List of Functions That Can Be Set in Each Recording Mode
- Specifications
- Index
- Trademarks and Licenses
- Firmware Update

101
4. Recording mode
Available Shutter Speeds (Sec.)
[EFC] [T] (Time, max. approx. 60 seconds), 60 to 1/500
[ESHTR] 1 to 1/16000
• The effects of the set aperture value and shutter speed will not be visible on
the recording screen.
To check the effects on the recording screen, use [Preview]. (106)
You can set the preview mode to operate constantly in [
] mode.
[
] [ ] [Constant Preview] (343)
• The brightness of the recording screen and of actual recorded images may
differ.
Check the images on the playback screen.
• When using a lens with an aperture ring, set the position of the aperture ring
to other than [A] to use the aperture value of the lens.
• Shutter speeds faster than 1/50 of a second are not available when you fire
the flash. (232)
• You can customize dial operations:
[
] [ ] [Dial Set.] [Assign Dial (F/SS)]/[Rotation (F/SS)] (340)
• The recording screen can display an exposure meter indicating the
relationship between aperture value and shutter speed:
[
] [ ] [Expo.Meter] (347)
Manual Exposure Assist
When ISO sensitivity is set to other than [AUTO], Manual Exposure Assist
(Example:
) will be displayed on the recording screen.
You can check the difference between the current exposure value and the
correct exposure (±0) measured by the camera.
• Use Manual Exposure Assist as a guide.
We recommend checking the images on the playback screen when recording.