
Operating Instructions


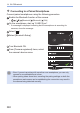
Table Of Contents
- About Operating Instructions
- Chapters
- Contents
- Contents by Function
- 1. Introduction
- 2. Getting Started
- 3. Basic Operations
- 4. Recording mode
- 5. Image Recording
- 6. Focus/Zoom
- 7. Drive/Shutter/Image Stabilizer
- Selecting the Drive Mode
- Taking Burst Pictures
- 4K Photo Recording
- Selecting Pictures from a 4K Burst File
- Post-Focus Recording
- Recording Using the Self-timer
- Recording with Time Lapse Shot
- Recording with Stop Motion Animation
- Time Lapse Shot/Stop Motion Animation Videos
- Bracket Recording
- [Silent Mode]
- [Shutter Type]
- Image Stabilizer
- 8. Brightness (Exposure)/Coloring/Picture effect
- 9. Flash
- 10. Recording Videos
- 11. Playing Back and Editing of Images
- 12. Camera Customization
- 13. Menu Guide
- 14. Wi-Fi/Bluetooth
- 15. Connecting to Other Devices
- 16. Materials
- Using Optional Accessories
- Monitor/Viewfinder Displays
- Message Displays
- Troubleshooting
- Cautions for Use
- Number of Pictures That Can Be Taken and Available Recording Time with the Battery
- Number of Still Images That Can Be Taken and Video Recording Time with Cards
- List of Functions That Can Be Set in Each Recording Mode
- Specifications
- Index
- Trademarks and Licenses
- Firmware Update

377
14. Wi-Fi/Bluetooth
Connecting to a Smartphone (Bluetooth Connection)
Follow a simple connection setup procedure (pairing) to connect to a
smartphone that supports Bluetooth Low Energy.
When pairing is set up, the camera also automatically connects to the
smartphone via Wi-Fi.
• For the first-time connection, pairing settings are required.
For information about connecting for the second and subsequent times, refer to
page 380.
• Supported smartphones
Android™: Android 5 or higher with Bluetooth 4.0 or higher
(excluding those that do not support Bluetooth Low Energy)
iOS: iOS 11 or higher
• Turn on the smartphone’s Bluetooth function in advance.
1
On the smartphone, start up
“LUMIX Sync”.
● A message regarding device
(camera) registration is displayed.
Select [Next].
• If you have closed the message, select
[
], then register the camera using
[Camera registration (pairing)].
2
Check the content in the displayed guide and select
[Next] until the screen to register the camera is
displayed.