
Operating Instructions

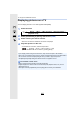
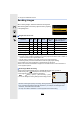


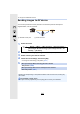
Table Of Contents
- Finding the information you need
- How to use this manual
- Contents
- Contents by Function
- 1. Before Use
- 2. Getting Started/Basic Operations
- Attaching the Shoulder Strap
- Charging the Battery
- Inserting/Removing the Battery
- Inserting/Removing the Card (Optional)
- Card Information
- Attaching/Removing the Lens
- Opening the Monitor
- Setting Date/Time (Clock Set)
- Basic Operations
- Tips for taking good pictures
- Using the Viewfinder
- Shutter button (Taking pictures)
- Motion picture button (Recording motion pictures)
- Mode dial (Selecting a Recording Mode)
- Front Dial/Rear Dial
- Control Dial
- Cursor buttons/[MENU/SET] button
- Joystick
- [DISP.] button (Switching the displayed information)
- Touch screen (Touch operations)
- Taking Pictures Using the Touch Function
- Setting menu items
- Calling frequently-used menus instantly (Quick Menu)
- Assigning frequently used functions to the buttons (function buttons)
- Entering Text
- 3. Recording Modes
- Taking Pictures using the Automatic Function (Intelligent Auto Mode)
- Taking Pictures with Automatically Adjusted Aperture and Shutter Speed (Programme AE Mode)
- Taking Pictures by Specifying the Aperture/ Shutter Speed
- Taking Pictures with different image effects (Creative Control Mode)
- Registering your preferred settings (Custom Mode)
- 4. Focus, Brightness (Exposure) and Colour tone Settings
- 5. 4K Photo and Drive Settings
- Select a Drive Mode
- Taking Pictures using Burst Mode
- Recording 4K Photos
- Selecting pictures from 4K burst file and saving
- Controlling Focus After Recording (Post Focus/ Focus Stacking)
- Taking Pictures with the Self-timer
- Taking Pictures with Time Lapse Shot/Stop Motion Animation
- Taking Pictures While Adjusting a Setting Automatically (Bracket Recording)
- 6. Stabiliser, Zoom and Flash
- 7. Recording Motion Pictures
- Recording Motion Picture
- Setting the format, size and frame rate
- How to set focus when recording a motion picture ([Continuous AF])
- Customising the operation settings of Auto Focus for motion picture recording ([AF Custom Setting(Video)])
- Displaying/setting the sound input level
- Setting the recording method of time code
- Synchronising the time code with an external device
- Recording images with superimposed recording dates ([Time Stamp Rec])
- Displaying colour bars/Outputting a test tone
- Recording with minimum white saturation by compressing overexposed portions (Knee)
- Log recording (V-Log L)
- Recording still pictures while recording motion pictures
- Recording Motion Pictures in Creative Video Mode
- Recording in Slow or Fast Motion ([Variable Frame Rate])
- Moving the focus position smoothly to a registered position ([Focus Transition])
- Recording Motion Pictures that Pan and Zoom While Maintaining a Fixed Camera Position ([4K Live Cropping])
- Recording HDR motion pictures (Hybrid Log Gamma)
- [Creative Video] menu
- Recording Motion Pictures Using a Connected External Device
- Recording Motion Picture
- 8. Playing Back and Editing Images
- 9. Using Menu Functions
- 10. Using the Wi-Fi/Bluetooth function
- What you can do with the Wi-Fi®/Bluetooth® function
- Wi-Fi function/Bluetooth function
- Connecting to a smartphone/tablet
- Controlling with a Smartphone/Tablet
- Turning on/off the camera with a smartphone
- Taking images via a smartphone (remote recording)
- Operating the shutter button with a smartphone via a Bluetooth connection alone
- Playing back/saving images stored on the camera, or uploading them on social media sites
- Transferring recorded images to a smartphone automatically
- Backing up images to a Cloud Storage automatically (Auto Cloud Backup)
- Recording location information to the camera’s images
- Synchronising the camera’s clock with a smartphone
- Saving the camera’s setup information to a smartphone
- Displaying pictures on a TV
- Sending images
- Sending images to a smartphone/tablet
- Printing Wirelessly
- Sending images to AV device
- Sending images to PC
- Using Web services
- About Wi-Fi connections
- [Wi-Fi Setup] Menu
- 11. Connecting to other equipment
- 12. Others
- Firmware Update
- Contents
- Before Use
- Firmware Ver. 1.1
- Addition of new functions
- [L.Monochrome D] has been added to [Photo Style] in the [Rec] menu
- The [Grain Effect] picture quality adjustment has been added to [Photo Style] in the [Rec] menu
- [Focus Ring Lock] has been added to the [Custom] menu
- [WB/ISO/Expo. Button] has been added to the [Custom] menu
- [Dial] has been added to [Operation Lock Setting] in the [Custom] menu
- Improved ease of operation / Other function additions/modifications
- Addition of new functions
- Firmware Ver. 1.3
- Firmware Ver. 1.4
- Additions/changes to the Auto Focus function
- Other function additions/modifications
- [AWBw] has been added to White Balance
- [Highlight Weighted] has been added to [Metering Mode] in the [Rec]/[Motion Picture] menu
- [Exposure Offset Adjust.] has been added to the [Custom] menu
- [0.5SEC] has been added to [Duration Time (photo)] in [Auto Review] in the [Custom] menu
- The AE Lock is now available in the Manual Exposure Mode
- [MODE1] has been added to [Live View Boost] in the [Custom] menu
- Functions that can be assigned to the function buttons have been added
- Firmware Ver. 2.0

303
10. Using the Wi-Fi/Bluetooth function
The smartphone sends its location information to the camera via Bluetooth, and the
camera performs recording while writing the acquired location information.
Preparations:
Enable the GPS function on the smartphone.
1 Make a Bluetooth connection to the smartphone. (P287)
2 Select the camera’s menu.
• The camera will enter a mode where location information can be recorded and [ ] will
be displayed on the recording screen.
3 Take pictures on the camera.
• Location information will be written to the recorded pictures.
Recording location information to the camera’s images
Wireless connectivity required:
A The smartphone acquires
location information.
B The smartphone sends the
location information.
C The camera performs recording
while writing the location
information.
> [Setup] > [Bluetooth] > [Location Logging] > [ON]
When [ ] appears translucent
Location information is not acquired, so data cannot be written. Positioning with the GPS on the
smartphone may not be possible if the smartphone is in a location such as a building or a bag.
Move the smartphone to a location where positioning performance can be optimised, such as
one that offers a wide view of the sky, to try positioning. In addition, refer to the operating
instructions of your smartphone.
• Images with location information are indicated with [ ].
• Be sure to pay special attention to the privacy, the likeness rights, etc. of the subject
when you use this function. Use at your own risk.
• The smartphone drains its battery faster while acquiring location information.
Not available in these cases:
• Location information is not written to motion pictures recorded in [AVCHD] format.
Bluetooth
GPS
Bluetooth
MENU