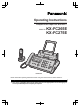
Operating Instructions Compact Plain Paper Fax with DECT Model No. KX-FC265E KX-FC275E KX-FC275 Please read these operating instructions before using the unit and save for future reference. Charge the battery for about 7 hours before initial use. R This unit is compatible with Caller ID. Subscription to the appropriate service through your service provider/telephone company is required.
Thank you for purchasing a Panasonic fax machine. Things you should keep a record of Attach your sales receipt here. For your future reference Date of purchase Serial number (found on the rear of the unit) Retailer’s/Dealer’s name and address Retailer’s/Dealer’s telephone number Note: R The suffix in the model number will be omitted in these instructions. Caution: R Note that the images of copied or received documents will remain on the used ink film. Use discretion when disposing of the used ink film.
ENERGY STAR: R As an ENERGY STAR® Partner, Panasonic has determined that this product meets the ENERGY STAR guidelines for energy efficiency. ENERGY STAR is a U.S. registered mark.
Important Information For your safety To prevent severe injury and loss of life/property, read this section carefully before using the unit to ensure proper and safe operation of your unit. WARNING Power and ground connection R Unplug this unit from power outlets if it emits smoke, an abnormal smell or makes unusual noise. These conditions can cause fire or electric shock. Confirm that smoke has stopped and contact an authorised service centre. R Use only the power source marked on the unit.
Important Information CAUTION Installation and relocation R After moving the unit from cold areas to warmer areas, wait approximately 30 minutes before connecting the unit to allow the unit to adjust to the ambient temperature. If the unit is connected too soon after a sudden climate change, condensation may form inside the unit, causing malfunction. R Never turn the unit upside down or sideways when moving it. R Never install telephone wiring during a lightning storm.
Important Information R Coverage and voice quality depends on the local environmental conditions. R If the reception for a base unit location is not satisfactory, move the base unit to another location for better reception. Environment R Keep the unit away from electrical noise generating devices, such as fluorescent lamps and motors. R The unit should be kept free from dust, high temperature and vibration. R The unit should not be exposed to direct sunlight. R Do not place heavy objects on top of the unit.
Important Information Important Information The connection to the telecommunication systems must not be hard wired and must be unplugged before the earth is disconnected. Method of connection This apparatus is connected to the exchange line or PABX/PMBX extension by the new standard British Telecom plug and socket. Arrangements for provision of this type of termination can be made through the nearest British Telecom Sales Office.
Important Information For your safety This appliance is supplied with a moulded three pin mains plug for your safety and convenience. Should the fuse need to be replaced please ensure that the replacement fuse is of the same rating and that it is approved by ASTA or BSI to BS1362. Check for ASTA mark mark or the BSI on the body of the fuse. If the plug contains a removable fuse cover you must ensure that it is refitted when the fuse is replaced.
Table of Contents 1. Introduction and Installation Accessories 1.1 1.2 Supplied accessories ..................................11 Accessory information .................................11 Finding the Controls 1.3 1.4 1.5 1.6 Button descriptions of the base unit ............12 Button descriptions of the cordless handset .......................................................13 Display descriptions of the cordless handset .......................................................13 Overview ..................
Table of Contents 11. Maintenance Jams 11.1 Recording paper jams .................................64 11.2 Document jams ...........................................65 Cleaning 11.3 Document feeder/recording paper feeder/ scanner glass cleaning ................................65 11.4 Thermal head cleaning ................................66 12. General Information Printed Reports 12.1 Reference lists and reports (Base unit only) ............................................................
1. Introduction and Installation K Quick installation guide (PNQW1872Y)*2 1.1 Supplied accessories 1. . Introduction and Installation A Telephone line cord (PQJA87S)*2*3 B Handset*1 (PNLXN1005Z)*2 C Handset cord*1 D Paper tray (PFJA04C003Z)*2 A Paper support (PFKS1148Z2 or PFKS1148Z3)*2 B Paper tray (PFKS1145Z3 or PFKS1145Z4)*2 A B *1 KX-FC275 only *2 Part numbers are subject to change without notice. *3 For UK.
1. Introduction and Installation 2 rechargeable nickel metal hydride (Ni-MH) batteries, AAA (R03) size Additional digital cordless handset Model No. (Part No.): KX-TGA641E DECT repeater Model No. (Part No.): KX-A272 *1 To ensure the unit operates properly, we recommend using the Panasonic replacement film. The ink film is not reusable. Do not rewind and use the ink film again. *2 Replacement batteries may have a different capacity from that of the supplied batteries.
1. Introduction and Installation 1.4 Button descriptions of the cordless handset Display item Meaning Cordless handset is on an outside call. Missed call*1 (page 27) A B C When displayed next to the battery icon: Auto answer setting is ON. (page 34) R When feature #10 is set to “GREETING ONLY”, will be displayed. D E F When displayed with a number: New messages have been recorded. (page 39) Answering machine answers calls with a greeting message and caller messages are not recorded.
1. Introduction and Installation Soft key icon Action 1.6 Overview Stop recording or playback. Insert a dialling pause. 1.6.1 Base unit Erase the selected item. Allow you to make an intercom call. D Switch the screen. (page 27) E F C B Erase a number/character. Put the call on mute. G A Symbols used in these operating instructions Symbol Meaning “” Select the words in quotations shown on the display (e.g.
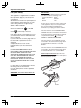
1. Introduction and Installation Note: R Shipping tape positions are subject to change without notice. 2 Release the back cover by pushing the green button (A). 1.6.2 Cordless handset A A C 3 Open the back cover. B D E A Charge indicator Ringer indicator B Speaker C Receiver D Microphone E Charge contacts 1.7 Ink film 4 Insert the blue gear of the ink film roll into the front left slot of the unit (B) and the white gear of the ink film roll into the rear left slot of the unit (C).
1. Introduction and Installation 5 Turn the blue gear (D) in the direction of the arrow Correct until the ink film is tight (E) and at least one layer of ink film is wrapped around the blue core (F). 1 turn Tight F Incorrect D No ink film is wrapped around the blue core. Slack/Crease Reverse 6 Close the back cover securely by pushing down on the dotted area at both ends (G). G E 7 Close the front cover securely.
1. Introduction and Installation – 1.8 Paper tray Pull up the metal recording paper guide (A), then install the paper tray (B). B R R R A R Make sure the arrows on the paper tray and the unit match. R R R R 1.
1. Introduction and Installation 2. Insert the paper gently, print-side down (A). R Do not force the paper into the paper tray. 1.10 Handset cord (KX-FC275 only) Connect the handset cord (A). A A R If the paper is not inserted correctly, remove all of the installed paper, and re-install it gently. Otherwise the paper may jam. Correct Slant Note: R Remove all of the installed paper before adding paper. 18 1.11 Battery installation / replacement Important: R USE ONLY Ni-MH batteries AAA (R03) size.
1. Introduction and Installation 1 Press the notch on the cordless handset cover firmly, and slide the cover. R When replacing batteries, remove the old batteries positive ( ) terminal first. 2 Insert the batteries negative ( ) terminal first. Close the cordless handset cover. R When the language selection is displayed, see page 49.
2. Preparation 2.1 Connections 2. . Preparation Important: R This unit is not designed for making emergency telephone calls when the power fails. We recommend connecting a corded-type telephone (without AC adaptor) to the same telephone line so in the case of power failure you will still be able to make emergency calls. R If you use the unit with a computer and your internet provider instructs you to install a filter (C), please connect it as follows. 2.1.
2. Preparation R Press the AC adaptor plug firmly. cloth once a month. Clean more often if the unit is exposed to grease, dust, or high humidity. Battery level Icon Battery level High Medium Low Needs charging. 2.2 Battery charge Place the cordless handset on the base unit or charger for about 7 hours before initial use. Confirm “Charging” is displayed. When the batteries are fully charged, the charge indicator (A) goes OFF.
2. Preparation 5. Press MDN or MCN to select the desired volume. A AM N Note: R When receiving a call, you can adjust the ringer volume by pressing MDN or MCN. R When the ringer volume is turned OFF, is displayed and the cordless handset does not ring for outside calls.
2. Preparation With the base unit 1 MMENUN A MBNM0NM2N A MSETN 2 Enter your logo, up to 30 characters (see page 53 for character entry). R To enter a hyphen, press MRECALLN. R To enter a space, press MMUTEN. 3 MSETN 4 Press MMENUN to exit. To correct a mistake Press MFN or MEN to move the cursor to the incorrect character, and make the correction. R To erase all of the characters, press and hold MSTOPN. 2.8 Your fax number You can program your fax number so that it appears on the top of each page sent.
3. Telephone 3.1 Making phone calls 3. . Telephone 3.1.1 With the cordless handset 1 Lift the cordless handset and dial the telephone number. R To correct a digit, press . 2 M N R To make hands-free telephone calls, press M N. 3 To hang up, press M N or place the cordless handset on the base unit or charger. Note: R While talking using M N, you can switch to a hands-free telephone conversation by pressing M N. To switch back, press M N.
3. Telephone Auto talk feature (Cordless handset) To search for a name by initial You can answer calls simply by lifting the cordless handset off the base unit or charger. You do not need to press M N. To turn this feature ON, see page 47. 1. 3.2.2 With the base unit KX-FC275: 1 Lift the handset or press MSP-PHONEN and talk into MMICN. 2 To hang up, replace the handset or press MSP-PHONEN. KX-FC265: 1 Press MSP-PHONEN and talk into MMICN. 2 To hang up, press MSP-PHONEN.
3. Telephone 3 Press to dial the number. Note: R When storing a calling card access number and your PIN in the phonebook as one phonebook item, press to add pauses after the number and PIN as necessary (page 24). 3.5 Base unit phonebook You can store 100 items to the base unit phonebook. R The cordless handset has its own individual phonebook (page 25). R You can copy phonebook items between the base unit and the cordless handset (page 52). 3.5.
3. Telephone “PRIVATE CALLER”/“Private Caller”: The caller requests not to send caller information. To erase a one touch dial assignment 1. Press and hold the desired one touch dial key (M1N to M9N). A MERASEN R To cancel erasing, press MSTOPN. 2. MSETN Note: R The corresponding base unit phonebook item will not be erased. 3.7 Caller ID service This unit is compatible with the Caller ID service offered by your local telephone company.
3. Telephone R If the other party’s name is displayed on the screen, you can switch the screen between the name and its telephone number by pressing repeatedly. R To erase the item, press . A “Yes” A 4 Press M N or M N to start dialling. 6 M N or M N 3.9.2 With the base unit 1 MCALLER IDN 2 Press MJN or MKN repeatedly to display the desired item. 3 Press MCALLER IDN repeatedly to display the 3.8.2 With the base unit telephone number.
3. Telephone 3.11 Storing caller information into the phonebook 3.11.1 Into the cordless handset 1 2 “Caller List” A 3 Press MDN or MCN repeatedly to display the desired item. A 4 “Add Phonebook” A 5 If a name is required, enter the name, up to 16 characters (see page 53 for character entry). A 6 Enter the telephone number, up to 24 digits. A A AM N 3.11.2 Into the base unit 1 MCALLER IDN 2 Press MJN or MKN repeatedly to display the desired item.
4. Fax 4.1 Sending a fax manually 4. . Fax 1 Adjust the width of the document guides to fit the actual size of the document. 2 Insert the document (up to 10 pages) FACE DOWN until a single beep is heard and the unit grasps the document. 3 If necessary, press MJN or MKN repeatedly to select the desired resolution. 4 KX-FC275: Lift the handset or press MSP-PHONEN. KX-FC265: MSP-PHONEN 5 Dial the fax number. 6 When a fax tone is heard: Press MFAX STARTN.
4. Fax Note: R Remove clips, staples or other fasteners. R Do not send the following types of documents: (Make a copy of the document using another copier and send the copy.
4. Fax Note: R If you select “FINE”, “SUPER FINE” or “PHOTO” resolution, the number of pages that the unit can send will decrease. R If the document exceeds the memory capacity, transmission will be cancelled. R If a party is busy or does not answer, it will be skipped and redialled later up to 5 times. To send the same document to a one-time group of items 1. Insert the document. A MPHONEBOOKN 2. Press MJN or MKN repeatedly to display “”. A MSETN 3.
4. Fax R The MAUTO ANSWERN indicator on the base unit (next to the battery icon) turns OFF and disappears from the cordless handset display. Note: R Make sure feature #73 is set to “TEL/FAX” beforehand (page 46). How phone calls and faxes are received If the call is a phone call, the fax machine will ring. If a fax calling tone is detected, the fax machine will receive the fax automatically without ringing. 4.
4. Fax Note: R Make sure feature #73 is set to “TEL/FAX” beforehand (page 46). How phone calls and faxes are received 1. “INCOMING CALL” will be displayed but the unit will not ring. 2. The unit will wait for the duration of 2 rings before answering the call. R The number of rings is determined by the “TEL/ FAX delayed ring count” (feature #78 on page 46). R During this time, an extension telephone will ring. 3. The unit will answer the call and try to detect a fax calling tone.
4. Fax Receiving a voice message and fax document in one call The caller can leave a voice message and send a fax document during the same call. Inform the caller of the following procedure beforehand. 1. The caller calls your unit. R The answering machine will answer the call. 2. The caller can leave a message after the greeting message. 3. The caller presses MGNM9N. R The unit will activate the fax function. 4. The caller presses the start button to send a fax.
4. Fax 3. Press MJN or MKN to display the item. 4. Press MMENUN to exit the program. To print the junk fax prohibitor list 1. Press MMENUN repeatedly to display “JUNK FAX PROH.”. 2. Press MEN repeatedly to display “JUNK LIST PRINT”. A MSETN 3. Press MMENUN to exit. To erase an item from the junk fax prohibitor list 1. Press MMENUN repeatedly to display “JUNK FAX PROH.”. 2. Press MEN repeatedly to display “JUNK LIST DISP.”. A MSETN 3. Press MJN or MKN repeatedly to display the desired item.
5. Copy 5.1 Making a copy 5. . Copy 1 Adjust the width of the document guides to fit the actual size of the document. 2 Insert the document (up to 10 pages) FACE DOWN Example: 150% enlarged copy Original document Enlarged copy A B A B C D C D until a single beep is heard and the unit grasps the document. 3 If necessary, press MJN or MKN repeatedly to select the desired resolution. R If you select “STANDARD”, copying will be performed using “FINE” mode.
6. Answering Machine 6. . Answering Machine 6.1 Recording your greeting message 6.2 Listening to recorded messages The unit has 2 pre-recorded greeting messages for TAM/ FAX mode. If you record your own greeting message, it will be played instead of the pre-recorded greeting message when a call is received. The maximum recording time of your greeting message is either 16 seconds (default) or 60 seconds. We recommend you record a message of less than 12 seconds to make it easier to receive faxes.
6. Answering Machine 2. Within 5 seconds, press MERASEN. Using a pre-recorded greeting message 6.3 Leaving a message for others or yourself You can record a voice memo to leave a private message for yourself or someone else. Recorded messages are treated as new messages. 1 MMEMON 6.4.2 Listening to recorded messages R A long beep will sound. 2 Speak clearly about 20 cm away from MMICN. 3 To stop recording, press MSTOPN. Note: R If you record for over 3 minutes, the unit will stop recording. 6.
6. Answering Machine 6. 2. “Answer System” A 3. “Erase All Msg.” A 4. “Yes” A AM N 6.4.4 Direct command operation You can operate the answering machine by pressing dial keys, rather than navigating through the menus. To use the following commands, press . A “Answer System” A AM N Note: R You can also program this feature with the base unit (feature #11 on page 42).
6. Answering Machine Important: R Program the remote operation ID beforehand (page 40, feature #11 on page 42). R Set the unit to TAM/FAX mode before going out (page 34). R Use a touch tone telephone for remote operations. 6.5.1 Summary of remote operation 1 Call your unit. 2 Enter the remote operation ID during or after the TAM/FAX greeting message. 3 When there are new recorded messages 1. A long beep will sound. 2. Short beep(s) will sound up to 8 times. R This indicates the number of new messages. 3.
7. Programmable Features 7.1 Base unit programming 1. MMENUN 2. Press MBN and the 2-digit code (page 42 to page 46). 3. Press the desired command to display the desired setting. R This step may be slightly different depending on the feature. 4. MSETN 5. To exit programming, press MMENUN. 7. . Programmable Features MMENUN MSETN 7.1.1 Basic features Feature Selection Setting the date and time*1 MBNM0NM1N Enter the date and time using the dial keypad. See page 22 for details.
7. Programmable Features Feature Selection Setting the ringtone for outside calls*2 MBNM1NM7N M1N “RINGTONE M2N “RINGTONE M3N “RINGTONE M4N “RINGTONE M5N “RINGTONE M6N “RINGTONE 1” (default) 2” 3” 4” 5” 6” *1 When this setting is changed using the base unit, the setting for the cordless handset will also be changed, and vice versa. *2 This setting can be changed individually for the base unit and the cordless handset. – To set the cordless handset ringtone for outside calls, see page 47. 7.1.
7. Programmable Features Feature Selection Setting the Caller ID list to print automatically MBNM2NM6N M0N “OFF” (default): The Caller ID list will not be printed automatically, but the base unit will keep a record of the information for the last 50 callers. M1N “ON”: The Caller ID list will be printed automatically each time the base unit logs 50 callers (page 27).
7. Programmable Features Feature Selection Changing the fax activation code MBNM4NM1N If you wish to use an extension telephone (page 33) to receive faxes, activate this feature and program the activation code. M0N “OFF” M1N “ON” (default) 1. MMENUN A MBNM4NM1N 2. Press M1N to select “ON”. A MSETN 3. Enter your code from 2 to 4 digits, using 0-9, MGN and MBN. R The default code is “H#9”. 4.
7. Programmable Features Feature Selection Setting the Error Correction Mode (ECM) MBNM6NM8N This feature is available when the transmitting/receiving fax machines are ECM compatible. M0N “OFF”: Deactivates this feature. M1N “ON” (default): If there is an error during fax transmission/reception, the unit will support the communication. Note: R You cannot change the setting when received documents are in memory.
7. Programmable Features 7.2 Cordless handset programming MDNMCN MihN 1. 2. Press MCN or MDN to select the desired top-menu. A 3. Press MCN or MDN to select the desired item in sub-menu 1. A R In some cases, you may need to select from sub-menu 2. A 4. Press MCN or MDN to select the desired setting. A R This step may vary depending on the feature being programmed. R To exit the operation, press M N. Note: R For other top-menus, please refer to each chapter.
7. Programmable Features *1 When this setting is changed using the cordless handset, the setting for the base unit will also be changed, and vice versa. *2 This setting can be changed individually for the base unit and the cordless handset. – To set the base unit ringer volume, see page 22. – To set the base unit ringtone for outside calls, see feature #17 on page 43. – To set the base unit LCD display contrast, see feature #39 on page 44.
7. Programmable Features MCN 2 times, press 2 times, select the desired language, then press . Press M N. 7.2.2 Cordless handset setup Alarm You can set one of 2 different alarm options (once or daily) at a time for each cordless handset. An alarm sounds at the set time for 3 minutes. Important: R Set the date and time beforehand (page 22). 1. 2. “Handset Setup” A 3. “Time Settings” A 4. “Alarm” A 5. Select the desired alarm option. A “Off” Turns alarm OFF. Press M N to exit.
8. Multi-unit Operation 8.1 Operating additional units 8. . Multi-unit Operation 8.1.1 Additional cordless handsets Up to 6 cordless handsets can be registered to a single base unit. Additional cordless handsets will give you the freedom to, for example, have an intercom call with another cordless handset while a third cordless handset is on an outside call. Important: R The additional cordless handset model recommended for use with this unit is noted on page 11.
8. Multi-unit Operation Note: R If you receive an outside call while talking on the intercom, you hear interrupt tones. To answer the call, hang up the intercom, then answer the outside call. – see step 3 on “3.1.1 With the cordless handset”, page 24. – see step 3 on “3.1.2 With the base unit”, page 24. MRECALLN / M N cannot be used to answer outside calls. R When paging the cordless handset, the paged cordless handset beeps for 1 minute.
8. Multi-unit Operation Note: R If the transferred call is not answered within 60 seconds, the call will ring at your cordless handset again. Press M N or M N to return to the outside call. 8.4.2 To a cordless handset (using the base unit) 1 Base unit: During a telephone call, press MINTERCOMN. R The call will be put on hold. 2 Base unit: To page one cordless handset, press the desired cordless handset number. To page all cordless handsets, press M0N.
9. Useful Information 9.1 Character entry 9. . Useful Information The dial keys are used to enter characters and numbers. Each dial key has multiple characters assigned to it. The available character entry modes are Alphabet (ABC), Numeric (0-9), Greek ( ), Extended 1 ( ), Extended 2 ( ) and Cyrillic ( ). When in these entry modes except Numeric, you can select which character is entered by pressing a dial key repeatedly.
9.
10. Help 10.1 Report messages 10. . Help To indicate the unit’s fax transmission/reception status, one of the following messages will be printed on the sending and journal reports (page 30). Message Code COMMUNICATION ERROR 40-42 46-72 FF Cause & Solution R A transmission or reception error occurred. Try again or check with the other party. 43 44 R A line problem occurred. Connect the telephone line cord to a different jack and try again. R An overseas transmission error occurred.
10. Help Display Cause & Solution “CHECK DOCUMENT” R The document was not fed into the unit properly. Re-insert the document. If misfeeding occurs frequently, clean the document feeder rollers (page 65) and try again. R The document is longer than 600 mm. Press MSTOPN to remove the document. Divide the document into two or more sheets, and try again. “CHECK FILM” R The ink film is empty. Replace the ink film with a new one (page 15). R The ink film is not installed. Install it (page 15).
10. Help Display Cause & Solution “POLLING ERROR” R The other party’s fax machine does not support polling. Check with the other party. “RECORDING ERROR” R The greeting message you recorded was under 1 second long. Record a longer message. “REDIAL TIME OUT” R The other party’s fax machine is busy or has run out of recording paper. Try again. “REMOVE DOCUMENT” R The document is jammed. Remove the jammed document (page 65). R Press MSTOPN to eject the jammed paper.
10. Help 10.3.1 Initial settings Problem Cause & Solution I cannot hear a dial tone. R If you used a splitter/coupler to connect the unit, remove the splitter/coupler and connect the unit to the wall jack directly. If the unit operates properly, check the splitter/coupler. R Disconnect the unit from the telephone line and connect a known working telephone. If the working telephone operates properly, contact our service personnel to have the unit repaired.
10. Help Problem Cause & Solution I cannot page a cordless handset or base unit. R The cordless handset is too far from the base unit. Caller information is not displayed. R You must subscribe to use a Caller ID service. Contact your service provider/telephone company for details. R If you use a DSL/ADSL service, we recommend connecting a DSL/ADSL filter between the base unit and the telephone line jack. Contact your DSL/ ADSL provider for details.
10. Help Problem Cause & Solution While programming, the cordless handset starts to ring. R A call is being received. Answer the call and start again after hanging up. is flashing. R The cordless handset is not registered to the base unit. Register it (page 50). R The cordless handset is too far from the base unit. Move closer. R The mains lead is not connected. Check the connections. R You are using the cordless handset or base unit in an area with high electrical interference.
10. Help 10.3.4 Fax – sending Problem Cause & Solution I cannot send documents. R The other party’s fax machine is busy or has run out of recording paper. Try again. R The other party’s machine is not a fax machine. Check with the other party. R The other party’s fax machine failed to answer the fax automatically. Send the fax manually (page 30). R The memory is full of received documents and the quick scan (feature #34 on page 44) is ON. Turn this feature OFF, and send the fax again.
10. Help Problem Cause & Solution The printing quality is poor. Please do not reuse the ink film! Please use genuine Panasonic replacement film. Refer to page 11 for further details. R The thermal head is dirty. Clean it (page 66). R If documents can be copied properly, the unit is working normally. The other party may have sent a faint document or there may be something wrong with the other party’s machine. Ask them to send a clearer copy of the document or to check their fax machine.
10. Help Problem Cause & Solution The printing quality is poor. Original ABC Copy Documents or recording paper frequently misfeed. Please do not reuse the ink film! Please use genuine Panasonic replacement film. Refer to page 11 for further details. R The thermal head is dirty. Clean it (page 66). R Some paper has instructions recommending which side to print on. Try turning the recording paper over.
11. Maintenance 11.1 Recording paper jams 11. . Maintenance 3 Turn the blue gear (E) in the direction of the arrow until the ink film is tight (F) and at least one layer of ink film is wrapped around the blue core (G). 11.1.1 When the recording paper has jammed in the unit The display will show the following: – “PAPER JAMMED” Important: R Remove the recording paper, then remove the paper tray beforehand, otherwise the paper may misfeed or jam.
11. Maintenance 4 Close the back cover securely by pushing down on the dotted area at both ends (H), then close the front cover securely (I). H 11.2 Document jams 1 Open the front cover. Remove the jammed document carefully (A). A I 5 Install the paper tray (page 17), then insert the recording paper gently (page 17). 11.1.2 When the recording paper was not fed into the unit properly The display will show the following: – “CHECK PAPER” Remove the recording paper and straighten.
11. Maintenance 1 Disconnect the mains lead and the telephone line cord. 2 Open the front cover (A), push the green button 4 Clean the recording paper feeder roller (G) with a cloth moistened with isopropyl rubbing alcohol, and let all parts dry thoroughly. (B), then open the back cover (C). G C B A 3 Clean the document feeder rollers (D) and rubber flap (E) with a cloth moistened with isopropyl rubbing alcohol, and let all parts dry thoroughly. Clean the scanner glass (F) with a soft, dry cloth.
11. Maintenance Important: R Remove the recording paper, then remove the paper tray beforehand, otherwise the paper may misfeed or jam. 4 Clean the thermal head (E) with a cloth moistened with isopropyl rubbing alcohol, and let it dry thoroughly. Caution: R To prevent a malfunction due to static electricity, do not use a dry cloth and do not touch the thermal head directly. E 1 Disconnect the mains lead and the telephone line cord.
12. General Information 12. General Information 12.1 Reference lists and reports (Base unit only) You can print out the following lists and reports for your reference: – “SETUP LIST” – “PHONEBOOK LIST” – “JOURNAL REPORT” – “BROADCAST LIST” – “PRINTER TEST” R If the test print has a smudges, blurred points or lines, clean the thermal head (page 66). – “CALLER ID LIST” You can set the following lists and reports to print automatically: – “AUTO JOURNAL” R See feature #22 on page 43 for details. – “AUTO CALL.
12. General Information Copy: Approx. 40 W (When copying a 20 % black document) Maximum: Approx. 135 W (When copying a 100 % black document) Recording paper specifications n Power supply: 220 V – 240 V AC, 50 Hz Recording paper weight: n Fax memory capacity*3: Approx. 25 pages of memory transmission Approx. 28 pages of memory reception (Based on the ITU-T No. 1 Test Chart in standard resolution, without using the Error Correction Mode.) n Voice memory capacity*4: Approx.
12. General Information 12.3 Condition of guarantee 1. 2. 3. 4. 5. 6. 7. 8. 9. 10. 11. 12. 13. 14. This machine is supplied with a one year swap out warranty. Please retain your Proof of Purchase and Packaging in the unlikely event that your machine should require attention.
13. Index 13.
13.
13.
Notes 74
Notes 75
0682 Sales Department: Panasonic House, Willoughby Road, Bracknell, Berkshire, RG12 8FP Manufacturer: 1-62, 4-chome, Minoshima, Hakata-ku, Fukuoka 812-8531, Japan Global web site: http://www.panasonic.net/ Copyright: R This material is copyrighted by Panasonic System Networks Co., Ltd., and may be reproduced for internal use only. All other reproduction, in whole or in part, is prohibited without the written consent of Panasonic System Networks Co., Ltd. © Panasonic System Networks Co., Ltd.