75VGN.book 1 ページ 2004年7月21日 水曜日 午前11時54分 Operating Instructions DVD Video Recorder Model No. DMR-E75V Before connecting, operating or adjusting this product, please read these instructions completely. Please keep this manual for future reference.
75VGN.book 2 ページ 2004年7月21日 水曜日 午前11時54分 Before Use Contents Before Use Timer Recording Contents ...........................................................................................2 Warning and Important Information ..................................................4 Control reference guide ....................................................................6 ≥Remote control ...........................................................................6 ≥Batteries ...............................
75VGN.book 3 ページ 2004年7月21日 水曜日 午前11時54分 Before Use (^^^^^^^^^^^^^^^^^^^^^^^^^^^^^^^^^[[VHS]]^^^^^^^^^^^^^^^^^^^^^^^^^^^^^^^^^ ) ( ^^^^^^^^^^^^^^^^^^^^^^^^^^^^^[[DVD/VHS]]^^^^^^^^^^^^^^^^^^^^^^^^^^^^^^) Before Use Advanced Operations Inserting video cassette ..................................................................50 Video cassette information .............................................................50 ≥Video cassettes ...................................................................
75VGN.book 4 ページ 2004年7月21日 水曜日 午前11時54分 Before Use NORSK Warning and Important Information CAUTION! THIS PRODUCT UTILIZES A LASER. USE OF CONTROLS OR ADJUSTMENTS OR PERFORMANCE OF PROCEDURES OTHER THAN THOSE SPECIFIED HEREIN MAY RESULT IN HAZARDOUS RADIATION EXPOSURE. DO NOT OPEN COVERS AND DO NOT REPAIR YOURSELF. REFER SERVICING TO QUALIFIED PERSONNEL.
75VGN.book 5 ページ 2004年7月21日 水曜日 午前11時54分 Before Use ª Important Your attention is drawn to the fact that the recording of pre-recorded tapes or discs or other published or broadcast material may infringe copyright laws. ª For your safety ª Copyright G-CODE is a registered trademark of Gemstar Development Corporation. The G-CODE system is manufactured under license from Gemstar Development Corporation. Do not remove outer cover.
75VGN.
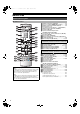
5VGN.book 7 ページ 2004年7月21日 水曜日 午前11時54分 Before Use ∫ Batteries ≥Insert so the poles (i and j) match those in the remote control. ≥Do not use rechargeable type batteries. R6, AA, UM-3 Do not; ≥mix old and new batteries. ≥use different types at the same time. ≥heat or expose to flame. ≥take apart or short circuit. ≥attempt to recharge alkaline or manganese batteries. ≥use batteries if the covering has been peeled off.
75VGN.book 8 ページ 2004年7月21日 水曜日 午前11時54分 Before Use ∫ The unit’s display Common to DVD/VHS [A] Main display ≥Current time ≥VHS recording and play counter ≥Miscellaneous messages, etc. [B] Dubbing direction indicator [C] Main display ≥Current time ≥Disc recording and play counter ≥Miscellaneous messages, etc. VHS (1) Tape speed indicator (l 53) ≥SP: When recording or playing in the Normal mode. ≥LP: When playing in the Long play mode. ≥EP: When recording or playing in the Extra long play mode.
75VGN.book 9 ページ 2004年7月21日 水曜日 午前11時54分 Before Use Connections Preparation Refer to the TV’s operating instructions. Turn the TV off and disconnect its AC mains leads. Situation Connections Setting Up (l 10) TV with [Q Link] and a 21-pin Scart socket. Connections 1 Preset Download Use a 21-pin Scart cable. Connections 1 Auto-Setup Use an Audio/Video cable. Connections 2 A Auto-Setup Use a S-Video cable and Audio/Video cable.
75VGN.book 10 ページ 2004年7月21日 水曜日 午前11時54分 Before Use Setting Up Í TV, Í TV, AV ∫ Auto-Setup DVD/VHS TV, VOLUME VOLUME CH DIRECT TV REC AV TV, CH, W, X DVD DVD/VHS VHS DVD TRACKING/V-LOCK Auto Setup automatically tunes all available stations. [1] [2] [3] [4] Switch on the TV. Select the AV input on your TV. Press [Í, DVD/VHS] to switch the unit on. Select the country with [3, 4, 2, 1]. ≥Select “Others” in Australia.
75VGN.book 11 ページ 2004年7月21日 水曜日 午前11時54分 Before Use TV operation You can control TVs by entering the remote control code. Preparation ≥Turn on the TV. [1] Refer to the chart below for the code for your TV. [2] Press and hold [TV, Í] and enter the 2-digit code with the numeric buttons. ≥e.g.: “01”: [0] )[1]. ≥After entering the code, test the remote control by turning on the TV and changing channels.
75VGN.book 12 ページ 2004年7月21日 水曜日 午前11時54分 Before Use Connecting amplifier or system component ∫ Connecting a digital amplifier or system component ∫ Connecting an analog amplifier or system component Connect an amplifier with a Dolby Digital, DTS and MPEG decoders. (l 16) ≥Use an optical digital audio cable. ≥Change the settings in “Digital Audio Output” (l 44). ≥You cannot use DTS Digital Surround decoders not suited to DVD.
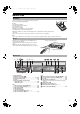
75VGN.book 13 ページ 2004年7月21日 水曜日 午前11時54分 Before Use Connecting an external device When connecting to the AV3 input terminals on the front of the unit EJECT VHS VIDEO IN Before connecting any cables, first make sure that the power for both units is off. Then after connecting any cable, turn on the both units. DVD L/MONO – AUDIO IN – R AV3 Note ≥If the audio output of the other equipment is monaural, connect to L/ MONO. (Both left and right channels are recorded when connected through L/MONO.
75VGN.book 14 ページ 2004年7月21日 水曜日 午前11時54分 [[DVD]] Before Use DVD Connecting a Television with Component video input terminals ªRegarding Progressive Television Picture You can enjoy progressive video by connecting this unit’s COMPONENT VIDEO OUT terminals to an LCD or plasma TV compatible with progressive video.
75VGN.book 15 ページ 2004年7月21日 水曜日 午前11時54分 Before Use DVD Discs ∫ Discs you can use ≥On DVD-Audio, DVD-Video and Video CD, the producer of the material can control how these discs are played. This means that you may not be able to control play of a disc with some operations described in these operating instructions. Read the disc’s information for details. The features you can use with the different types of discs are as follows.
75VGN.book 16 ページ 2004年7月21日 水曜日 午前11時54分 Before Use DVD Discs that cannot be played Discs and accessories ≥2.6 and 5.2 GB DVD-RAM, 12 cm ≥3.95 and 4.7 GB DVD-R for Authoring ≥Unfinalized DVD-R recorded on other equipment ≥DVD-Video with a region number other than the number for this unit or “ALL” ≥DVD-ROM ≥DVD-RW ≥iR ≥iRW ≥CD-ROM ≥CDV ≥CD-G ≥Photo CD ≥CVD ≥SVCD ≥SACD ≥MV-Disc ≥PD ≥Divx Video Disc, etc.
75VGN.book 17 ページ 2004年7月21日 水曜日 午前11時54分 Before Use Disc handling ∫ How to hold a disc DVD Inserting discs Do not touch the recorded surface. [1] Press [<, OPEN/CLOSE] on the main unit to open the tray. ∫ If there is dirt or condensation on the disc Note ≥Load double-sided discs so the label for the side you want to record/play is facing up. ≥It is not possible to record continuously from one side of a double sided disc to the other. You will need to eject the disc and turn it over.
75VGN.book 18 ページ 2004年7月21日 水曜日 午前11時54分 Playback DVD Playing discs ∫ When a menu screen appears on the TV DVD/VHS [DVD-A] [DVD-V] [VCD] Í VOLUME CH DIRECT TV REC AV DVD/VHS VHS DVD DVD TRACKING/V-LOCK Numeric Buttons G-Code CANCEL/RESET :, 9 INPUT SELECT SLOW/ REW SEARCH FF SKIP/INDEX STOP CREATE CHAPTER PAUSE PLAY ∫ DIRECT NAVIGATOR 3, 4, 2, 1 2;, ;1 ENTER CREATE CHAPTER 6, 5 FUNCTIONS 1 ; [VCD] Press the numeric buttons to select an item. e.g.
75VGN.book 19 ページ 2004年7月21日 水曜日 午前11時54分 Playback DVD Fast forward and rewind—SEARCH [RAM] [DVD-R] [DVD-A] [DVD-V] [VCD] [CD] [MP3] DVD-RAM During play • • • • Press [6, SLOW/SEARCH] or [5, SLOW/SEARCH]. LR ≥Press and hold [:/6] or [5/9] on the DVD main unit. ≥There are 5 search speeds. Each press increases the search speed. ≥Press [1, PLAY] to restart playback. ≥Sound is output only in the first level of fast forward.
75VGN.book 20 ページ 2004年7月21日 水曜日 午前11時54分 Playback DVD Using menus to play MP3 discs DVD/VHS VOLUME CH DIRECT TV REC [MP3] This unit can play MP3 files recorded on CD-R/RW with a computer. Files are treated as tracks and folders are treated as groups. “TOTAL” means total number of all MP3 files (all tracks in all groups) recorded in the disc. AV DVD/VHS VHS DVD DVD TRACKING/V-LOCK Numeric Buttons [1] During stop or play Press [TOP MENU]. ≥The file list appears.
75VGN.book 21 ページ 2004年7月21日 水曜日 午前11時54分 Playback DVD ∫ Using the tree screen to find a group [1] While the file list is displayed Press [1] to display the tree screen. Tree MENU G T TOTAL 1 1 1/ 24 No.
75VGN.book 22 ページ 2004年7月21日 水曜日 午前11時54分 Recording DVD ∫ To exit the Title View Press [DIRECT NAVIGATOR]. DVD/VHS Í VOLUME CH DIRECT TV REC AV DVD/VHS VHS DVD DVD TRACKING/V-LOCK CH, W, X Numeric Buttons INPUT SELECT STOP CREATE CHAPTER While recording or timer recording SLOW/ REW SEARCH FF SKIP/INDEX PAUSE [1] Press [TIME SLIP].
75VGN.book 23 ページ 2004年7月21日 水曜日 午前11時54分 Recording DVD Recording TV programmes [RAM] [DVD-R] ≥You can record up to 99 titles on a disc. ≥DVD-RAM/DVD-R has limitations on recording (l 15). ≥Recording will take place on open space on the disc. Data will not be overwritten. ≥If there is no space left on the recording drive, you will need to erase unwanted programmes (l 31) or use a new disc. ≥When recording bilingual TV broadcast onto DVD-R, only one of either “M1” or “M2” audio can be recorded.
75VGN.
75VGN.book 25 ページ 2004年7月21日 水曜日 午前11時54分 Recording [1] DVD While stopped Press [FUNCTIONS]. (l 49) [2] Select “FLEXIBLE REC” with [3, 4, 2, 1] and press [ENTER]. [3] Press FLEXIBLE REC [3, 4, 2, 1] to Recording in FR mode set the Maximum rec. time 1 Hour 23 Min. recording time. Set rec. time 1 Hour 23 Min. ≥You can also set the recording time with the numeric buttons. ≥Maximum recording time is 8 hours. Start Cancel Select RETURN [4] Select “Start” with [3, 4, 2, 1] and press [ENTER].
75VGN.book 26 ページ 2004年7月21日 水曜日 午前11時54分 Timer Recording DVD [4] DVD/VHS If the programme is correct TIMER RECORDING Press [ENTER]. CH DIRECT TV REC ≥To continue programming, repeat steps 1–4. VOLUME AV DVD/VHS VHS DVD DVD [5] Press [ TRACKING/V-LOCK ≥“ Numeric Buttons G-Code CANCEL/RESET INPUT SELECT G-Code SLOW/ REW SEARCH FF SKIP/INDEX STOP CREATE CHAPTER PAUSE 1 FUNCTIONS DIRECT NAVIGATOR ENTER PROG/CHECK DISPLAY [1] Press [PROG/CHECK].
75VGN.book 27 ページ 2004年7月21日 水曜日 午前11時54分 Timer Recording [4] Press [ENTER] when you have finished making changes. ≥To continue programming: Select “New Timer Programme” and repeat steps 2, 3, and 4. [5] Press [ ≥“ , TIMER]. ” lights on the unit’s display. The timer recording standby mode is activated on DVD (“ ” lights on the DVD unit’s display). However, the unit may not be turned off automatically.
75VGN.book 28 ページ 2004年7月21日 水曜日 午前11時54分 Advanced Operations DVD DISC MANAGEMENT [1] While stopped Press [FUNCTIONS]. (l 49) DVD/VHS FUNCTIONS e.g.
75VGN.book 29 ページ 2004年7月21日 水曜日 午前11時54分 Advanced Operations DVD 1 Format Disc [RAM] Some DVD-RAM are unformatted. You must format these discs before using them in this unit. Formatting also allows you to erase the entire contents of a disc. [4] Select “Yes” with [2] and press [ENTER]. [5] Select “Start” with [2] and press [ENTER]. Format Disc Formatting the Disc will erase all contents. This will take approximately 1 minute. Start formatting the disc ? ≥Formatting starts.
75VGN.book 30 ページ 2004年7月21日 水曜日 午前11時54分 Advanced Operations DVD [1] After the entering screen appears Press [3, 4, 2, 1] to select the character you want to enter and press [ENTER]. DVD/VHS ≥You can enter the following characters.
75VGN.book 31 ページ 2004年7月21日 水曜日 午前11時54分 Advanced Operations DVD Using the Direct Navigator [RAM] [DVD-R] ∫ Selecting recorded programmes (titles) to play Preparation ≥Insert a disc that has been recorded on. ≥Press [DVD]. Preparation ≥Insert a disc that has been recorded on. ≥Press [DVD]. Title/Chapter Programmes are recorded as a single title consisting of one chapter. [1] Press [DIRECT NAVIGATOR].
75VGN.book 32 ページ 2004年7月21日 水曜日 午前11時54分 Advanced Operations DVD Preparation ≥Insert a disc that has been recorded on. ≥Press [DVD]. DVD/VHS [1] Press [DIRECT NAVIGATOR]. [2] Press [3, 4, 2, 1] to select a desired title. VOLUME CH DIRECT TV REC AV DVD/VHS VHS ≥“To show other pages”, l below ≥“Multiple editing”, l below DVD DVD CHAPTER TRACKING/V-LOCK STOP [3] Press [SUB MENU]. [4] Press [3, 4] to select a desired item and press [ENTER].
75VGN.book 33 ページ 2004年7月21日 水曜日 午前11時54分 Advanced Operations DVD 11 Partial Erase [RAM] ∫ To erase another part of the same title The specified parts of the title are erased irretrievably when you use this procedure. Check the title carefully before erasing. After storing the point in “Start” and “End”, select “Next” in step 7 and perform step 8, then repeat steps 6–8. [6] Press [ENTER] at the start point and end point of the section you want to erase.
75VGN.book 34 ページ 2004年7月21日 水曜日 午前11時54分 Advanced Operations DVD Preparation ≥Insert a disc that has been recorded on. ≥Press [DVD]. DVD/VHS [1] Press [DIRECT NAVIGATOR]. [2] Press [3, 4, 2, 1] to select a desired title. VOLUME CH DIRECT TV REC AV DVD/VHS VHS ≥“To show other pages”, l below ≥“Multiple editing”, l below DVD DVD CHAPTER TRACKING/V-LOCK :, 9 [3] Press [SUB MENU]. [4] Press [3, 4] to select a desired item and press [ENTER].
75VGN.book 35 ページ 2004年7月21日 水曜日 午前11時54分 Advanced Operations DVD Using play list [RAM] You can create a play list by gathering your favourite chapters (l 31) from your recordings. You can also edit the created play lists. Title Chapter Title Chapter Play list Chapter Chapter Chapter ≥The Maximum number of item on a disc: - Play lists: 99 - Chapters in play list: Approximately 1000 (Depends on disc contents.) Preparation ≥Release protection (disc l 28, cartridge l 15). ≥Press [DVD].
75VGN.book 36 ページ 2004年7月21日 水曜日 午前11時54分 Advanced Operations ∫ Playing play lists DVD/VHS Preparation ≥Create play lists first (l 35). ≥Press [DVD]. VOLUME CH DIRECT TV REC AV DVD/VHS VHS DVD DVD TRACKING/V-LOCK Numeric Buttons G-Code CANCEL/RESET :, 9 INPUT SELECT SLOW/ REW SEARCH FF SKIP/INDEX STOP CREATE CHAPTER PAUSE PLAY ∫ DIRECT NAVIGATOR 3, 4, 2, 1 ENTER DVD FUNCTIONS 1 ; FUNCTIONS TOP MENU [1] While stopped Press [FUNCTIONS].
75VGN.book 37 ページ 2004年7月21日 水曜日 午前11時54分 Advanced Operations DVD 1 Edit Edit Sub menu displayed. Create [5] Press [3, 4] to select a desired item and press [ENTER]. Copy Enter Name Change Thumbnail 11 Create 11 Change Thumbnail Refer to “Creating play lists”. (l 35) You can specify an image to be shown as a thumbnail picture in the Title View. ≥The default thumbnail is the picture approximately 1 second from the beginning. 11 Copy (Multiple editing is possible.
75VGN.book 38 ページ 2004年7月21日 水曜日 午前11時54分 Advanced Operations Preparation ≥Create play lists first (l 35). ≥Release protection (disc l 28, cartridge l 15). ≥Press [DVD]. DVD/VHS VOLUME CH DIRECT TV REC For your reference ≥You can fast-forward, rewind, pause, and slow-motion while playing scenes just as you can during normal play. AV DVD/VHS VHS DVD DVD TRACKING/V-LOCK Numeric Buttons [1] Press [FUNCTIONS]. [2] Select “PLAY LIST” with [3, 4, 2, 1] and press [ENTER].
75VGN.book 39 ページ 2004年7月21日 水曜日 午前11時54分 Advanced Operations 11 Add Chapter 11 Erase Chapter ≥(Multiple editing is possible. l 38) Refer to “Creating play lists”, step 4–7. (l 35) [8] Select “Erase” with [2] and press [ENTER]. 11 Move Chapter [8] Press [3, 4, 2, 1] to select the position to insert the chapter and press [ENTER]. DVD ≥Even if you erase the chapter, the original title is not erased.
75VGN.book 40 ページ 2004年7月21日 水曜日 午前11時54分 Advanced Operations DVD Using DISPLAY menus ∫ Common procedures DVD/VHS VOLUME CH DIRECT TV REC Preparation ≥Press [DVD]. [1] Press [DISPLAY].
75VGN.book 41 ページ 2004年7月21日 水曜日 午前11時54分 Advanced Operations DVD 1 Play menu [RAM] [DVD-R] [DVD-A] [DVD-V] [VCD] [CD] [MP3] Disc Play Picture Sound Repeat Play OFF Repeat play This function works only when the elapsed play time is displayed. [RAM] [DVD-R] [DVD-V] Title,.Chapter,.OFF ^--------------------------J [VCD] [CD] Track,.All,.OFF ^-------------------J While playing a play list [RAM] PL (play list),.
75VGN.book 42 ページ 2004年7月21日 水曜日 午前11時54分 Various Settings DVD Entering a password (Ratings) DVD/VHS VOLUME CH DIRECT TV REC You can limit play of DVDs unsuitable for some audiences and children, for example. Play and changes to the settings are not possible unless you enter a password. (l 43) AV DVD/VHS OUTPUT VHS Preparation ≥Press [DVD]. DVD DVD TRACKING/V-LOCK When setting ratings Numeric Buttons The password screen is shown when you select levels 0 to 7.
75VGN.book 43 ページ 2004年7月21日 水曜日 午前11時54分 Various Settings Summary of settings This description shows the settings for this unit. For details on menu operation (l 42). ≥Underlined items are the factory presets. ≥ is effective settings in both DVD and VHS. / ≥ is effective settings in DVD only. ∫ Tuning Manual (l 46) / Auto-Setup Restart (l 47) Download from TV (l 47) (This function is not available unless you connect TV and this unit with the 21-pin Scart cable.
75VGN.book 44 ページ 2004年7月21日 水曜日 午前11時54分 Various Settings ≥Underlined items are the factory presets. ∫ Picture Comb Filter Select the picture sharpness when recording. The setting is fixed with “On” if you set “TV System” to “NTSC”. [On] [Off] On Pictures become clear and vivid. Normally, use this setting. [RAM] Off Select it when recording noisy pictures. Hybrid VBR Resolution (l 63, “VBR”) Records the video on DVD-RAM in high quality.
75VGN.book 45 ページ 2004年7月21日 水曜日 午前11時54分 Various Settings DVD ≥To change the TV system (PAL/NTSC) setting: While stopped, keep pressing [∫, STOP] on the DVD main unit and [< OPEN/CLOSE] on the main unit for 5 or more seconds. ≥Underlined items are the factory presets. ∫ Display On-Screen Messages Choose whether to show on-screen messages automatically. [Automatic] [Off] Grey Background Select whether to show the grey background, normally shown when TV reception is poor.
75VGN.book 46 ページ 2004年7月21日 水曜日 午前11時54分 Various Settings DVD VHS Channel Settings ≥“Channel Settings” will be reflected also in the VHS. DVD/VHS Preparation ≥Press [DVD]. VOLUME CH DIRECT TV REC [1] AV DVD/VHS VHS Press [FUNCTIONS]. [2] Press [3, 4, 2, 1] to select “SETUP” and press [ENTER]. [3] Press [3, 4] to select “Tuning” and press [1].
75VGN.book 47 ページ 2004年7月21日 水曜日 午前11時54分 Various Settings DVD VHS 1 Adding, deleting, and moving channels [4] Select “Manual” with [3, 4] and press [ENTER]. [5] Press [3, 4, 2, 1] to select the desired TV station and press the [A], [B], [C] buttons to select “Delete”, “Add”, “Move”. To delete a programme position “Delete”: Press [A]. [6] Press [RETURN]. Note ≥If downloading of the setup data has been performed, only the instruction indication “Delete” appears.
75VGN.book 48 ページ 2004年7月21日 水曜日 午前11時54分 Various Settings DVD VHS Clock Settings Usually, the unit’s Preset Download or Auto-Setup function (l 10) automatically adjusts the clock to correct time. Under some reception conditions, however, the unit cannot set the clock automatically. In this case, follow the operation steps below to manually set the clock. ≥In the case of a power failure, the clock setting remains in memory for approximately 60 minutes.
75VGN.book 49 ページ 2004年7月21日 水曜日 午前11時54分 Various Settings DVD ∫ Display examples FUNCTIONS window By using the FUNCTIONS window you may access the main functions quickly and easily. Preparation ≥Press [DVD]. [1] While stopped Press [FUNCTIONS].
75VGN.book 50 ページ 2004年7月21日 水曜日 午前11時54分 [[VHS]] Before Use VHS Inserting video cassette Facing up the surface from which you can see a roll of tape, Insert a video cassette ≥This unit automatically is turned on. ∫ To eject a video cassette For main unit. ≥Press [<, EJECT] on the main unit. For remote control. ≥Press [VHS] and then press and hold [∫, STOP] for about 3 or more seconds. Video cassette information ∫ Video cassettes ≥Break out the video cassette’s tab to prevent accidental erasure.
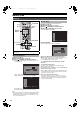
75VGN.book 51 ページ 2004年7月21日 水曜日 午前11時54分 Playback VHS Playing a video cassette [1] [2] [3] [4] DVD/VHS Í VOLUME CH DIRECT TV REC AV VHS DVD/VHS VHS DVD INPUT SELECT SKIP/INDEX STOP CHAPTER SLOW/ REW SEARCH FF PAUSE Press [∫, STOP].
75VGN.book 52 ページ 2004年7月21日 水曜日 午前11時54分 Playback VHS DVD/VHS VOLUME CH DIRECT TV REC AV DVD/VHS VHS DVD TRACKING/V-LOCK Numeric Buttons G-Code CANCEL/RESET :, 9 INPUT SELECT CREATE CHAPTER PAUSE PLAY ∫ DIRECT NAVIGATOR FUNCTIONS 1 ; TOP MENU During normal or slow playback, Press [TRACKING/V-LOCK, i, j] until the bars noise disappear.
75VGN.book 53 ページ 2004年7月21日 水曜日 午前11時54分 Recording Recording TV programmes [1] Insert a video cassette with an intact erasure prevention tab. (l 50) [2] Press [CH, W, X] to select the channel. To select with the numeric buttons: e.g., “5”: [0] )[5] “15”: [1] )[5] ≥If you keep pressing one of these buttons, the channels changes quickly. [3] Press [REC MODE] to select the tape speed. Each time you press the button: SP>LP>EP>SP [4] Press [¥, VHS REC] to start recording.
75VGN.book 54 ページ 2004年7月21日 水曜日 午前11時54分 Timer Recording VHS [4] DVD/VHS If the programme is correct Press [ENTER]. AV VHS DVD/VHS VHS DVD [5] Press [ TRACKING/V-LOCK Numeric Buttons ≥“ G-Code CANCEL/RESET INPUT SELECT STOP PAUSE FUNCTIONS / , TIMER]. ” lights on the unit’s display.
75VGN.book 55 ページ 2004年7月21日 水曜日 午前11時54分 Timer Recording [6] Turn the unit off when you do not play or record on DVD. ≥If the timer recording is started with keeping the unit turned on, the unit is not turned off automatically even after the timer recording is completed. VHS Check, change or delete programmes [1] Press [PROG/CHECK]. Timer recording Name Date 1 ---- ∫ To release the unit from recording standby Press [ , TIMER]. The unit turns on and “ ” goes out.
75VGN.book 56 ページ 2004年7月21日 水曜日 午前11時54分 Advanced Operations VHS ∫ Summary of settings DVD/VHS VOLUME CH DIRECT TV REC This description shows the initial settings for this unit. For details on menu operation (l left). ≥Underlined items are the factory presets. AV DVD/VHS VHS DVD TRACKING/V-LOCK VHS DVD ∫ VHS FUNCTIONS Timer recording (l 54) QUICK ERASE (l 57) You can delete a cassette contents all at once.
75VGN.book 57 ページ 2004年7月21日 水曜日 午前11時54分 Advanced Operations QUICK ERASE VHS Various indications in on-screen display You can delete a cassette contents all at once. To see these displays, set the “OSD” item in the “VHS FUNCTIONS” to “4:3” or “WIDE” (l 56). Preparation ≥Press [VHS]. ≥Insert a recorded video cassette. Press [STATUS]. [1] Insert a cassette that you want to delete the cassette contents. [2] While stopped, Press [FUNCTIONS] to display the VHS FUNCTIONS on the screen.
75VGN.book 58 ページ 2004年7月21日 水曜日 午前11時54分 [[DVD/VHS]] Advanced Operations DVD VHS Dubbing from VHS DVD/VHS DUBBING indicator CH DIRECT TV REC VOLUME AV DVD/VHS VHS DVD TRACKING/V-LOCK SKIP/INDEX REW SEARCH FF VHS DVD CH, W, X OPEN/CLOSE TIME SLIP /k1.
75VGN.book 59 ページ 2004年7月21日 水曜日 午前11時54分 Advanced Operations DVD VHS ∫ Manual Dubbing (VHS l DVD) [RAM] [DVD-R] You can specify the position to start dubbing the programme recorded on the tape to the disc. ≥The available discs for dubbing from the tape are DVD-RAM and non-finalized DVD-R. ≥Copy-guarded video tapes cannot be dubbed. Most of commercially sold/purchased video tapes are copy-guarded to prevent illegal reproduction and they cannot be recorded with the following procedure.
75VGN.book 60 ページ 2004年7月21日 水曜日 午前11時54分 Advanced Operations DVD VHS Dubbing from DVD DVD/VHS DUBBING indicator VOLUME CH DIRECT TV REC AV DVD/VHS VHS DVD TRACKING/V-LOCK VHS DVD CH, W, X OPEN/CLOSE :, 9 SKIP/INDEX CANCEL/RESET STOP PAUSE JET REW DIRECT NAVIGATOR FUNCTIONS VHS REC REC MODE DVD REC TIMER EXT LINK /k1.
75VGN.book 61 ページ 2004年7月21日 水曜日 午前11時54分 Advanced Operations DVD VHS ∫ Manual Dubbing (DVD l VHS) You can specify the position to start dubbing the programme recorded on the disc to the tape. ≥The available discs for dubbing source are discs without copy guard. Most of DVD-Videos are copy-guarded to prevent illegal reproduction and they cannot be recorded with the following procedure. Preparation DVD (Recording source) ≥Insert the disc containing the programme to be copied.
75VGN.book 62 ページ 2004年7月21日 水曜日 午前11時54分 Advanced Operations DVD Recording from an external device DVD/VHS When connecting to the AV3 input terminals on the front of the unit. (l 13) VOLUME CH DIRECT TV REC AV DVD/VHS VHS DVD TRACKING/V-LOCK VHS DVD Before connecting any cables, first make sure that the power for both units is off. Then after connecting any cable, turn on the both units. CH, W, X Note ≥If the audio output of the other equipment is monaural, connect to L/MONO.
75VGN.book 63 ページ 2004年7月21日 水曜日 午前11時54分 Helpful Hints DVD VHS Glossary Bitstream Linear PCM (LPCM) This is the compressed form of digital signals. A decoder decodes these signals into 5.1 surround and multi-channel signals. These are uncompressed digital signals. CDs are recorded with 44.1 kHz/16 bit PCM, while DVDs use PCM between 48 kHz/16 bit and 96 kHz/24 bit, allowing playback with greater quality sound.
75VGN.book 64 ページ 2004年7月21日 水曜日 午前11時54分 Helpful Hints DVD Title/Chapter (DVD-Video) Track DVD-Video are divided into large sections (titles) and smaller sections (chapters). The numbers allocated to these sections are called title numbers and chapter numbers. This is the smallest division on CD, and Video CD.
75VGN.book 65 ページ 2004年7月21日 水曜日 午前11時54分 Helpful Hints DVD VHS Frequently asked questions Set up Page What equipment is necessary to play multi channel surround sound? ≥DVD-Video: You can play DVD-Video multi channel surround by digitally connecting an amplifier equipped with a Dolby Digital, DTS or MPEG decoder. ≥DVD-Audio: This unit plays DVD-Audio in 2 channels. You cannot play multi channel surround sound.
75VGN.book 66 ページ 2004年7月21日 水曜日 午前11時54分 Helpful Hints DVD VHS Error messages ∫ Common Operation X HOLD Page ≥The Child Lock function is activated. Press and hold [ENTER] and [RETURN] simultaneously until “X HOLD” disappears. 62 ∫ DVD On the TV Cannot finish recording completely. Cannot record on the disc. Please check the disc. Unable to format. Cannot record. Disc is full. Cannot record. Maximum number of titles recorded. Page ≥The programme was copy-guarded. ≥The disc may be full.
75VGN.book 67 ページ 2004年7月21日 水曜日 午前11時54分 Helpful Hints DVD VHS Troubleshooting guide Before requesting service, check the below items. If you have doubt about the check points, or if the remedies indicated in the chart do not solve the problem, consult your dealer. ∫ Common Power Page No power ≥Insert the AC mains lead securely into a known active AC outlet. – The unit switches to the standby mode. ≥One of the unit’s safety devices may have activated.
75VGN.book 68 ページ 2004年7月21日 水曜日 午前11時54分 Helpful Hints DVD VHS Picture Page TV reception worsens after connecting the unit. ≥This can occur because the signals are being divided between the unit and the TV. It can be solved by using a signal booster, available from audio-visual suppliers. The images from this unit do not appear on the TV. ≥Make sure that the television is connected to the AV1 terminal, VIDEO OUT terminal, S-VIDEO OUT terminal or COMPONENT VIDEO OUT terminals on this unit.
75VGN.book 69 ページ 2004年7月21日 水曜日 午前11時54分 Helpful Hints DVD VHS ∫ DVD DVD Picture Page Status messages do not appear. ≥Go to “Display” in the SETUP menus and select “Automatic” in “On-Screen Messages”. Press [STATUS] to show the on-screen messages constantly. The grey background does not appear. ≥Go to “Display” in the SETUP menus and select “On” for “Grey Background”. The 4:3 aspect ratio picture expands left and right. ≥Use the TV to change the aspect.
75VGN.book 70 ページ 2004年7月21日 水曜日 午前11時54分 Helpful Hints DVD VHS DVD Recording, timer recording Cannot record. A part or whole of a recorded programme has been lost. ≥You haven’t inserted a disc or the inserted disc is not compatible. Insert a disc the unit can record onto. ≥The disc is unformatted. Format the disc. [RAM] ≥The write protect tab on the cartridge is set to “PROTECT” or the disc is protected with “DISC MANAGEMENT”.
75VGN.book 71 ページ 2004年7月21日 水曜日 午前11時54分 Helpful Hints DVD VHS Specifications Power Supply: Power Consumption: AC 220 V–240 V, 50 Hz 39 W (Approx. 4 W in power save mode) Dimensions: Mass: Operating Temperature: Operating Humidity: Approx. 430 mm (W) k89 mm (H) k352 mm (D) Approx. 5.9 kg 5oC – 40oC 35% – 80% RH (no condensation) DVD Recording format: DVD-RAM: DVD-R: Video: Audio: Recording disc: DVD-RAM: 12 cm 4.7 GB, 12 cm 9.4 GB, 8 cm 2.
75VGN.book 72 ページ 2004年7月21日 水曜日 午前11時54分 Helpful Hints DVD DVD Audio interface VHS Audio interface Input °3 Input °3 AV1 SCART: Standard: 0.5 Vrms, Full scale: 2 Vrms at 1 kHz AV1 SCART: -6 dBV AV2 SCART: Standard: 0.5 Vrms, Full scale: 2 Vrms at 1 kHz AV2 SCART: -6 dBV AV3 Pin jack: Standard: 0.5 Vrms, Full scale: 2 Vrms at 1 kHz AV3 Pin jack: -6 dBV Output °4 Output °4 AV1 SCART: Standard: 0.