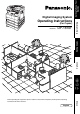
Operating Instructions (For Copier) DP-1810F Getting To Know Your Machine Options Making Copies Model No. Before Starting Digital Imaging System Before operating this equipment, please read these instructions completely and keep these operating instructions for future reference.
IMPORTANT INFORMATION When requesting information, supplies or service always refer to the model and serial number of your machine. The model and serial number plate (Main Name Plate) is located on the rear side of machine. For your convenience, space is provided below to record information you may need in the future. Model No. Serial No.
Getting To Know Your Machine Operation Chart Common Features and Usage ■ Basic Operation Original Load Paper Turn the Power Switch On 1 2 Place the Original(s) (ADF: Up to 50) Original Size (Reduction/ Enlargement Only) 3 4 5 Copy Size Number (Reduction/ of Copies Enlargement Only) Press START ■ Position of the Original From ADF From Platen Original Guide INV INV Original Guides Adjust to the original’s width INV LTR LGL LTR LDR LETTER ADF Tray LEGAL LGL LDR LEDGER LTR LETTER R INVOI
Energy Star As an ENERGY STAR® Partner, Panasonic has determined that this product meets the ENERGY STAR® guidelines for energy efficiency. This voluntary program specifies certain energy consumption and usage standards. This product will automatically “power down” after a specified period of non-use. The use of this ENERGY STAR® compliant product will reduce energy consumption and ultimately benefit the environment. The default functions can be adjusted depending on your office requirements.
Table of Contents Table of Contents Getting To Know Your Machine Operation Chart .............................................................................................................................. 3 ■ Common Features and Usage .............................................................. 3 Energy Star ..................................................................................................................................... 4 Before Starting Precautions ...............................
Table of Contents Options Accessories .................................................................................................................................. 37 ■ Components ....................................................................................... 37 Problem Solving Problem Solving ........................................................................................................................... 38 ■ Adding Paper (J) .........................................................
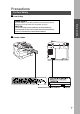
Precautions For Your Safety ■ Laser Safety LASER SAFETY Before Starting This unit employs a laser. Only qualified service personnel should attempt to service this device due to possible eye injury. CAUTION: USE OF CONTROLS, ADJUSTMENTS OR PERFORMANCE PROCEDURES OTHER THAN THOSE SPECIFIED HEREIN MAY RESULT IN HAZARDOUS RADIATION EXPOSURE.
Precautions Handling ■ Do not look directly at the exposure lamp when copying. ■ Do not turn the power switch Off or open the front panel during copying. C Do not drop paper clips or other metal objects into the copier. Toner and Paper ■ Store toner, drum and paper in cool areas with low humidity. C Use high quality 16 - 24 lb (60 – 90 g/m2) [Sheet Bypass: 15 – 34 lb (56 – 128 g/m2)] paper. C For optimum performance, it is recommended that only Panasonic Brand supplies are used in the copier.
Precautions Installation ■ The copier should not be installed in areas with the following conditions: Before sStarting C Extremely high or low temperature and humidity. Ambient conditions Temperature: 50 – 86°F (10° – 30°C) Relative humidity: 30 – 80% C Where temperature and humidity can change rapidly, causing condensation. C Direct exposure to sunlight. C Directly in the air conditioning flow. C In areas of high dust concentration. C In areas of poor ventilation.
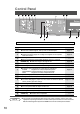
Control Panel #1 $ % & ( ) * + : 9 8 S Keys are used only for FAX/EMAIL functions, refer to Operating Instructions (For Facsimile/Internet Fax) No & 2 in 1 Key C From two 1-Sided originals, side by side, to 1-Sided copies. 2 PAGE COPY Key C Copying two facing pages or a Ledger size original on two separate Letter size sheets. SORT Key C When using Electric Sorting Mode. Optional memory is required. MARGIN Key C Shifts the image to the right or left.
Control Panel 0 1 -. / Before Starting LCD Display 6 5 4 Warning Indicators J Add Paper ? Add Toner I Misfeed 2 Call Service ; = No 4 5 3 2 Contents INTERRUPT Key, MEMORY IN Key, M1/M2 Keys C Interrupt Key interrupts other copy or print jobs while making copies. C Memory In Key registers two copy jobs for recall at a later time. C M1/M2 Keys are used to store a Job in Memory or to recall a Job stored in Memory. Cursor Keys C Select copy ratio and function modes using (G or F).
Basic Copy Full Size Copying ■ Copying the Same Size Originals (1:1) Copy size is automatically selected. ORIGINAL SIZE Key CLEAR Key 1 2 3 Place the Original LCD Display (Sample) Number of Copies* Press START** Up to 999 READY TO COPY COPIES:001 Select the Original Size on units without the ADF. ■ Manually Selecting Exposure Control or Original Type # Select the Original Type PHOTO : Originals are mainly composed of photo. TEXT/PHOTO: Combined originals with text and photo.
Basic Copy Reduction or Enlargement Copying ■ Copying with Preset Ratios Place the Original 2 Select the ORIGINAL SIZE 3 4 5 Making Copies 1 RESET Number of Copies Select the COPY SIZE Example: Reduction Original size Copy size LEDGER LETTER LDR ->LTRB [LTRB ] ZOOM: 65% COPIES:001 The correct ratio is automatically selected.
Basic Copy Automatic Document Feeder ■ ADF 1. Features # Automatic Original Feeding C The ADF tray can hold up to 50 Letter size originals of 20 lb (80 g/m2) paper (up to 30 Legal or Ledger size originals). Accommodates from Invoice to Ledger size originals. C Automatic original size detection. $ 2 in 1 Copy C To make a 1-Sided copy (full size or reduction), from two 1-Sided originals side-by-side. 2. Components C Set the originals up to the upper limit arrow.
Basic Copy Automatic Document Feeder 3.
Basic Copy Zoom Copying ■ Zoom RESET Copies with variable zoom ratios from 50% to 200% in 1% increments. 1 2 3 Place the Select ORIGINAL Original SIZE (without using ADF) Press Cursor (G or F) keys to select Zoom Ratio 4 5 Number of Copies Press START B LTR ->LTRB [LTRB ] ZOOM:125% COPIES:001 (Example: 125% Zoom) ATTENTION NOTE 16 C When changing the paper size after setting the zoom ratio, please use the paper tray key. C Press the RESET key to cancel all job settings.
Basic Copy Using the Sheet Bypass ■ Copying on Special Paper, etc. 1 Place the original. Open the sheet bypass. Sheet Bypass 3 # Place the sheets of paper into the tray. (approximately up to 50 Letter size sheets/20 lb) Making Copies 2 Pull out the sheet bypass tray until it stops. (For Ledger size only) Do not fill above. Side Guides Insert the paper until it stops. $ Adjust the side guides. Incorrect adjustment may cause the paper to wrinkle, misfeed or skew. Press START.
Creative Features 2 in 1 Copy ■ 2 in 1 Copy From two 1-Sided originals, side by side, to 1-Sided pages. 1 \ 2 (Layout)* 1 \ 2 (Layout)* 2 \ 1 (Layout)* 2 \ 1 (Layout)* Landscape (Orientation)* Portrait (Orientation)* ■ Procedure ADF Face-Up 1 Place the Originals NOTE 18 2 Press 2 in 1 key (3 ) COPY SIZE (Reduction/ Enlargement Only) 4 5 Number of Copies Press START CPress the RESET key to cancel all job settings.
Creative Features 2 PAGE COPY ■ 2 PAGE COPY Copying two facing pages on a ledger size original on two separate Letter size sheets. Making Copies ■ Procedure 1 2 Place the Press the 2 Originals PAGE COPY key Platen 3 ORIGINAL SIZE (Letter or Ledger size Only) 4 5 Number of Copies Press START Ledger size original Book Mark Center book by length and width according to center marks. Letter NOTE C To reset all job settings, press the RESET key.
Creative Features BOOK/EDGE/MARGIN ■ BOOK Key Eliminates dark inner binding shadows when copying from a book. ■ EDGE Key Creates a blank edge. ■ MARGIN Key Shifts the image to the right or left. ■ Procedure 3 2 1 Place the Original Press Cursor (G or F) keys to adjust the void width while the button is blinking. (approx. 5 sec.
Creative Features Job Memory ■ Two Copy Jobs Can Be Programmed in Memory (M1, M2) for recall at a later time. To Store a Job in Memory JOB MEMORY PRESS M1,M2 TO STORE. Making Copies # Set up the copy job to be stored in memory, by first selecting each function you wish the copier to perform. $ Press the MEMORY IN (F2) key. % Press the M1 (F3) or M2 (F4) key. To Recall a Job Stored in Memory & Place the Original RECALL JOB MEMORY LOADING... ( Press the M1 (F3) or M2 (F4) key.
Creative Features Sort Copy ■ Sort Copy The sort copy has 2 available electronic sorting functions as follows: Note: Before using the sort copy, select the desired sorting mode by setting its function first (See page 28). Sort Sort-Rotate Multiple copies sorted automatically. 1 1 1 Multiple copies sorted automatically and Stacked in alternate direction.
Other Features Energy Saver/Interrupt Mode INTERRUPT (F1) Key ENERGY-SAVER Key ENERGY SAVER ■ These modes can save power while the copier is not in use. # To enter this mode Press the ENERGY-SAVER key or the copier will automatically enter the Energy Saver Mode after 15 minutes* from the last copy. The indicator will flash. $ To cancel this mode and make copies Press the ENERGY-SAVER key again. Sleep Mode # Automatically enters the Sleep Mode after 30 minutes from the last copy.
Other Features Skyshot Mode ■ Skyshot allows copying a manuscript without generating dark borders even if the platen cover or ADF is opened. Skyshot mode eliminates dark borders around the originals, and is especially convenient for copying small-sized originals like bank checks or documents with unusual shapes (round, oval, etc.). These documents can be reproduced without generating any unnecessary black areas simply by making a copy with the cover open.
Other Features ■ Manual Skyshot Mode When using this function, the custom size should be registered into memory (M1, M2) in advance. (See page 29) Platen Upperleft corner 2 2 Place the Original Select the Custom Size (M1 or M2) 3 4 Number of Copies Press START # Press the FUNCTION key. FUNCTION MODE (1-2) ENTER NO. OR ∨ ∧ 2:COPIER SETTINGS PRESS SET TO SELECT COPIER PARAM. (00-14) ENTER NO. OR ∨ ∧ 07 MANUAL SKYSHOT 2:M1 ON $ Press the 2 key to select COPIER SETTINGS. % Press the SET key.
Combined Function Table 2-ORIGINAL H COPY Zoom Copy 2 in 1 Copy 2 Page Copy Book Edge Margin Non-Sort Sort Sort-Rotate Manual Skyshot Job Memory Retrieval Job Memory Storing O O O O O O O O A A O 2 in 1 Copy O A A O O O O O O A A O 2 Page Copy O A A O O O O O O A A O Book O O O A O O O O O A A O Edge O O O O A O O O O A A O Margin O O O O O A O O O A A O Non-Sort O O O O O O A A A A A O Sort O O O O O
Function ■ Using Function Modes to Change the Initial Copy Modes Options General Functions Copier Settings LAN Settings Printer Settings Input Identification Code Copier Settings for Key Operator ■ Procedure LAN Settings for Key Operator Printer Settings for Key Operator Making Copies General Functions for Key Operator FUNCTION Key RESET Key COPY SIZE PAPER Key TRAY Key FUNCTION MODE (1-2) ENTER NO. OR ∨ ∧ # Press the FUNCTION Key $ Press 1 (GENERAL FUNCTIONS) or 2 (COPIER SETTINGS) key.
Function General Functions No. Function Initial Setting 00 SORT MODE DEFAULT Selects the sort mode. C NON-SORT, SORT NON-SORT 02 POWER ON DEFAULT Select mode.* C Copy, Fax Copy 05 SORT MEMORY USAGE Displays the amount of sort memory used on the panel. C OFF, DISPLAY OFF 06 DEPT. COUNTER Copy usage and copy limit of the selected department and total copy usage will appear on the screen. Consult your service technician. 08 SORT-ROTATE DEFAULT Select Sort-Rotate mode.
Function Copier Settings Modes Function Initial Setting 00 MARGIN DEFAULT Selects the margin position and shift value. C POSITION (Left, Right, Top, Bottom) C VALUE (5 - 99 mm) LEFT 10 mm 01 EDGE DEFAULT EQUAL RATE 5 mm 02 BOOK MARGIN DEF. Selects the edge mode (Equal Rate = set the same value for X & Y or Individual = set the value for X & Y individually) and width. C EQUAL RATE (X & Y ), INDIVIDUAL C 5 - 99 mm Selects the book Center Void margin width.
Function General Functions for Key Operator No. Function Initial Setting Consult your service technician. 1 min. 00 PAPER SIZE Sets the paper size of each paper tray. C Tray-1, Tray-2, Tray-3, Tray-4 01 AUTO RESET TIME Selects the Control Panel reset time. C OFF, 30 sec, 1 min., 2 min., 3 min., 4 min. 02 ENERGY SAVER MODE Sets the Energy Saver mode and time.
Function Copier Settings for Key Operator Modes 01 ORIGINAL (HOME) 02 TEXT CONTRAST 03 T/P CONTRAST 04 PHOTO CONTRAST 10 MAX. COPY SETTING 12 M1, SIZE 13 M2, SIZE 16 MEM.
Function Function Setting ■ Changing the Auto Exposure Setting You can select whether the copying density is adjusted automatically for text and photographic originals. 1 Press the FUNCTION key. 2 Proceed as Follows: FUNCTION Key FUNCTION MODE (1-2) ENTER NO. OR ∨ ∧ # Press the 2 key to select COPIER SETTINGS. 2:COPIER SETTINGS PRESS SET TO SELECT $ Press the SET key. COPIER PARAM. (00-14) ENTER NO. OR ∨ ∧ % Press 8 and SET key to select AUTO EXPOSURE MODE.
Function Function Setting for Key Operator ■ Changing the Paper Size The Paper Trays are designed to accommodate Invoice, Letter, Letter R, Legal and Ledger size paper. To change the paper size, perform the steps shown below. 2 Proceed as Follows: FUNCTION Key Making Copies 1 Press the FUNCTION key. FUNCTION MODE (1-2) ENTER NO. OR ∨ ∧ # Press the 1 key to select GENERAL FUNCTIONS. 1:GENERAL FUNCTIONS PRESS SET TO SELECT $ Press the SET key. GENERAL PARAM. (0-9) ENTER NO. OR ∨ ∧ % Press 9 key.
Function Function Setting for Key Operator 3 Changing the Paper Guide and Paper Size Indicator in the Paper Tray # Pull the Paper Tray out and remove paper. $ Adjust the paper guide a to the required paper length. Stopper Paper Guide a Paper Guide b % Adjust the Paper Guide b to the required paper width. Pinch the stopper to move the Paper Guide b. & Change the Paper Size Indicator. Size Indicator ( Close the Paper Tray.
Function ■ Department Counter The Key Operator can manage, limit copies, counters and code numbers for each department. (Maximum department counters: 50) 2 Proceed as Follows: FUNCTION Key FUNCTION MODE (1-2) ENTER NO. OR ∨ ∧ # Press the 1 key to select GENERAL FUNCTIONS. 1:GENERAL FUNCTIONS PRESS SET TO SELECT $ Press the SET key. GENERAL PARAM. (0-9) ENTER NO. OR ∨ ∧ & Press the Key Operator ID code (3 digit) and SET key. KEY OPR. MODE (00-25) ENTER NO.
Function Function Setting for Key Operator 3 Select the Department Counter Mode. DEPT.COUNTER MODE 1:TOTAL COUNTER DEPT. CODE (01-50) ENTER NO. OR ∨ ∧ 4 Press 2 and the SET key. Change the Department ID Code, limit the maximum number of copies and Department Counter number. I.D CODE 01:1234 # Press the Keypad and the SET key to input the Department ID Code. 01: 1234 Department ID Code Department No. MAX COPIES 01:123456 $ Press the Keypad and the SET key to input the maximun number of copies.
Accessories Components PCL6 Emulation Kit (DA-PC210) C Printer Controller for PCL6* 10/100 Ethernet Interface/ Internet Fax Kit (DA-NE200) C Network Interface Board NOTE ∗ 2nd/4th Paper Feed Module (DA-DS182) C To increase the paper feed sources and capacity. Paper Feed Module × 1 (550 sheets) 3rd Paper Feed Module (DA-DS183) C To increase the paper feed sources and capacity. Paper Feed Module × 1 (550 sheets) PCL6 is a Page Description Language of the Hewlett-Packard Company.
Problem Solving J) Adding Paper (J ■ 550-Sheet Paper Tray 1 Pull the Paper Tray out. 2 Place the paper with the copying surface facing upward. 3 Make sure paper is not loaded above the overfill indicator located in the Paper Tray. 4 Firmly push the Paper Tray back into the copier. ATTENTION 38 Special papers, like glossy paper, mailing labels and transparencies cannot be used in the paper tray. Use the Sheet Bypass for special paper. C Do not use paper with folds or wrinkles.
Problem Solving/U13 ?) Adding the Toner and Replacing Toner Waste Container (? 1 Open the Front Cover. 2 Remove the Toner Waste Container by slowly pulling it towards the left as illustrated. 3 Seal the container with the enclosed cap and dispose of it properly. Cap 4 1 2 ATTENTION # Turn the empty Toner Bottle counter-clockwise until it stops. The Arrow mark (Unlocked symbol ) visible on the end of the Toner Bottle is aligned with the Arrow mark on the machine.
Problem Solving ?) Adding the Toner and Replacing Toner Waste Container (? 5 # Shake the new Toner Bottle four or five times to loosen the contents. 2 1 $ Remove the cap from the Toner Bottle. 6 1 2 2-1 2-3 Incorrect Correct 2-2 7 Install a new Toner Waste Container. 8 Close the Front Cover. ATTENTION 40 # Align the Key of the bottle, also represented by the Arrow mark (Unlocked symbol ) visible on the end of the Toner Bottle with the Arrow mark on the machine.
Problem Solving Removing a Misfed Paper ■ Paper Misfeed Indicators and Locations When a paper misfeed occurs, the misfeed indicator and the misfeed location(s) will be displayed on the panel display. I Misfeed Indicator Paper Misfeed Locations A: ADF (see page 45) (J70, J71) B: Copier (Paper Exit, Paper Entry/Transport) area (see page 42-43) (J51 - J59, J80) C: Paper Feed Module (see page 44) (J00 - J50) I NOTE C Make sure that the misfeed indicator goes off after removing the misfed paper.
Problem Solving Removing a Misfed Paper ■ Paper Exit Area C Make sure that the misfeed indicator goes off after removing all misfed paper. 1 ATTENTION 42 Remove the misfed paper. C Make sure that the misfeed indicator goes off after removing all misfed paper.
Problem Solving ■ Paper Entry/Transport Area C Make sure that the misfeed indicator goes off after removing all misfed paper. 1 Open the Right Cover. 2 Remove the misfed paper. 3 If copy paper is fed far into the copier: # Turn the right paper clearing knob. $ Remove the misfed paper. 4 # Open the Heat Roller Cover. $ Remove the misfed paper. % Close the Right Cover. Caution heated surface Caution: This fuser area may be hot.
Problem Solving Removing a Misfed Paper ■ Paper Feed Module C Make sure that the misfeed indicator goes off after removing all misfed paper. 1 # Pull the Paper Tray out. $ Remove the misfed paper. % Return the Paper Tray to the original position. 2 # Open the Feed Cover. $ Remove the misfed paper. % Close the Feed Cover. ATTENTION 44 C Make sure that the misfeed indicator goes off after removing all misfed paper.
Problem Solving ■ ADF C Make sure that the misfeed indicator goes off after removing all misfed paper. 1 # Open the Entry Cover. $ Remove the misfed paper. % Close the Entry Cover. 2 # Open the ADF Cover. Note: To prevent damaging the originals, open the ADF Cover before removing the misfed original(s). $ Remove the misfed paper. % Close the ADF Cover. & Close the ADF. I ATTENTION C Make sure that the misfeed indicator goes off after removing all misfed paper.
Troubleshooting Before Calling Service Action Check Unit Does Not Operate Check if the Power Switch is turned On and that the power cord is connected into the outlet. Does the display light? (No) Does the Energy Saver key flash (or light) and displays are turned OFF? (See page 23) (No) Does any of the U## codes and messages appear on the display? (U01, U07, U13, U14, U20 and U21) (See page 48) (Yes) Press Energy Saver key on the Control Panel. (Yes) Perform actions in accordance with each message.
Troubleshooting 2. The Toner Charging Mode starts and the LCD displays: CHARGING TONER Add Toner Warning Indicator: C Flashing = Toner Bottle is nearly empty C Lit = Toner Bottle is empty 3. This message is displayed for approximately 200 seconds. CHARGING TONER ❚❚❚❚❚ ∗ Each “ ❚ ” is approximately 10 sec. 4. This massage will continue to be displayed until the warm-up cycle is completed, and if the toner bottle was replaced. Upon completion, the Add Toner Warning Indicator automatically turns Off.
Troubleshooting User Error Codes (U Code) The self-diagnostic functions detect troubles in the important components of the copier. When any trouble occurs, the copier stops. Code U01 U07 U13 Display Message CLOSE FRONT/RT COVER CLOSE FEED COVER TONER IS RUNNING LOW NO WASTE TONER BOX U14 WASTE TONER BOX IS FULL U20 CLOSE ADF COVER U21 CLOSE PLATEN COVER Check Points Front Cover is open. Feed Cover is open. 1. Toner Bottle is incorrectly installed. 2. Low Toner. 1.
Troubleshooting Replacing the Battery The copier has an internal battery (Product No.: CR2032) which maintains the date setting in the event of a power outage. ■ Battery Replacement Required Message REPLACE BATTERY U90 ■ Battery Replacement Procedure 1 Turn the power Off. Pull out the Battery Holder. 2 Replace the Battery. 3 Reinstall the Battery Holder. 4 Turn the power On. Set the Date and Time. (See P.
Specifications ■ DP-1810F (Copier) Type Desktop Platen Type Fixed Acceptable Originals Sheets, Books (max. Ledger) Copying Method Laser Electrophotography Fixing Method Heat Roller Fixing Imaging Method Dry-Type Single component imaging Resolution Max. 600 dpi Maximum Copy Size Ledger - Invoice via paper tray Void Area Max. 0.2 in (5 mm) Warm Up Time Approx. 30 seconds (68°F/20°C) First Copy Time Approx. 6.
Specifications ■ 2nd/4th Paper Feed Module (DA-DS182) DA-DS182 Paper Size Invoice/Letter/Legal/Ledger Paper Weight 16 – 24 lb (60 – 90 g/m2) Electrical Requirements Supplied from the copier Dimensions (W × D × H) 21.7 × 6.1 × 23.0 in (550 × 155 × 585 mm) Weight 20.9 lb (9.5 kg) ■ 3rd Paper Feed Module (DA-DS183) DA-DS183 Paper Size Invoice/Letter/Legal/Ledger Paper Weight 16 – 24 lb (60 – 90 g/m2) Electrical Requirements Supplied from the copier Dimensions (W × D × H) 21.7 × 6.1 × 20.
Options and Supplies ■ The DP-1810F is a digital photocopier which can produce images with great clarity. Furthermore, its copying functionality can also be greatly enhanced by the addition of the following options and supplies. We hope you find that the wide ranging capabilities will make your office-place more productive and efficient. ■ Options Part Name Part No.
memo 53
U.S.A. Only WARRANTY PANASONIC DOCUMENT IMAGING COMPANY MAKES NO WARRANTIES, GUARANTEES OR REPRESENTATIONS, EXPRESSED OR IMPLIED, TO THE CUSTOMER WITH RESPECT TO THIS PANASONIC MACHINE, INCLUDING BUT NOT LIMITED TO, ANY IMPLIED WARRANTY OF MERCHANTABILITY OR FITNESS FOR A PARTICULAR PURPOSE.