Operating Instructions for advanced features Digital Camera Model No. DMC-FP2 DMC-FP1 Before connecting, operating or adjusting this product, please read the instructions completely.
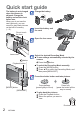
Quick start guide The battery is not charged when the camera is shipped. Charge the battery and set the clock before use. When you do not use the card (optional), you can record or play back pictures on the built-in memory (→11). Do not touch the lens. Charge the battery Insert the battery and the card Open the lens cover Lens cover button Playback button Select the desired Recording Mode ■ To use settings automatically selected by the camera Press the button.
Contents Before use Before use .............................................. 5 Read first .......................................................5 To prevent damage, malfunctions, and faults .....5 Standard Accessories ........................... 6 Names of parts....................................... 7 Cursor button ................................................7 Preparations Charging the battery ............................. 8 Basics Sequence of Recording ......................
Contents (Continued) Application (Record) Changing recording information display .................................................. 33 Taking pictures with the self-timer .... 34 Taking pictures with flash................... 35 Taking close-up pictures .................... 37 Viewing as list (Multi Playback/Calendar Playback) .. 61 Watching motion pictures .................. 62 Different playback methods (Playback Mode) ..................................
Before use Read first ■ Fully peel off the strip of To prevent damage, malfunctions, and faults ■ Avoid shocks, vibration, and pressure. tape from the lens cover before using the camera. • Avoid exposing the camera to strong vibration or shock; e.g. dropping or hitting the camera, or sitting down with the camera in your pocket. Strip of (Attach hand strap to avoid dropping tape camera.
Before use (Continued) To prevent damage, malfunctions, and faults ■ Lens • Do not leave the lens exposed to direct sunlight. ■ When using a tripod or unipod • Do not apply excessive force or tighten screws when they are crooked. (This may damage the camera, screw hole, or label.) • Ensure that the tripod is stable. (Refer to the tripod instructions.) ■ When transporting Switch off power.
Names of parts Zoom lever (→29) Release lever (→10) Shutter button (→25, 49) Flash (→35) Tripod receptacle Lens (→6) Self-timer indicator (→34)/ AF Assist Lamp (→59) Card/Battery door (→10) Lens cover (→23) Microphone (→49) Power button (→24) button (→25) Playback button (→31) LCD monitor (→33, 80) Speaker (→17, 62) [MODE] button (→27) Cursor button Hand strap eyelet [DISPLAY] button (→33) [Q.
Charging the battery ■About batteries that you can use with this unit It has been found that counterfeit battery packs which look very similar to the genuine products are made available to purchase in some markets. Some of these battery packs are not adequately protected with internal protection to meet the requirements of appropriate safety standards. There is a possibility that these battery packs may lead to fire or explosion.
Always charge before first use! (not sold pre-charged) Guidelines for number of recordable pictures and recording time Figures may be reduced if flash, zoom, or [LCD MODE] are used frequently; or in colder climates. Number of recordable Approx. 300 pictures pictures By CIPA standard Recording time Approx. 150 min ●Recording conditions by CIPA standard • CIPA is an abbreviation of [Camera & Imaging • Recording once every 30 seconds with full flash every second recording. Products Association].
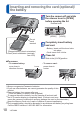
Inserting and removing the card (optional)/ the battery Turn the camera off and slide the release lever to [OPEN] before opening the lid Release lever Lever [OPEN] Do not touch terminal [LOCK] Completely insert battery and card • Battery: Insert until the lever locks into place. • Card: Insert until it clicks. Charged battery (check orientation) Card (check orientation: terminals face LCD) Close lid Slide to the [LOCK] position. ■To remove • To remove battery: move lever in direction of arrow.
Picture save destination (cards and built-in memory) Pictures will be saved to a card if one is inserted, or to the built-in memory if not. ■ Built-in memory (approx. 40 MB) ●Pictures may be copied between cards and the built-in memory (→73). ●The access time for the built-in memory may be longer than the access time for a card. ●[QVGA] in [REC QUALITY] can only be available to record motion pictures in the built-in memory.
Setting the Clock Do not touch the lens. Open the lens cover The power is turned on. If the language select screen is not displayed, proceed to step . Press [MENU/SET] while the message is displayed Lens cover Press ▲▼ to select the language, and press [MENU/SET] • The [PLEASE SET THE CLOCK] message appears.
The Clock is not set when the camera is shipped. Press ◄► to select the items (year, month, day, hour, minute, display order or time display format), and press ▲▼ to set Select the setting item Change the values and settings Select either [24HRS] or [AM/ PM] for the time display format. Select the display order for the day, month, and year ([M/D/Y], [D/M/Y], or [Y/M/D]). • To cancel → Press . • When set to [AM/PM], 0:00 midnight is AM 12:00, and 0:00 noon is PM 12:00.
Setting the menu Refer to the procedure example below when operating the [SETUP] menu, [REC] menu and [PLAYBACK] menu. (Example) Change [LCD MODE] in [SETUP] menu when in [NORMAL PICTURE] Mode. Do not touch the lens. Open the lens cover The power is turned on. Select the [NORMAL PICTURE] Mode Press the [MODE] button. Press ▲▼ to select [NORMAL PICTURE], and then press [MENU/SET]. • To display the [PLAYBACK] menu, press the Playback button to switch to Playback Mode.
Settings display may vary according to items. Menu items displayed vary according to the mode. Select the setting Settings Selected setting Close menu • You can also exit this menu in Recording Mode by pressing the shutter button halfway down. Menu type [REC] menu (Recording Mode only) Changing picture preferences (→53 - 59) • Enables you to specify color, Sensitivity, pixel level, and other settings.
Setting the menu (Continued) Using Quick menu Recording menu items can be called up easily. In Recording Mode, display the Quick menu Press the button until the Quick menu is displayed Quick menu Select item and setting Select Press (Finished) Setting Item ●Settings items displayed vary depending on Recording Mode.
Using the [SETUP] menu For details about the setting procedure in the [SETUP] menu. (→14) Make general camera settings such as adjusting the Clock, extending the battery life, and changing the Beep sounds. [CLOCK SET], [AUTO REVIEW] and [AUTO POWER OFF] are important for Clock setting and battery life. Please check these before use. Item [CLOCK SET] Settings, notes Set time, date, and display format. Set the date and time. (→12) [WORLD TIME] [DESTINATION]: Set the local time at travel destination.
Using the [SETUP] menu (Continued) For details about the setting procedure in the [SETUP] menu. (→14) Item [LCD MODE] Settings, notes [OFF]: Normal (cancel setting) Make LCD monitor easier to see. [AUTO POWER LCD]: The brightness is adjusted automatically depending on how bright it is around the camera. [POWER LCD]: Makes screen brighter than normal (for outdoor use). [HIGH ANGLE]: Makes screen easier to see when taking pictures from high positions.
For details about the setting procedure in the [SETUP] menu. (→14) Item [AUTO POWER OFF] The camera turns off automatically after a specified period of inactivity. [AUTO REVIEW] Automatically display still pictures immediately after taking them. Settings, notes [OFF]/[2 MIN.]/[5 MIN.]/[10 MIN.] • Not used in the following situations.
Using the [SETUP] menu (Continued) For details about the setting procedure in the [SETUP] menu. (→14) Item [RESET] Reset to the default settings. Settings, notes [RESET REC. SETTINGS?] [YES]/[NO] [RESET SETUP PARAMETERS?] [YES]/[NO] • Resetting the setup parameters will also reset the following: - Age in years/months and names in Scene Modes [BABY] and [PET] - [TRAVEL DATE] - [WORLD TIME] - [FAVORITE] in [PLAYBACK] menu (set to [OFF]) - [ROTATE DISP.
For details about the setting procedure in the [SETUP] menu. (→14) Item [VIDEO OUT]∗ Change the video output format when connected to a TV, etc. (Playback Mode only). [TV ASPECT] Change the aspect ratio when connected to a TV, etc. (Playback Mode only). [VERSION DISP.] Settings, notes [NTSC]/[PAL] • Operates when AV cable is connected. / • Operates when AV cable is connected. Current version is displayed. Check the version of the camera firmware.
Using the [SETUP] menu (Continued) For details about the setting procedure in the [SETUP] menu. (→14) Item [LANGUAGE] Settings, notes Set the language displayed on the screen. Change display language. [DEMO MODE] View demonstration of functions. [STABILIZER DEMO.
Sequence of Recording Please set the Clock before recording. (→12) Do not touch the lens. Open the lens cover The power is turned on. Select the desired Recording Mode and record ■ To use settings automatically selected by the camera Press the button. ■ To select the Recording Mode manually Press the [MODE] button. Press ▲▼ to select the Recording Mode, and then press [MENU/SET]. Lens cover Power button button Playback button Play back the pictures you took Press the Playback button.
Sequence of Recording (Continued) ■Holding the camera AF Assist Lamp Flash • If jitter becomes noticeable, use both hands, keep your arms close to your body, and stand with your feet at shoulder width. • Do not touch the lens. • Do not block the microphone when recording motion picture. (→7) • Do not block the flash or the AF Assist Lamp. Do not look at it from close range. • Try to hold the camera steady when you press the shutter button.
Taking pictures with automatic settings [INTELLIGENT AUTO] Mode Recording Mode: Optimum settings are made automatically from information such as ‘face,’ ‘movement,’ ‘brightness,’ and ‘distance’ just by pointing the camera at the subject, meaning that clear pictures can be taken without the need to make settings manually. Open the lens cover The power is turned on. Select [INTELLIGENT AUTO] Mode • Press again to return to the previous Recording Mode.
Taking pictures with automatic settings [INTELLIGENT AUTO] Mode (Continued) Recording Mode: ■To use flash Select either (i Auto) or (Forced flash off). • When is used, , (Auto/Red-Eye Reduction), (Slow Sync./Red-Eye Reduction) and (Slow Sync.) are selected automatically according to the subject type and brightness. (For details (→36)) • and indicate that digital red-eye correction is activated. • The shutter speed is slower in and .
Taking pictures with your own settings [NORMAL PICTURE] Mode Recording Mode: Using the [REC] menu to change settings and set up your own recording environment. Shutter button Open the lens cover The power is turned on.
Taking pictures with your own settings [NORMAL PICTURE] Mode (Continued) Recording Mode: Align focus for desired composition Useful when subject is not in center of picture. First adjust focus according to subject ●Subjects/environments which may Align the AF area with the subject Hold down halfway AF area make focusing difficult: • Fast-moving or extremely bright objects, or objects with no color contrast. • Taking pictures through glass or near objects emitting light.
Taking pictures with zoom Recording Mode: ‘Optical Zoom’ offers 4 x magnification. At a lower recording pixel level, ‘Extended Optical Zoom’ can be used to zoom up to 8.4 x (DMC-FP2) or 7.8 x (DMC-FP1). For zooming in even closer, ‘Digital Zoom’ is available. Zoom In/Out Capture a wider area (wide-angle) Enlarge the subject (telephoto) W side (wide-angle): 1x T side (telephoto): up to 4 x Focus range Zoom ratio Zoom bar (approx.) ●Adjust the focus after adjusting the zoom.
Taking pictures with zoom (Continued) Recording Mode: Enlarging further [DIGITAL ZOOM] Zoom 4 times further than Optical/Extended Optical Zoom. (Note that, with Digital Zoom, enlarging will decrease picture quality.) Display the [REC] menu Select [ON] Select [DIGITAL ZOOM] Close menu Digital Zoom area is displayed within zoom bar on screen. e.g. With 16 x 16 x Digital Zoom area • Zoom motion stops momentarily when entering Digital Zoom range.
Viewing your pictures [NORMAL PLAY] Playback Mode: When a card is in the camera, pictures are played back from the card, and without a card, pictures are played back from the built-in memory. Press the Playback button Zoom lever • Press again to enter the Recording Mode. Scroll through pictures Previous Next [DISPLAY] ■To enlarge (Playback zoom) File number Picture number/Total pictures • Press the shutter button to switch to Recording Mode.
Deleting pictures Playback Mode: Pictures will be deleted from the card if the card is inserted, or from the built-in memory if the card is not inserted. (Deleted pictures cannot be recovered.) Press to delete displayed picture Select [YES] • Do not turn off the power during deletion.
Changing recording information display You can switch between various information shown on the LCD monitor, such as guide lines and recording information. Press to change display ●In Recording Mode Recording information ●In Playback Mode Picture information No display Guide lines Picture information + Recording information No display ■Guide lines • Reference for composition (e.g. balance) when recording.
Taking pictures with the self-timer Recording Mode: We recommend using a tripod. This is also effective for correcting jitter when pressing the shutter button, by setting the self-timer to 2 seconds. Display [SELFTIMER] Select time duration (Can also be selected with ◄.) The menu screen is displayed for approx. 5 sec. Items you select during this period are automatically selected. Take a picture Press the shutter button fully to start recording after the preset time.
Taking pictures with flash Recording Mode: Display [FLASH] Select the desired type (Can also be selected with ►.) ●Stand at least 1 m (3.28 feet) away when using the flash to take pictures of infants. Type, operations [AUTO] • Automatically judges whether or not to flash [AUTO/RED-EYE]∗1 • Automatically judges whether or not to flash (reduce red-eye) [FORCED FLASH ON] • Always flash [FORCED ON/RED-EYE]∗1 • Always flash (reduce red-eye) [SLOW SYNC.
Taking pictures with flash (Continued) Recording Mode: ■Available types in each mode (○: Available, —: Not available, ○ : Default setting) [SCENE MODE] ○ ○ ○ ○ ○∗ ○ ○ ○ ○ ○ ○ ○ ○ ○ ○ ○ ○ ○ ○ ○ ○ ○ ○ ○ ○ ○ ○ ○ ○ ○ ○ ○ ○ ○ ○ ○ ∗ Set to (Auto), (Auto/Red-Eye Reduction), (Slow Sync.) according to the subject and brightness. ○ ○ ○ ○ ○ ○ ○ ○ ○ ○ ○ - ○ ○ ○ ○ ○ ○ ○ ○ ○ ○ ○ ○ (Slow Sync.
Taking close-up pictures Recording Mode: When you want to enlarge the subject, setting to [AF MACRO] ( ) enables you to take pictures at an even closer distance than the normal focus range (up to 10 cm (0.33 feet) for max. W). Display [MACRO MODE] Select [AF MACRO] ●It may take some time until distant subjects come into focus. ([INTELLIGENT AUTO] Mode), macro recording can be activated by just pointing the camera at the subject. display) ( The menu screen is displayed for approx. 5 sec.
Taking close-up pictures (Continued) Recording Mode: Taking pictures at even closer range [MACRO ZOOM] To take even larger pictures of the subject, setting to [MACRO ZOOM] enables the subject to appear even larger than when using [AF MACRO]. Zoom lever Display [MACRO MODE] Select [MACRO ZOOM] The menu screen is displayed for approx. 5 sec. Items you select during this period are automatically selected.
Taking pictures with exposure compensation Recording Mode: Corrects exposure when adequate exposure cannot be obtained (if difference between brightness of object and background, etc.). Depending on the brightness, this may not be possible in some cases. Under-exposed Optimum exposure Plus direction Over-exposed Minus direction Display [EXPOSURE] Select a value [0] (no compensation) ●After exposure adjustment, the adjustment value ( for example) is displayed in the bottom-left corner of the screen.
Taking pictures according to the scene [SCENE MODE] Recording Mode: Using [SCENE MODE] enables you to take pictures with optimum settings (exposure, coloring, etc.) for given scenes. Display the screen for Recording Mode selection Zoom lever Select [SCENE MODE] [DISPLAY] [MENU/SET] ■Registering commonly used scenes [MY SCENE MODE] (→48) Select and set the scene Scene menu Zoom lever can also be used to switch to next screen. To see description of each scene: Select scene, and press [DISPLAY] button.
Using flash in Scene Modes. (→36) Scene Uses, Tips Improves the skin tone of subjects for a healthier appearance in bright daylight conditions. [PORTRAIT] [SOFT SKIN] Tips • Stand as close as possible to subject. • Zoom: As telescopic as possible (T side) Smoothes skin colors in bright, outdoor daylight conditions (portraits from chest upwards). Tips • Stand as close as possible to subject.
Taking pictures according to the scene [SCENE MODE] (Continued) Recording Mode: Scene Uses, Tips Take pictures of yourself. Notes • Main fixed settings: [STABILIZER]: [MODE 2] [AF ASSIST LAMP]: [OFF] [SELFTIMER]: [OFF]/[2SEC.] • [AF MODE] default setting is (Face Detection). Tips • Press shutter button halfway → self-timer indicator illuminates → press shutter button fully → review (if self-timer indicator flashes, focus is not correctly aligned) • Focus: 30 cm - 1.2 m (0.99 - 3.94 feet) (Max.
How to select a scene. (→40) Using flash in Scene Modes. (→36) Scene Uses, Tips Takes clear pictures of night scenes. Tips • Stand at least 5 m (16.4 feet) away. • Tripod, self-timer recommended. [NIGHT SCENERY] Notes • When the camera is set to [STABILIZER] and there is very little jitter, or if [STABILIZER] is set to [OFF], shutter speed may slow down up to 8 seconds. • Interference may be noticeable with dark scenes. • Shutter may remain closed for up to 8 seconds after taking picture.
Taking pictures according to the scene [SCENE MODE] (Continued) Recording Mode: Scene Uses, Tips [BABY] [PET] [SUNSET] 44 Notes • Age and name will be displayed for approx. 5 seconds after setting this mode. • To record age and name ([BABY1] and [BABY2] can be set separately.) • When the camera is set to [STABILIZER] and there is very little jitter, or if [STABILIZER] is set to [OFF], shutter speed may slow down up to 1 second. • Age display format depends on [LANGUAGE] setting.
How to select a scene. (→40) Using flash in Scene Modes. (→36) Scene Uses, Tips Prevents blurring of subject in dark, indoor conditions. Select the aspect ratio and the picture size with ▲▼ and press [MENU/SET]. [HIGH SENS.] Tips • Focus: Max. W: 10 cm (0.33 feet) and above Max. T : 50 cm (1.64 feet) and above Takes pictures of rapid movement or a decisive moment. Select the aspect ratio and the picture size with ▲▼and press [MENU/SET]. [HI-SPEED BURST] Take pictures.
Taking pictures according to the scene [SCENE MODE] (Continued) Recording Mode: Scene Uses, Tips Enables continuous recording in dim locations. Use ▲▼to select the picture size and aspect ratio, and press [MENU/SET] to set. [FLASH BURST] Take pictures (Hold shutter button). Still pictures are taken continuously while the shutter button is held down. Number of continuous shots: Max. 5 Tips • Use within the effective range of the flash. (→36) • Focus: Max. W: 10 cm (0.33 feet) and above Max. T : 50 cm (1.
How to select a scene. (→40) Using flash in Scene Modes. (→36) Scene [FIREWORKS] Uses, Tips Notes Takes clear pictures of fireworks in the night sky. • Shutter speed can be set to 1/4 second or 2 seconds (if there is a little jitter or if Optical Image Stabilizer is [OFF]). (when not using exposure compensation) • Main fixed settings: [FLASH]: [FORCED FLASH OFF] [SENSITIVITY]: ISO80 [AF ASSIST LAMP]: [OFF] • [AF MODE] default setting is (Face Detection). • Do not touch camera with wet hands.
Registering commonly used scenes [MY SCENE MODE] Recording Mode: You can register commonly used Scene Mode in . After you register it, simply switch to [MY SCENE MODE] and you can record in the registered Scene Mode. Zoom lever Display the screen for Recording Mode selection Select [MY SCENE MODE] [DISPLAY] [MENU/SET] ■Taking pictures in registered Scene Mode Press the [MODE] button. Press ▲▼ to select the registered scene, and then press [MENU/SET].
Taking motion pictures [MOTION PICTURE] Mode Recording Mode: Record motion pictures with audio as follows. (Note that recording without audio is not possible.) Microphone Display the screen for Recording (Do not cover with your finger) Mode selection Select [MOTION PICTURE] Mode Remaining recording time (approx.) Start recording Press halfway (adjust the focus) Press fully (start recording) • The focus and zoom will remain as they were at the beginning of recording.
Taking motion pictures [MOTION PICTURE] Mode (Continued) Recording Mode: [REC QUALITY] When recording motion picture, use a card rated with an SD speed class∗ of ‘Class 6’ or higher. ∗ SD speed class refers to a specification for sustained write speeds. Display [REC] menu Select the desired picture quality Select [REC QUALITY] Close menu Picture Quality Picture Size [HD] 1280 × 720 pixels [WVGA] 848 × 480 pixels [VGA] 640 × 480 pixels [QVGA]∗ 320 × 240 pixels No.
Useful features for travel Recording Mode: ∗ ∗ Recording only. (Cannot set.) [TRAVEL DATE] (Record travel date and destination) Record information as to what day and where pictures were taken by setting departure dates and destinations. Set-up: • Clock must be set in advance (→12).
Useful features for travel (Continued) Recording Mode: ∗ ∗ Recording only. (Cannot set.) [WORLD TIME] (Registering local time at your travel destination) Set-up: • Clock must be set in advance (→12). [SETUP] menu → Select [WORLD TIME] • Press [MENU/SET] → [PLEASE SET THE HOME AREA] will be displayed when setting for the first time. In this case, press [MENU/SET] and skip to step .
Using the [REC] menu For details about the setting procedure in the [REC] menu (→14) ‘Quick menu’ (→16) is useful to easily call up frequently-used menus. [PICTURE SIZE] Set size of picture. This setting determines how many pictures you can record. ■ Mode: ■ Settings: Recording picture capacity (→92) DMC-FP2 DMC-FP1 Recording pixel level type Recording pixel level type 14 M 4320 × 3240 12 M 3648 × 2736 8M 10 M 5M 3M ∗1 ∗1 0.3 M 12.5 M 10.
Using the [REC] menu (Continued) [SENSITIVITY] Set ISO sensitivity (sensitivity to lighting) manually. We recommend higher settings to take clear pictures in darker locations. ■ Mode: ■ Settings: [ ] (Intelligent ISO) / [80] / [100] / [200] / [400] / [800] / [1600] Setting guide [SENSITIVITY] Location (recommended) Shutter speed Interference ●[ [80] Bright (outdoors) Slow Low [1600] Dark Fast High ] is automatically set in a range up to 1600 based on subject movement and brightness.
For details about the setting procedure in the [REC] menu (→14) [WHITE BALANCE] Adjust coloring to suit light source if colors otherwise appear unnatural.
Using the [REC] menu (Continued) [AF MODE] Method of aligning focus can be changed according to position and number of subjects. ■ Mode: ■ Settings: / / Taking front-on pictures of people (Face Detection) Subject not centered in picture (AF area not displayed until focused) Recognized faces (up to 15 people) and adjusts exposure and focus accordingly. AF area Yellow : When the shutter button is pressed halfway, the frame turns green when the camera is focused.
For details about the setting procedure in the [REC] menu (→14) [BURST] Enables a rapid succession of still pictures to be taken. Succession of still pictures taken while shutter button is held down. ■ Mode: ■ Settings:[OFF]/ Speed∗ DMC-FP2 Approx. 1.5 pictures/sec DMC-FP1 Approx. 1.8 pictures/sec No. of pictures Until card/built-in memory is full ∗ Recording becomes progressively slower. (The onset of delay varies depending on the type of card and the recording pixel level.
Using the [REC] menu (Continued) [COLOR MODE] Set color effects. ■ Mode: ■ Settings: [STANDARD] / [NATURAL] (soft) / [VIVID] (sharp) / [B/W] / [SEPIA] / [COOL] (more blue) / [WARM] (more red) ●If interference is noticeable in dark locations: Set to [NATURAL]. ●In ([INTELLIGENT AUTO] Mode), [STANDARD], [B/W], and [SEPIA] can only be set. [STABILIZER] Automatically detects and prevents jitter.
For details about the setting procedure in the [REC] menu (→14) [AF ASSIST LAMP] Illuminates lamp when dark to facilitate focus alignment. ■ Mode: ■ Settings: [OFF] : Lamp off (taking pictures of animals in dark, etc.) [ON] : Lamp illuminated with halfway press of shutter and larger AF area displayed) button ( ●Cannot be set in Motion Picture Recording Mode. The setting in other Recording Mode is applied. Lamp: Effective distance: 1.5 m (4.
Entering Text Use the cursor buttons to enter names in Scene Modes [BABY] and [PET], or to enter [LOCATION] names in [TRAVEL DATE]. (On the setting screen of each menu) Select the type of character : Upper/lower case alphabet : Symbols/numbers Changes each time you press the button. Select characters and press [MENU/SET] (repeat) • Text is inserted at the cursor position.
Viewing as list (Multi Playback/Calendar Playback) Playback Mode: You can view 12 (or 30) pictures at once (Multi Playback), or view all pictures taken on a certain date (Calendar Playback). Press the Playback button • To view pictures: press ◄► Set to multiple screen display Date recorded Picture no. Total no.
Watching motion pictures Playback Mode: Motion pictures can be played back just as you view still pictures. Press the Playback button Select the motion picture and start playback Motion picture recording time ■ Operations during Motion Picture Playback ▲:Pause/Play ▼:Stop ◄:Fast rewind (2 steps) Single-frame rewind (while paused) ►:Fast forward (2 steps) Single-frame forward (while paused) Motion picture icon • Press ▲ during fast rewind or fast forward to return to the normal playback speed.
Different playback methods (Playback Mode) Playback Mode: Recorded pictures can be played back in a variety of ways. Press the Playback button Display the screen for Playback Mode selection ■[NORMAL PLAY] Select the method of playback (→31) ■[SLIDE SHOW] (→64) ■[CATEGORY PLAY] (→66) ■[FAVORITE PLAY] (→66) ●When no card is inserted, pictures are played back from the built-in memory. ●After you switch from Recording Mode to Playback Mode, the Playback Mode automatically becomes [NORMAL PLAY].
Different playback methods (Playback Mode) (Continued) Playback Mode: [SLIDE SHOW] Automatically play still pictures in order and to music. Recommended when viewing on TV screen. Select playback method • [ALL] : Playback of all still pictures • [CATEGORY SELECTION] : Select a category and play. (Select category with ▲▼◄► and press [MENU/SET].) (→66) • [FAVORITE]: Play still pictures set as [FAVORITE] (displayed only when [FAVORITE] still pictures have been set and setting is [ON]).
For details about the switching Playback Mode procedure (→63) ■Operations during Slide Show Pause/Play (While paused) Next (While paused) Previous Stop Volume down Volume up ●When [URBAN] has been selected, the picture may appear in black and white as a screen effect. ●Music effects cannot be added. ●Motion pictures cannot be played back in a Slide Show. When the [MOTION PICTURE] category is selected, the initial screens of motion pictures are used as still pictures for playback in the Slide Show.
Different playback methods (Playback Mode) (Continued) Playback Mode: [CATEGORY PLAY] Pictures can be classified automatically and viewed by category. Automatic classification starts when [CATEGORY PLAY] is selected from the Playback Mode selection menu. Select the category [CATEGORY] Icons of categories with pictures (dark blue) No. of pictures (appears after a few seconds) View pictures • To delete pictures → Press . Previous Next ●Calendar display cannot be used.
Using the [PLAYBACK] menu Playback Mode: For details about the setting procedure in the [PLAYBACK] menu (→14) [CALENDAR] Select the date from the calendar screen to view only the pictures taken on that day (→61). [PLAYBACK] menu → Select [CALENDAR] Set-up: Press [MENU/SET]→ ●This setting can only be made when the Playback Mode is [NORMAL PLAY]. [TEXT STAMP] Stamps the recording date or text you have registered in the [BABY] and [PET] Scene Modes or [TRAVEL DATE] on still pictures.
Using the [PLAYBACK] menu (Continued) Playback Mode: ■Items that can be stamped [SHOOTING DATE] [NAME] [LOCATION] [TRAVEL DATE] [W/O TIME]: Stamp the recording date [WITH TIME]: Stamp the recording time Stamp names registered in [BABY] or [PET] Stamp destinations registered in [TRAVEL DATE] Stamp travel dates registered in [TRAVEL DATE] • Items you select [OFF] are not stamped.
For details about the setting procedure in the [PLAYBACK] menu (→14) ■[MULTI] Select [MULTI] in step the previous page on Select still picture (up to 50 pictures) Select size To see description of resize: Press [DISPLAY] button Select number of pixels after resizing Resize setting Number of pixels before/after resizing • To cancel → Press [DISPLAY] button again. • To execute → Press [MENU/SET]. Press ▲ to select [YES], and then press [MENU/SET] ●Picture quality is reduced after resizing.
Using the [PLAYBACK] menu (Continued) Playback Mode: [ROTATE DISP.] Automatically rotate portrait still pictures. [PLAYBACK] menu → Select [ROTATE DISP.] Set-up: Press [MENU/SET] → Select [ON] [ON] [OFF] ●[ROTATE DISP.] cannot be used with motion pictures. ●Still pictures taken with the lens surface facing directly up or down and still pictures taken on other cameras may not be rotated. Additionally, still pictures taken while holding the camera upside down are not rotated automatically.
For details about the setting procedure in the [PLAYBACK] menu (→14) [PRINT SET] Picture/picture no./date printing settings can be made for when printing with DPOF printcompatible shops or printers. (Ask at shop to check compatibility) For more information visit: http://panasonic.jp/dc/dpof_110/white_e.
Using the [PLAYBACK] menu (Continued) Playback Mode: [PROTECT] Set protection to disable picture deletion. Prevents deletion of important pictures. [PLAYBACK] menu → Select [PROTECT] Set-up: Press [MENU/SET]→ Select [SINGLE] or [MULTI] Select picture and make setting ●[SINGLE] ●[MULTI] Picture protected Picture protected ■ To clear all Select [CANCEL] in step • To cancel → Press [MENU/SET] again. • After confirmation, press to return to the menu screen. and select [YES].
For details about the setting procedure in the [PLAYBACK] menu (→14) [COPY] You can copy pictures between built-in memory and memory card. [PLAYBACK] menu → Select [COPY] Set-up: Press [MENU/SET] → Select the copy method (direction) : Copy all pictures from built-in memory to card (go to step ) : Copy 1 picture at a time from card to built-in memory.
Using with your PC Pictures and motion pictures can be imported from the camera to your computer by connecting the two together. • If your computer does not support SDXC memory cards, a message will be displayed requesting you to format the card. (Do not format the card. This will erase recorded pictures.) If the card is not recognized, refer to the following support website: http://panasonic.net/avc/sdcard/information/SDXC.
Some computers can read directly from the camera’s memory card. For details, see the manual for your computer. You can save pictures to use on your computer by dragging and dropping folders and files into separate folders on your computer. ■Folder and file names on computer ●Windows DCIM (Still pictures/motion pictures) 100_PANA (Up to 999 pictures/folder) P1000001.JPG : JPG: P1000999.
Printing You can connect directly to a PictBridgecompatible printer for printing. Getting Ready: • Use a fully charged battery or connect an AC adaptor (optional). • When printing pictures from the built-in memory, remove any memory cards. • Adjust the print quality or other settings on your printer, as needed. Check socket direction and insert straight in. (Damage to socket shape can lead to faulty operation.
Some printers can print directly from the camera’s memory card. For details, see the manual for your printer. Printing multiple pictures Select [MULTI PRINT] in step on the previous page Select item (See below for details) Print (Previous page ) • [MULTI SELECT] : Scroll between pictures with ▲▼◄►, select pictures with [DISPLAY] button to print. (Press [DISPLAY] button again to release selection.) Press [MENU/SET] when selection is complete. • [SELECT ALL] :Print all pictures.
Printing (Continued) Making print settings on camera (Make settings before selecting [PRINT START]) Select item Select setting Item Settings [PRINT WITH DATE] [OFF]/[ON] [NUM. OF PRINTS] Set number of pictures (up to 999 pictures) [PAPER SIZE] (printer takes priority) [L/3.5”×5”] (89×127 mm) [2L/5”×7”] (127×178 mm) [POSTCARD] (100×148 mm) [16:9] (101.6×180.
Viewing on TV screen You can view still pictures and motion pictures on a TV by connecting the camera to your TV with the AV cable (supplied). ●Also consult TV operating manual. Getting Ready: • Complete the [TV ASPECT] setting. • Turn off both the camera and television. Connect camera to TV Turn on TV ●Set to auxiliary input. Turn on camera Press the Playback button Check socket direction and insert straight in. (Damage to socket shape can lead to faulty operation.
List of LCD monitor displays In recording 1 2 3 4 5 13 6 7 12 14 15 20 19 8 16 9 17 11 10 1 Recording Mode (→23) 2 3 4 5 6 7 8 9 10 Flash Mode (→35) Optical Image Stabilizer (→58) Jitter alert (→27) Macro recording (→37) AF area (→27) Focus (→27) Picture size (→53) Battery capacity (→11) Number of recordable pictures (→92) Save destination (→11) Recording state Travel date (→51) Exposure compensation (→39) Aperture value / Shutter speed (→27) ISO Sensitivity (→54) Focus range Zoom (→29) Macro Z
Press the [DISPLAY] button to change display (→7, 33).
Message displays [THIS MEMORY CARD CANNOT BE USED] ● A MultiMediaCard was inserted. → Not compatible with the camera. Use a compatible card. [THIS MEMORY CARD IS WRITE-PROTECTED] ● Unlock the write-protect switch on the card. (→11) [NO VALID PICTURE TO PLAY] ● Take pictures, or insert a different card already containing pictures. [THIS PICTURE IS PROTECTED] ● Release the protection before deleting, etc.
Meanings and required responses to major messages displayed on LCD monitor. [MEMORY CARD ERROR] [FORMAT THIS CARD?] ● The card format cannot be used with this camera. → Save needed data on a computer or other device, and then use [FORMAT] on the camera. (→21) [INSERT SD CARD AGAIN] [TRY ANOTHER CARD] ● Access to card has failed. → Insert card again. ● Try with a different card. [MEMORY CARD ERROR] [MEMORY CARD PARAMETER ERROR] ● Card is not of SD standard.
Q&A Troubleshooting Battery, power Camera does not work even if power is turned on. ● Battery is not inserted correctly (→10), or needs recharging. The power cuts off during use. ● Battery needs recharging. ● Camera is set to [AUTO POWER OFF]. (→19) → Press the Power button to turn the power on again. Recording Cannot record pictures. ● The camera is in Playback Mode. → Press the Playback button to switch to Recording Mode. ● The lens cover is closed. → Open the lens cover.
Try checking these items (→84 - 89) first. (Restoring menu settings to default values may solve certain problems. Try using [RESET] in [SETUP] menu in Recording Mode (→20).) Recording (continued) Recorded pictures are blurred. Optical Image Stabilizer ineffective. ● Shutter speed is slower in dark locations and Optical Image Stabilizer is less effective. → Hold camera firmly with both hands, keeping arms close to body. → Set [DIGITAL ZOOM] to [OFF] and [SENSITIVITY] to [ ].
Q&A Troubleshooting (Continued) LCD monitor LCD monitor dims during Motion picture recording. ● LCD monitor may dim if continuing Motion picture recording for long periods. Monitor sometimes shuts off even though power is on. ● After recording, monitor shuts off until next picture can be recorded. (Approx. 6 seconds (Max.) when recording to the built-in memory) Brightness is unstable. ● Aperture value is set while shutter button is pressed halfway. (Does not affect recorded picture.
Playback (continued) Folder/file number displayed as [-]. Picture is black. ● Picture edited on computer or taken on different device. ● Battery removed immediately after picture taken, or picture taken with low battery. → Use [FORMAT] to delete (→21). Incorrect date displayed in Calendar Playback. ● Picture edited on computer or taken on different device. ● [CLOCK SET] is incorrect (→12).
Q&A Troubleshooting (Continued) TV, computer, printer No image appear on TV. Image blurred or not colored. ● Not connected correctly. (→79) ● The television has not been switched to auxiliary input. ● The television does not support the type of card used. TV screen display different to LCD monitor. ● Aspect ratio may be incorrect or edges may be cut off with certain televisions. Cannot play motion pictures on TV. ● Card is inserted into TV.
Others Menu not displayed in desired language. ● Change [LANGUAGE] setting (→22). Camera rattles if shaken. ● This sound is made by the lens movement and is not a fault. Cannot set [AUTO REVIEW]. ● Not available when [BURST] is used or in the Scene Modes [SELF PORTRAIT], [HI-SPEED BURST], or [FLASH BURST]. Red lamp illuminated when pressing shutter button halfway in dark locations. ● [AF ASSIST LAMP] set to [ON] (→59). AF assist lamp is not illuminated. ● [AF ASSIST LAMP] is set to [OFF].
Usage cautions and notes When in use ●Camera may become warm if used for long periods of time, but this is not a fault. ●To avoid jitter, use a tripod and place in a stable location. (Especially when using telescopic zoom, lower shutter speeds, or self-timer) ●Keep the camera as far away as possible from electromagnetic equipment (such as microwave ovens, TVs, video games etc.).
Memory cards ●To prevent damage to cards and data • Avoid high temperatures, direct sunlight, electromagnetic waves, and static electricity. • Do not bend, drop, or expose to strong impacts. • Do not touch connectors on reverse of card or allow them to become dirty or wet.
Recording picture/time capacity Recording picture capacity (still pictures) ●The number of pictures that can be stored varies depending on the [PICTURE SIZE] setting. (→53) ●When the number of recordable pictures exceeds 99,999, ‘+99999’ is displayed. DMC-FP2 Picture aspect ratio [PICTURE SIZE] Built-in memory 256 MB 512 MB 1 GB 2 GB 4 GB 6 GB Memory 8 GB card 12 GB 16 GB 24 GB 32 GB 48 GB 64 GB 14 M 10 M EZ 5 M EZ 3 M EZ 0.3 M EZ 12.5 M 10.
●Figures given are estimates. May vary according to conditions, card type, and subject. ●Recording capacities/times displayed on LCD monitor may not be reduced regularly. DMC-FP1 Picture aspect ratio [PICTURE SIZE] Built-in memory 256 MB 512 MB 1 GB 2 GB 4 GB 6 GB Memory 8 GB card 12 GB 16 GB 24 GB 32 GB 48 GB 64 GB [REC QUALITY] 12 GB 16 GB 24 GB Memory card 32 GB 48 GB 64 GB 12 M 8 M EZ 5 M EZ 3 M EZ 0.3 M EZ 10.
• SDXC Logo is a trademark of SD-3C, LLC. • QuickTime and the QuickTime logo are trademarks or registered trademarks of Apple Inc., used under license therefrom. • Other names, company names, and product names printed in these instructions are trademarks or registered trademarks of the companies concerned.