Owner’s Manual for advanced features Digital Camera Model No. DMC-FP7 DMC-FP5 Before connecting, operating or adjusting this product, please read the instructions completely.
Contents Before Use Precaution................................................. 4 Standard Accessories............................... 6 Names of the Components........................ 7 How to Use the Touch Panel...................... 8 Preparation Charging the Battery............................... 10 • Approximate operating time and number of recordable pictures.......... 13 Inserting and Removing the Card (optional) / the Battery......................... 14 About the Built-in Memory / the Card......
• [Party]................................................ 65 • [Candle Light].................................... 65 • [Baby1] / [Baby2]............................... 66 • [Pet]................................................... 66 • [Sunset]............................................. 67 • [High Sens.]....................................... 67 • [Hi-Speed Burst]................................ 67 • [Flash Burst]...................................... 68 • [Starry Sky]......................................
Before Use Precaution Optimal use of the camera Fully peel off the strip of tape A from the lens cover before using the camera. Do not strongly shake or bump the camera by dropping or hitting it. Do not subject to strong pressure. • When you use in the following cases, the camera may malfunction, recording pictures may become impossible, or the lens, the LCD monitor or the external case may be damaged. ––Dropping or hitting the camera.
Before Use About Condensation (When the lens is fogged up) • Condensation occurs when the ambient temperature or humidity changes. Be careful of condensation since it causes lens stains, fungus and camera malfunctions. • If condensation occurs, turn the camera off and leave it for about 2 hours. The fog will disappear naturally when the temperature of the camera becomes close to the ambient temperature.
Before Use Standard Accessories Check that all the accessories are supplied before using the camera. • The accessories and their shape will differ depending on the country or area where the camera was purchased. For details on the accessories, refer to Basic Owner’s Manual. • Battery Pack is indicated as battery pack or battery in the text. • Battery Charger is indicated as battery charger or charger in the text. • SD Memory Card, SDHC Memory Card and SDXC Memory Card are indicated as card in the text.
Before Use Names of the Components 1 2 3 4 5 6 Flash (P51) Microphone Lens (P5, 120) Lens cover (P18) Self-timer Indicator (P57) AF Assist Lamp (P85) Strap eyelet • Be sure to attach the strap when using the camera to ensure that you will not drop it.
Before Use How to Use the Touch Panel This touch panel is a type that detects pressure. You can operate the camera by directly touching the icons or images on the LCD monitor (Touch Panel) with your finger or the supplied stylus pen. Touch To touch and release the touch panel. Drag A movement without releasing the touch panel. Use this to select icons or images, or to set the items. • It may not operate properly when multiple icons are touched simultaneously, so try to touch the center of the icon.
Before Use Note • If you use a commercially available liquid crystal protection sheet, please follow the instructions that accompany the sheet. (Depending on the material, visibility or operability may be impaired.) • Apply a little extra pressure when touching if you have a commercially available protection sheet affixed or if you feel it is not responding well. • Touch panel will not operate properly when the hand holding this unit is pressing on the touch panel.
Preparation Charging the Battery About batteries that you can use with this unit Supplied battery or dedicated optional batteries can be used with this camera. It has been found that counterfeit battery packs which look very similar to the genuine product are made available to purchase in some markets. Some of these battery packs are not adequately protected with internal protection to meet the requirements of appropriate safety standards.
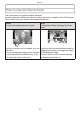
Preparation Connect the charger to the electrical outlet. Plug-in type • Charging starts when the [CHARGE] indicator A lights green. Inlet type [CHARGE] indicator Lights on: Charging Lights off: C harging complete (Disconnect the charger from the electrical socket and detach the battery after charging is completed.) • When the [CHARGE] indicator flashes ––The battery temperature is too high or too low.
Preparation Charging time Charging time (When charging the exhausted battery) Supplied battery Optional battery Approx. 115 min Approx. 120 min Battery indication The battery indication is displayed on the LCD monitor. (Only when using the battery) • If the indication blinks, charge or replace the battery. Note • The battery charging time may become longer in high or low temperature or for the battery which has not been used for a long period of time.
Preparation Approximate operating time and number of recordable pictures Recording still pictures (By CIPA standard in Normal Picture Mode) DMC-FP7 DMC-FP5 Supplied battery Optional battery Supplied battery Optional battery Capacity 660 mAh 680 mAh 660 mAh 680 mAh Number of recordable pictures Approx. 240 pictures Approx. 245 pictures Approx. 260 pictures Approx. 265 pictures Recording time Approx. 120 min Approx. 122 min Approx. 130 min Approx.
Preparation Inserting and Removing the Card (optional) / the Battery • Check that this unit is turned off. • We recommend using a Panasonic card. Slide the release lever in the direction of the [OPEN] and open the card / battery door. • Always use genuine Panasonic batteries. • If you use other batteries, we cannot guarantee the quality of this product. Completely insert battery and card. Battery: Check the direction is correct and insert it securely to the end until the clicking sound is heard.
Preparation Note • Remove the battery after use. • Before removing the card or battery, turn the camera off and wait for the “LUMIX” display on the LCD monitor to clear. (Otherwise, this unit may no longer operate normally and the card itself may be damaged or the recorded pictures may be lost.) Using an AC adaptor (optional) and a DC coupler (optional) instead of the battery The AC Adaptor (optional) can only be used with the designated Panasonic DC coupler (optional).
Preparation About the Built-in Memory / the Card When the card is inserted, pictures are saved to the card. When there is no card inserted, pictures are saved to the built-in memory [1]. Built-in Memory You can copy the recorded pictures to a card. (P104) Memory size: Approx. 70 MB Recordable motion pictures: QVGA (320 × 240 pixels) only The built-in memory can be used as a temporary storage device when the card being used becomes full.
Preparation While accessing the built-in memory or card The access indication lights red. [2] (Built-in Memory) / [3] (Card) While lighting, operations such as writing/reading pictures, deleting or formatting are being performed. Do not turn the power off, or do not remove the battery, card or AC adaptor (optional). Also, do not subject the camera to vibration, impact or static electricity. Access operation may be stopped midway. The data may be damaged or malfunction may occur.
Preparation Setting Date / Time (Clock Set) • The clock is not set when the camera is shipped. Open the lens cover. • The camera is turned on. • If the language select screen is not displayed, proceed to step 4. Touch the language select icon on the screen. Select the language. • The [Please set the clock] message appears. Touch [Clock Set].
Preparation Touch the items you wish to set (Year / Month / Day / Hours / Minutes), and set using [e] / [r]. Aq Bw A : Time at the home area B : Time at the travel destination • You can continue to switch the settings by continuously touching [e] / [r]. • Touch [:] to cancel the date and time settings without setting a date and time. To set the display sequence and the time display format. • Touch [Style] to display the settings screen for setting display order/time display format.
Basic Recording Sequence Open the lens cover. The camera is turned on in Recording Mode. (Recording is possible with this setting.) A Shutter button Select Recording Mode. 1 Touch [w1]. 2 Touch the mode icon. • The description is displayed after the first touch. • When operating from Playback Mode, touch [1] first to switch to Recording Mode, and then perform 1. List of [Rec] Modes 4 Intelligent Auto Mode (P22) The subjects are recorded using settings automatically selected by the camera.
Basic Take the picture. Press the shutter button halfway to focus and then press it fully to take the picture. (For details, see P22.) Close the lens cover. The camera is turned off. • The camera can also be turned off by pressing the camera ON / OFF switch. To view the recorded pictures Touch [9]. (For details, see P31.) • Touch [1] to return to the recording mode. Tips for taking good pictures • Be sure to attach the strap when using the camera to ensure that you will not drop it.
Basic [Rec] Mode: 4 Taking Pictures Using the Automatic Function (4: Intelligent Auto Mode) The camera will set the most appropriate settings to match the subject and the recording conditions so we recommend this mode for beginners or those who want to leave the settings to the camera and take pictures easily. A Shutter button • The following functions are activated automatically: ––Scene Detection / [Stabilizer] / [Intelligent ISO] / Face Detection / [i.
Basic When taking pictures using the flash (P51) • When [w] is selected, [w], [e], [r] or [{] is set depending on the type or brightness of the subject. • When [e] or [r] is set, Digital Red-Eye Correction is activated. • The shutter speed becomes slower during [r] or [{]. • When the flash is not used, select [o]. Scene Detection When the camera identifies the optimum scene, the icon of the scene concerned is displayed in blue for 2 seconds, after which its color changes to the usual red.
Basic Note • Due to conditions such as the ones below, a different scene may be identified for the same subject.
Basic Settings in Intelligent Auto Mode [Rec] Mode menu ––[Flash] / [Selftimer] / [Picture Size] / [Burst] / [Color Mode] • [Color Mode] can set the color effects of [STD.], [Happy], [B/W] or [SEPIA]. When [Happy] is selected, it is possible to automatically take a picture with a higher level of brilliance for the color brightness and vividness. ¼¼ The settings which can be selected are different from when other [Rec] Modes are used.
Basic [Rec] Mode: 1 Taking Pictures with Your Favorite Settings (1: Normal Picture Mode) The camera automatically sets the shutter speed and the aperture value according to the brightness of the subject. You can take pictures with greater freedom by changing various settings in the [Rec]. Touch [w1] in Recording Mode. • When operating from Playback Mode, touch [1] first to switch to Recording Mode, and then touch [w1]. Touch [1]. Aim the AF area at the point you want to focus on.
Basic Confirming the recording information such as focus and shutter speed A B Focus C D When the subject is focused When the subject is not focused Focus indication On Blinks AF area White"Green White"Red Sound Beeps 2 times Beeps 4 times EFG A Focus indication B AF area (normal) C AF area (when using the Digital Zoom or when it is dark) D Focus range1 E ISO sensitivity F Aperture value2 G Shutter speed2 1 The recordable range (range that can be focused) is displayed during zoom operati
Basic Preventing jitter (camera shake) When the jitter alert [0] appears, use [Stabilizer] (P86), a tripod or the self-timer (P57). • Shutter speed will be slower particularly in the following cases. Keep the camera still from the moment the shutter button is pressed until the picture appears on the screen. We recommend using a tripod. ––Slow sync.
Basic [Rec] Mode: 4 1 < 5 / Touching the Screen to Release the Shutter (Touch Shutter function) Touching the subject on the screen to record can automatically focus and release the shutter. • Touch AF/AE (P30) or AF Tracking (P24) cannot be used at the same time. Touch [Q]. [R]: Touch Shutter recording enabled [Q]: Touch Shutter canceled Touch the subject you wish to focus on. A The area that can be focused with the Touch Shutter.
Basic [Rec] Mode: 4 1 < 5 / Touching the Screen to Adjust the Focus and the Exposure (Touch AF/AE) Touching the subject to record can adjust the focus and the exposure. This is useful when the targeted subject is not in the center of the screen, etc. When [7] is set for [AF Mode] or the Intelligent Auto Mode is used, the AF Tracking functions at the same time and the camera continues to focus, tracking the movement of the touched subject. • Cancel the Touch Shutter function (P29) beforehand.
Basic [Playback] Mode: 5 Playing Back Pictures ([Normal Play]) If the card is inserted, pictures in the card are played back. If not, pictures in the built-in memory are played back. Touch [9] in Recording Mode. • Touching [9] in Recording Mode will automatically enter Normal Playback Mode. Forward or rewind the image by dragging (P8) the screen horizontally.
Basic Displaying Multiple Screens (Multi Playback) Touch [[] to change to the 12 screen display. • Each time you touch, the display method is switched. [9] 1 screen, [[] 12 screens, []] 30 screens, [t] Calendar (P90) • This can also be switched by moving the zoom lever to [6] (W) or [7] (T). • The screen can be switched by dragging the slide bar A up or down (P8). • The screen can be switched gradually by dragging the screen up or down. • Pictures displayed using [[] cannot be played back.
Basic Using the Playback Zoom Touch the part to enlarge. 1"2"4"8"16 • Moving the zoom lever to [7] (T) can also enlarge the picture. • When you change the magnification, the zoom position indication A appears for about 1 second. • The more a picture is enlarged, the more its quality deteriorates. Move the position to be displayed by dragging the picture (P8). • Picture will return to the original size (1) by touching [d].
Basic [Rec] Mode: 6 Recording Motion Pictures This records motion pictures with sound. (Motion pictures cannot be recorded without audio.) Touch [w1] in Recording Mode. Touch [6]. Press the shutter button halfway to focus and then press it fully to start recording. A Available recording time B Recording state C Elapsed recording time • After pressing the shutter button fully, release it straight away. • The focus and zoom are fixed to the setting when recording starts (the first frame).
Basic Note • The flash setting is fixed to [o]. • It is recommended to use a card with SD Speed Class with “Class 6” or higher when recording motion pictures. • The available recording time displayed on the screen may not decrease regularly. • Depending on the type of the card, the card access indication may appear for a while after recording motion pictures. This is not a malfunction.
Basic [Playback] Mode: 5 Playing Back Motion Pictures Select motion picture icon and touch [5] to play back. A Motion picture icon B The motion picture recording time • After playback starts, the elapsed playback time is displayed on the screen. For example, 8 minutes and 30 seconds is displayed as [8m30s]. A B Operations performed during motion picture playback Display control panel by touching screen. • If there is no operation for approx. 2 seconds, the operation icon will disappear.
Basic [Playback] Mode: 5 Deleting Pictures Once deleted, pictures cannot be recovered. • Pictures on the built-in memory or the card, which are being played back will be deleted. To delete a single picture Select the picture to be deleted, and then touch [4]. Touch [Delete Single]. Touch [Yes].
Basic To delete multiple pictures (up to 50) or all the pictures Touch [4]. Touch [Delete Multi] or [Delete All]. • [Delete All]: [Delete All] " step 5. • If you select [All Delete Exceptz] after selecting [Delete All], the pictures except ones of favorite setting are deleted. (When [Delete Multi] is selected.) Touch the picture to be deleted. (repeat this step) • [b] appears on the selected pictures. Touching again cancels the setting. Touch [OK]. Touch [Yes].
Basic Setting the Menu Using the menu, you can select your preferred recording or playback functions, or can make basic settings for the camera. This section describes the operation method using the example of how to set the [AF Mode] in the recording menu to [3] (Face Detection). Select Normal Picture Mode. 1 Touch [w1]. 2 Touch [1]. • When using the playback menu, touch [9] to switch to Playback Mode. Touch [MENU]. Touch the type of menu (P40).
Basic Type of menu 1 Recording menu (Only in Recording Mode) When recording with your preferred settings (P76 to P86) • Color shade, sensitivity, number of pixels, etc. can be set. 9 Playback menu (Only in Playback Mode) When enjoying or using the recorded pictures (P95 to P104) • You can edit or protect pictures, make print settings, etc.
Basic Calling up frequently used menus easily (Shortcut setting) You can always display on the LCD monitor your favorite menu items among the recording menu and the playback menu. Up to 2 items for the recording menu and 2 items for the playback menu can be registered. To register the menu item to the shortcut 1 Display the recording or playback menu screen. (Steps 1 to 3 in page 39) 2 Touch [Me]. • The description is displayed for 5 seconds. (Touch the screen to close the description.
Basic Perform these settings if you need to. About the Setup Menu [Clock Set], [Auto Power Off] and [Auto Review] are important items. Check their settings before using them. For details on how to select the [Setup] menu settings, refer to P39. [Clock Set] Setting Date / Time. • Refer to P18 for details. Set the time in your home area and travel destination. [World Time] w [Destination]: Travel destination area q [Home]: Your home area • Refer to P74 for details.
Basic These menu settings make it easier to see the LCD monitor when you are in bright places or when you are holding the camera high above your head. [LCD Mode] x [Auto Power LCD]: The brightness is adjusted automatically depending on how bright it is around the camera. c [Power LCD]: The LCD monitor becomes brighter and easier to see even when taking pictures outdoors. y [High Angle]: The LCD monitor becomes easier to see when holding the camera above your head to take pictures.
Basic [Auto Review] Set the length of time that the picture is displayed after taking it. [1 SEC.] / [2 SEC.] / [HOLD] (The pictures are displayed until one of the buttons is pressed.) / [OFF] • [Auto Review] is activated regardless of its setting when using [Hi-Speed Burst], [Flash Burst] and [Photo Frame] in Scene Mode and [Burst]. • In Intelligent Auto Mode, the Auto Review function is fixed to [2 SEC.]. • [Auto Review] does not work in Motion Picture Mode.
Basic [Rotate Disp.] This mode allows you to automatically display pictures vertically if they were recorded holding the camera vertically. [F] (Automatically set to portrait orientation) [G] (Set to portrait orientation only when viewing on TV) [OFF] [Version Disp.] It is possible to check which version of firmware is on the camera. [Format] The built-in memory or card is formatted. Formatting irretrievably deletes all the data so check the data carefully before formatting.
Basic Adjust the position of the touch panel if a different thing gets selected from what you touched or touch operation does not respond. [Calibration] 1 Touch [Start]. 2 Touch the orange [4] mark displayed on the screen in order with the stylus pen (supplied) (5 places). • A message is displayed once the position is set. • After setting, close the menu. • Calibration is not done if correct position is not touched. Touch the [4] mark again. [Language] Set the language displayed on the screen.
Advanced (Recording pictures) About the LCD Monitor Touch [DISP.] to change. • During Playback Zoom, while playing back motion pictures and during a slide show, you can only select “Normal display D” or “No display F”. In Recording Mode A Normal display B No display C No display (Recording guideline) In Playback mode D Normal display E Display with recording information F No display A B C D E F The following icons will remain if you do not perform operations for a specific period of time.
Advanced (Recording pictures) [Rec] Mode: 4 1 < 5 / 6 Taking Pictures with the Zoom Using the Optical Zoom / Using the Extended Optical Zoom (EZ) / Using the Intelligent Zoom / Using the Digital Zoom 4x magnification is possible with the Optical Zoom. Reducing the recording pixel level will activate the Extended Optical Zoom which can zoom up to 9.0x for DMC-FP7 or 8.4x for DMC-FP5. For zooming in even closer, use Intelligent Zoom or Digital Zoom.
Advanced (Recording pictures) Feature Maximum magnification Picture quality Conditions Intelligent Zoom Approx. 1.3× of Optical Zoom or Extended Optical Zoom No noticeable deterioration [i.Resolution] (P82) on the [Rec] menu is set to [i.Zoom]. Digital Zoom 4× of Optical Zoom, Extended Optical Zoom or Intelligent Zoom The higher the magnification level, the greater the deterioration. [Digital Zoom] (P83) on the [Rec] menu is set to [ON]. Screen display B [i.Zoom] is displayed.
Advanced (Recording pictures) Note • The indicated Zoom Magnification is an approximation. • “EZ” is an abbreviation of “Extended Optical Zoom”. • The Intelligent Zoom employs the super-resolution technology, which can increase the zoom ratio without noticeable deterioration of the image quality. • When using the Digital Zoom, we recommend using a tripod and the self-timer (P57) for taking pictures. • [i.Resolution] is fixed to [i.Zoom] in Cosmetic Mode, Intelligent Auto Mode or Scene Mode. [i.
Advanced (Recording pictures) [Rec] Mode: 4 1 < 5 / Taking Pictures Using the Built-in Flash A Photo flash Do not cover the flash with your fingers or other objects. Switching to the appropriate flash setting Set the flash to match the recording. Select [Flash] from the recording menu. (P39) Select the setting.
Advanced (Recording pictures) Item Description of settings q: AUTO The flash is automatically activated when the recording conditions make it necessary. @: AUTO / Red-Eye Reduction The flash is automatically activated when the recording conditions make it necessary. It is activated once before the actual recording to reduce the redeye phenomenon (eyes of the subject appearing red in the picture) and then activated again for the actual recording.
Advanced (Recording pictures) Available flash settings by Recording Mode The available flash settings depend on the Recording Mode.
Advanced (Recording pictures) Shutter speed for each flash setting Flash setting Shutter speed (Sec.) Flash setting q [ @ o 1/60 to 1/1600 Shutter speed (Sec.) 1 to 1/1600 1 or 1/4 to 1/1600 t ` The shutter speed becomes a maximum of 1 second in the following cases. ––When the Optical Image Stabilizer is set to [OFF]. ––When the camera has determined that there is little jitter when the Optical Image Stabilizer is set.
Advanced (Recording pictures) [Rec] Mode: 1 Taking Close-up Pictures Select [Macro Mode] from the recording menu. (P39) Select the setting. • [a] is displayed during AF Macro Mode and [.] is displayed during Macro Zoom Mode. • To cancel, select [OFF]. AF Macro This mode allows you to take close-up pictures of a subject, e.g. when taking pictures of flowers. You can take pictures of a subject as close as 10 cm (0.33 feet) from the lens by moving the zoom lever upmost to Wide (1×).
Advanced (Recording pictures) Macro Zoom You can take a picture with the Digital Zoom up to 3× while maintaining the distance to the subject for the extreme Wide position [10 cm (0.33 feet)]. • Focus range will be 10 cm (0.33 feet) to 7 during Macro Zoom Mode regardless of the zoom position. • Zoom range will be displayed in blue. (Digital Zoom range A) • The image quality is poorer than during normal recording. • Macro Zoom Mode cannot be used when [7] in [AF Mode] is set.
Advanced (Recording pictures) [Rec] Mode: 4 1 < 5 / Taking Pictures with the Self-timer Select [Selftimer] from the recording menu. (P39) Select the setting. • After setting, close the menu. Press the shutter button halfway to focus and then press it fully to take the picture. • The self-timer indicator A blinks and the shutter is activated after 10 seconds (or 2 seconds). • If you touch [Cancel] while the self-timer is set, the self-timer setting is canceled. Note • When using a tripod etc.
Advanced (Recording pictures) [Rec] Mode: 1 < 5 / 6 Compensating the Exposure Use this function when you cannot achieve appropriate exposure due to the difference in brightness between the subject and the background. Look at the following examples. Underexposed Properly exposed Compensate the exposure towards positive. Overexposed Compensate the exposure towards negative. Select [Exposure] from the recording menu. (P39) Compensate the exposure by touching the slide bar.
Advanced (Recording pictures) [Rec] Mode: < Taking Pictures While Changing the Skin Texture (<: Cosmetic Mode) Pictures can be taken while setting the texture or clearness of the skin. Touch [w1] in Recording Mode. Touch [<]. Touch the item and the degree of effectiveness. Item [Soft Skin] [Natural Skin] [Summer Look] Adjustment contents To take a picture with soft skin. To bring out the original beauty of the skin. To create healthy tanned skin such as at the beach.
Advanced (Recording pictures) [Rec] Mode: 5 / Taking Pictures That Match the Scene Being Recorded (5: Scene Mode) When you select a Scene to match the subject and recording situation, the camera sets the optimal exposure and hue to obtain the desired picture. Touch [w1] in Recording Mode. Touch [5]. Touch the scene to set. • Touching [w] / [q] can switch the page of the scene list. To reselect the scene Perform steps 1 to 3.
Advanced (Recording pictures) Calling up the frequently used scene quickly (/: My Scene Mode) Registering the frequently used scene with My Scene Mode enables you to take pictures quickly. 1 In Recording Mode, touch [w1] Touch [/]. 2 Touch the scene. The selected scene is registered with My Scene. • You can take pictures using the registered scene just by selecting [My Scene Mode] next time. To reselect the registered scene In My Scene Mode, touch [MENU] Touch [5].
Advanced (Recording pictures) [Self Portrait] Select this to take pictures of yourself. Technique for Self Portrait Mode • Press the shutter button halfway to focus. The self-timer indicator lights up when you are brought into focus. Making sure you hold the camera still, press the shutter button fully to take the picture. • The subject is not focused when the self-timer indicator is blinking. Make sure to press the shutter button halfway again to focus.
Advanced (Recording pictures) [Panorama Assist] You can take pictures with connections suitable for creating panorama images. Setting the recording direction 1 Select the direction to take picture. • The horizontal / vertical guideline will be displayed. 2 Take the picture. • You can retake the picture by selecting [Retake]. 3 Touch [Next]. • Part of the recorded image is displayed as a transparent image.
Advanced (Recording pictures) [Sports] This mode allows you to take pictures of sports scenes or other fast-moving events. Note • The shutter speed becomes a maximum of 1 second. • This mode is suitable for taking pictures of subjects at distances of 5 m (16.4 feet) or more. • [,] is activated, and maximum ISO sensitivity level becomes [ISO1600]. [Night Portrait] This allows you to take pictures of a person and the background with near real-life brightness.
Advanced (Recording pictures) [Food] This mode allows you to take pictures of food with a natural hue without being affected by the ambient light in restaurants etc. [Party] Select this mode when you want to take pictures at a wedding reception, an indoor party etc. This allows you to take pictures of people and the background with near real-life brightness. Technique for Party Mode • Use the flash. (You can set to [[] or [`].) • We recommend using a tripod and the self-timer for taking pictures.
Advanced (Recording pictures) [Baby1] / [Baby2] This takes pictures of a baby with a healthy complexion. When you use the flash, the light from it is weaker than usual. It is possible to set different birthdays and names for [Baby1] and [Baby2]. You can select to have these appear at the time of playback, or have them stamped on the recorded image using [Text Stamp] (P96). Birthday / Name setting 1 Select [SET] of [Age] or [Name]. 2 Enter the birthday or name.
Advanced (Recording pictures) [Sunset] Select this mode when you want to take pictures of a sunset view. This allows you to take vivid pictures of the red color of the sun. [High Sens.] This mode minimizes the jitter of the subjects, and enables you to take pictures of these subjects in dimly lit rooms. (Select this for high-sensitivity processing. The sensitivity automatically switches to between [ISO1600] and [ISO6400].) Setting Picture size 3M (4:3), 2.5M (3:2), 2M (16:9) and 2.
Advanced (Recording pictures) [Flash Burst] Still pictures are taken continuously with flash. It is convenient to take continuous still pictures in dark places. Setting Picture size 3M (4:3), 2.5M (3:2), 2M (16:9) and 2.5M (1:1) is selected as the picture size. • Still pictures are taken continuously while the shutter button is pressed fully. Number of recordable max. 5 pictures pictures Note • [i.Resolution] is fixed to [OFF].
Advanced (Recording pictures) [Fireworks] This mode allows you to take beautiful pictures of fireworks exploding in the night sky. Technique for Fireworks Mode • Since the shutter speed becomes slower, we recommend using a tripod. Note • This mode is most effective when the subject is 10 m (32.8 feet) or more away. • The shutter speed becomes 1/4th of a second or 2 seconds. • You can change the shutter speed by compensating the exposure.
Advanced (Recording pictures) [Aerial Photo] This mode allows you to take pictures through an airplane window. Technique for Aerial Photo Mode • We recommend using this technique if it is difficult to focus when taking pictures of clouds etc. Aim the camera at something with high contrast, press the shutter button halfway to fix the focus and then aim the camera at the subject and press the shutter button fully to take the picture. Note • Be careful about the reflection from the window.
Advanced (Recording pictures) [High Dynamic] You can use this mode to easily record pictures in which bright and dark regions of the scene are expressed with suitable brightness when looking into the sun, at night, or in similar circumstances. Setting the effect [STD.] : Natural color effect [ART] : Eye-catching effect which emphasizes contrast and color [B&W] : Black and white effect Note ISO sensitivity is fixed to [ISO400]. Compensation effect may not be achieved depending on the conditions.
Advanced (Recording pictures) [Rec] Mode: 4 1 < 5 / 6 Useful Functions at Travel Destinations Recording which Day of the Vacation You Take the Picture For details on the [Setup] menu settings, refer to P39. If you set the departure date or the travel destination of the vacation in advance, the number of days that have passed since the departure date (which day of the vacation it is) is recorded when you take the picture.
Advanced (Recording pictures) Touch [SET]. Enter the location. • For details on how to enter characters, refer to the “Entering Text” on P87. • After setting, close the menu. Canceling the travel date The travel date is automatically canceled if the current date is after the return date. If you want to cancel the travel date before the end of the vacation, touch [OFF] on the screen shown in step 3 or 7. If the [Travel Setup] is set to [OFF] in step 3, [Location] will be also set to [OFF].
Advanced (Recording pictures) Recording Dates / Times at Overseas Travel Destinations (World Time) For details on the [Setup] menu settings, refer to P39. You can display the local times at the travel destinations and record them on the pictures you take. • Select [Clock Set] to set the current date and time in advance. (P18) Select [World Time] from the [Setup] menu. • When first using the camera after purchasing it, the [Please set the home area] message appears.
Advanced (Recording pictures) Touch [Destination]. • Depending on the setting, the time at the travel destination area or the home area is displayed. Touch [w] or [q] to select the area that the travel destination is in, and touch [Set]. C Current time of the destination area D Time difference • If daylight saving time [z] is used at the travel destination, touch [z]. (The time advances by one hour.) Touch [z] again to return to the original time. • After setting, close the menu.
Advanced (Recording pictures) Using the [Rec] Mode Menu [Flash] Refer to P51 for details. [Selftimer] Refer to P57 for details. [Picture Size] For details on [Rec] Mode menu settings, refer to P39. Set the number of pixels and aspect ratio of the pictures. The higher the number of pixels, the finer the detail of the pictures will appear even when they are printed onto large sheets. Applicable modes: 4 1 < 5 / [4:3 16M] (DMC-FP7) [4:3 14M] (DMC-FP5) [4:3 10M P] [4:3 5M P] [4:3 3M P] [4:3 0.
Advanced (Recording pictures) [Rec Quality] Refer to P34 for details. [Sensitivity] For details on [Rec] Mode menu settings, refer to P39. This allows the sensitivity to light (ISO sensitivity) to be set. Setting to a higher number enables pictures to be taken even in dark places without the resulting pictures coming out dark.
Advanced (Recording pictures) [White Balance] For details on [Rec] Mode menu settings, refer to P39. In sunlight, under incandescent lights or in other such conditions where the color of white takes on a reddish or bluish tinge, this item adjusts to the color of white which is closest to what is seen by the eye in accordance with the light source.
Advanced (Recording pictures) Auto White Balance Depending on the conditions when pictures are taken, the pictures may take on a reddish or bluish tinge. Furthermore, when a multiple number of light sources are being used or there is nothing with a color close to white, Auto White Balance may not function properly. In this case, set the White Balance to a mode other than [AWB]. 1 Auto white balance will work within this range.
Advanced (Recording pictures) About [3] (Face Detection) The following AF area frames are displayed when the camera detects the faces. Yellow: When the shutter button is pressed halfway, the frame turns green when the camera is focused. White: Displayed when more than one face are detected. Other faces that are the same distance away as faces within the yellow AF areas are also focused.
Advanced (Recording pictures) About [7] (AF Tracking) When the subject is touched on the screen, the subject is set as a target of AF tracking. • The AF area (AF tracking frame) is displayed in yellow. The camera continues to focus the subject and adjust the exposure even if the subject moves afterwards. • To reselect the subject, touch [T] and perform operation again.
Advanced (Recording pictures) [Exposure] Refer to P58 for details. [i.Exposure] For details on [Rec] Mode menu settings, refer to P39. Contrast and exposure will be adjusted automatically when there is a big difference in brightness between the subject and background. Applicable modes: 1 6 [ON] / [OFF] Note • Even when the [Sensitivity] is set to [ISO100], [Sensitivity] may be set higher than [ISO100] if the picture is taken with [i.Exposure] set to valid.
Advanced (Recording pictures) [Digital Zoom] For details on [Rec] Mode menu settings, refer to P39. This can enlarge subjects even more than the Optical Zoom, Extended Optical Zoom or Intelligent Zoom. Applicable modes: 1 < 5 / [ON] / [OFF] Note • Refer to P49 for details. • The setting is fixed to [ON] in Macro Zoom Mode. • [Digital Zoom] cannot be set in Motion Picture Mode. Setting of other Recording Mode will be reflected. [Burst] For details on [Rec] Mode menu settings, refer to P39.
Advanced (Recording pictures) Note • Do not turn the camera off or remove the card after recording until the access indication lights off. • The Burst speed becomes slower halfway. The exact timing of this depends on the type of card, the picture size and the quality. • The focus is fixed when the first picture is taken. • The exposure and the White Balance are adjusted each time you take a picture. • When the self-timer is used, the number of recordable pictures in Burst Mode is fixed to 3.
Advanced (Recording pictures) [AF Assist Lamp] For details on [Rec] Mode menu settings, refer to P39. Illuminating the subject makes it easier for the camera to focus when recording in low light conditions that make focusing difficult. Applicable modes: 1 < 5 / [ON]: When taking pictures in dark places, the AF Assist Lamp lights while the shutter button is pressed halfway. (Larger AF areas are now displayed.) [OFF]: The AF Assist Lamp does not turn on.
Advanced (Recording pictures) [Stabilizer] For details on [Rec] Mode menu settings, refer to P39. This automatically detects jitter and corrects for it. Applicable modes: 1 < 5 / [ON] / [OFF] Note • The Stabilizer function may not be effective in the following cases. ––When there is a lot of jitter, when the zoom magnification is high. ––In Digital Zoom range. ––When taking pictures while following a moving subject. ––When the shutter speed becomes slower to take pictures indoors or in dark places.
Advanced (Recording pictures) Entering Text It is possible to enter babies’ and pets’ names and the names of travel destinations when recording. (Only alphabetical characters and symbols can be entered.) You can use the stylus pen (supplied) if it is hard to operate with your fingers. Display the entry screen. • You can display the entry screen via the following operations. ––[Name] of [Baby1] / [Baby2] or [Pet] in Scene Mode. (P66) ––[Location] in [Travel Date] (P72) Enter characters.
Advanced (Playback) [Playback] Mode: 5 Playing Back Pictures in Sequence (Slide Show) You can play back the pictures you have taken in synchronization with music, and you can do this in sequence while leaving a fixed interval between each of the pictures. Furthermore, you can play back the pictures grouped together by category or play back only those pictures you have set as favorites as a Slide Show. This playback method is recommended when you have connected the camera to a TV to view the pictures.
Advanced (Playback) Operations performed during slide show Display control panel by touching screen. • If there is no operation for approx. 2 seconds, the operation icon will disappear. [q/h]: Play/Pause [g]: Exit [i]: Forward to next picture (While paused) [u]: Back to previous picture (While paused) [:]: The setting screen returns. [4] [3]: Adjust volume • You can also adjust the volume level by using the zoom lever.
Advanced (Playback) [Playback] Mode: 5 Selecting Pictures and Playing them Back [Calendar] You can display pictures by recording date. Touch [w9] in Playback Mode. Touch [0]. • You can also move the zoom lever to [6] (W) several times to display the calendar search display screen. Touch [e] / [r] to select the month to be played back. • If there were no pictures recorded during a month, the month is not displayed. • The multi playback screen will appear by touching []].
Advanced (Playback) [Category Selection] This mode allows you to search images by Scene Mode or other categories (such as [Portrait], [Scenery] or [Night Scenery]) and sort the pictures into each of the categories. You can then play back the pictures in each category. Touch [w9] in Playback Mode. Touch []] and touch [;]. Touch the category to playback. • If there are no pictures in the selected category, a message is displayed and playback will become impossible.
Advanced (Playback) [Favorite] You can play back the pictures you have set as [Favorite] (P100) (Only when there are pictures which have been set to [Favorite]). Touch [w9] in Playback Mode. Touch []] and touch [z].
Advanced (Playback) [Playback] Mode: 5 Refining Portraits (Beauty Retouch) (Only for DMC-FP7) By adding make-up effects, adjusting texture of skin, etc., you can transform the faces of subjects even after taking pictures so they look more attractive. Make sure there is some space available on the built-in memory or card before transformed pictures are newly created. Touch [B] in Playback Mode. Drag the screen to select the picture before transformation, and then touch [OK].
Advanced (Playback) Touch [OK]. • Pre-transformed and post-transformed pictures are displayed side by side. Touch [OK]. • Returns to the screen on step 3. • If you want to transform other subjects in succession, touch other faces and perform from step 3. Touch [Save]. Touch [Yes]. Note • If the camera cannot detect a person’s face, a message is displayed after step 3. Select other subjects or other pictures. • Beauty Retouch cannot be used for motion pictures.
Advanced (Playback) [Playback] Mode: 5 Using the [Playback] Mode Menu You can use various playback functions such as setting of pictures to upload to the image sharing sites, resizing recorded pictures, setting protection, etc. • Using [Text Stamp], [Resize] or [Cropping], a newly edited picture is created. A new picture cannot be created if there is no free space on the built-in memory or the card so we recommend checking that there is free space and then editing the picture.
Advanced (Playback) Canceling all the [Upload Set] settings Select [Upload Set] [CANCEL] [Yes] on the playback menu. Note • A card with the capacity of less than 512 MB cannot be set. • You may not be able to set pictures taken with other equipment. • A picture with the picture size of 10 MB or more cannot be set. Select another picture or perform [Resize] (P98). [Text Stamp] You can stamp the recording date / time, name, location or Travel Date onto the recorded pictures.
Advanced (Playback) Select the items to stamp. Item [Shooting Date] [Name] [Location] [Travel Date] Setting item [DATE]: Stamp the year, month and date. [TIME]: Stamp the year, month, day, hour and minutes. [OFF] [w/d]: Stamps names registered in name settings for [Baby1] / [Baby2] or [Pet] in Scene Mode. [OFF] [ON]: Stamps the travel destination name set under [Location]. [OFF] [ON]: Stamps the travel date set under [Travel Date]. [OFF] Touch [:]. Touch [OK].
Advanced (Playback) [Resize] Reducing the picture size (number of pixels) You can reduce the size of the recorded picture(s) to attach them to an e-mail or use them on a website. Select [Resize] on the [Playback] Mode menu. (P39) Touch [S (Single)] or [M (Multi)]. Select the picture(s) and the size(s). [Single] setting 1 Drag the screen horizontally to select an image, and then touch [Set]. • For how to select a picture, see P31. 2 Touch the picture size. [Multi] setting 1 Touch the picture size.
Advanced (Playback) [Cropping] You can enlarge and then crop the important part of the recorded picture. Select [Cropping] on the [Playback] Mode menu. (P39) Drag the screen horizontally to select an image, and then touch [Set]. • For how to select a picture, see P31. Select the part to be cropped. Touch [z]: Enlarge Touch [e]: Reduce Touch [e] / [r] / [w] / [q]: Move • The zoom lever can also be used. Touch [Set]. Touch [Yes]. • After saving, close the menu.
Advanced (Playback) [Favorite] You can play back or print only pictures set as favorites. Also, you can delete pictures other than favorites. Select [Favorite] on the [Playback] Mode menu. (P39) Touch [S (Single)] or [M (Multi)]. Select the picture. • [z] is displayed on pictures that are already registered as favorites. • For how to select a picture, see P31. [Single] [Single] setting Drag the screen horizontally to select an image, and then touch [Set]. • Repeat touching to select other pictures.
Advanced (Playback) [Print Set] DPOF “Digital Print Order Format” is a system that allows the user to select which pictures to print, how many copies of each picture to print and whether or not to print the recording date on the pictures when using a DPOF compatible photo printer or photo printing store. For details, ask at your photo printing store. When you want to use a photo printing store to print pictures recorded on the built-in memory, copy them to a card (P104) and then set the print setting.
Advanced (Playback) To print the date After setting the number of prints, set/cancel printing with the recording date by touching [Date]. • Depending on the photo printing store or the printer, the date may not be printed even if you set to print the date. For further information, ask at your photo printing store or refer to the operating instructions for the printer. • The date cannot be printed on pictures stamped with text or date. Note • The number of prints can be set from 0 to 999.
Advanced (Playback) [Protect] You can set protection for pictures you do not want to delete by mistake. Select [Protect] on the [Playback] Mode menu. (P39) Touch [S (Single)] or [M (Multi)]. Select the picture. [Single] setting Drag the screen horizontally to select an image, and then touch [Set]. • For how to select a picture, see P31. • Setting is canceled by touching [Cancel]. [Single] [Multi] setting Touch the picture you wish to protect. • For how to select a picture, see P31.
Advanced (Playback) [Copy] Copying pictures from the built-in memory to a card You can copy the data of the pictures you have taken from the built-in memory to a card or from a card to the built-in memory. Select [Copy] on the [Playback] Mode menu. (P39) Touch the copy destination. N: All the picture data in the built-in memory are copied onto the card at one time. " step 4. M: One picture at a time is copied from the card to the built-in memory. " step 3.
Connecting to other equipment [Playback] Mode: 5 Playing Back Pictures on a TV Screen Playing back pictures using the AV cable (supplied) Preparations: Set the [Output]. (P44) Turn this unit and the TV off. 1 Yellow: To the video input socket 2 White: To the audio input socket A Align the marks, and insert straight. (Cannot insert in the opposite direction.) B AV cable (supplied) • Check the directions of the connectors, and plug them straight in or unplug them straight out.
Connecting to other equipment Note • Depending on the aspect ratio, black bands may be displayed on the top and bottom or the left and right of the pictures. • Do not use any other AV cables except the supplied one. • Read the operating instructions for the TV. • When you play back a picture vertically, it may be blurry. • You can view pictures on TVs in other countries (regions) which use the NTSC or PAL system when you set [Video Out] in the [Setup] menu.
Connecting to other equipment Connecting to a PC You can acquire recorded pictures to a PC by connecting the camera and the PC. • Some PCs can read directly from the card removed from the camera. For details, refer to the operating instructions of the PC. • You can easily print out or e-mail the pictures you have imported. Use of the “PHOTOfunSTUDIO” bundled software on the CD-ROM (supplied) is a convenient way of doing this.
Connecting to other equipment Connect the camera to the PC using the USB connection cable A. • Do not use any other USB connection cables except the supplied one. Use of cables other than the supplied USB connection cable may cause a malfunction. Touch [PC]. • When the camera has been connected to the PC with [USB Mode] set to [PictBridge(PTP)], a message may appear on the PC’s screen. Select [Cancel] to close the screen, and disconnect the camera from the PC. Then set [USB Mode] to [PC] again.
Connecting to other equipment Viewing the contents of the built-in memory or card using the PC (folder composition) • Built-in memory • Card 1 Folder number 2 File number 3 JPG: Pictures MOV: Motion Pictures MISC: DPOF print Favorite AD _LUMIX: For Upload Set LUMIXUP.
Connecting to other equipment Uploading pictures to the image sharing sites Using the upload tool (LUMIX Image Uploader), you can upload pictures or motion pictures to the image sharing sites (Facebook, YouTube). You do not need to import pictures to the computer or to install software. Only with the computer that can be connected to the Internet, you can upload pictures. This is convenient when immediately publicizing pictures taken while traveling.
Connecting to other equipment Printing the Pictures If you connect the camera to a printer supporting PictBridge, you can select the pictures to be printed out and instruct that printing be started on the camera’s LCD Monitor. • Some printers can print directly from the card removed from the camera. For details, refer to the operating instructions of the printer. Preparations: Turn on the camera and the printer. Remove the card before printing the pictures in the built-in memory.
Connecting to other equipment Note • Do not use any other USB connection cables except the supplied one. Use of cables other than the supplied USB connection cable may cause malfunction. • Turn the camera off before connecting or disconnecting the AC adaptor (optional). • Before inserting or removing a card, turn the camera off, and disconnect the USB connection cable. • Motion pictures recorded cannot be printed out. Drag the screen horizontally to select image, and then touch [Print].
Connecting to other equipment Item [Multi Select] Description of settings Multiple pictures are printed at one time. • Switch the screen by touching [e] / [r] if these are displayed on the slide bar. • Touch the pictures and [2] appears on the pictures to be printed. (When the selected picture is touched again, the setting is canceled.) • After the pictures have been selected, touch [Set]. [Select All] Prints all the stored pictures. [Print Set (DPOF)] Prints the pictures set in [Print Set] only.
Connecting to other equipment [Print with Date] Item Description of settings [ON] Date is printed. [OFF] Date is not printed. • If the printer does not support date printing, the date cannot be printed on the picture. • Since the printer’s settings may take precedence over the Print With Date setting, check the printer’s Print With Date setting as well. • When printing pictures with characters or dates stamped, if you specify the date print, the date will be overlapped and printed.
Connecting to other equipment [Page Layout] (Layouts for printing that can be set with this unit) Item Description of settings h Settings on the printer are prioritized 3 1 picture with no frame on 1 page 4 1 picture with a frame on 1 page 5 2 pictures on 1 page 6 4 pictures on 1 page • An item cannot be selected if the printer does not support the page layout.
Others Screen Display In recording Recording in Normal Picture Mode [1] (Initial setting) 1 Recording Mode 2 Picture size (P76) Recording quality (P34) Flash Mode (P51) Optical Image Stabilizer (P86) Jitter alert (P28): 0 3 Focus (P27) 4 AF area (P27) 5 AF Macro (P55) Macro Zoom (P56) AF mode (P79) 6 Battery indication (P12) 7 Built-in memory (P16) Access indication (P17): 2, 3 Number of recordable pictures (P135) (When the number of recordable pictures exceeds 99999, it is displayed as “+99999” on the
Others In recording (after settings) 15 Exposure Compensation (P58) 16 White Balance (P78) Color Mode (P84) 17 Burst (P83) 18 Intelligent Exposure (P82): AF Assist Lamp (P85): W 19 Shortcut area (P41) 20 Elapsed recording time (P34): 00h00m00s1 21 Zoom / Extended Optical Zoom (P48) / Intelligent Zoom (P49) / Digital Zoom (P49, 83) 22 Current date and time /w: Travel destination setting2 (P74) / Age3 (P66) / Name3 (P66) / Location2 (P72) / Number of days that have passed since the departure date (P7
Others In playback 1 Playback Mode (P31) 2 Recording quality (P34) Color Mode (P84) Protected picture (P103) Favorites (P100) Stamped with text indication (P96) Picture Size (P76) 3 Motion picture playback (P36) 4 Picture number / Total pictures Elapsed playback time (P36): 00h00m00s 5 Battery indication (P12) 6 Beauty retouched indication (P93) Number of prints (P114) LCD mode (P43) 7 Built-in memory (P16) Cable disconnection warning icon (P111): 1 Folder / File number (P109) 8 Motion picture recordin
Others Cautions for Use Keep this unit as far away as possible from electromagnetic equipment (such as microwave ovens, TVs, video games etc.). • If you use this unit on top of or near a TV, the pictures and/or sound on this unit may be disrupted by electromagnetic wave radiation. • Do not use this unit near cell phones because doing so may result in noise adversely affecting the pictures and/or sound.
Others Cleaning Before cleaning the camera, remove the battery or the DC coupler (optional), or disconnect the power plug from the outlet. Then wipe the camera with a dry soft cloth. • When the camera is very dirty, it can be cleaned by wiping the dirt off with a wrung wet cloth, and then with a dry cloth. • Do not use solvents, such as: benzine, thinner, alcohol, kitchen detergents, etc., to clean the camera, as it may deteriorate the external case or the coating may peel off.
Others Battery The battery is a rechargeable lithium ion battery. Its ability to generate power comes from the chemical reaction that takes place inside it. This reaction is susceptible to the surrounding temperature and humidity. If the temperature is too high or too low, the operating time of the battery will become shorter. Always remove the battery after use. • To store or carry the battery, put the removed battery into a plastic bag, avoiding metallic objects (clip, etc.).
Others Card Do not leave the card where the temperature is high, where electromagnetic waves or static electricity are easily generated or exposed to direct sunlight. Do not bend or drop the card. • The card may be damaged or the recorded content may be damaged or deleted. • Put the card in the card case or the storage bag after use and when storing or carrying the card. • Do not allow dirt, dust or water to get into the terminals on the back of the card and do not touch the terminals with your fingers.
Others When not using the camera for a long period of time • Store the battery in a cool and dry place with a relatively stable temperature: [Recommended temperature: 15 °C to 25 °C (59 °F to 77 °F), Recommended humidity: 40%RH to 60%RH] • Always remove the battery and the card from the camera. • If the battery is left inserted in the camera, it will discharge even if the camera is turned off.
Others Message Display Confirmation messages or error messages will be displayed on the screen in some cases. The major messages are described below as examples. [This picture is protected] ppDelete the picture after canceling the protect setting. (P103) [This picture cannot be deleted] / [Some pictures cannot be deleted] • Pictures not based on the DCF standard cannot be deleted. ppIf you want to delete some pictures, format the card after saving necessary data on a PC etc.
Others [Memory Card Error Format this card?] • It is a format that cannot be used with this unit. ppFormat the card again with the camera after saving necessary data on a PC etc. (P45) [Please turn camera off and then on again] / [System Error] • This message appears when the camera is not operating properly. ppTurn the camera off and on. If the message persists, contact the dealer or your nearest Service Center.
Others [A folder cannot be created] • A folder cannot be created because there are no remaining folder numbers that can be used. (P109) ppFormat the card after saving necessary data on a PC etc. (P45) [Picture is displayed for 4:3 TV] / [Picture is displayed for 16:9 TV] • The AV cable is connected to the camera. ppSelect [TV Aspect] in the [Setup] menu if you want to change the TV aspect. (P44) • The USB connection cable is connected to the camera only.
Others Troubleshooting First, try out the following procedures (P127 to P134). If the problem is not resolved, it may be improved by selecting [Reset] (P44) on the [Setup] menu when taking pictures. Battery and power source The camera cannot be operated even when it is turned on. • The battery is exhausted. The power cuts off during use. • Battery needs recharging. • Camera is set to [Auto Power Off]. (P43) ppPress the Power button to turn the power on again. The card / battery door cannot be closed.
Others 2 or 3 pictures are taken at one time. ppSet [Hi-Speed Burst] (P67), [Flash Burst] (P68) in Scene Mode or [Burst] (P83) of the [Rec] Mode menu to [OFF]. The subject is not focused properly. • The focus range varies depending on the Recording Mode. ppSet to the proper mode for the distance to the subject. • The subject is beyond the focus range of the camera. • There is camera shake (jitter) or the subject is moving slightly. (P28) The recorded picture is blurred.
Others Motion picture recording stops in the middle. • Depending on the type of the card, recording may stop in the middle. ppUse a card with SD Speed Class with “Class 6” or higher when recording motion pictures. ppIn the event it stops even after using a “Class 6” card or higher, or if you are using a card that has been formatted with a PC or other equipment, the data writing speed has deteriorated. It is recommended to make a backup copy of the data and then format the card with this unit (P45).
Others The LCD monitor is too bright or dark. • [LCD Mode] is activated. (P43) Black, red, blue and green dots appear on the LCD monitor. • This is not a malfunction. These pixels do not affect the recorded pictures. Noise appears on the LCD monitor. • In dark places, noise may appear to maintain the brightness of the LCD monitor. This does not affect the pictures you are recording. Flash The flash is not activated. • Is the flash setting set to [o]? ppChange the flash setting.
Others The folder number and the file number are displayed as [—] and the screen turns black. • Is this a non-standard picture, a picture which has been edited using a PC or a picture which was taken by another maker of digital camera? • Did you remove the battery immediately after picture-taking or did you take the picture using a battery with a low remaining charge? ppFormat the data to delete the pictures mentioned above.
Others TV, PC and printer The picture does not appear on the television. • Is the camera connected to the TV correctly? ppSet the TV input to External Input Mode. The display areas on the TV screen and the camera’s LCD Monitor are different. • Depending on the TV model, the pictures may be extended horizontally or vertically or they may be displayed with their edges cut off. The motion pictures cannot be played back on a TV.
Others The picture cannot be printed when the camera is connected to a printer. • Pictures cannot be printed using a printer which does not support PictBridge. • Set to [PictBridge(PTP)] in [USB Mode]. (P111) The ends of the pictures are cut at printing. ppWhen using a printer with a cropping or borderless printing function, cancel this function before printing. (For details, refer to the operating instructions for the printer.
Others When pictures are taken using the zoom, they are slightly distorted and the areas around the subject contain colors which are not actually present. • It is possible that the subject may be warped slightly, or the borders get colored, depending on the zoom magnification, due to the characteristics of the lens, but this is not a malfunction. Zooming stops instantaneously. • When using the Extended Optical Zoom or Intelligent Zoom, the zooming action will stop temporarily. This is not a malfunction.
Others Number of Recordable Pictures and Available Recording Time • The number of recordable pictures and the available recording time are an approximation. (These vary depending on the recording conditions and the type of card.) • The number of recordable pictures and the available recording time varies depending on the subjects. Number of recordable pictures • When the number of recordable pictures exceeds 99999, it is displayed as “+99999” on the screen.
Others Available recording time (when recording motion pictures) Recording quality setting Built-in Memory (Approx. 70 MB) a x y – – 2 min 30 s 2 GB 10 min 10 s 21 min 40 s 1 h 2 min Card 4 GB 20 min 30 s 43 min 10 s 2 h 4 min 16 GB 1 h 23 min 2 h 56 min 8 h 28 min • Motion pictures can be recorded continuously up to 2 GB. The maximum available recording time for up to 2 GB only is displayed on the screen.
Others • SDXC Logo is a trademark of SD-3C, LLC. • QuickTime and the QuickTime logo are trademarks or registered trademarks of Apple Inc., used under license therefrom. • YouTube is a trademark of Google Inc. • This product uses “DynaFont” from DynaComware Corporation. DynaFont is a registered trademark of DynaComware Taiwan Inc. • Other names, company names, and product names printed in these instructions are trademarks or registered trademarks of the companies concerned.